Сообщение отредактировал cherva70 — 18.06.19, 22:47
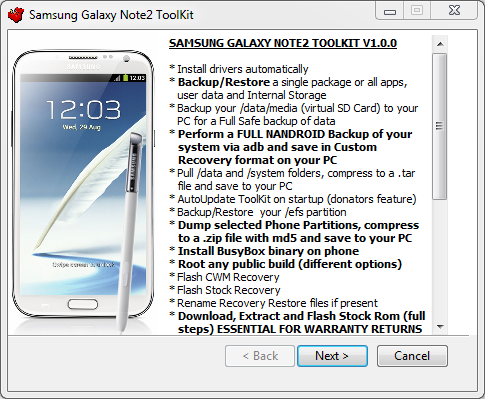
Установка драйверов автоматически
Резервное копирование / восстановление одного пакета или всех приложений, пользовательских данных и внутренней системы хранения
Резервное копирование / данные / средства массовой информации (виртуальные карты SD) на компьютер для полной безопасного резервного копирования данных
Выполнить полное резервное копирование Nandroid вашей системы с помощью АDB и сохранить в пользовательском формате восстановления на ваш компьютер
Автоматическое обновление инструментария до последней версии при запуске програмы
Резервное копирование / Восстановление / EFS раздела
Дамп выбранных разделов телефона, сжимать в ZIP. Файл с md5 сохранять на свой компьютер
Установка BusyBox на телефон
Root с Superuser (ChainsDD) или SuperSU (Chainfire) через CWM (работает на любой сборке)
Установка стокового Recovery
Установка CWM Recovery
Переименовка файлов восстановления
Установка Insecure Boot Image для режима АDB
Установка Stock Boot Image на телефон
Создание файла TAR для прошивки через Odin (до 10 файлов)
Rip cache.img в Zip-файлов в формате CWM для редактирования и прошивки
Установка одного или нескольких APK на ваш телефон
Передача файлов с компьютера на телефон
Передача файлы с телефона на компьютер
Установка файлов разрешения на телефон
Дамп выбранного буфера LogCat на компьютер
Дамп отчет об ошибке на компьютер (если установлен)
Справка , информации для решения различных задач
Моды — раздел для изменения вашего телефона
Перезагрузка телефона параметры в режиме ADB
Изменение фона, цвет текста в ToolKit памяти
ПРИМЕЧАНИЕ: Так как ToolKit.exe файл не имеет цифровой подписи с сертификатом Microsoft , то перед установкой отключайте антивирус.
Сообщение отредактировал nano26 — 07.01.14, 19:15
Сообщение отредактировал nano26 — 16.10.12, 08:30
CWM RECOVERY 6.0.1.5
Android Revolution HD 1.1 | High Quality & Performance | AROMA | Android 4.1.1 (дата выпуска 13.10.2012)
Android 4.1.1 (Jelly Bean) — последняя официальная прошивка Samsung N7100XXALJ1
Это улучшенная версия стокового ROMа — никаких визуальных изменений!
Очень быстро, чисто и стабильно!
Multi-языковая (WWE)
Полная поддержка арабского и еврейского языков! (ICS функция)
Для Samsung Galaxy Note 2
Спасибо Samsung за базу прошивки
Стоковое ядро (наиболее стабильное)
Removed software (CPU) rendering — full Exynos 4 Quad (GPU) rendering Fully optimized and tweaked ROOT (su + SuperSu Permissions — Thanks to chainfire) Unsecured boot.img Newest BusyBox RAM optimizations System signatures check enabled for system security and safety Improved virtual memory management Speed optimizations Enabled GPU UI rendering Data, cache and system partitions mounting tweaks Bloatware applications removed All /system applications updated to latest available All /data applications updated to latest available Improved camera performance Improved CPU governors performance Most optimal system scheduler Disabled kernel debugging for better performance Zipaligned (Improved RAM management) Zipalign on boot (for user applications on data partition) Fully de-odexed init.d scripts (BusyBox run-parts) support Auto init.d permissions set on boot sysro/sysrw commands support Excellent battery life! Improved EXT4 performance You can replace Samsung boot animation with any custom one (or use ICS default) OpenVPN support Most up-to-date system files permissions Adobe Flash Player support for Jelly Bean Support almost 24h a day . and many more!
Удалены экспериментальные твики Исправлено неправильное название девайса в установщике AROMA Исправлен твик SQLite в AROMA Google Play обновлен до последнего 3.9.16 Dropbox обновлен до последнего 2.2 Google Plus обновлен до последнего 3.2.0.35289806 другие незначительные изменения и исправления
Скачать ROM и разместить его на вашей карте SD Скачать «Super Wipe» скрипт и поместить его на карту SD ( опционально если перешиваетесь с более ранних версий моей прошивки, обязательно если переходите со стока или других прошивок) Загрузите телефон в режиме восстановления (громкость вверх + домой + питание) В главном меню выберите пункт «install zip from sdcard» Выберите «choose zip from sdcard» и перейдите к папке где находится скрипт «Супер Wipe» Снова выберите «choose zip from sdcard» и перейдите к папке где лежит Revolution Rom После того как процесс будет завершен, перезагрузите устройство
Дополнительно: Super Wipe or Wipe inside AROMA (saves your internal SD-card) is highly recommended due to new base!
— Этот скрипт удаляет и форматирует данные (в том числе внутреннюю карту SD), систем и кэш разделы — — Ваши внешняя SD-карта останется нетронутой FAT32 и рекомендуется оставить это так — — Ваша внутренняя карта SD (/ данные / медиа) будут вайпнуты (очищены) — — Вам нужно скопировать ROM. ZIP файл на внешнюю карту памяти SD перед использованием сделайте Super Wipe —
Сообщение отредактировал xaoc747 — 15.10.12, 21:48
The first thing you need to do is to install the drivers. These are needed so that you can communicate with the phone via the PC and perform the tasks that the ToolKit offers.
NOTE: If you have Kies installed then it is advisable to uninstall it first to avoid conflicts.
a. Make sure your phone is booted into Android and the USB cable is unplugged.
b. Select Option 1 in the ToolKit to install the Samsung USB Driver pack. This should install all the neccessary drivers you need.
C. While the drivers are installing make sure that USB Debugging is enabled on your phone via the Settings, Developer options Screen.
d. After the drivers have been installed connect the USB cable and the PC should detect the phone and install the correct drivers. This will also happen when you enter Download Mode and Recovery Mode for the first time.
e. If you want to check the drivers then go to your Control Panel on your PC and open the Device Manager. With the USB cable connected you should see a device listed as ‘Samsung Android Phone’ or something similar and a driver attached to it.
NOTE: If you are having trouble with your device being detected or the drivers installing correctly then you could try rebooting your phone, using a different usb port and making sure no other drivers are installed on your pc.
a. Download the Samsung Galaxy Note2 ToolKit package and run to install the ToolKit to your PC. The installation will also create a Shortcut on your desktop for easy access. You have the option to include or exclude the drivers files at installation so if you already have your drivers set up and are just updating the ToolKit then you can untick the drivers if you wish.
b. Once the ToolKit is installed make sure your phone is booted and plugged in via USB cable and double click on the ‘Galaxy Note2 ToolKit’ shortcut on your desktop to run it.
c. You will be asked if you want to check for an Update. This will download and check the latest version numbers against the versions in the ToolKit. If there is an update available then you will have the option to download and install it (donator feature).
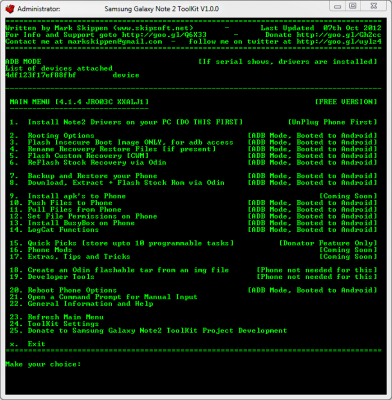
d. You will now be presented with a Model Selection Screen to choose the build that you are currently on. If you cannot find the build your phone is using then select the HELP option to get more info.
e. When you enter the Main Menu you will see ‘Adb Mode’ at the top. If you have installed your drivers correctly then you will see your phones serial number under the text with ‘device’ next to it. If you see this then your device is connected and you can carry on.
f. Each option in the ToolKit has full information on what it is and how to use it.
a. Download the Samsung Galaxy Note2 ToolKit package and run to install the ToolKit to your PC. The installation will also create a Shortcut on your desktop for easy access. You have the option to include or exclude the drivers files at installation so if you already have your drivers set up and are just updating the ToolKit then you can untick the drivers if you wish.
b. Once the ToolKit is installed make sure your phone is booted and plugged in via USB cable and double click on the ‘Galaxy Note2 ToolKit’ shortcut on your desktop to run it.
c. You will be asked if you want to check for an Update. This will download and check the latest version numbers against the versions in the ToolKit. If there is an update available then you will have the option to download and install it (donator feature).
d. You will now be presented with a Model Selection Screen to choose the build that you are currently on. If you cannot find the build your phone is using then select the HELP option to get more info.
e. When you enter the Main Menu you will see ‘Adb Mode’ at the top. If you have installed your drivers correctly then you will see your phones serial number under the text with ‘device’ next to it. If you see this then your device is connected and you can carry on.
f. Each option in the ToolKit has full information on what it is and how to use it.
Odin can be used to flash image files or parts of your phone. You can flash something as simple as a boot image or a complete system. Everything is packed in a tar or tar.md5 file on your PC and flashed via Odin which is a Windows OS program.
a. Make sure you have your tar file stored on your PC.
b. Reboot your phone to Download Mode [shut down your phone, then hold down the Home + Volume DOWN Buttons and press the Power Button for about 2 seconds until a Warning screen appears. Press Volume UP to continue to Download Mode.
c. Connect your phone via usb and the first box at the top under ID:COM should turn blue and have some text in it. If you are using Download Mode on your phone for the first time then you will notice drivers being installed to use it.
d. The site or page you downloaded the file from will usually give you instructions to set Odin but if not you want to load boot/recovery/system files to the PDA location and have ‘Auto Reboot’ and ‘F.Reset Time’ ticked and nothing else.
e. Click on ‘Start’ to start the flash. You can see what is happening in the text box in the lower left.
Сообщение отредактировал xaoc747 — 15.10.12, 13:03
Источник
Прошивка android для samsung galaxy note n7100
Samsung GT-N7100 Galaxy Note II — Прошивки PARANOIDANDROID/AOSP/AOKP GT-N7100 Galaxy Note II Описание | Обсуждение » | FAQ | Покупка » | Аксессуары » | Брак » | Прошивки PARANOIDANDROID/AOSP/AOKP | Кастомные прошивки | Темы для СМ10 | Официальные прошивки | Клуб общения владельцев | Обои | CyanogenMod 10/СМ10.1 (OS 4.х.х) | Прошивки MIUI | Кастомные ядра и их обсуждение
CyanogenMod является прошивкой на основе системы с открытым исходным кодом Android ОС. Он имеет характеристики, отсутствующие в официальной прошивке поставщиков устройств Android, в том числе оригинальную тему (также известную как «T-Mobile Theme Engine»), кодек для Free Lossless Audio Codec (FLAC), сжатый кэш (compcache), большой APN список, OpenVPN клиент, меню перезагрузки, поддержка Wi-Fi, Bluetooth, USB-модем. CyanogenMod — первая мобильная ОС, включающая планировщик задач BFS и являющаяся объединением экспериментальной ветви и официального дерева исходных Android.
Какие бывают виды сборок и чем они друг от друга отличаются? Бывает четыре вида сборок. Nightly, RC, Experimental и Stable. Nightly (ночная сборка) это сборки которые обновляются ежедневно, в них появляются новые функции, новые глюки, лечатся старые глюки и.т.д., RC (релиз кандидат) это предрелизная сборка, условно безглючная, является неким этапом на пути к Stable. Последующие Nightly делаются на основе RC. Experimental сборки делаются раз в месяц, основаны на Nightly. Stable (стабильная версия) это сборка считается полностью безглючной, релизной, рекомендованной к установке для повседневного использования обычным, не профессиональным пользователям. Релиз CyanogenMod 10, независимой сборки мобильной платформы Android Официальный сайт
1. Скачиваем файл прошивки, Google Apps (если надо) и записываем на телефон (можно на внешнюю карту памяти) 2. Заходим в рекавери 3. Делаем Wipe Cache, Wipe Dalvik Cache и Wipe Data (Factory Reset) 4. Устанавливаем прошивку 5. Устанавливаем Google Apps (Если этого требует разработчик, например если gapps не интегрирован в прошивку) 6. Перегружаемся (На разных прошивках первый запуск по разному долог) ГОТОВО.
При обновлениях версий СМ10.1/РА: Можно делать только Wipe Cache и Wipe Dalvik Cache. Во избежание дополнительных проблем рекомендуется делать все вайпы (Cache/Dalvik/Data/System/SDCard).
Если, после установки CyanogenMod 10.1 и ему подобных, слетела файловая система exFat карты памяти размером 64Gb , смотри ответ здесь
 Menu_key_remap.zip ( 185.2 КБ )
 Menu_key_remap.zip ( 185.2 КБ )
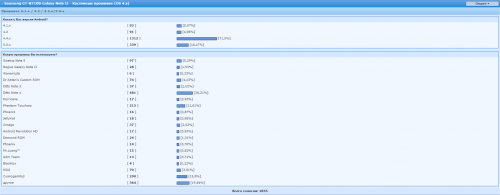


 GT-N7100 Galaxy Note II


