- How to Set up a Proxy Server on Android (Wi-Fi and Mobile)
- How to configure the Android proxy settings on a Wi-Fi network
- Step 1. Open the ‘Settings’ app.
- Step 2. Tap on the ‘Wi-Fi’ settings category.
- Step 3. Long-press the desired Wi-Fi network (the one you need to use with the proxy).
- Step 4. Tap ‘Modify Network’ when the menu is shown.
- Step 5. On the next screen, tap ‘Advanced options’.
- Step 6. Tap on ‘Proxy’. Next, tap on ‘Manual’.
- Step 7. Enter the proxy server IP or name and the proxy port.
- Step 8. (Optional) Enter the proxy username and password.
- Step 9. Open a browser and load an IP checker site in order to verify the proxy connection.
- How to configure the Android proxy settings on a Mobile network
- Step 1. Open the ‘Settings’ app.
- Step 2. Tap on the ‘More’ settings category.
- Step 3. Next, tap on ‘Mobile networks’.
- Step 4. Tap on ‘Access point names’.
- Step 5. Tap on APN you are currently using.
- Step 6. Enter the proxy server IP, proxy port, username and password.
- Step 7. Tap ‘Save’ from the top-right menu.
- Step 8. Verify the proxy connection.
- How to disable proxy settings on Android
- What does it happen if the proxy server does not work?
- Types of proxies that you can use on your Android phone or tablet
- Summary
- Gradle and Proxy Authentication in Android Studio
- Proxy для Android
- Proxy with authentication android
- About
- Resources
- Releases 1
- Packages 0
- Languages
- Proxy with authentication android
How to Set up a Proxy Server on Android (Wi-Fi and Mobile)
Using a proxy server on an Android device may have significant benefits, like improved privacy and anonymity, access to restricted websites, bypass firewalls at school, or access to a secured business network. Learn how to configure proxy server on Android, both on Wi-Fi and mobile.
Important! When you set up a proxy on your device all your Internet traffic will pass through the proxy and it may involve security risks.
Firstly, you need access to the proxy authentication credentials (proxy address, port, username, password). You get them from the network administrator (at school or work), or you may obtain access to one or more proxies by subscribing to a proxy service. You may also use free, open proxies. However, I do not recommend free proxies for security reasons.
There are two cases when it comes to setting up a proxy on an Android device: when you are connected to a Wi-Fi network or when you are using a mobile network.
What You’ll Learn
How to configure the Android proxy settings on a Wi-Fi network
You don’t have to be a tech guru to configure the proxy settings on an Android device. It is a straightforward process.
Android devices allow configuring proxy settings for each Wi-Fi network. This might be required if you need to access the Internet on a specific network (like a business or school network, for example). The browser traffic will be sent through the proxy you configure.
The proxy you configure will be used by Chrome, Firefox, and other web browsers, but might or might not be used by all apps.
Step 1. Open the ‘Settings’ app.
The Settings window contains all the necessary options for configuring a proxy on your Android device while connected to a Wi-Fi network.
Step 2. Tap on the ‘Wi-Fi’ settings category.

Step 3. Long-press the desired Wi-Fi network (the one you need to use with the proxy).
The proxy settings are unique for each Wi-Fi network. Thus, if you want to use the same proxy on two or more different networks, you need to repeat steps 3 to 8 for each Wi-Fi network.

Step 4. Tap ‘Modify Network’ when the menu is shown.

Step 5. On the next screen, tap ‘Advanced options’.

Step 6. Tap on ‘Proxy’. Next, tap on ‘Manual’.
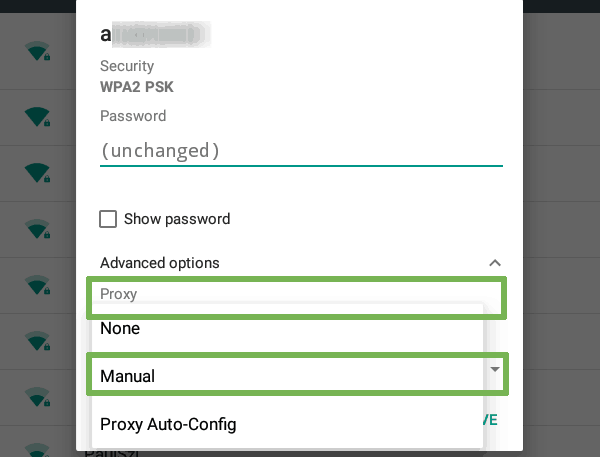
The HTTP proxy option is None by default. It means that your Android device does not use a proxy to connect to the Internet.
If you have access to a proxy server information (server address or IP address, port, username, password) select Manual.
The Proxy Auto-Config option can be used if you have access to a PAC file (proxy autoconfiguration script) provided by your network administrator or proxy service provider.
Step 7. Enter the proxy server IP or name and the proxy port.
It is important to remember that: The HTTP proxy is used by the browser but may not be used by the other apps.
Enter the address or the IP address of the proxy server in the Server text box and the port in the Port box. Further, tap Save.

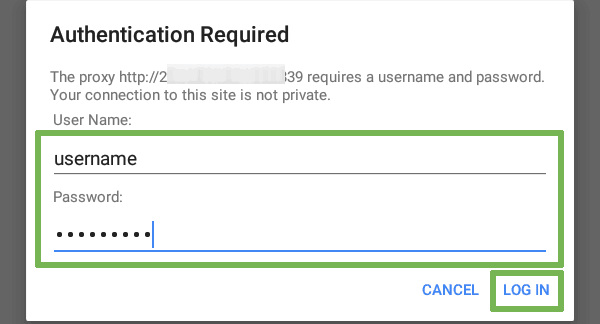
Step 8. (Optional) Enter the proxy username and password.
If the proxy requires basic HTTP authentication, open a browser and enter the Username and Password (provided by the proxy service or network administrator).
Step 9. Open a browser and load an IP checker site in order to verify the proxy connection.
Every time you set up a proxy on your Android device, you need to check whether the setup is correct and the proxy connection could be established.
Open a web browser (Chrome, Firefox) and load an IP checker website, like xmyip.com. If the web page loads and it shows the proxy IP address then you are done: you have successfully finished the proxy configuration on your Android device.
How to configure the Android proxy settings on a Mobile network
The configuration of a proxy on a mobile network is slightly different from the steps described above.
Step 1. Open the ‘Settings’ app.
Step 2. Tap on the ‘More’ settings category.

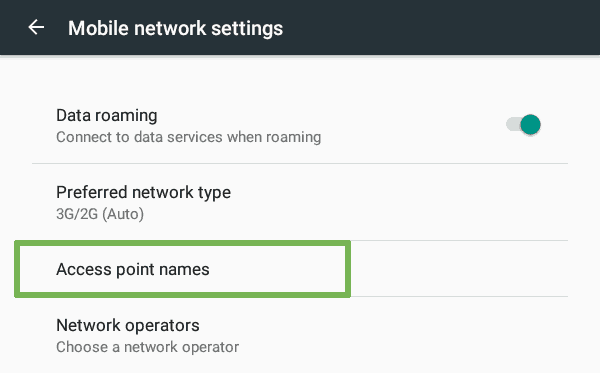
Step 3. Next, tap on ‘Mobile networks’.

Step 4. Tap on ‘Access point names’.
Step 5. Tap on APN you are currently using.

Step 6. Enter the proxy server IP, proxy port, username and password.
Enter the address or the IP address of the proxy server in the Proxy text box and the port in the Port box. Additionally, enter the proxy username and password.

Step 7. Tap ‘Save’ from the top-right menu.

Step 8. Verify the proxy connection.
Open a browser and load an IP checker site to verify the proxy data connection. If the page does not load you need to check the proxy settings (proxy server name, port, username, password).
How to disable proxy settings on Android
Removing the manual proxy configuration for a Wi-Fi network involves changing the Proxy settings from Step 6 to None.
For the mobile networks, delete the proxy settings (server address, port, username, password) from Step 6. Don’t forget to Save the changes!
What does it happen if the proxy server does not work?
A proxy server may go offline, the proxy credentials may change, or your proxy subscription may expire. In these cases, your network connection to the proxy server is not possible. Thus, you will not be able to access the Internet or other network addresses.
You will get an error message similar to the one from the image below when browsing the Internet.

To fix the problem, you may either disable the proxy (as explained above) or solve the issues with the proxy connection (check proxy credentials, check proxy subscription, change the proxy).
Types of proxies that you can use on your Android phone or tablet
The Android OS works with HTTP proxies, and it is not able to communicate directly with SOCKS proxies. However, you may set up a SOCKS proxy on the Android Firefox browser, or you may use an application like ProxyDroid.
Another type of proxies that can be used on Android devices is web proxies. But, you don’t need to configure anything to use such a proxy. A web proxy is similar to a web site that can be loaded on your browser. Check my proxy tools list for recommended web proxies.
Summary
Setting us a proxy on Android devices is easy. Firstly, you need to identify the type of network you are connected to (Wi-Fi or mobile) and proceed with the step-by-step tutorials presented above.
Источник
Gradle and Proxy Authentication in Android Studio
Update: This is obsolete as Android Studio is going to eliminate JVM arguments for gradle. See this post for a more future-proof approach.
The other day I did an exercise to install Android Studio (“AS” henceforth) (0.8.4 at the moment of writing) and create a project with gradle in an environment with an authenticated proxy. It didn’t work out of the box, of course. Worse, it generated an exception (internal error). I found two solutions to make it work:
- Via configuration file
- JVM variables
When you create a project in AS, it’ll have a gradle.properties file in the root directory. This file contains configuration information for gradle (d’oh!).
By default, the file is empty (or, to be more accurate, it has a bunch of information in comments). All you need to do is to add the relevant data:
The entries are self-explanatory.
However, this apparently does not work in some instances. If that’s the case, just follow the accepted answer 🙂
Gradle accepts VM input parameters. The Gradle section of preferences in AS allows for such parameters to be passed:

They replicate the same as the ones in the above configuration approach:
This “just works” 🙂
Both variants work for me. In the end, I’ve chosen the JVM variables approach because:
Источник
Proxy для Android
C чего бы вдруг?
Я думаю, что большинство пользователей Андроид устройств столкнулись с такой проблемой как настройка прокси. Проблема не вселенского масштаба, но от этого не менее неприятная.
Я являюсь обладателем планшета Acer A500 и как некоторые могут знать, в отличии от своего собрата A501 в нет нет возможности использовать 3g (не прибегая к кустарным забегам с 3g модемом), а в 4 версии так и вовсе модемчик не воткнуть, т.к. с root-правами проблемка (хотя чего я вру, воткнуть народные умельцы уже смогли, но все настолько криво и через пень-колоду, что лучше не лезть сейчас). Но у меня в универе есть халявный, пусть и не скоростной и многогдеотсутствующий, но интернет. И он, барабанная дробь, через wifi+proxy. C вифи проблем нет, а вот как стать властелином мира настроить прокси известно точно не было.
Собственно, с версии Андроида 3.2 и 4 есть возможность настроить прокси стандартными средствами, но, увы работать оно будет только на стандартном браузере =( и все лакомые интернет-приложения тоже не работают.
Сторонние средства
anProxy — небольшая программа, позволяющая быстро настроить прокси-сервер для браузера.
Proxymator — Простенькая программа для настройки прокси-сервера (Включает также имя пользователь + пароль)
ProxyDroid — HTTP / SOCKS4 / SOCKS5 прокси с автоматическим включением по SSID.
Auto Proxy — Достаточно интересная программа для настройки прокси http(s), socks, ntlm, но для ее использования нам необходимы root и iptables с поддержкой nat.
Для всех трех программ, выделенных мною (они являются самыми удобными и подходящими), необходимы рут права. С версиями до 4 с ними проблем нет, для каждого устройства метод получения уже расписан до мелочей, ищите(хоть на том же 4пда) и рутаетесь =). Используем любую приглянувшуюся программу и интернет прекрасно работает.
Собственно, мне-то хотелось рассказать немного о другом, о прокси и 4 Андрюшей. Скажу сразу, что сейчас все пессимистично и настроить сможем только серфинг по сайтам и усе.
Поплыли
Я уже упомянул о стандартной возможности настроить прокси для стандартного браузера. Для этого в настройках подключения к wi-fi залезаем в настройки нужной нам сети. Ставим птичку у «Дополнительно» и лицезрением неведомые доселе пункты настройки. Выбираем Настройки прокси-сервера: Вручную и вбиваем все необходимые данные (по сути тут всего имя хоста и порт, остальное уже не столь важно). Сохраняем, запускаем стандартный браузер и радуемся.
Источник
Proxy with authentication android
As the name suggests, the solution provides local proxy service on the device. This with the main objective of carrying out the authentication process with a proxy server and in this way allow access to the Internet in the installed applications. Initially it is very similar to applications like UCIntlm or UCIProxy, that is, it allows access to the Internet through the proxy server of a certain institution. Its difference lies in the idea that led to its development: it must operate in as many Cuban institutional networks as possible. For the development of the solution, a study of the authentication schemes most used in the proxy servers was carried out, a somewhat complicated study that yielded achievable results. In addition, similar applications were studied in detail: ProxyDroid, SandroProxy, Drony and UCIntlm, from which important functionalities were extracted that were implemented taking into account the level of usability for the end user. For its implementation, the UCIProxy and UCIntlm applications were reused at the abstraction and object level, several functionalities were added and important changes were introduced in the local proxy service.
About
Android authentication proxy. No need of root permissions.
Resources
Releases 1
Packages 0
Languages
You can’t perform that action at this time.
You signed in with another tab or window. Reload to refresh your session. You signed out in another tab or window. Reload to refresh your session.
Источник
Proxy with authentication android
Proxy servers are useful tools for protecting user privacy, or for accessing the internet when you are in a corporate network. While you are connected to a WiFi network that uses a proxy server, this server acts as an intermediary for network requests between you and the rest of the web. Websites will not identify your specific device, but the proxy server that you are connected to. Here is how to set up the use of a proxy server on your Android smartphones and tablets.
Android allows you to configure proxy settings for each Wi-Fi network. This is sometimes required to access the Internet on a business or school network, for example. Your browser traffic will be sent through the proxy you configure.
Below you can see set of images with comments how to setup proxy settings for your Android device:
1) Firstly you ned to go to Settings

2) Then go to Wi-Fi

3) Next step you need hold on Connected Wi-Fi access point

4) Tap on Modify Network

5) Check Show advanced options

6) Then tap to None, menu will appears. Select Manual

7) Then you need fill:
- Proxy hostname field with: node.monkeysocks.net
- Proxy port: 9000
- Click SAVE button

8) Next step. You just need to open your browser and request some URL. Modal window will appear. You need paste in that modal window your package Login and Password. You can read here How to get free proxy package

9) Congratulations! Now you surfing through MonkeySocks proxy!
Источник


