- Exploring Android O: Notification Badges
- Exploring Android O: Notification Channels
- This week we saw the announcement of the first Android-O developer preview. One of the features of this announcement…
- Creating Push Notifications in Android O – Part 1
- Prerequisites
- Notification Channels
- Notification Badges
- Creating a Push Notification on Android Oreo
- Implementing Push Notifications into Your iOS or Android App
- Firebase Cloud Messaging (FCM)
- Registering with FCM
- Notification channels
- Push notifications behavior
- Alternative push notification services (for both iOS & Android)
- Push notifications on iOS
- Apple push notifications architecture tutorial
- Badge handling
- The server’s role in the badge count
- Request sent to the server fails to be delivered
- Mind user permission requests
- Explain
Exploring Android O: Notification Badges


Now the Android O APIs have finalised, Android O is just around the corner — which means we need to be sure our apps are filled with the latest goodies from the API. In this article we’re going to be taking a look at one of my favourite Android O features: Notification Badges 👌 I feel like these have been a long time coming, so let’s take a look at what these are and how we can use them in our app!

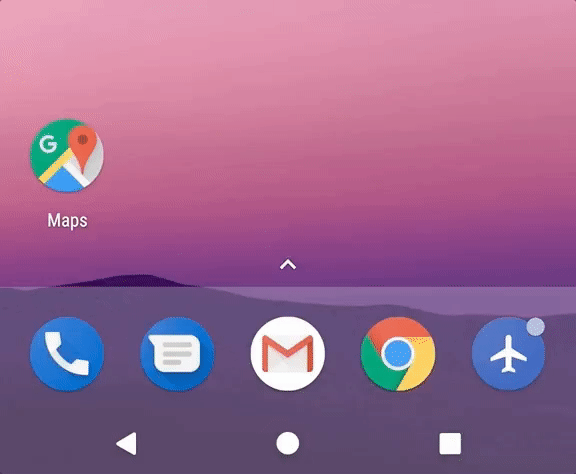
What is a notification badge you ask? Also known as ‘Dots’, these allow us to display a Badge (or Dot) on our applications launcher icon to notify our users that there is a pending notification that they have not yet acted upon.
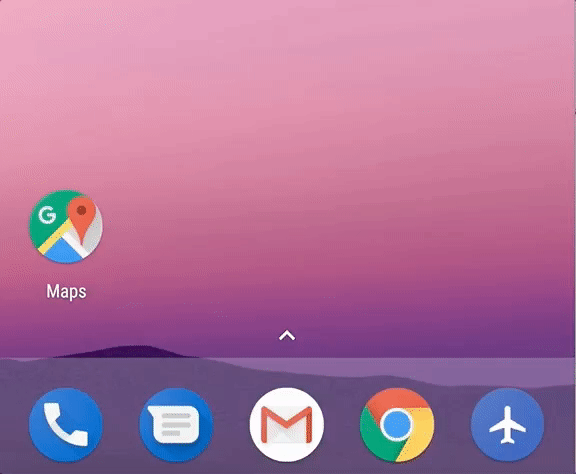
These badges will automatically appear when a notification is received and disappear when there are no notifications that remain to be interacted with.
When the notification badge is showing, the user can perform a long press on the application icon to reveal a pop-up dialog that displays the notifications that currently exist for that app.
Personally for me this feels like a much better interaction point for notifications, meaning that I no longer have to reach all the way to the top of my screen to interact with notifications. It also allows me to see only the notifications I want to for a specific app, rather than being overwhelmed by notifications in the status bar.
Within this pop-up the user can interact with the notification (such as click on it) or swipe it away to dismiss it from the list of notifications. When the last notification is dismissed the notification dot will disappear from the notification icon.
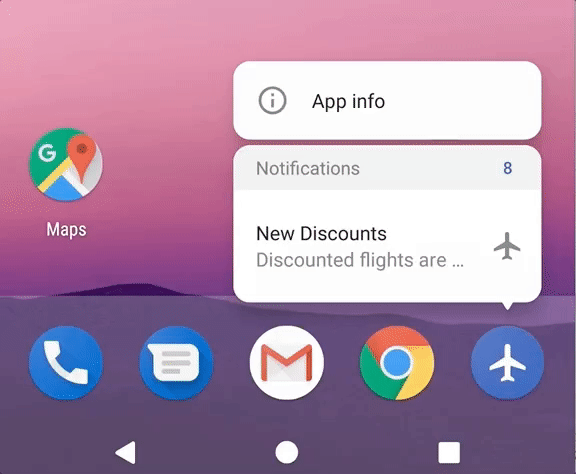
You may have also noticed the number that is shown on the right-hand-side of the Notifications header section of the notification pop-up. Each new notification that is received in a any channel for the app in question will increment this number, as these notifications are dismissed the notification count will be decremented. This number can be manually overridden programatically — we’ll look at how we can do this in a bit 🙂
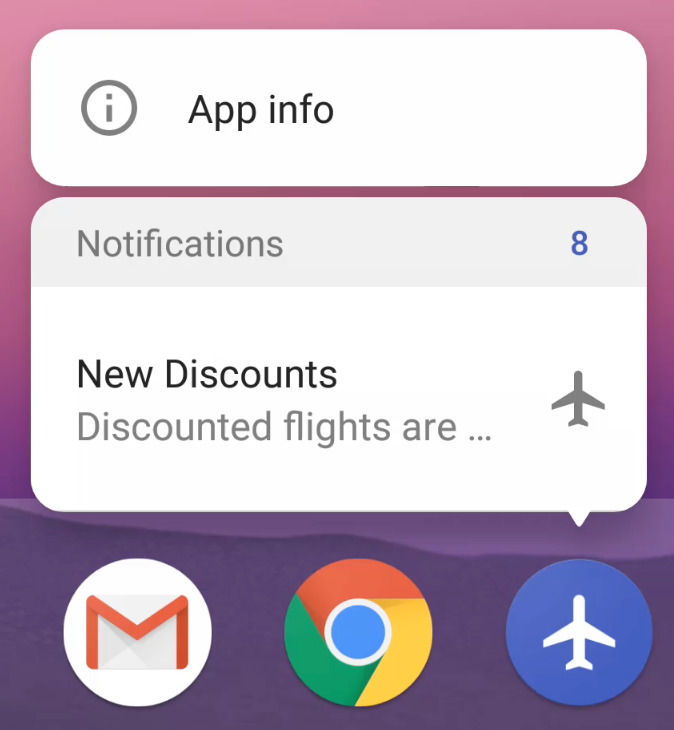

Notification badges might not be for everyone though! if this is the case then the user can tap on the ‘App Info’ button displayed in the notification badge pop-up, this will take them to the App Info screen for the given application.
At this point, the user has the ability to select ‘App notifications’ and from here toggle whether or not the notification badge should be shown for the given application.
When notification badges are disabled, notifications will still be shown in the status bar — the only difference is that no badge will be shown on the application icon.
When using notification badges, it’s important to remember that you don’t need to badge every type of notification from your app. For example, an ongoing process (such as listening to a song in Spotify) wouldn’t make sense to show as a notification badge, or any other kind of event that is something currently taking place (such as alarms or calendar events.
However, events such as messages in Slack, or a new email in Gmail, or when a post fails to go out in Facebook would make sense to show as a notification badge.
But how can we toggle what notifications are to be shown as badges and which ones aren’t? Well, that’s where we make sue of notification channels by grouping related notifications into fine-grained categories so that we can manage the badges for those channels individually.
Note: We’re not going to cover much to do with Notification Channels as I already covered it in this article if you wish to learn more:
Exploring Android O: Notification Channels
This week we saw the announcement of the first Android-O developer preview. One of the features of this announcement…

The default behaviour for notification channels and badges is that their notifications will be shown in the pop-up dialog and reflected by the badge shown on the app icon. If you don’t want to show the notification badge for the notification channel then you can use the setShowBadge() method to disable the display of the badge for the given channel.
Note: This behaviour change must be set before the channel has been created and submitted to the notification manager, changes will not be displayed if set after this point in time.

The Notification Builder used to build notifications now comes with a method called setNumber(). This method can be used to customise the number shown for the notification count when the user long presses on the application icon with the notification badge

You can use this notification count to display a custom value for the count of notifications. So for example, on the screenshot here you can only see a single notification but the count shows at 8. In this context, 8 could be the number of discounts available to the user (but I don’t want to show 8 notifications for that!). It would even work for things such as messaging applications, where you may want to display the number of messages received along with a notification to display that someone has messaged you.
If you don’t make use of this setNumber() method, then the notification count will be automatically incremented / decremented as notifications are received and removed.
By default the menu shown from a long press uses the Large notification icon. However, we can make use of the setBadgeIconType() method to set this to use a small icon (using BADGE_SMALL_ICON) instead if we wish 🙂

That’s all pretty neat isn’t it! Hopefully from this you can see just how easy it is to implement notification badges into your app. I’m looking forward to both adding these to any applications I work on, as well as using them in applications so that I can take a more fine grained approach to managing notifications for those applications.
Any questions or tips building on what we’ve looked at, I’d love to hear from you!
Источник
Creating Push Notifications in Android O – Part 1

Want to save this article for later?
The latest Android OS version, Android Oreo, released on August 21st right in time with the Great American Eclipse. The latest version was deliciously named following the ritual to name Android OS versions on something sweet.
Here are a bunch of prominent Android O features that will catch your eye –
- 2x Faster – Android O boasts of upto two times faster speed when powering up the OS and apps
- Background limits – Android O will limit the background tasks for the apps you use the least, thereby freeing up resources for the apps you use regularly
- Autofill – With your permission, Android O will remember credentials to speed up logins into your favorite apps
- Picture-in-picture – This feature allows you to see two apps in one screen, so you can do a Whatsapp video call and check your email at the same time. That is cool!
- Instant Apps – You won’t need to install an app to use it, Instant Apps allow you to use a specific app right from the Chrome browser
- Notification dots – A small dot will appear on the app’s icon when you receive notifications and with a long press on the app icon, you can have a small view of the notifications right there.
Apart from the above eye-catching features, Android Oreo includes many subtle, behind the scene features like improved battery performance, new emojis on the Google keyboard, adaptive icons, background location limits, notification categories/channels, notification snoozing and a smart WiFi assistant.
Unlike iOS, Android still does not support GIFs or videos in its Rich Push Notifications.
After reading this blog post, you will be able to build push notifications using the latest features of Android O, i.e Notification Channels and Notification Badges in your app.
Prerequisites
Since Notification channels and badges are the features of the latest Android version, you as a developer will have to update your SDK and Build Tools to the latest versions. The latest SDK tools version is 26.0.2 and the latest Build Tools version is 26.0.1. You will have to make sure that in your build.gradle file, the compileSdkVersion is 26 and buildToolsVersion is 26.0.1
I am also assuming that your app is using one of Firebase or GCM service providers for push notifications. If not, you can setup your app on Firebase and go through their documentation to use it in your app.
Notification Channels
Starting with Android O, notification channels allow you to create a custom user-controllable channel for each type of notification you want to display. When you target your app to Android O, you will have to implement one or more notification channels to display notifications to your users. If you don’t target Android O and your app is used on a device running Android O, then it will behave the way as it would on Android Nougat (7.0/7.1.1) or lower.
To create a notification channel –
- Construct a NotificationChannel object with a String ID unique to your app
- Configure the NotificationChannel object to the settings of your choice like alert sounds, lights and importance.
- Submit the notification channel to the notification manager.
Creating a notification channel with the same name and settings again doesn’t cause any problem, so you can create the notification channels at the launch of your app.
Notification Badges
The new Android O launched a cool feature called Notification Dots/Badges which show notifications that a user has not dismissed on a long press of the app’s icon. By default, each new notification in a particular channel will increment the number displayed in the long-press menu. You can change the number appearing by setting a number of your choice while building the notification.

Creating a Push Notification on Android Oreo
To create a notification, you will use the NotificationCompat.Builder class. The constructor which was used before took only Context as a parameter, but in Android O, the constructor looks like this –
We’ll be using Postman to send ourselves a push notification payload which looks like this
The following code snippet will show you how to create a notification –
Android O gives you a few more functions to customize your notification –
- setNumber() – allows you to set the number displayed in the long-press menu
- setChannelId() – allows you set the Channel Id explicitly if you are using the old constructor
- setColor() – allows a RGB value to put a color theme for your notification
- setBadgeIconType() – allows you to set an icon to be displayed in the long-press menu
Your notification will look like on Android O:

That’s it! This is all you need, to try out the cool new notification features of Android O.
In part 2 of this blog, I will help you understand how you can use CleverTap to leverage these features without any coding hassle. Stay tuned!
Источник
Implementing Push Notifications into Your iOS or Android App


If we had a mobile app, we could send you a push notification alerting you about something new on our blog. Then you could check out what we’d prepared for you. Push messages delivery can be a great way to engage your app’s users. That’s why they’re a necessity for modern apps. But what exact purposes do push notifications serve?
Push notifications keep users informed about important updates. Moreover, they remind users of your app’s existence and tend to improve retention metrics. Whether your app is running in the background or is inactive, sending a push notification will ensure that relevant information is delivered on time, providing value for users and convertible actions for product owners.
Keep in mind that on Android, push notifications are received by default. On iOS, they’re blocked by default. For this reason, iOS and Android users treat pushes differently. Compared to Android users, iOS users are less likely to open a notification. However, if they do so, they do it much faster than Android users. We suggest considering the differences between these two mobile platforms when planning your approach to push notifications.
How do push notifications work? What are the technologies standing behind the push notification mechanisms? We wrote this post to answer these questions by breaking down the push technology and to address the issues a developer should keep in mind when building push notification features.
Firebase Cloud Messaging (FCM)
In 2014, Google acquired Firebase. Subsequently, they replaced Google Cloud Messaging (GCM) with Firebase Cloud Messaging (FCM), announcing it to be the successor of GCM.
FCM provides new functionality:
— An intuitive notifications interface in the Firebase console
— Improved reporting
— Native integrations with other Firebase products including A/B Testing (to find out which message brings more conversions) and Predictions (to tailor notifications to people based on their expected behavior)
FCM helps you inform a client app that incoming data (e.g. a new message) is ready to sync. In the case of instant messaging, a message can transmit a payload not exceeding 4KB.
To implement FCM, you’ll need two key components:
1. A trusted environment like Cloud Functions for Firebase or an app server that allows you to create, target, and forward messages
2. An iOS or Android client application for accepting messages
Messages can be sent by means of the Firebase Admin SDK or the FCM server protocols. The notifications composer is used for testing and sending messages. It provides built-in targeting and analytics. FCM helps you send notifications and messages to iOS and Android free of charge.
Registering with FCM
FCM lets you forward pushes directly from the Firebase console, with an app server or other trusted environment supporting the server logic. Devices exchange pushes with the help of a notification key by sending notifications to the server. This ensures synchronization of actions, such as alerts, across multiple mobile devices. But to do that, the app needs to register with FCM first:
1. The client app transmits the sender ID, API Key, and App ID to FCM.
2. FCM returns a registration token to the client app.
3. The client app then sends the registration token to the app server.

[Client app registration with FCM]
Note: To use FCM, in addition to implementing it in the mobile app, you’ll have to implement it on the server side. Also, you’ll have to implement the sending of a device’s registration_id from the mobile app to the server.
Notification channels
Beginning in Android 8.0 (API level 26), all pushes have to be assigned to a channel. It’s possible to set the visual and auditory behavior applied to all pushes in a channel. Users can change these settings and choose which notification channels from your application will have the highest priority.
Note that after you make a notification channel, you aren’t able to change the behavior of notifications. Only the user is allowed to do that. However, you can change the channel’s name and description. Keep in mind that you should make different channels for all types of pushes you want to forward. In addition, you can set up different notification channels for all conversation groups a user creates in a messaging app.

[Push notification settings for the Clock app and one of its channels]
Push notifications behavior
The behavior of Firebase notifications depends on the foreground/background state of the receiving application. You can learn about receiving messages in an Android app here.
Keep in mind that push notification behavior also depends on devices. For example, push notifications not coming through is a common issue on Xiaomi phones unless notifications are manually whitelisted in the device’s settings.
Alternative push notification services (for both iOS & Android)
There are other services that either extend the possibilities of FCM or offer their own custom solutions that don’t rely on Google Play Services. Two of these alternatives are Sailthru and Airship. Their advantage is that they can be used cross-platform. However, the functionality they provide can be too extensive for some basic use cases.
Push notifications on iOS
In the latest iOS versions, the number of features related to pushes has grown considerably. Currently, iOS lets you:
— Determine your own actions
— Change the content of pushes before displaying them
— Show push notifications in a custom interface
Apple push notifications architecture tutorial

How can you add push notifications to an iOS app? Follow these steps:
1. iOS requests a device token from Apple Push Notification Service (APNS).
2. The app receives the token, which functions as the address to send a push notification to.
3. The app sends the token of the device to your server.
4. When prompted, the server will send a push notification with a device token to the APNS.
5. APNS will send a push notification to the user’s device.
What must you do to enable push notifications for iOS? First, you need to create a provisioning profile and an SSL certificate. Push notifications are always sent by your own server. You need to launch the background implementation on this server, install an SSL certificate, and set up an outgoing TLS connection on certain ports.
Badge handling
A badge is a little red circle in the top right corner of your iOS app icon that tells the user when there is new information waiting to be read (messages, news, events, missed calls, etc.) A badge also indicates the number of unread messages or notifications.
Note: The Android Oreo operating system implemented notification badges and notification previews allowing users to check unread messages, emails, and missed calls. In Oreo, users can see just a small dot and don’t see the actual number of unread notifications. Android launchers such as Evie Launcher, Microsoft Launcher, and One Launcher will help you customize the badge style or change its color and size.
However, there’s one problem with badge notifications: the number indicated on the badge may not coincide with the number of messages inside the app. For example, the badge on your app’s icon may show two unread messages, but when you open the app there are five.
This is confusing for users. It’s especially irritating, however, when a badge shows a new message that doesn’t exist in the app. And users can’t manually clear message counts unless you specifically build that functionality into your app. To keep your users sane, bind the number of incoming messages with the badge count. Don’t let them live separate lives!
The server’s role in the badge count
It’s not just iOS developers who are responsible for badge counts. Badge counts come from the server. Apps typically have unread notification counts that are maintained on the server for each user. When the server sends a push notification to a particular device, it sends the badge count along with the payload.
Once a device receives a push notification, iOS automatically sets the badge count on the app icon to the specified value. So this value should always be up to date on the server. Remember to inform the server when a message has been read so that it can reduce the badge count. It’s a simple process:
— Locally update the badge counter
— Notify the server that the information was read by sending a request
Request sent to the server fails to be delivered
When a user reads new messages, the badge count on the app’s icon is updated locally and a request is sent to the server to update the badge count. This is great — unless the request fails to be delivered to the server due to a poor internet connection or some other factor. If a request fails, the server will be unaware of the status of the message and the badge count won’t be updated. The next time a push arrives, the local data won’t correspond to the icon count sent in the push.
A developer should always guarantee the delivery of the request to the server. But how? One option would be to save the updated value of the badge counter locally, and in case of delivery failure, resend it at the next opportunity.
Note: Remember that a device, not a user, subscribes for push notifications. This means that if a user logs out of an app to let somebody else log in on the same device, this device should unsubscribe from push notifications to avoid the nuisance of receiving somebody else’s pushes.
Mind user permission requests
You need access to a user’s device to be able to send them notifications, but you need permission for that.
The way your users encounter this permission request is crucial for your app. The challenge for iOS app developers is that iOS lets you ask for a user’s permission only once. If they decline, the user has to find out how to turn the permission back on in the iOS settings.
Explain
We can explain why we need the user to subscribe for push notifications before the request for permission shows up on the screen. This explanatory window can stress the importance of push notifications and draw attention to how the app’s functionality will be limited without them.
Cheat
We can outwit the system. How? We can send users permission request pop-ups with options that are more appealing. For example, we might display the options “Yes” and “Later.” If the user pushes “Yes,” they’ll then have to confirm that choice again by pushing “OK” in the system window. Asking two times for the same thing isn’t the best solution, but it works!
In other cases, a user may push “Later.” That’s not what we want, but at least we can show the same dialog again every time they open the app until they finally press “Yes.”
Popular apps such as Circa and Breaking News have borrowed this hack. The Breaking News app shows a mock push. Circa encourages users to accept pushes by explaining the benefits.

[Requesting the ability to send notifications in the Circa and Breaking News apps]
Read how we managed to increase the number of active GrowFit users by 15 percent largely thanks to push notifications.
Still have questions about implementing pushes? Push the envelope to achieve your business goals with Yalantis.
Источник


