- Tutorial: Send push notifications to Android devices using Firebase SDK version 0.6
- Prerequisites
- Create an Android Studio Project
- Create a Firebase project that supports FCM
- Configure a hub
- Configure Firebase Cloud Messaging settings for the hub
- Connect your app to the notification hub
- Add Google Play services to the project
- Add Azure Notification Hubs libraries
- Add Google Firebase support
- Update the AndroidManifest.xml file
- Add code
- Test send notification from the notification hub
- Run the mobile app on emulator
- Next steps
Tutorial: Send push notifications to Android devices using Firebase SDK version 0.6
This tutorial shows you how to use Azure Notification Hubs and the Firebase Cloud Messaging (FCM) SDK version 0.6 to send push notifications to an Android application. In this tutorial, you create a blank Android app that receives push notifications by using Firebase Cloud Messaging (FCM).
The completed code for this tutorial can be downloaded from GitHub.
In this tutorial, you take the following steps:
- Create an Android Studio project.
- Create a Firebase project that supports Firebase Cloud Messaging.
- Create a hub.
- Connect your app to the hub.
- Test the app.
Prerequisites
To complete this tutorial, you must have an active Azure account. If you don’t have an account, you can create a free trial account in just a couple of minutes. For details, see Azure Free Trial.
You also need the following items:
- The latest version of Android Studio
- Android 2.3 or higher for Firebase Cloud Messaging
- Google Repository revision 27 or higher for Firebase Cloud Messaging
- Google Play Services 9.0.2 or higher for Firebase Cloud Messaging
Completing this tutorial is a prerequisite for doing all other Notification Hubs tutorials for Android apps.
Create an Android Studio Project
- Launch Android Studio.
- Select File, point to New, and then select New Project.
- On the Choose your project page, select Empty Activity, and then select Next.
- On the Configure your project page, take the following steps:
Enter a name for the application.
Specify a location in which to save the project files.
Select Finish.

Create a Firebase project that supports FCM
Sign in to the Firebase console. Create a new Firebase project if you don’t already have one.
After you create your project, select Add Firebase to your Android app.
On the Add Firebase to your Android app page, take the following steps:
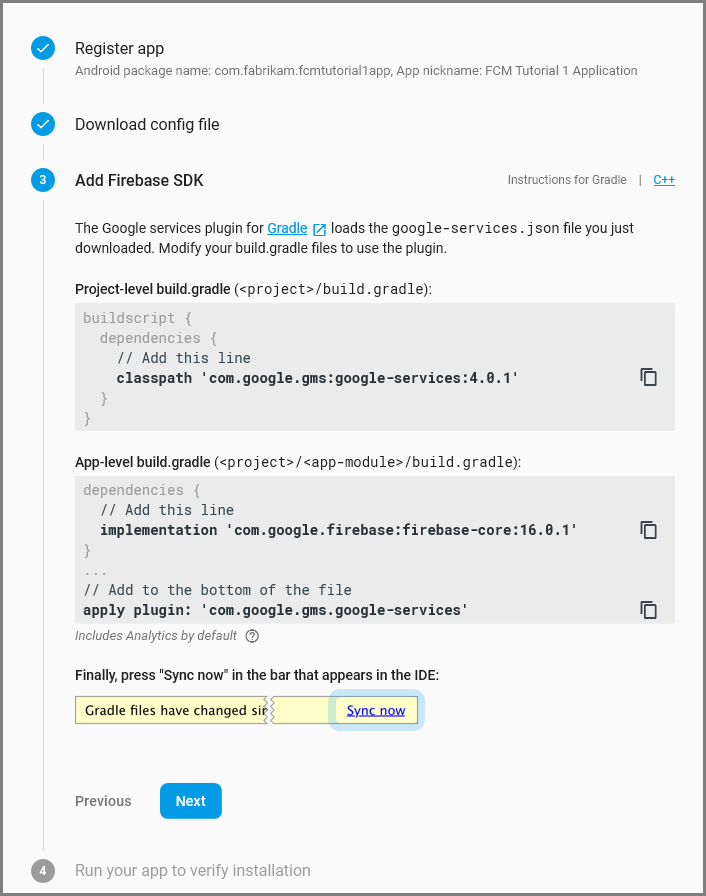
For Android package name, copy the value of your applicationId in your application’s build.gradle file. In this example, it’s com.fabrikam.fcmtutorial1app .
Select Register app.
Select Download google-services.json, save the file into the app folder of your project, and then select Next.
Make the following configuration changes to your project in Android Studio.
In your project-level build.gradle file (
/build.gradle), add the following statement to the dependencies section.
In your app-level build.gradle file (
Add the following line to the end of the app-level build.gradle file after the dependencies section.
Select Sync now on the toolbar.
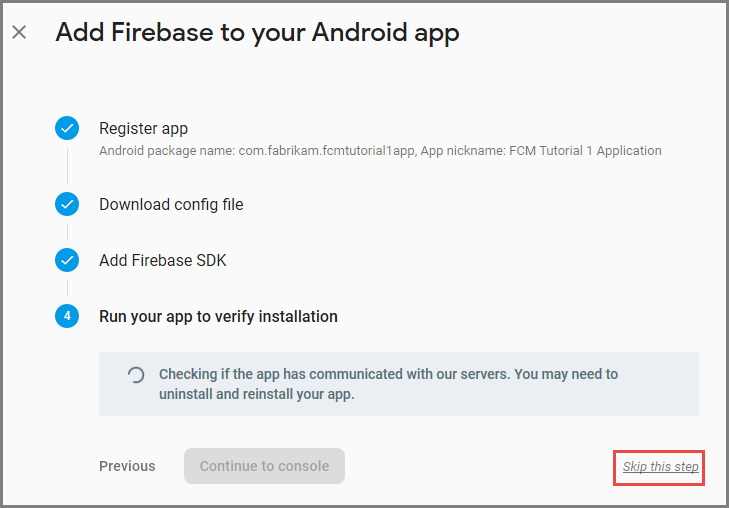
Select Next.
Select Skip this step.
In the Firebase console, select the cog for your project. Then select Project Settings.
If you haven’t downloaded the google-services.json file into the app folder of your Android Studio project, you can do so on this page.
Switch to the Cloud Messaging tab at the top.
Copy and save the Server key for later use. You use this value to configure your hub.
Configure a hub
Select All services on the left menu, and then select Notification Hubs in the Mobile section. Select the star icon next to the service name to add the service to the FAVORITES section on the left menu. After you add Notification Hubs to FAVORITES, select it on the left menu.
On the Notification Hubs page, select Create on the toolbar.
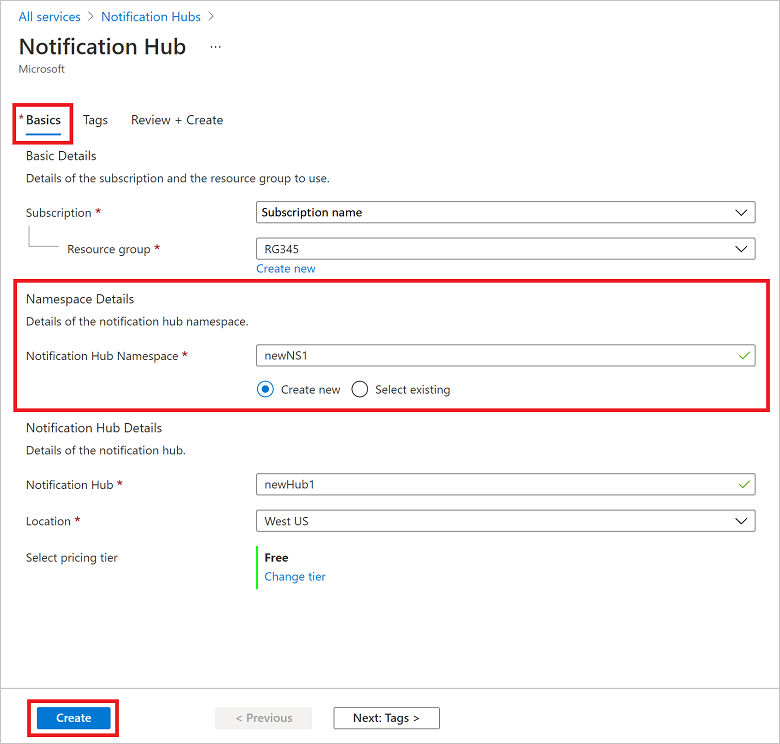
In the Basics tab on the Notification Hub page, do the following steps:
In Subscription, select the name of the Azure subscription you want to use, and then select an existing resource group, or create a new one.
Enter a unique name for the new namespace in Namespace Details.
A namespace contains one or more notification hubs, so type a name for the hub in Notification Hub Details. Or, select an existing namespace from the drop-down.
Select a value from the Location drop-down list box. This value specifies the location in which you want to create the hub.
Select Create.
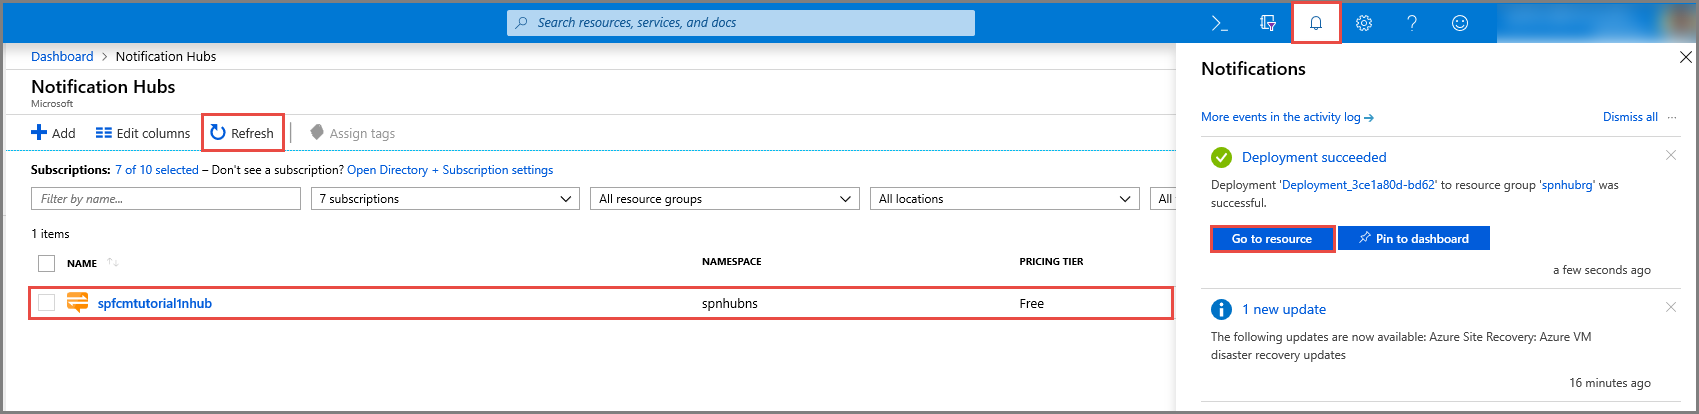
Select Notifications (the bell icon), and then select Go to resource. You can also refresh the list on the Notification Hubs page and select your hub.
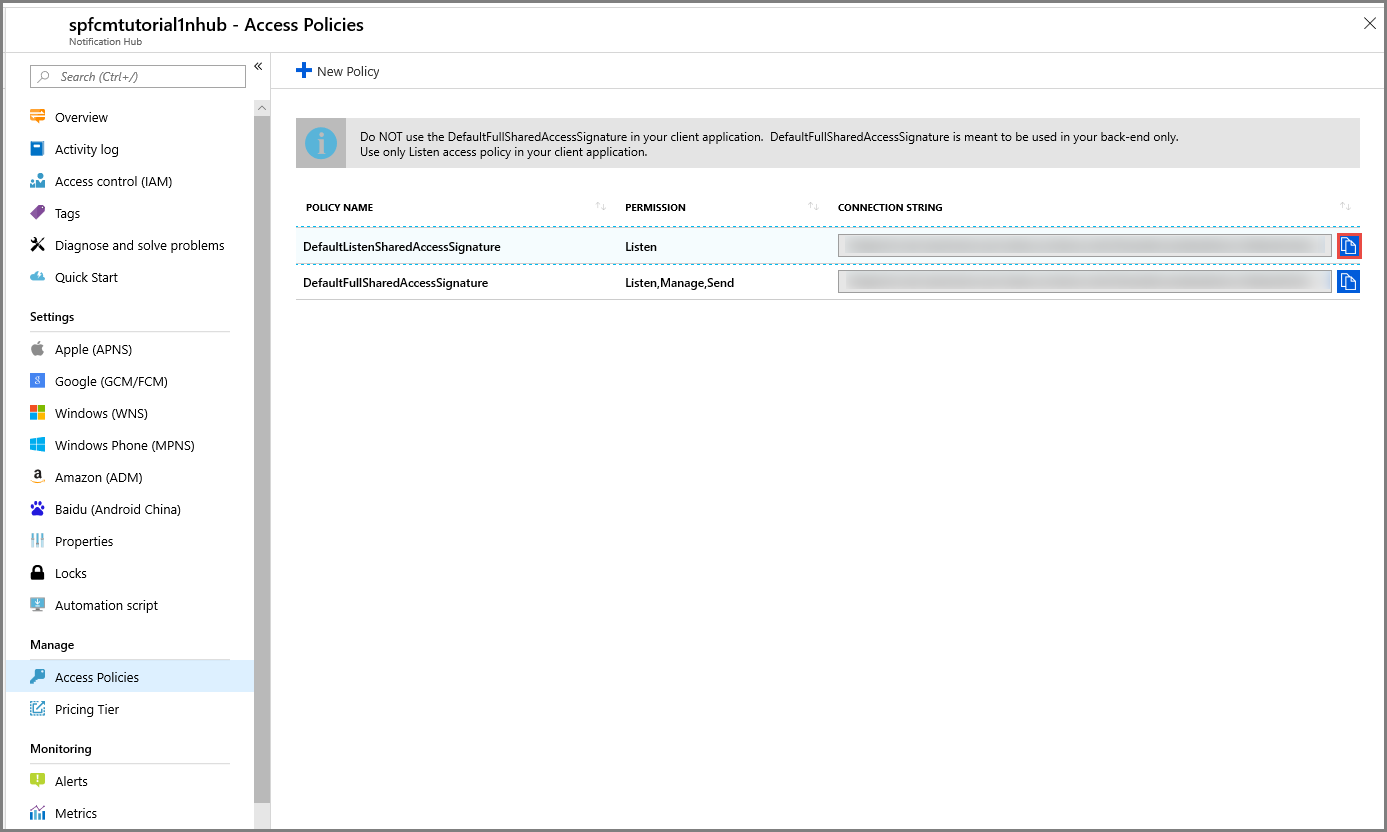
Select Access Policies from the list. Note that the two connection strings are available to you. You’ll need them later to handle push notifications.
Do not use the DefaultFullSharedAccessSignature policy in your application. This is meant to be used in your back end only.
Configure Firebase Cloud Messaging settings for the hub
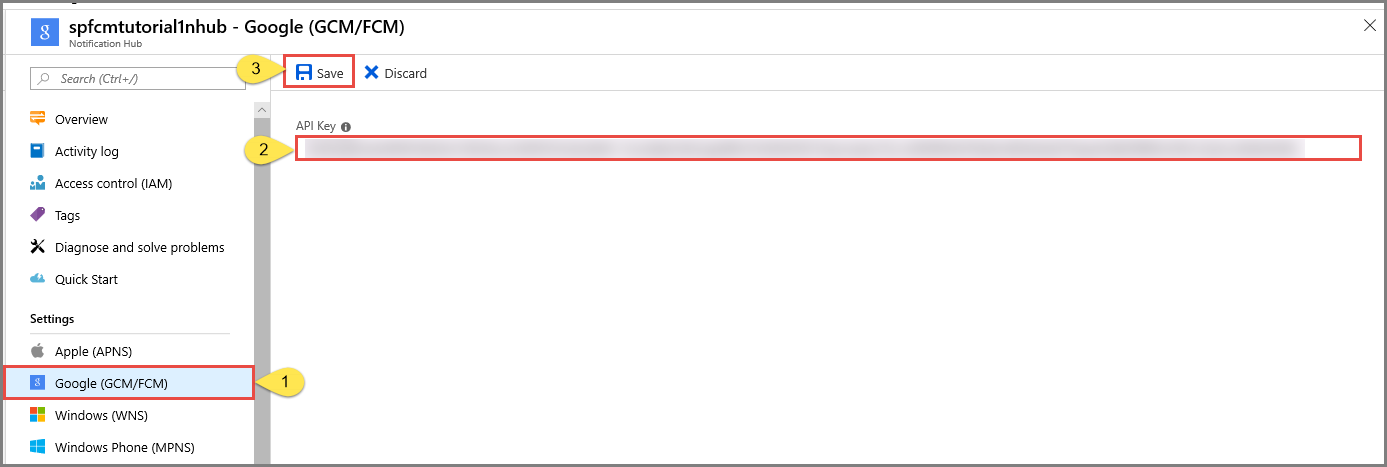
In the left pane, under Settings, select Google (GCM/FCM).
Enter the server key for the FCM project that you saved earlier.
On the toolbar, select Save.
The Azure portal displays a message in alerts that the hub has been successfully updated. The Save button is disabled.
Your hub is now configured to work with Firebase Cloud Messaging. You also have the connection strings that are necessary to send notifications to a device and register an app to receive notifications.
Connect your app to the notification hub
Add Google Play services to the project
In Android Studio, select Tools on the menu, and then select SDK Manager.
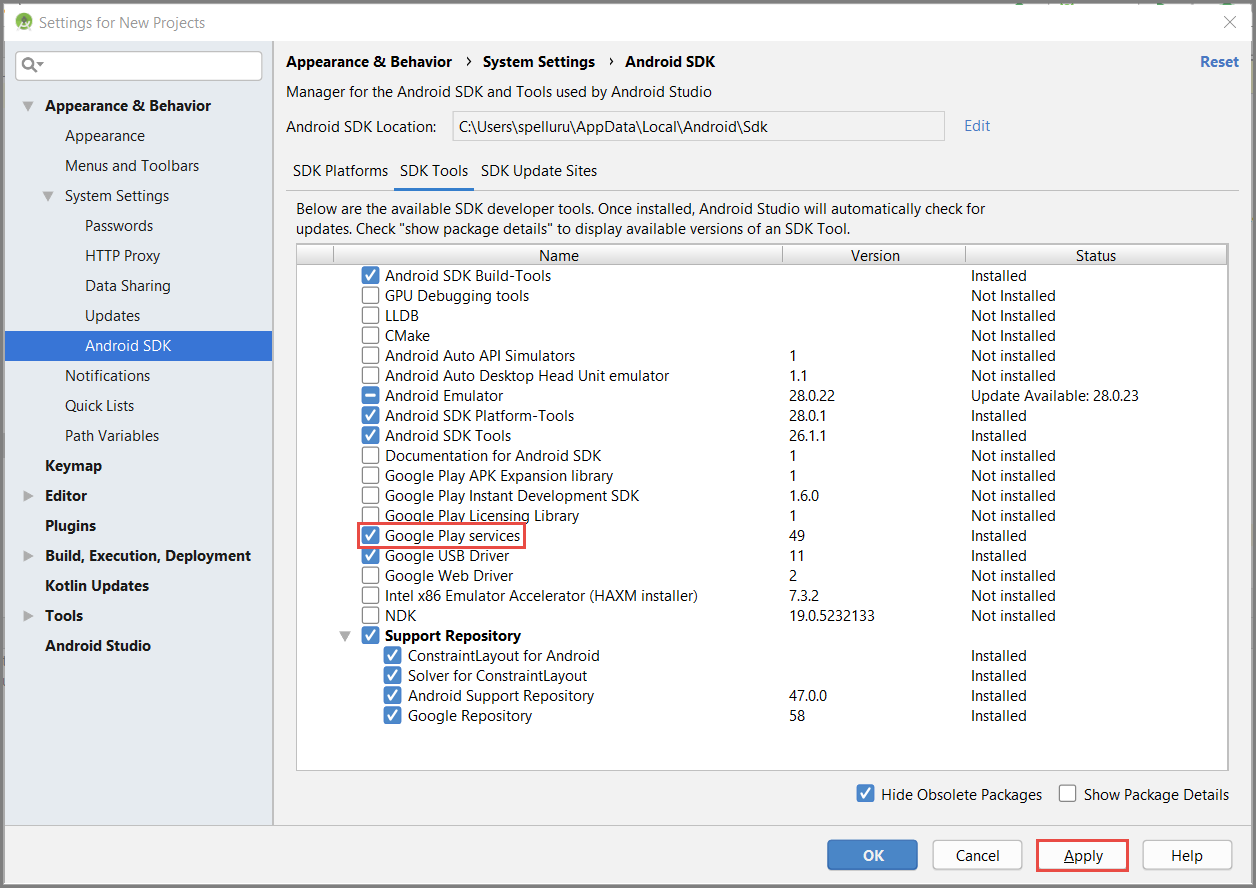
Select the target version of the Android SDK that is used in your project. Then select Show Package Details.
Select Google APIs, if it’s not already installed.
Switch to the SDK Tools tab. If you haven’t already installed Google Play Services, select Google Play Services as shown in the following image. Then select Apply to install. Note the SDK path, for use in a later step.
If you see the Confirm Change dialog box, select OK. The Component Installer installs the requested components. Select Finish after the components are installed.
Select OK to close the Settings for New Projects dialog box.
Open the AndroidManifest.xml file, and then add the following tag to the application tag.
Add Azure Notification Hubs libraries
In the Build.Gradle file for the app, add the following lines in the dependencies section.
Add the following repository after the dependencies section.
Add Google Firebase support
In the Build.Gradle file for the app, add the following lines in the dependencies section if they don’t already exist.
Add the following plug-in at the end of the file if it’s not already there.
Select Sync Now on the toolbar.
Update the AndroidManifest.xml file
After you receive your FCM registration token, you use it to register with Azure Notification Hubs. You support this registration in the background by using an IntentService named RegistrationIntentService . This service also refreshes your FCM registration token. You also create a class named FirebaseService as a subclass of FirebaseMessagingService and override the onMessageReceived method to receive and handle notifications.
Add the following service definition to the AndroidManifest.xml file, inside the tag.
Add the following necessary FCM-related permissions below the tag.
Add code
In the Project View, expand app > src > main > java. Right-click your package folder under java, select New, and then select Java Class. Enter NotificationSettings for the name, and then select OK.
Make sure to update these three placeholders in the following code for the NotificationSettings class:
HubListenConnectionString: The DefaultListenAccessSignature connection string for your hub. You can copy that connection string by clicking Access Policies in your hub in the Azure portal.
HubName: Use the name of your hub that appears in the hub page in the Azure portal.
Enter the name and the DefaultListenSharedAccessSignature of your hub before proceeding further.
Add another new class to your project named RegistrationIntentService . This class implements the IntentService interface. It also handles refreshing the FCM token and registering with the notification hub.
Use the following code for this class.
In the MainActivity class, add the following import statements above the class declaration.
Add the following members at the top of the class. You use these fields to check the availability of Google Play Services as recommended by Google.
In the MainActivity class, add the following method to check the availability of Google Play Services.
In the MainActivity class, add the following code that checks for Google Play Services before calling the IntentService to get your FCM registration token and register with your hub:
In the OnCreate method of the MainActivity class, add the following code to start the registration process when the activity is created:
To verify app state and report status in your app, add these additional methods to MainActivity :
The ToastNotify method uses the «Hello World» TextView control to report status and notifications persistently in the app. In your res > layout > activity_main.xml layout, add the following ID for that control.
Next you add a subclass for the receiver that you defined in AndroidManifest.xml. Add another new class to your project named FirebaseService .
Add the following import statements at the top of FirebaseService.java :
Add the following code for the FirebaseService class, making it a subclass of FirebaseMessagingService .
This code overrides the onMessageReceived method and reports notifications that are received. it also sends the push notification to the Android notification manager by using the sendNotification() method. Call the sendNotification() method when the app isn’t running and a notification is received.
In Android Studio, on the menu bar, select Build > Rebuild Project to make sure that there aren’t any errors in your code. If you receive an error about the ic_launcher icon, remove the following statement from the AndroidManifest.xml file:
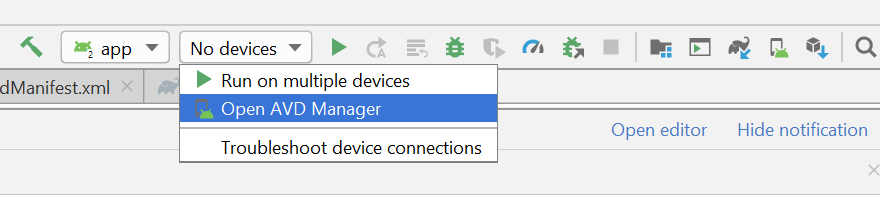
Ensure you have a virtual device for running the app. If you do not have one, add one as follows:
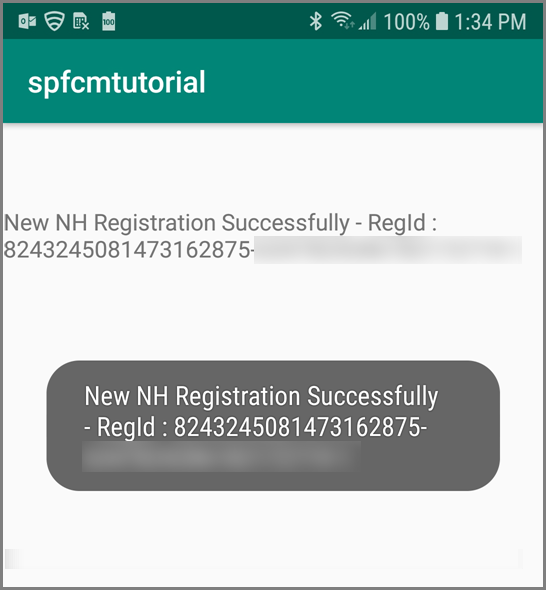
Run the app on your selected device and verify that it registers successfully with the hub.
Registration might fail during the initial launch until the onTokenRefresh() method of the instance ID service is called. The refresh should initiate a successful registration with the notification hub.
Test send notification from the notification hub
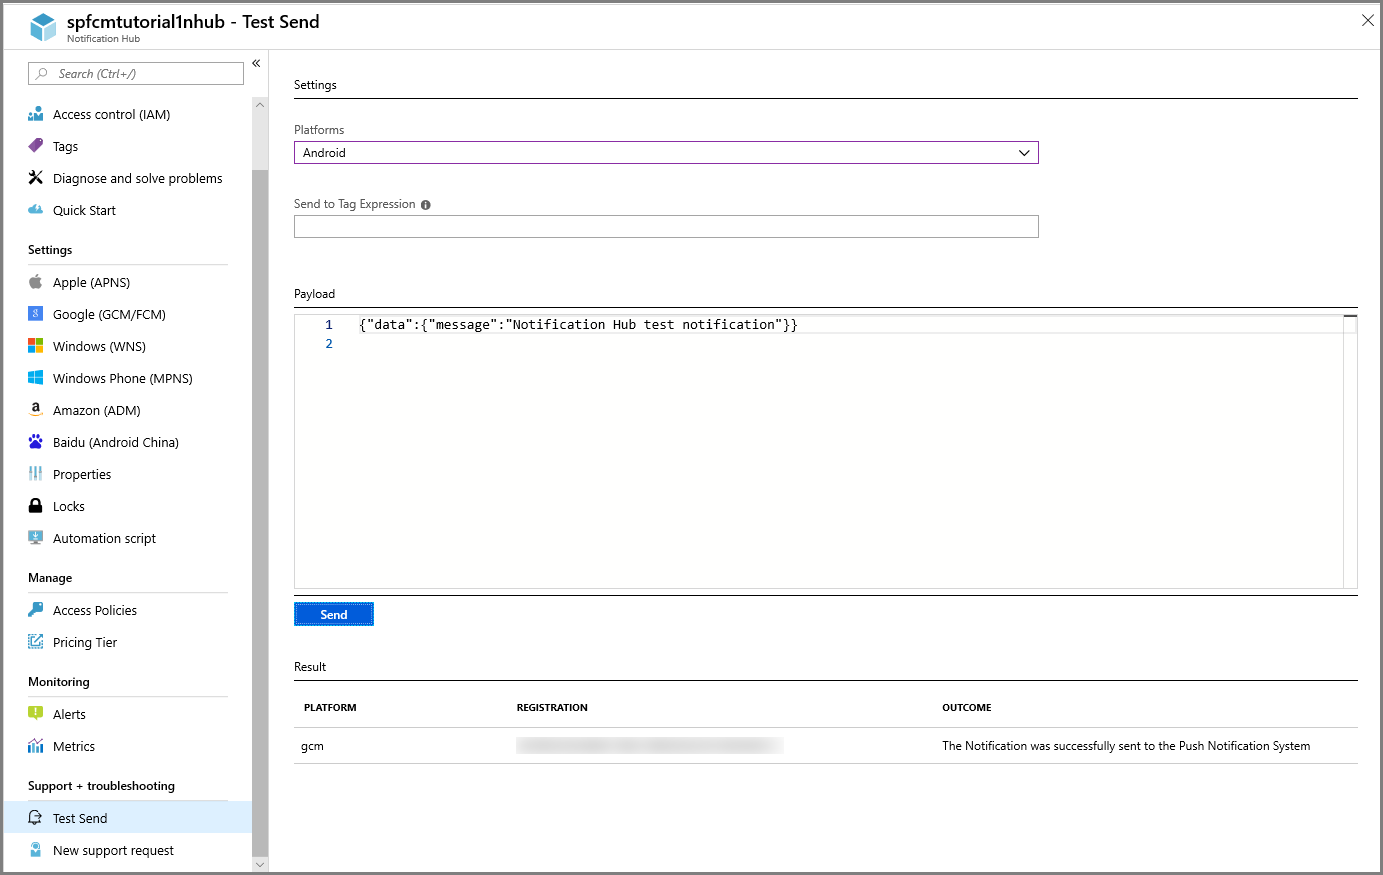
You can send push notifications from the Azure portal by taking the following steps:
In the Azure portal, on the Notification Hub page for your hub, select Test Send in the Troubleshooting section.
For Platforms, select Android.
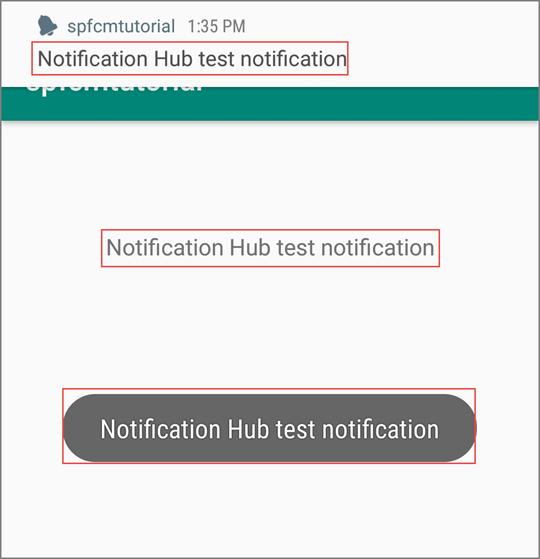
Select Send. You won’t see a notification on the Android device yet because you haven’t run the mobile app on it. After you run the mobile app, select the Send button again to see the notification message.
See the result of the operation in the list at the bottom.
You see the notification message on your device.
Push notifications are normally sent in a back-end service like Mobile Apps or ASP.NET using a compatible library. If a library isn’t available for your back end, you can also use the REST API directly to send notification messages.
Here is a list of some other tutorials you might want to review for sending notifications:
- Azure Mobile Apps: For an example of how to send notifications from a Mobile Apps back end integrated with Notification Hubs, see Add Push Notifications to your iOS App.
- ASP.NET: Use Notification Hubs to push notifications to users.
- Azure Notification Hub Java SDK: See How to use Notification Hubs from Java for sending notifications from Java. This has been tested in Eclipse for Android Development.
- PHP: How to use Notification Hubs from PHP.
Run the mobile app on emulator
Before you test push notifications inside an emulator, make sure that your emulator image supports the Google API level that you chose for your app. If your image doesn’t support native Google APIs, you might get the SERVICE_NOT_AVAILABLE exception.
Also make sure that you’ve added your Google account to your running emulator under Settings > Accounts. Otherwise, your attempts to register with FCM might result in the AUTHENTICATION_FAILED exception.
Next steps
In this tutorial, you used Firebase Cloud Messaging to broadcast notifications to all Android devices that were registered with the service. To learn how to push notifications to specific devices, advance to the following tutorial:
Источник