- Unity Mobile Notifications Package
- Android
- Push notifications for Android
- Prerequisites
- Configuring the Android notification channel
- Google and Firebase setup
- PlayFab requires a server API key
- Using the API key
- Getting started: push notifications for Android + Unity
- Setting up your first Push Notification
- Troubleshooting Android
- Advanced Features
- Additional Support
Unity Mobile Notifications Package
The runtime API is split into two parts: AndroidNotificationCenter and iOSNotificationCenter . These can be used to schedule and manage notifications for their respective platforms. You can download a sample Project which implements a high-level wrapper that you can use to send notifications to both Android and iOS with the same API from our GitHub page, or see the code samples below.
This package supports the following features:
- Schedule local one-time or repeatable notifications.
- Cancel already displayed and upcoming (scheduled) notifications.
- Android:
- Create and modify notification channels (categories) on Android Oreo and above.
- Preserve notifications when the device restarts.
- Set custom notification icons.
- iOS:
- Use the Apple Push Notification Service (APNs) to receive remote notifications.
- Modify remote notification content if the device receives notifications from other apps while your app is running.
- Group notifications into threads (only supported on iOS 12+).
Requirements:
- Supports Android 4.4 (API 19) and iOS 10 or above.
- Compatible with Unity 2018.3 or above.
Android
Create a notification channel
Every local notification must belong to a notification channel. Notification channels are only supported on Android 8.0 Oreo and above. On older Android versions, this package emulates notification channel behavior. Settings such as priority ( Importance ) set for notification channels apply to individual notifications even on Android versions prior to 8.0.
Send a simple notification
This example shows you how to schedule a simple text notification and send it to the notification channel you created in the previous step.
If you don’t specify a custom icon for each notification, the default Unity icon displays in the status bar instead. You can configure notification icons in the Project Settings **window (menu: **Edit > Project Settings > Mobile Notification Settings). Whenever you schedule a notification in your script, use the icon ID you define in the Mobile Notification Settings window.
You can optionally set a large icon which also displays in the notification view. The smaller icon displays as a small badge on top of the large one.
Unity assigns a unique identifier to each notification after you schedule it. You can use the identifier to track the notification status or to cancel it. Notification status tracking only works on Android 6.0 Marshmallow and above.
Use the following code example to check if your app has delivered the notification to the device and perform any actions depending on the result.
Preserve scheduled notifications after the device restarts
By default, apps remove scheduled notifications when the device restarts. To automatically reschedule all notifications when the user turns the device back on, enable the Reschedule Notifications on Device Restart setting in the Project Settings window (menu: Edit > Project Settings > Mobile Notification Settings). This adds the RECEIVE_BOOT_COMPLETED permissions to your app’s manifest.
Handle received notifications while the app is running
You can subscribe to the AndroidNotificationCenter.OnNotificationReceived event to receive a callback whenever the device receives a remote notification while your app is running.
Save custom data and retrieve it when the user opens the app from the notification
To store arbitrary string data in a notification object set the IntentData property.
If the user opens the app from the notification, you can retrieve it any and any data it has assigned to it like this:
If the app is opened in any other way, GetLastNotificationIntent returns null.
Request authorization
You need to request permission from the system to post local notifications and receive remote ones. If you intend to send the user remote notifications after they confirm the authorization request, you need to retrieve the DeviceToken . To do this, the request must be created with registerForRemoteNotifications set to true. For more information on how to send push notifications to a device and how to add push notification support to your app, see the Apple Developer website documentation.
Optionally, you can ask the user for permission to only send certain notification types. The example below shows how to request permission to show UI Alert dialogs and add a badge on the app icon. However, the user might change the authorization status for each notification type at any time in the settings app, so to check the actual authorization status, call iOSNotificationCenter.GetNotificationSettings .
Alternatively, you can enable the Request Authorization on App Launch **setting in the **Project Settings **window (menu: **Edit > Project Settings > Mobile Notification Settings), which makes the app automatically show a permissions request dialog when the user launches the app. Afterwards, you can call this method again to determine the current authorization status. The permissions request dialog won’t display again if the user has already granted or denied authorization.
Send a simple notification
The following code example cancels the notification if it doesn’t trigger:
The following code example removes the notification from the Notification Center if it was already shown to the user:
Other triggers
As well as the time interval trigger, you can use calendar and location triggers. All the fields in iOSNotificationCalendarTrigger are optional, but you need to set at least one field for the trigger to work. For example, if you only set the hour and minute fields, the system automatically triggers the notification on the next specified hour and minute.
You can also create location triggers if you want to schedule the delivery of a notification when the device enters or leaves a specific geographic region. Before you schedule any notifications with this trigger, your app must have authorization to use Core Location and must have when-in-use permissions. Use the Unity LocationService API to request this authorization. For additional information, see the Core Location documentation on the Apple Developer website.
In this example, the center coordinate is defined using the WGS 84 system. The app triggers the notification when the user enters an area within a 250 meter radius around the Eiffel Tower in Paris.
Handle received notifications when the app is running
If your app triggers a notification while it’s running, you can perform a custom action instead of showing a notification alert. By default, if your app triggers a local notification while it is in the foreground, the device won’t display an alert for that notification. If you want the notification to behave as though the device isn’t running the app, set the ShowInForeground property when you schedule the notification:
Alternatively, you can perform another action when the app triggers the notification. For example, you can display the notification content using the app’s UI. To do this, subscribe to the OnNotificationReceived event. Your app calls this event whenever a local or a remote notification is received, regardless if it’s shown in the foreground.
To modify or hide the content of a remote notification your app receives while its running, subscribe to the OnRemoteNotificationReceived event. If you do this, the remote notification won’t display when your app is running. If you still want to show an alert for it, schedule a local notification using the remote notification’s content, like this:
Save custom data and retrieve it when the user opens the app from the notification
To store arbitrary string data in a notification object, set the Data property:
The following code example shows how to retrieve the last notification the app received:
If the user opens the app from a notification, GetLastRespondedNotification also returns that notification. Otherwise it returns null.
Why are small Android icons white in the editor notification settings preview ?
Small notification icons are required to be monochrome and Android ignores all non-alpha channels in the icon image, therefore Unity automatically strips all RGB channels. You can also provide icons by putting them in the \Assets\Plugins\Android\res\drawable-
The notification color can be modified by setting the AndroidNotification.Color property.
Why are Notifications not delivered on certain Huawei and Xiaomi phones when my app is closed and not running in the background ?
Seems that Huawei (including Honor) and Xiaomi utilize aggresive batter saver techniques which restrict app background activities unless the app has been whitelisted by the user in device settings. This means that any scheduled notifications will not be delivered if the app is closed or not running in the bacgkround. We are not aware of any way to workaround this behaviour besides encouraging the user to whitelist your app.
What can I do if notifications with a location trigger don’t work?
Make sure you add the CoreLocation framework to your Project. You can do this in the Mobile Notification Settings menu in the Unity Editor (menu: Edit > Project Settings > Mobile Notification Settings) Alternatively, add it manually to the Xcode project, or use the Unity Xcode API. You also need to use the Location Service API to request permission for your app to access location data.
Источник
Push notifications for Android
Prerequisites
Configuring the Android notification channel
The Google and Firebase developer consoles experience changes regularly. The setup description in this section best describes the values you need — and how to get them — as of June 2017.
Google and Firebase setup
There are three Google websites that you must use and synchronize. In Google/Firebase, there are both Projects and Apps:
Project:
- Ensure that your project is set up and accessible from the Google API Manager.
- Import your project into the Firebase Console if it’s not already there.
App:
- Firebase Projects contain apps.
- The Google Play Dev Console also contains apps.
- Make sure your app exists in both locations, with the same name and identifier (for example, Unicorn Battle and com.playfab.unicornbattle2).
PlayFab requires a server API key
You can get this key from the Google API Manager, or from the Firebase Console
Google API Manager:
- Select your Project.
- Select Credentials (left menu).
- The Firebase Project import will have created a ServerKey for you here.
Firebase Console:
- Select your Project or App, and find the Settings option (there are many ways to do this, all of which lead you to the same place).
- In the General tab, this is listed as the Web API Key.
- In the Cloud Messaging tab, this is listed as the Legacy server key.
All of the keys described above should be identical, and they are all the API key described in this document.
If they are not identical, the Legacy server key is the one needed by PlayFab.
Using the API key
Provide your API key in one of two ways:
- Input your key directly into the Game Manager UI: Settings (for your Title) >Push Notifications >Android.
- Or call SetupPushNotification using Postman or a Unity project with Server API methods enabled.
- Once finished, you can continue with this guide to receive messages from PlayFab.
- We will give you a complete FCM-ready monoBehaviour script in the following example, which combines FCM and PlayFab.
- You can continue using that monobehavior script, or replace it with the one in the example that follows.
Name: your_game_name
Platform: GCM
Credential: (Google server API Key): AIza**ppo
Overwrite OldARN: true
You should receive an HTTP 200 OK response with data similar to the following.
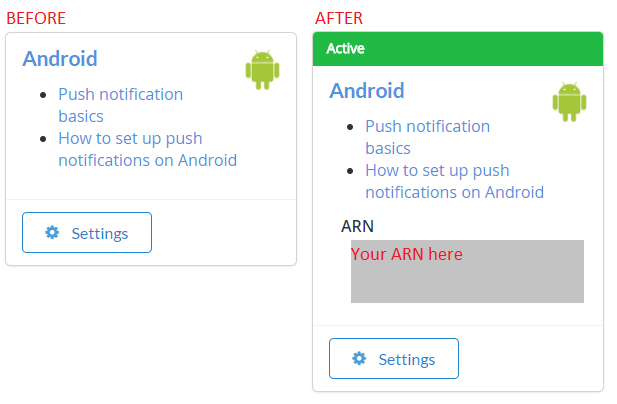
Once set up properly (using either method), you should see this in the Game Manager UI Settings (for your title) > Push Notifications > Android.
Getting started: push notifications for Android + Unity
To set up your Unity project:
Create a new Unity project.
Follow the FCM Unity guide to install FCM messaging, and set up a project for push notifications.
In the FCM guide, you created a monobehavior script that set up the Firebase plugin.
Setting up your first Push Notification
In Unity, open the script you created in the FCM tutorial, and replace the contents.
Build and run your Unity project on a device. If you receive a push notification with the text, Push notifications registered successfully, then everything worked as expected.
PlayFabSettings.TitleId = TITLE_ID . You must set your own TitleId . This example will not work if you don’t update this TitleId , because our title is registered with our Firebase Keys and settings, not yours. You can do so by un-commenting this line and replacing TITLE_ID with your titleId , or you can choose your title from the optional Editor Extensions plugin mentioned in the previous section.
Troubleshooting Android
Verify that you can send a test push notifications from the Firebase Console.
- If you cannot, then your Firebase plugin is not set up correctly, and you should review the Firebase Documentation to find out why, or contact Firebase Support.
Ensure your FCM client pushToken is set properly.
- The OnTokenReceived function in the example should be called, and should have a valid token.
- If it is not called, your Firebase plugin is not set up correctly, and you should review the Firebase Documentation to find out why, or contact Firebase Support.
Ensure your titleId is set to a title that you own, and that it has been registered with the server API key from your Firebase project.
Advanced Features
In server.SendPushNotification, you can use request.Package.CustomData to deliver arbitrary data to the device. In the example previously, this is delivered to the section with the following comment.
You can customize your client receiver to utilize that data however you like. CustomData is not displayed to the player, so it can be used to deliver custom game information to your client, or to locally schedule another future notification using the FCM plugin.
You can also use request.Package.CustomData or request AdvancedPlatformDelivery to deliver to many 3rd party plugins.
3rd party plugin delivery is not supported or guaranteed, but is available for advanced users.
Additional Support
For help, example bugs, and related questions, drop us a line in our Forums.
Currently, we only support our services for the standard flow described in this document. If you team is looking for additional functionality with other common push services or plugins, please let us know! We love getting feedback from our developer community.
For documentation on the push payload via Amazon SNS:
Источник


