- How to Generate QR Code in Android?
- Implementation of QR Code Generator in Android
- Step by Step Implementation
- Kotlin Generate QRCode Using Zxing Android Studio Programmatically
- Step 1. ZXing Dependencies
- Step 3. Add black and white colors
- Step 4. Permissions in manifest
- Step 5. Updating Main Activity
- Understanding above code
- Генерируем и сканируем QR/BAR коды
- QR Code Reader Android Kotlin Tutorial using ML Kit
- What is QR Code?
- Building a QR Code Reader Android App
- Pre-requisites
- Android Studio Project
- Tutorialwing
- Video Output
- Download Source Code
- Getting Started
- What is QR Code?
- Different Uses of QR Code
- Generating QR Code
- Implementing QR Code Scanner Using ZXing Library
- 1. Creating New Project
- Setup ViewBinding
- 2. Adding ZXing Library in app/build.gradle
- 3. Modify values Folder
- 4. Creating QR Code Scanner in Activity Using ZXing Library
- 4.1 Creating User Interface for Activity
- 4.2 Defining View Object and Click Listener
- 4.3 Code for QR Code Scanner in Kotlin
- 5. Problem in Landscape and Portrait Mode Change Automatically?
- 6. Creating QR code Scanner in Fragment Using ZXing Library
- 6.1 Creating User Interface For Fragment
- 6.2 Creating Kotlin File For Fragment
- 6.3 Defining View Object and Set Click Listener
- 6.4 Code for QR Code Scanner in Fragment
- 6.5 Using QR Code of Fragment in Helper Activity
- 7. Customise QR Code Scanner Using ZXing Library
How to Generate QR Code in Android?
QR codes are used in many apps for displaying data in machine-readable form. These codes are used to represent data in a secured manner that is readable only by machines and not by humans. We have seen many apps that provide QR codes that and we can scan that QR codes with our mobile device. In this article, we will take a look at how we can generate a QR Code for our app. So for implementing this feature we will be using a library from GitHub.
Implementation of QR Code Generator in Android
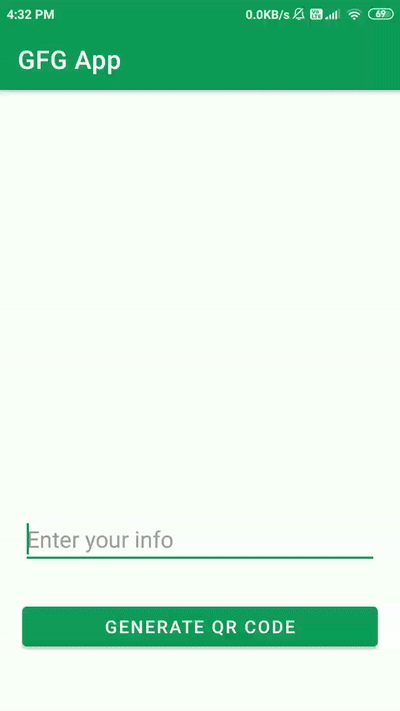
We will be creating a simple QR Code generator app in which we will be adding data from the app and generate a QR Code that will display the data inside it. Below is the sample GIF in which you will get a basic idea of what we are going to do in this article. Not that we are using Java language for building this project.
Step by Step Implementation
Step 1: Create a New Project
To create a new project in Android Studio please refer to How to Create/Start a New Project in Android Studio. Note that select Java as the programming language.
Step 2: Add dependency to build.gradle(Module:app)
Navigate to the Gradle Scripts > build.gradle(Module:app) and add the below dependency in the dependencies section.
Now sync the project from the top right corner option of Sync now.
Источник
Kotlin Generate QRCode Using Zxing Android Studio Programmatically

Kotlin Generate QR Code tutorial with example is what you are learning now.
In this tutorial, we have used ZXing library to generate qr code from string.
We have also explained how you can save generated qr code in android device.
If you are making app related to grocery products or so you need to maintain unique qr code for each product.
This is where this tutorial will help you a lot.
User will enter any string which he likes and app will generate qr code for that particular string.
If you want to generate qr code using Java then follow android qr code generator example.
After implementing all the steps, you should get following output
Step 1. ZXing Dependencies
ZXing dependencies are required to be added to use their classes.
Add below line in the build.grdale(Module:app) file
Full code will look like
Step 3. Add black and white colors
As you already know that every qr code image includes only two colors – Black and White
So let’s add these colors in the colors.xml file
Go to res->values->colors.xml directory and add following
Whole code for colors.xml
Step 4. Permissions in manifest
This tutorial required read and write permissions for internal storage of android device.
Put below lines in AndroidManifest.xml
So final code for AndroidManifest.xml is like below
Step 5. Updating Main Activity
Finally, change main activity codes and our example is ready.
replace your whole code for activity_main.xml with below one
Now it is time to add code to generate qr code image.
Add some kotlin coding into the MainActivity.kt file
Understanding above code
Following method is responsible for QR Code generation from given string.
Above method uses various classes from ZXing library.
Now look at the below method, which is saving generated qr code image into the device.
If you are not able to get result like above video, share your questions in comment section.
Источник
Генерируем и сканируем QR/BAR коды

В статье приводится короткий пример, как встроить в своё приложение генератор и/или сканер QR кодов (или штрих-кодов), и тем самым облегчить себе задачу передачи с устройства на устройство коротких объемов информации.
QR-коды пришли на смену устаревшим штрих-кодам (далее вместо ‘Bar code’) и все плотнее входят в нашу жизнь, их используют в десятках различных решений от передачи ссылок на сайт, до сложных систем авторизаций и покупок.
Подробно узнать что такое QR-код можно в подробностях узнать из статьи Читаем QR код
Для выполнения поставленой задачи нам понадобится 2 библиотеки из двух проектов:
- ZBar bar code reader
- ZXing («Zebra Crossing»)
Сканируем QR-коды
Тут есть одна особенность, result = scanner.scanImage(codeImage) иногда возвращет корректный результат, даже когда нет никакого QR-кода перед камерой. То есть, камера иногда распознает что то даже в обычной размытой картинке. Поэтому рекомендую ввести дополнительную проверку на размер прочитанного кода или на соответствие ожидаемому формату.
Генерируем QR-коды
В этом случае уже будут задействованы ресурсы библиотеки ZXing.
Входные парамеры encodeAsBitmap: текст или код для кодирования, стандарт в который мы кодируем, размеры картинки на выходе.
Что на счёт Штрих-кодов?
Сканер понимает все виды штрих-кодов без каких-либо модификаций, из коробки.
Генератор же модифицируется не просто, а очень просто:
в функцию encodeAsBitmap передаем в поле format вместо BarcodeFormat.QR_CODE, что нибудь вроде BarcodeFormat.CODE_128, что будет соответствовать штрих-коду стандарта Code 128
Пару советов напоследок
Имейте ввиду, что работа с камерой может иметь свои особенности на разных платформах
Замечено, что метод
постоянно теряет память (есть Memory Leak) ввиду того что буфер кадра постоянно создается и очищается на каждом новом превью кадре с камеры.
Для того, что бы этого избежать, есть возможность использовать CallbackBuffer для выделения статичного буфера под превью кадры.
Это действительно помогает избавится от утечек памяти и даже увеличивает фрейм-рейт у превью картинки с камеры.
Но!, нашлась модель телефона, которая ни в какую не захотела работать с превью буфером и не факт что не найдутся еще, поэтому оставил в примере более надежный способ.
Генерация штрихкодов имеет ограничения согласно выбранному стандарту: максимальный размер в байтах, разрешенные смиволы и т.д.
Изучите особенности линейных штрикодов, для того что бы обеспечить совместимость отображаемых вами штрих-кодов с магазинными сканерами
Источник
QR Code Reader Android Kotlin Tutorial using ML Kit
QR Code has became very popular in India. Even small vendors accept digital payments, and we use any Payment App (Google Pay, PhonePe, PayTm) to scan a QR Code and pay them easily. And in your next android app project, you might want to add a QR Code Scanner. And that is why I am here with QR Code Reader Android Kotlin Tutorial.
In this tutorial we will use ML Kit to build a QR Code Scanner Application. If you want to know about what exactly we are going to build, then watch the video below.
You can actually put any kind of information in a QR Code; and for this example I’ve used URL.
What is QR Code?
As we already discussed, almost all digital app based payments in India uses QR Code; so I assume you’ve seen a QR Code already. It stands for Quick Response Code. QR Code is a type of Barcode; it is a two dimensional Bar Code. It contains black squares over a white background, and we can put some data in it that can be read by camera.
Below you can see a sample QR Code, and you can use this QR Code to test the application that you will build in this tutorial.
 QR Code Reader Android Kotlin
Building a QR Code Reader Android App
Now let’s build our application that can read information from a QR Code.
Pre-requisites
I will be using the following things, for this project.
- ML-Kit Barcode Scanning – To scan the QR Code
- Bottom Sheet – To display the information after reading from QR Code
- CameraX – For creating camera that will read QR Code
- Jsoup – To read URL Meta Data
Android Studio Project
Now let’s create our project. I have created a new project using an Empty Activity and the first step is adding required dependencies.
Источник
Tutorialwing
In this tutorial, we will study about one of the popular android library for QR Code scanner in android application. We will see how to implement android QR Code Scanner Using ZXing library in Kotlin. We will see how to use ZXing library in activity, how to use ZXing library in fragment etc. Since Kotlin is official programming language for android application development, this tutorial has been covered in Kotlin programming language. However, you can get source code for android ZXing library in Kotlin.
Video Output
Download Source Code
You can download source code of this tutorial on QR code scanner using ZXing library –
ZXingLibrary Kotlin Source Code
Getting Started
At first, we will see some basic concepts about QR Code. For example, what is QR Code, different usages of QR Code, how to generate QR code etc. After that, we will see how to implement Android QR Code Scanner Using ZXing library in Kotlin.
What is QR Code?
QR Code (abbreviated from Quick Response Code) is a trademark for two dimensional bar code that contains information about the item to which it is attached.
It became popular due to it’s fast readability and greater storage capacity compared to standard UPC barcode.
A QR Code consists of black squares arranged in a square grid on a white background that can be read by an imaging devices such as camera. For example,
Different Uses of QR Code
QR Code can be used in different ways –
– Most commonly in consumer advertising.
– URLs redirection.
– QR Code Payment.
– Website Login.
– WIFI Network Login.
– Video games and many more
For the sake of simplicity of this post, we have just given an introduction about QR Code. If you want to learn more about QR Code – Visit https://en.wikipedia.org/wiki/QR_code
Generating QR Code
Note – If you want to skip this part, you can just download sample QR Code for this tutorial. Open link in new tab. Then, right click and click on “Save As Image”. Then, move to implement QR Code Scanner section.
Since we know what a QR Code is, we will see how to implement QR Code scanner in android application. This scanner helps us to retrieve the data stored in QR Code. Before implementing android QR Code scanner, we will see how to generate QR Code.
Here, we will use http://goqr.me/ to generate QR Code. Generated QR Code will be used as a sample QR Code in this tutorial.
Follow steps below to generate QR code –
- Go to website – http://goqr.me/.
- Screen similar to shown as below will appear.
Generate QR Code
Generate QR Code
Enter the text as shown in the Section 2. Contents. Then, click on the download button (as shown in bottom-right of the above image).
Note that we are assuming that you have entered text in json format. Here, we have entered
Implementing QR Code Scanner Using ZXing Library
Till now, we have seen what a QR Code is, different uses of QR Code, how to generate QR Code etc. Now, we will see how to implement android QR Code scanner using ZXing library in kotlin.
As we already know, a QR Code scanner is used to retrieve the data stored in the QR code. We have already generated a QR code and stored some data –
Now, we will create a scanner that will retrieve this information.
You may see Button, TextView and Different Android Project Structures to understand this post (qr code scanner using zxing library) clearly.
So, Let’s start by creating a new android application.
1. Creating New Project
Follow steps below to create any android project in Kotlin –
| Step | Description |
|---|---|
| 1. | Open Android Studio (Ignore if already done). |
| 2. | Go to File => New => New Project. This will open a new window. Then, under Phone and Tablet section, select Empty Activity. Then, click Next. |
| 3. | In next screen, select project name as ZXingLibrary. Then, fill other required details. |
| 4. | Then, clicking on Finish button creates new project. |
Newbie in Android ?
Some very important concepts (Recommended to learn before you move ahead)
Before we move ahead, we need to setup for viewBinding to access widget in Kotlin file without using findViewById() method.
Setup ViewBinding
Add viewBinding true in app/build.gradle file.
Now, set content in activity using view binding.
Open MainActivity.kt file and write below code in it.
Now, we can access view in Kotlin file without using findViewById() method.
2. Adding ZXing Library in app/build.gradle
As we have already mentioned, we will be using ZXing library to create QR Code Scanner. So, once your project is created successfully, Open app/build.gradle file. Then, add below code into it.
This is gradle for ZXing library with appcompat packages.
After adding ZXing library gradle, sync your project by clicking on Sync Now button shown at top-right section of the IDE.
3. Modify values Folder
Now, we will add code into values folder (dimens.xml, strings.xml). These code contains all constants values to be used in the application. So, it would be better if you add it now to avoid any error.
- Open res/values/strings.xml file. Then, add below code into it.
- Then, open res/values/dimens.xml file. Then, add below code into it.
Till now, we have added ZXing library in our application. Then, we have added all the constant values to be used in the application. Now, we will implement the QR Code scanner in activity as well as in fragment.
So, Let’s start by creating QR Code Scanner in Activity.
4. Creating QR Code Scanner in Activity Using ZXing Library
Now, we will see how to implement QR Code scanner in activity.
At first, we will create user interface. Then, we will implement QR code scanner using zxing library.
4.1 Creating User Interface for Activity
Open res/layout/activity_main.xml file. Then, add below code into it.
Designed ui will look like below – 
Here, we have used two buttons, two textViews. Since we know the data stored in QR Code, we can design ui accordingly.
- Click on button, SCAN QR CODE, to start scanning QR Code.
- Result is displayed in Name and Site Name fields.
Note – Since we know about the types of data stored in QR Code. We have created the user interface accordingly. However, you can design interface as per your need.
You can see one more button with id showQRScanner that show, whenever it is clicked, user interface implemented for QR Code Scanner in fragment.
4.2 Defining View Object and Click Listener
Till now, we have defined only ui part in activity_main.xml file. Now, we will access view objects defined in that xml file and set click listener in button to perform QR Code scanning using ZXing Library.
So, open your main/java/tutorialwing.com.zxinglibrary/MainActivity.kt file. Then, add below code into it.
Here, we have defined view objects and set click listener on button to perform some actions (will be added later).
4.3 Code for QR Code Scanner in Kotlin
Now, we will add the code to scan the QR Code using ZXing library in kotlin.
So, open your main/java/tutorialwing.com.zxinglibrary/MainActivity.kt file. Then, add below code into it.
Here, we are starting the QR Code scanning when button is clicked. Then, retrieving the scanned data in onActivityResult method. After that, we are showing the data in textViews.
Note that we have not done anything in click listener set to button with id showQRScanner. We will use this later in this tutorial.
5. Problem in Landscape and Portrait Mode Change Automatically?
At this point of time, when you run the app, you will notice that whenever you click on button (SCAN QR CODE), camera is displayed in landscape mode. The orientation mode changes back to portrait mode as soon as QR Code scanning is complete. This causes frustration because your app orientation mode changes rapidly.
How to solve this?
Follow steps below to solve it –
- Add code to check app’s orientation into AndroidManifest file. So, open main/AndroidManifest.xml file. Then, add below code into it.
Then, add below code into MainActivity.kt file inside setupScanner() method.
Now, run the app. You will notice that screen orientation is not changing now. You will get output as shown below –
Using ZXing Library in Activity
6. Creating QR code Scanner in Fragment Using ZXing Library
Just like activity, we can implement Android QR code scanner using ZXing library in fragment. So, our next topic will be using zxing library in fragment. In this part, we will have below steps –
- Creating User Interface For Fragment
- Creating Kotlin File For Fragment
- Defining View Object
- Code for QR Code Scanner in Fragment
- Using QR Code of Fragment in Helper Activity
6.1 Creating User Interface For Fragment
Create a new xml file (named fragment_qrcode.xml) in res/layout folder. Then, open res/layout/fragment_qrcode.xml file. Then, add below code into it.
Here, we have designed ui like below – 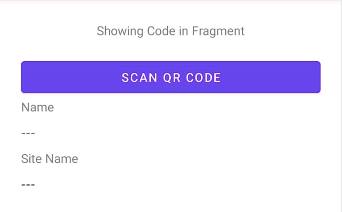
- Click on button, SCAN QR CODE, to start scanning QR Code.
- Result is displayed in Name and Site Name fields.
Here, we have shown a button and some textViews that will display the data retrieved from QR Code after scanning using ZXing Library.
6.2 Creating Kotlin File For Fragment
Create a new Kotlin file (named QRCodeFragment.kt) in main/java/tutoriawing.com.zxinglibrary package. Then, write below code into it –
6.3 Defining View Object and Set Click Listener
Now, we will add code in QRCodeFragment.kt file to access objects defined in xml file (i.e. fragment_qrcode.xml) . Then, perform some operations on click. So, open main/java/tutoriawing.com.zxinglibrary/QRCodeFragment.kt file. Then, add below code into it.
6.4 Code for QR Code Scanner in Fragment
Till now, we have defined ui, setup etc. for scanning. Now, we will add code to create android QR code scanner in fragment (QRCodeFragment.kt). So, open main/java/tutoriawing.com.zxinglibrary/QRCodeFragment.kt file. Then, add below code into it.
Here, we have added code to start the qr code scanning when button is clicked. Then, we are retrieving the data in onActivityResult method. Then, result is being shown in respective textViews.
6.5 Using QR Code of Fragment in Helper Activity
Till now, we have defined ui for scanning in fragment, written code to scan QR Code in fragment etc. Now, we will use this fragment, i.e. QRCodeFragment, in Helper Activity and Scan some QR Code.
So, create helper activity, it’s xml file to use implemented QR Code in fragment. Follow steps below to do it –
- Create a new xml file , named activity_helper.xml, in main/res/layout/ folder. Then, add below code into it –
- Now, Create a new Kotlin file, named HelperActivity.kt, in main/java/tutorialwing.com.zxinglibrary package. Then, write below code in it –
- Now, mention about this Activity File in AndroidManifest.xml file. So, add below line in AndroidManifest.xml file –
- Now, write code to add fragment, QRCodeFragment into HelperActivity. So, add below line in HelperActivity –
Finally, HelperActivity.kt file will be –
Call to Show HelperActivity
Remember we have defined a button with id showQRScanner in MainActivity. Then, we have set click listener in it. Now, add below code to show HelperActivity when this button is clicked.
Finally, it will be like
Remember AndroidManifest.xml file is very important file in android application. Finally, our AndroidManifest.xml file would look like below –
Now, run the app. Click on button to show “Scanner From Fragment”. You will see user interface defined in fragment.
Android ZXing Library Output in Fragment
Android ZXing Library Output in Fragment
Note – For simplicity of this project, we have defined the user interface in fragment to similar as that of activity. However, you can define it as per your need.
This completes implementation of Android QR Code Scanner using ZXing library in fragment.
Now, we will see some more concepts on how can you customise the default features provided in ZXing library.
7. Customise QR Code Scanner Using ZXing Library
Till now, whatever we have discussed is default features provided by ZXing library. However, you can customise it if needed. For example, you can turn on/off beep sound you hear when QR Code scanning is complete, choose camera to scan the code etc.
Different options to customise QR code scanner using zxing library are as below –
Change Prompt Message
When you run the app and start scanning, you can see a text message shown at bottom of the screen. You can change this prompt message as below –
Change Camera
You can select which camera you want to use for QR Code scanning. You can do it as below –
ON/OFF Beep Sound
You clearly hear a beep sound when scanning of any QR Code is complete. You can turn it on or off as per your need. You can do it as below –
Get the Bar Code Image Path
If you need to get the barcode image path, you can get it in result intent as below –
This completes our tutorial on implementing Android QR Code Scanner Using ZXing library in Kotlin.
Источник


