- Raspberry pi android bluetooth
- Re: Raspberry Pi Zero bluetooth connection to android phone.
- Re: Raspberry Pi Zero bluetooth connection to android phone.
- Re: Raspberry Pi Zero bluetooth connection to android phone.
- Re: Raspberry Pi Zero bluetooth connection to android phone.
- Re: Raspberry Pi Zero bluetooth connection to android phone.
- Re: Raspberry Pi Zero bluetooth connection to android phone.
- Подключение Raspberry Pi к телефону по Bluetooth. Часть 1
- Raspberry pi android bluetooth
- Raspberry Pi Bluetooth Data Transfer to the Smartphone
- Required Hardware Parts
- Setting up the Software
- Send Files with the Raspberry Pi Bluetooth Module
- Receive Files using Raspberry Pi Bluetooth
- Related Posts
- Top 12 Advanced Robot Kits For Adults – Full Overview
- Raspberry Pi: Printer Setup and Printing Images by pressing a Button
- Top 21 OS for the Raspberry Pi for your Project – Overview
- Raspberry Pi: Set Up USB Boot Using a Stick or SSD Hard Drive
- 6 Comments
- Raspberry pi android bluetooth
- About
Raspberry pi android bluetooth

Re: Raspberry Pi Zero bluetooth connection to android phone.
You can’t ssh in from the public internet unless you can port forward port #22 to the WAN side of your router.
Easier way to connect remotely is with RealVNC Cloud support which doesn’t need any port forwarding.
Languages using left-hand whitespace for syntax are ridiculous
DMs sent on Twitter/LinkedIn will be answered next month.
Fake doctors — are all on my foes list.
The use of crystal balls and mind reading is prohibited.
Re: Raspberry Pi Zero bluetooth connection to android phone.
Re: Raspberry Pi Zero bluetooth connection to android phone.
you can either make a wifi hotspot or tether with bluetooth. Both should work. I haven’t tried a wifi hotspot myself but I would expect this to be faster than the bluetooth version. If your interested in bluetooth tethering I can try writing down what I did to get it working.
Re: Raspberry Pi Zero bluetooth connection to android phone.

Re: Raspberry Pi Zero bluetooth connection to android phone.
Not bluetooth but Wifi:
«Smartphone as terminal for Pi Zero(!)»
viewtopic.php?t=196057
Just a LiPo for powering, and a WiFi dongle added to Pi Zero: 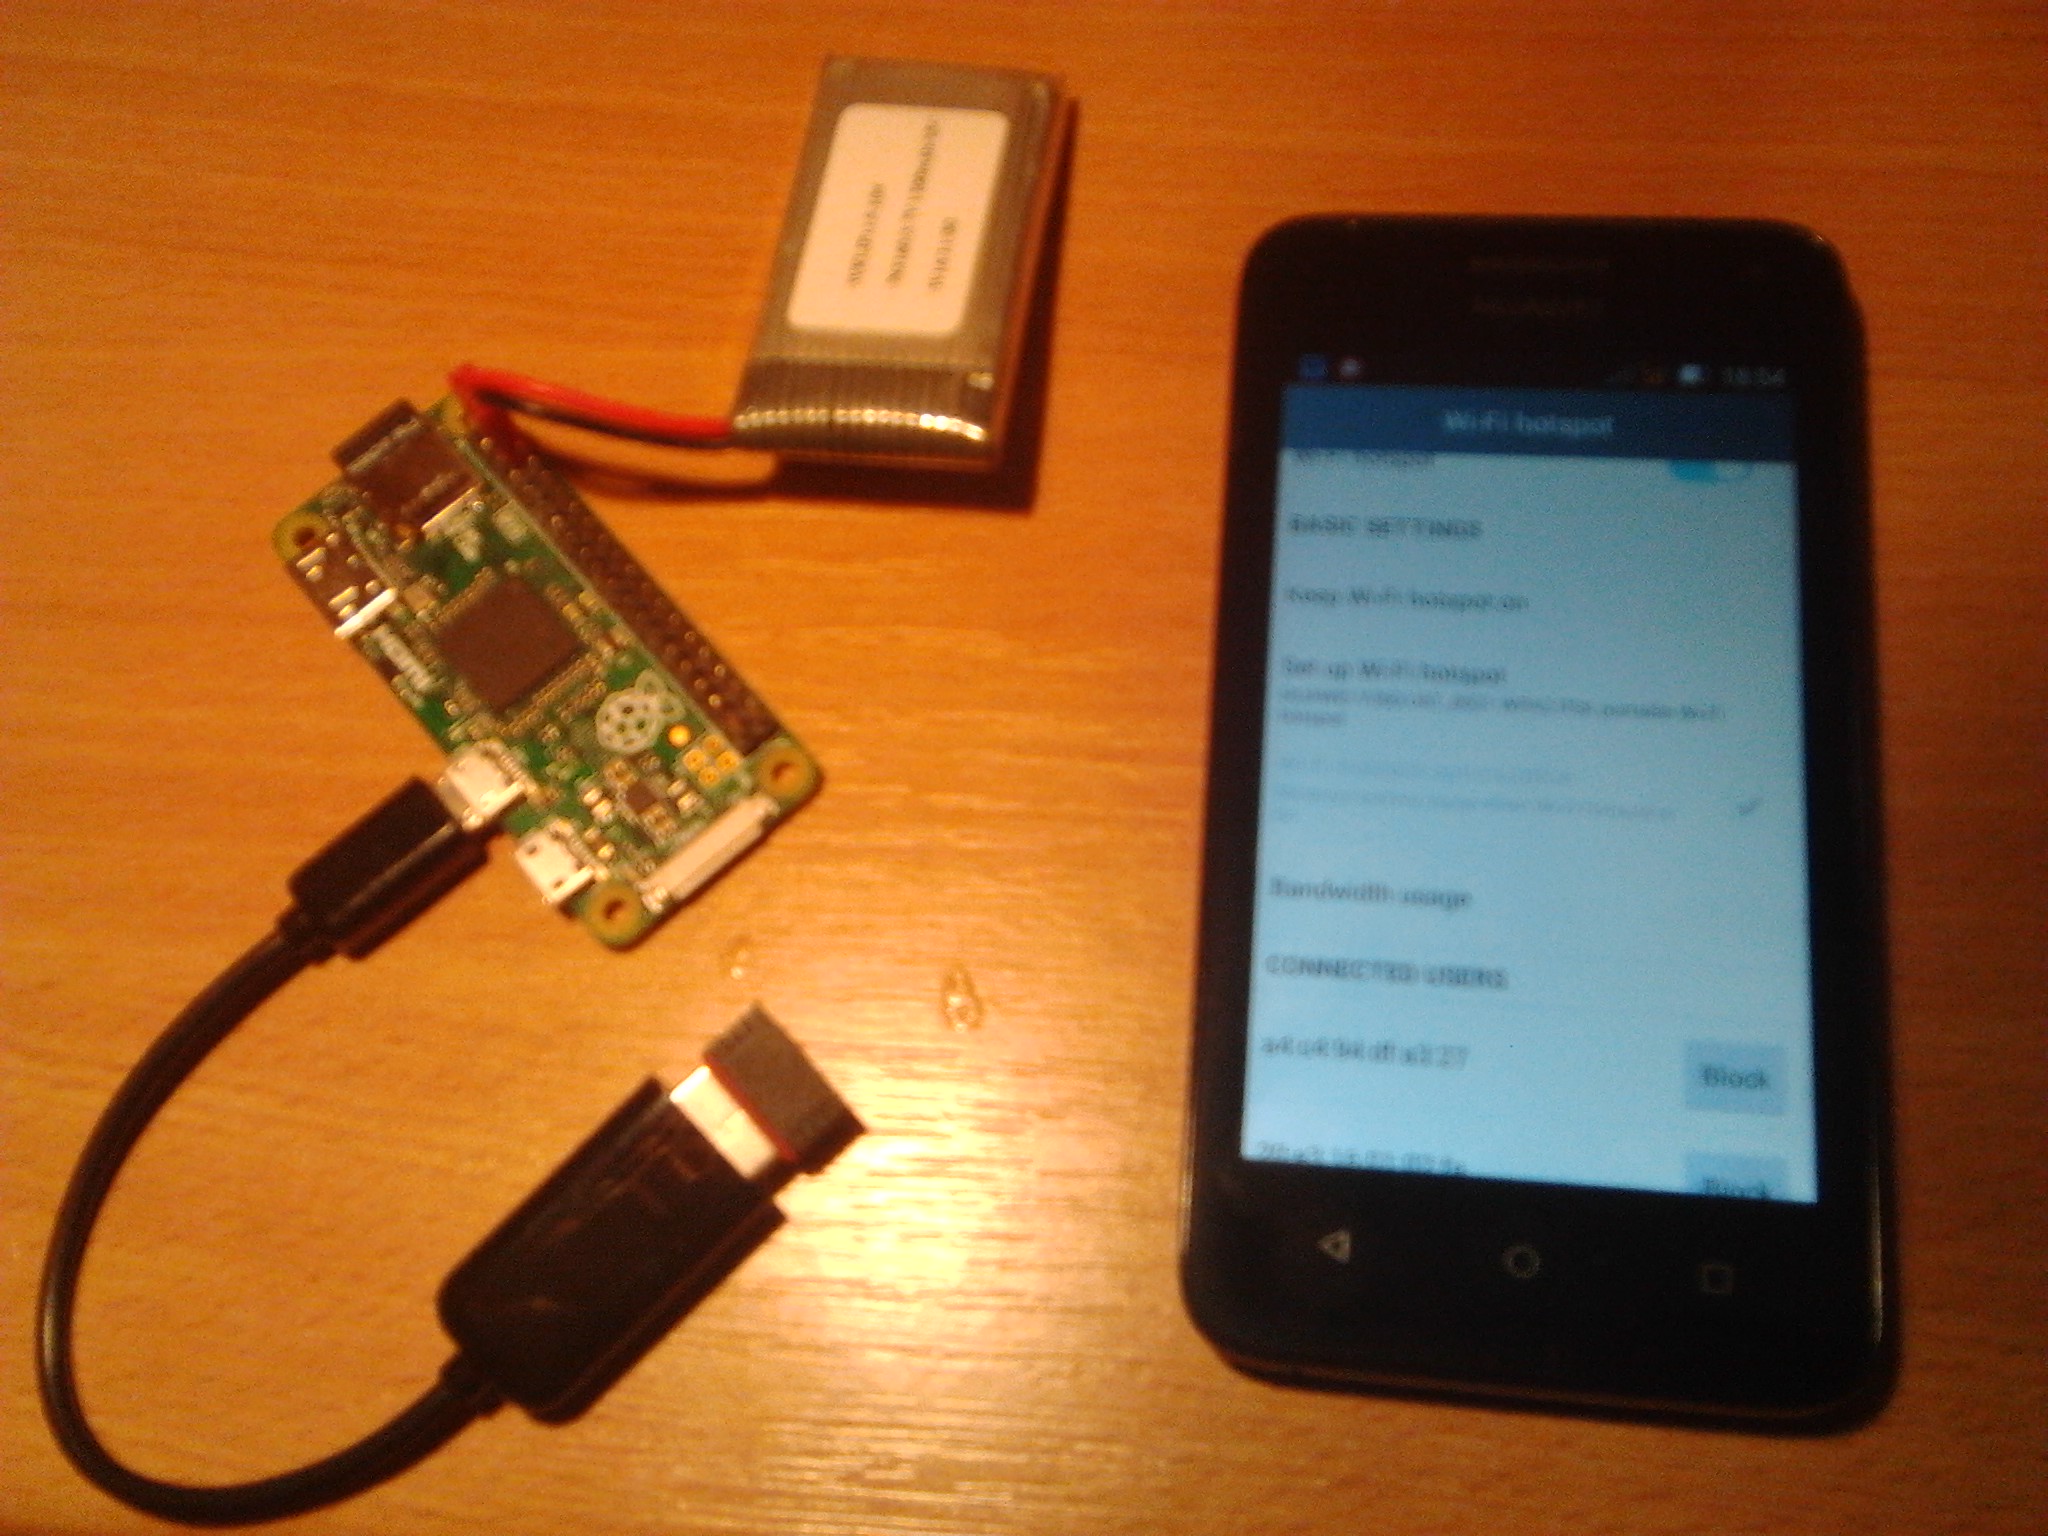
I use JuiceSSH on Android to ssh into the Pi Zero: 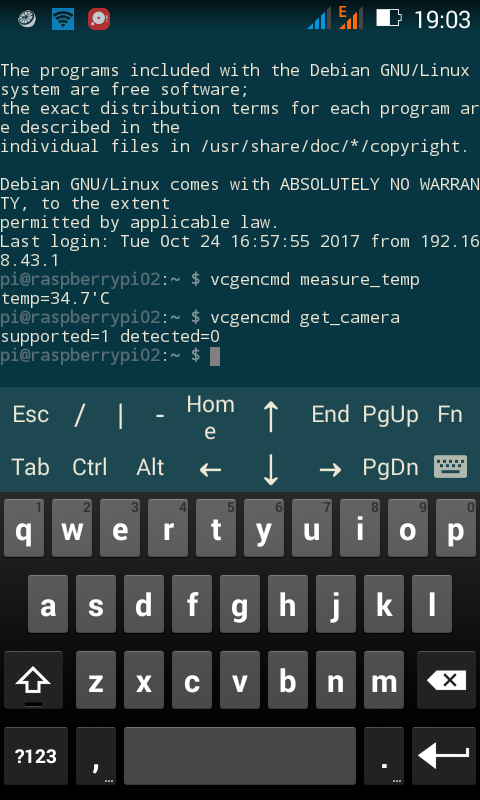
Re: Raspberry Pi Zero bluetooth connection to android phone.
Thank you for the replies. I am sorry that it took so long for me to reply. I will give it a go. I use an 2000mAh battery when I am out and about. I am experimenting with video capture to a 64GB card. It will be nice to be able to access the pi zero w from my phone.
Источник
Подключение Raspberry Pi к телефону по Bluetooth. Часть 1
В этой статье мы рассмотрим как установить связь между смартфоном и Raspberry Pi по Bluetooth, и в каких полезных целях можно данное соединение использовать.
1. Телефон с поддержкой Bluetooth (я тестировал на Android смартфоне Huawei)
2. USB-Bluetooth модуль для Raspberry Pi (покупал такой http://smarteletronika.com/viewproduct/76/
3. Дополнительное программное обеспечение
Загружаем Raspberry Pi и подключаем Bluetooth USB модуль. В Raspbian модуль работает «из коробки» и никаких дополнительных драйверов устанавливать не надо.
Устанавливаем необходимое ПО
Получаем список доступных Bluetooth устройств, к которым может подключиться Raspberry Pi (не забудьте сделать смартфон видимым для других BT устройств в настройках):
В ответ на эту команду появится список доступных для сопряжения устройств. Ищем в списке наше и берём его адрес (у меня 18:34:51:55:B0:D8)
Устанавливаем соединение между Raspberry Pi и смартфоном (Перед установкой соединения нужно отредактировать скрипт /usr/bin/bluez-simple-agent следующим образом — открываем скрипт в текстовом редакторе и меняем строчку capability = «KeyboardDisplay» на capability = «DisplayYesNo»):
В ответ в консоли Raspberry Pi должен появится запрос подтверждения, одновременно на экране смартфона появляется запрос на разрешение сопряжения:
Отвечаем «yes» и нажимаем кнопку «Сопряжение» в окне запроса на смартфоне.
Если всё прошло успещно, то скрипт bluez-simple-agent должен вывести надпись
Всё — теперь соединение успешно установлено.
В следующих частях этой статьи мы рассмотрим как проигрывать музыку со смартфона на Raspberry Pi, а также осуществлять звонки и слать sms-сообщения
Источник
Raspberry pi android bluetooth
Using Bluetooth With The Raspberry Pi
The following instructions show how to setup and use a USB Bluetooth adapter with the Raspberry Pi. Please note that these instructions only apply to the latest Raspbian Jessie distribution. If you are using a different distribution or an older Raspbian build such as Wheezy some of the instructions will need to be changed as the Bluetooth stack and utilities have changed with the Jessie release and BlueZ 5.23.
A lot of the instructions I found online were relating to the older wheezy builds and it took some extra time to find the correct way to do things with Jessie. There were also a few configuration changes that needed to be made in order to work around some known issues/bugs relating to the RFCOMM (serial over Bluetooth) communication on the Pi. I have documented all this and hopefully I can save you some time if you are trying to do a similar things.
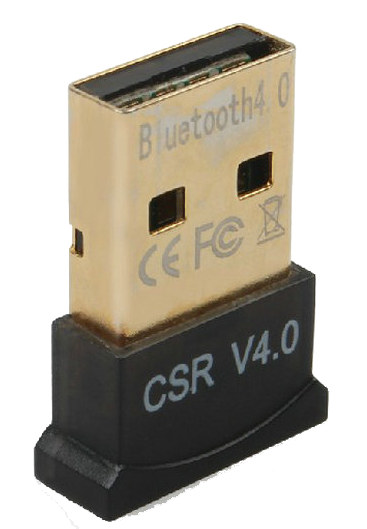
I am using a USB Bluetooth 4.0 adapter with a Broadcom BCM20702 chipset but there are many other supported Bluetooth adapters including those with CSR (Cambridge Silicon Radio) chipsets. I tested on a Raspberry Pi 2 but all this should work with any version of the Raspberry Pi as long as you are running the latest Raspbian Jessie distribution.
First make sure your Pi is up to date:
Insert your USB Bluetooth adapter into one of the USB ports on the Pi and enter:
You should see output similar to the following:
If you used an adapter with a different chipset like CSR you might see ‘Cambridge Silicon Radio’ insead of ‘Broadcom Corp’. If you do not see something similar to this it might mean that there is something wrong with your adapter or it is not recognized/supported.
Next install the bluez and bluetooth manager packages:
Now you can check you your adapter state:
You should see output similar to the following:
The [XX:XX:XX:XX:XX:XX] part is the MAC address of your Bluetooth adapter If you do not see «UP RUNNING» enter the following to turn on Bluetooth:
Part 2. Paring and Connecting Devices
Start the command line Bluetooth manager
You should see a line similar to:
‘raspberrypi’ is the default name you will see when pairing/connecting to the Pi from other devices
Источник
Raspberry Pi Bluetooth Data Transfer to the Smartphone

In addition to some wireless connections such as 433Mhz, infrared and NFC, Bluetooth is probably the most common and popular mode of data transmission between smartphones, which is why the Raspberry Pi Bluetooth data transfer is interesting. Meanwhile, pretty much all devices support Bluetooth and can not only be paired with it but of course, you can also transfer data, which is interesting for projects such as a Car PC.
This tutorial will show you how to exchange files between Raspberry Pi and a Bluetooth-enabled mobile phone/smartphone.
Required Hardware Parts
In this tutorial, I used the following hardware parts:
- Raspberry Pi Model (Raspbian OS)
- if neccessary: USB Bluetooth Adapter
- Bluetooth enabled mobile phone (Android, iOS, etc.)
The Bluetooth adapter can have a significant impact on the range. Cheap devices often do not recognize the connection after a few meters or obstacles, whereas higher-quality dongles also work up to a distance of 30 meters (outdoors).
Setting up the Software
First, some packages have to be installed:
After the USB Bluetooth dongle is connected, we check if it has been recognized correctly:
If a device has been detected, it will look like this:

Now we check if the Bluetooth service has already been started (it is automatically loaded every time you restart).
For the device to be connected, it (smart phone) must be searched for. It starts a scan, which should find all devices in the immediate vicinity.
The mobile phone should be found directly. If not, wait a few seconds as the last result is cached. If it’s detected, it will look like this:
This address of the device is important and will continuously be needed. In the following step, it must be changed according to your device address.
In order to connect the Pi and your mobile phone, this address must be specified (adjust it!):
Then you will be asked for a code which you also have to enter on the mobile phone (for example 1234).
After that, the devices should be connected.
Send Files with the Raspberry Pi Bluetooth Module
Files can be sent on different channels. To find out which OBEX channel your smartphone uses, you can use the following command:
Now you have to see which channel is under “OBEX Object Push”. For me, that is Channel 12.
To transfer a file (here
/TEST.txt ) you have to specify the following command (do not forget to change it):
Subsequently, a request will pop up on the smartphone, which must be confirmed.
A number of other examples of obexftp can be found here.
Receive Files using Raspberry Pi Bluetooth
To receive files, we start an FTP server on the Raspberry Pi, which is waiting for files. With screen, the server can also be run in the background.
Now you can select the file to be sent on the smartphone and send it to the connected Pi. Of course, depending on the size, it can take a bit. The file is created in the directory from which the server was started.
Finally, it should be said that the connected devices remain stored and no reconnecting is necessary, as long as both devices (Raspberry Pi Bluetooth Module and a terminal device such as a smartphone) are within reach of each other.
Related Posts
Top 12 Advanced Robot Kits For Adults – Full Overview
Raspberry Pi: Printer Setup and Printing Images by pressing a Button
Top 21 OS for the Raspberry Pi for your Project – Overview
Raspberry Pi: Set Up USB Boot Using a Stick or SSD Hard Drive
6 Comments
Hello:
This is what I got:
$ sudo apt-get install bluez-utils libopenobex1 obexftp obexpushd –yes
Reading package lists… Done
Building dependency tree
Reading state information… Done
Package bluez-utils is not available, but is referred to by another package.
This may mean that the package is missing, has been obsoleted, or
is only available from another source
However the following packages replace it:
bluez
Package libopenobex1 is not available, but is referred to by another package.
This may mean that the package is missing, has been obsoleted, or
is only available from another source
E: Package ‘bluez-utils’ has no installation candidate
E: Package ‘libopenobex1’ has no installation candidate
My data:
Static hostname: raspberrypi
Icon name: computer
Machine ID:
Boot ID:
Operating System: Raspbian GNU/Linux 10 (buster)
Kernel: Linux 4.19.75-v7+
Architecture: arm
Try
sudo apt-get update
then
sudo apt-get upgrade
Try
sudo apt-get update
then
sudo apt-get upgrade
NO effect, same problem as Timon Yoder
Transfer from LT to RPi, where does it save?
In this example, it will be in whatever folder you were running the command from. Other examples on the web tell you to create a folder, and then specify the file transfer location using the -o option. Here’s what I was using on my old setup. sudo obexpushd -B -o /home/pi/Documents/file_transfer -n
How can I transfer data , movie, songs etc from my Android phone to raspberry Pi 4
Источник
Raspberry pi android bluetooth


An Android app that communicates with headless Raspberry Pi mobile server running treehouses image via Bluetooth.
- Get detailed software and hardware information of a Raspberry Pi.
- Configure a Raspberry Pi through user-friendly interface.
![]()
![]()
Check our issues to see what features we are working on.
Setting Up the Raspberry Pi
Within this section we will cover the required hardware and software you will need to contribute to the System’s Engineering team, then explore the first steps you should take as a Virtual Intern.
We will need a few hardware and software components as follows:
officially supported Raspberry Pi versions:
- 5V 2.4A with microUSB connector for 3b/3+ and 3a+
- 5V 1.2A with microUSB connector for Zero W
- 5V 3A with usb-c connector for 4b
A microSD card reader (check to see if your computer has an SD slot)
Three or more Class 10 microSD card (minimal 8GB, but we strongly recommend 32GB or greater)
Software for burning OS image to microSD card. We recommend Etcher, but there are many from which to choose
The latest version of Treehouse image
Wi-Fi or a ethernet connection
Get It Up and Running
After getting your microSD cards and card reader/adapter, our first step will be to burn an image of the treehouse onto the a microSD card which we will later insert into our Rasperry Pi.
Prepping the microSD card
Download the newest treehouse image that is available here
Download and install Etcher or another software.
Insert a microSD card into the card reader and connect this to your computer
Burn the treehouses image onto the microSD card, this is done by:
- Opening Etcher
- Clicking «Select Image» -This is the downloaded image
- Selecting the «Target» — This is your microSD card
- Clicking «Flash!»
The process will take approximately 10 min to complete.
Once it’s done burning, if you chose you can view the contents in the boot partition. You will see a long list of files.
Unmount and safely eject the microSD card from your computer.
Starting up the Raspberry Pi
Place the microSD card into the RPi.
Connect the RPi to power, if there in an «on» switch or button ensure the Rpi has power.
If you possess an android phone, find the Treehouses Remote app on Google Play or on F-Droid.
Wait for a minute or two and look for treehouses in your Android device’s Bluetooth pairing screen.
Setting Up the Android Device
We assume you’ve already installed Android Studio on your machine and enabled USB debugging on your Android device.
Connect to Raspsberry Pi via Bluetooth
In the android bluetooth settings, scan and pair with the Pi device (look for treehouses )
Open the treehouses remote app
Click on «Connect to RPI»
Select your Raspberry Pi ( treehouses- ) i.e. treehouses-8930
Once you have connected to your Raspberry Pi, tap the menu button on the top left of your screen to view a whole host of options to interact with your Raspberry Pi
Go to Terminal in the treehouses app
In the Terminal window type treehouses detectrpi and send it
Now type treehouses default network
Reboot the system by entering the command reboot and go back to the home screen to re-connect to your Pi
Back in the terminal, type treehouses bridge «wifiname» treehouses «wifipassword» , and replace wifiname with the name of your wifi network, and wifipassword with the password
Reboot once again
- The connection status is shown on the action bar.
- In cmd
- Use the Wi-Fi icon on the action bar to comfigure the Raspberry Pi to connect to a Wi-Fi network.
- Use buttons on the lower part of the screen to perform various commands.
- The circle on the upper left corner shows the Raspberry Pi’s internet connectivity status using color green and red.
- To return to dashboard, click on the back button at the bottom of the device.
Scrcpy allows screen sharing over USB or Internet for Android to PC. This runs on Windows/Mac/Linux and has no advertisements. No root access is required.
Checkout our tutorial for Android Screen Sharing using Scrcpy.
About
⚡ control Raspberry Pi from Android Device through Bluetooth ⚡
Источник


