- Ultimate guide to use custom fonts in react native
- 1. First step (Set Font Naming For Cross Platform)
- You need to check the file name before using it . Android will use the font name but in IOS it will use the “PostScript name”. It is tricky part let me explain to you.
- Manually Add / Remove Fonts
- Mehran Khan
- React Native Custom Fonts Android | IOS (2020)
- React Native Custom Fonts
- Cross Platform Custom Font Naming
- Add Fonts to Assets
- Package.json
- Adding Fonts to Android
- React Native Styles
- Custom Fonts in React Native for Android and iOS
- React Native Custom Fonts
- How to use custom fonts in React Native
- Where Can I Found the Custom Fonts?
- Project Overview
- To Make a React Native App
- Download Fonts
- Importing Custom Font Files in Android
- Importing Custom Font Files in iOS
- Code to Use Custom Fonts in React Native
- App.js
- To Run the React Native App
- Output Screenshots
- Leave a Comment Cancel reply
Ultimate guide to use custom fonts in react native

Jan 12, 2019 · 4 min read

Adding custom fonts in react native project is very simple task with react-native link command but can be tricky if you are a new in react native .
I have decided to write article on all the possible issues which can occur while implementing custom fonts and give you detail information about how it will work.
Following are steps to link fonts(Using React Native Link Command):
1. First step (Set Font Naming For Cross Platform)
First step is to select a font family you want to use in your react native app. I have decided to use “SF UI Display” for my sample test project.
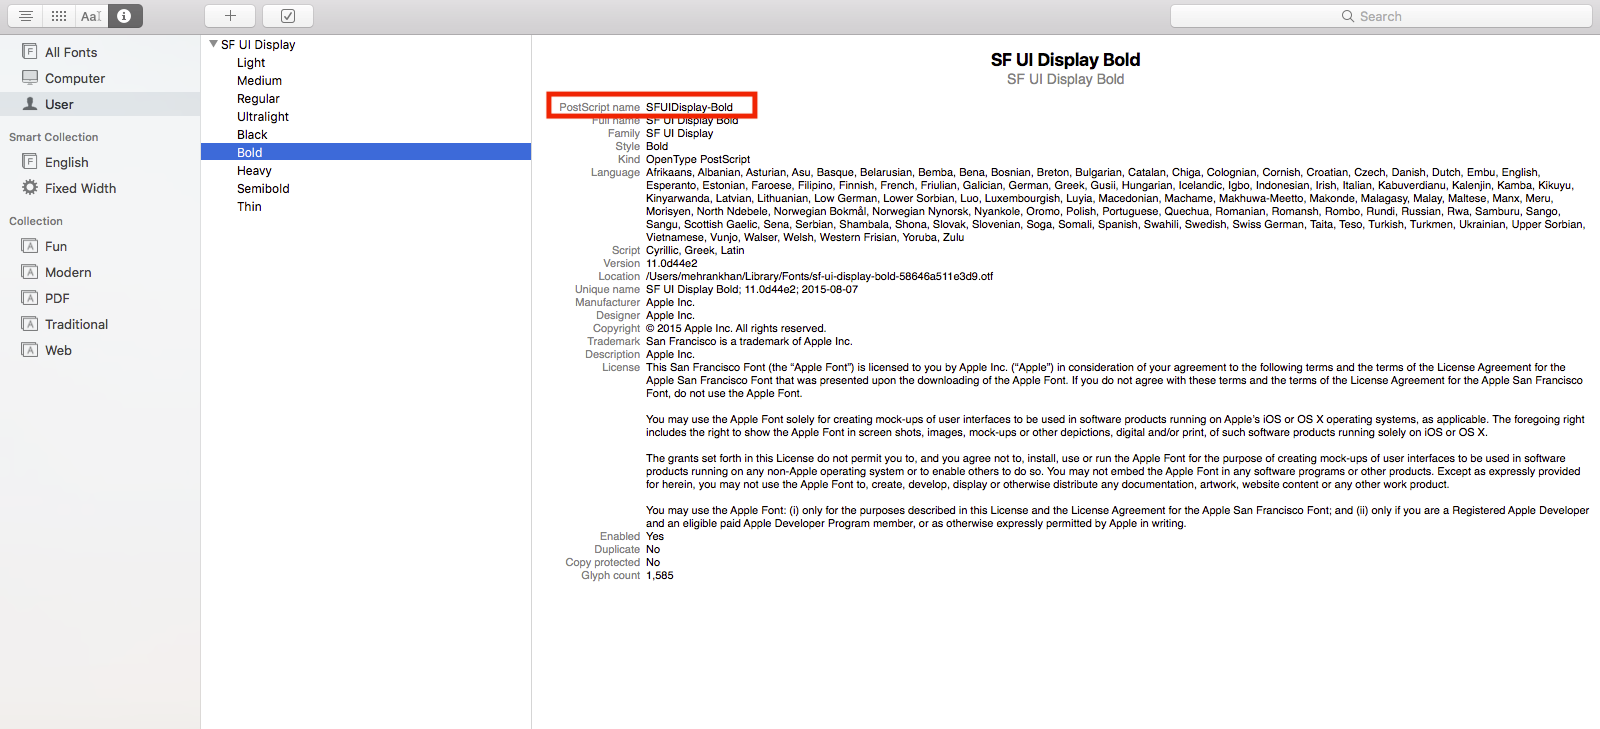
You need to check the file name before using it . Android will use the font name but in IOS it will use the “PostScript name”. It is tricky part let me explain to you.

Supp o se i have above font files and i am using “SFUIDisplayBold” in my react native code it will work in ANDROID but not in IOS because the “postscript name” is “SFUIDisplay-Bold” . So for IOS you have to use “SFUIDisplay-Bold” despite of the fact that you have added font file with name “SFUIDisplayBold.otf”
You can check the “postscript name” of a font file in Font book
After renaming following are list of my font files .
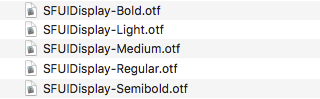
Note : Although you can add logic in your code to use “SFUIDisplayBold” for Android and “SFUIDisplay-Bold” for IOS but it is better to rename the font .
Step 2 : Add Fonts to Assets
Next add all the font files you want to us in “assets/fonts” directory (It can vary)

Step 3 : Define assets directory
Create File “react-native.config.js” and add following code

if React Native Version
Path can vary. if you have “src” folder and you want to put assets in “src” folder then path will be “.src/assets/fonts/”
Step 4 : Link assets using react native link
Run in terminal
link command will links fonts in Info.plst for IOS and creates fonts directory (android/app/src/main/assets/fonts) for Android, where copies your fonts
Step 5 : Use font in React Native Styles
Finally you can use font in styles by adding “fontFamily”
Side By Side Comparison After adding “fontFamily” in style

Manually Add / Remove Fonts
After running react-native link you should see something like this in your terminal

This command will done all the hard work for you. Create “Resources” folder in xcode project ,copy files in “Resources” folder , add fonts in “info.plist” in , creates fonts directory (android/app/src/main/assets/fonts) for Android
There is no command for Unlink(Remove) assets you have to do it manually . So if you want to Unlink(Remove) fonts or manually add fonts without react native link command following are steps
Step 1 : Add/Remove fonts to android project in following directory

Step 2 : Add/Remove fonts to “Resources” folder in xcode project

Note : Just Drag the fonts in xcode “Resources” folder and check “Copy items if needed” . Add to target should be your project .For Detail see link

if files are copied correctly you can see the files in “Copy bundle resources” in “Build phases” tab

In case of remove please remove it from bundle resources
Step 3 : Add/Remove fonts in info.plist files in xcode project with key “Fonts provided by application”

You can see my demo project code on Github . I have tried by best to give you detail information about how to use custom fonts . Thanks for reading my article . Please clap if you liked it!
Mehran Khan
Senior Mobile Application Developer at Cubix Inc with more than 6 years of experience in React Native/Android/iOS
Источник
React Native Custom Fonts Android | IOS (2020)

Jun 5, 2020 · 2 min read
In this tutorial, I will tell you how to implement custom fonts in React-Native both in Android and IOS.
Step 1: Create an assets folder in the root directory of your project. Then create a fonts folder inside it. Finally, copy your fonts file inside the fonts folder.

Step 2: react-native.config.js
Create a file in the root folder of your project called react-native.config.js , and add the following:

Then, run the following command in your terminal:
Done, you can check the b e low location. If you can see your fonts at this location it means it is done both in Android and IOS.

In IOS: Info.plist file

Before using your fonts run npx react-native run-android for android and for IOS run pod install and then npx react-native run-ios. Then, in your code you can use:
That’s all folks. If you want to learn react-native in 2020 follow us.
Источник
React Native Custom Fonts

TLDR => Quick tutorial on setting up custom fonts with React Native across iOS and Android.
Cross Platform Custom Font Naming
To avoid conditional logic in your React Native styles it’s a good plan to rename a font if necessary to ensure it is read the same on both iOS and Android.
For example, I’m using a font file named “vinchand.ttf”. Yet when I open it up in FontBook.app I can see that the fonts full name is “vincHand” with a capital H.

To ensure things run smoothly I’m going to rename the font to be “vincHand.ttf” as Android will read from the filename whilst iOS will read from the full name property.
Add Fonts to Assets
Next add all the font files you want to an “assets/fonts” folder in the root of your react native project:

Package.json
Next we need to tell React Native where our custom fonts are located. We do this by adding rnpm to package.json providing the path to the font files:
Then we tell react native to link those font files for us:
This should add the font references in your Info.plist file for iOS and on Android copy the font files to android/app/src/main/assets/fonts. You can verify this by opening up Info.plist from the iOS folder and looking for a UIAppFonts key, you should see something similar to:
Adding Fonts to Android
On Android if you look in the file path “android/app/src/main/assets/fonts/” you should see your fonts have been copied over:

React Native Styles
With your fonts embedded and referenced it’s a simple case of adding them to your React Native styles. Simply add a fontFamily property with your font name:
Источник
Custom Fonts in React Native for Android and iOS
React Native Custom Fonts
This is an example to use Custom Fonts in React Native for Android and iOS. We will see how to use a custom font in React Native? Where can we find custom fonts? Steps to download custom fonts, and import in Android and iOS, and at last the code sample which will give you a perfect idea about the use of the custom font in React Native.
In the current scenario fonts and Icons have the same importance in the app. If you are planning for the app with beautiful Icons then you also need beautiful fonts to make it perfect. I personally observed many applications using custom fonts nowadays. If you also want to use the custom font in your React Native app then you can continue with this example.
Using custom fonts in React native is very easy. You do not need any external library for it, just add the fonts in your Android and iOS projects and you are good to go.
How to use custom fonts in React Native
As I said, to use the custom fonts in React Native you need to add fonts in Android and iOS projects (To add the custom fonts steps are mentioned below) and after adding the custom font in the project you can directly set the font using fontFamily prop in Style .
Remember you need to import the font before using it in fontFamily
Where Can I Found the Custom Fonts?
For those who have the same question in their mind, You can get lots of different fonts from Google Font’s Official Site. Just visit the site and choose the font you like.
Project Overview
In this example, We will have two text components and we will apply the different custom fonts on it so that we can understand how it works. The main thing in this example is to download the font and import them in the Android and iOS projects which are explained below. So let’s get started with the steps to apply custom font in React Native.
To Make a React Native App
Getting started with React Native will help you to know more about the way you can make a React Native project. We are going to use react-native init to make our React Native App. Assuming that you have node installed, you can use npm to install the react-native-cli command line utility. Open the terminal and go to the workspace and run
Run the following commands to create a new React Native project
If you want to start a new project with a specific React Native version, you can use the —version argument:
This will make a project structure with an index file named App.js in your project directory.
Download Fonts
First of all download the font that you want to use in React Native. There are many custom fonts on the Google Fonts site but for this example, I am using
It is a very designer font and you will be able to find the difference in the fonts easily after the completion of the example.
Click the link to go to the download site and follow the steps
1. After opening the URL you will see some sample text with the custom font applied. Click on the Select this syle

2. After clicking on the Select this Style. You can click on Download Family

3. This will download zip with fonts in it. In simple language, fonts are some ttf file which you can find in static directory after unzipping the downloaded zip

Importing Custom Font Files in Android
To use Custom Fonts in Android, you need to create asset/fonts directory in projectname/android/app/src/main and have to copy all the font files in it
projectname/android/app/src/main/assets/fonts

Importing Custom Font Files in iOS
Please follow the below steps to use Custom Fonts icons in iOS
1. Create a fonts directory in the iOS project and copy all the font files there

2. Now open the project YourProject -> ios -> YourProject.xcworkspace in Xcode.
3. After opening the project in Xcode click on the project from the left sidebar to open the options and select Add Files to “YourProjectName”

4. Select the fonts directory which you have created. Remember to select Create Folder references from below and click Add

5. Now click the project name on the left top, and select the project name on TARGETS. Click the Info tab on the top menu to see Info.plist and add Fonts provided by application and font files to Info.plist.

If you were an iOS developer or have knowledge about info.plist then you can add following lines directly into info.plist but if you performed the above action then you don’t worry about this as this has been already added by XCode.
6. After completion, it will look like this

Code to Use Custom Fonts in React Native
If you have done all the above-expected steps then you can move to the code and can use the custom fonts.
Jump into your project
App.js
Open App.js in any code editor and replace the code with the following code
To Run the React Native App
Open the terminal again and jump into your project using.
To run the project on an Android Virtual Device or on real debugging device
or on the iOS Simulator by running (macOS only)
Output Screenshots


This is how you can use custom fonts in React Native for Android and iOS both. If you have any doubts or you want to share something about the topic you can comment below or contact us here. There will be more posts coming soon. Stay tuned!
I hope you liked it. 🙂
Leave a Comment Cancel reply
This site uses Akismet to reduce spam. Learn how your comment data is processed.
Источник


