- Debugging
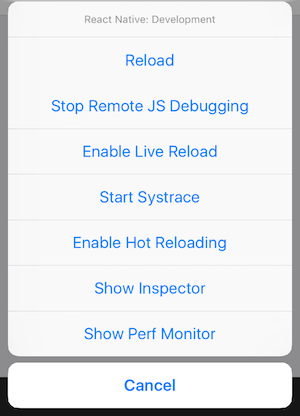
- Accessing the In-App Developer Menu
- Enabling Fast Refresh
- Enabling Keyboard Shortcuts
- LogBox
- Console Errors and Warnings
- Unhandled Errors
- Syntax Errors
- Chrome Developer Tools
- Debugging using a custom JavaScript debugger
- Safari Developer Tools
- React Developer Tools
- React native android logs
- About
- React native android logs
- Announcing React Native 0.63 with LogBox
- LogBox
- Pressable
- Native Colors (PlatformColor, DynamicColorIOS)
- Dropping iOS 9 and Node.js 8 support
- Other notable improvements
- Thanks
Debugging
Accessing the In-App Developer Menu
You can access the developer menu by shaking your device or by selecting «Shake Gesture» inside the Hardware menu in the iOS Simulator. You can also use the ⌘D keyboard shortcut when your app is running in the iOS Simulator, or ⌘M when running in an Android emulator on Mac OS and Ctrl+M on Windows and Linux. Alternatively for Android, you can run the command adb shell input keyevent 82 to open the dev menu (82 being the Menu key code).
The Developer Menu is disabled in release (production) builds.
Enabling Fast Refresh
Fast Refresh is a React Native feature that allows you to get near-instant feedback for changes in your React components. While debugging, it can help to have Fast Refresh enabled. Fast Refresh is enabled by default, and you can toggle «Enable Fast Refresh» in the React Native developer menu. When enabled, most of your edits should be visible within a second or two.
Enabling Keyboard Shortcuts
React Native supports a few keyboard shortcuts in the iOS Simulator. They are described below. To enable them, open the Hardware menu, select Keyboard, and make sure that «Connect Hardware Keyboard» is checked.
LogBox
Errors and warnings in development builds are displayed in LogBox inside your app.
LogBox is automatically disabled in release (production) builds.
Console Errors and Warnings
Console errors and warnings are displayed as on-screen notifications with a red or yellow badge, and the number of errors or warning in the console respectively. To view a console error or warnings, tap the notification to view the full screen information about the log and to paginate through all of the logs in the console.
These notifications can be hidden using LogBox.ignoreAllLogs() . This is useful when giving product demos, for example. Additionally, notifications can be hidden on a per-log basis via LogBox.ignoreLogs() . This is useful when there’s a noisy warning that cannot be fixed, like those in a third-party dependency.
Ignore logs as a last resort and create a task to fix any logs that are ignored.
Unhandled Errors
Unhandled JavaScript errors such as undefined is not a function will automatically open a full screen LogBox error with the source of the error. These errors are dismissable and minimizable so that you can see the state of your app when these errors occur, but should always be addressed.
Syntax Errors
When syntax error occurs the full screen LogBox error will automatically open with the stack trace and location of the syntax error. This error is not dismissable because it represents invalid JavaScript execution that must be fixed before continuing with your app. To dismiss these errors, fix the syntax error and either save to automatically dismiss (with Fast Refresh enabled) or cmd+r to reload (with Fast Refresh disabled).
Chrome Developer Tools
To debug the JavaScript code in Chrome, select «Debug JS Remotely» from the Developer Menu. This will open a new tab at http://localhost:8081/debugger-ui.
Select Tools → Developer Tools from the Chrome Menu to open the Developer Tools. You may also access the DevTools using keyboard shortcuts ( ⌘⌥I on macOS, Ctrl Shift I on Windows). You may also want to enable Pause On Caught Exceptions for a better debugging experience.
Note: on Android, if the times between the debugger and device have drifted; things such as animation, event behavior, etc., might not work properly or the results may not be accurate. Please correct this by running adb shell «date `date +%m%d%H%M%Y.%S%3N`» on your debugger machine. Root access is required for the use in real device.
Note: the React Developer Tools Chrome extension does not work with React Native, but you can use its standalone version instead. Read this section to learn how.
Debugging using a custom JavaScript debugger
To use a custom JavaScript debugger in place of Chrome Developer Tools, set the REACT_DEBUGGER environment variable to a command that will start your custom debugger. You can then select «Debug JS Remotely» from the Developer Menu to start debugging.
The debugger will receive a list of all project roots, separated by a space. For example, if you set REACT_DEBUGGER=»node /path/to/launchDebugger.js —port 2345 —type ReactNative» , then the command node /path/to/launchDebugger.js —port 2345 —type ReactNative /path/to/reactNative/app will be used to start your debugger.
Custom debugger commands executed this way should be short-lived processes, and they shouldn’t produce more than 200 kilobytes of output.
Safari Developer Tools
You can use Safari to debug the iOS version of your app without having to enable «Debug JS Remotely».
- Enable Develop menu in Safari: Preferences → Advanced → Select «Show Develop menu in menu bar»
- Select your app’s JSContext: Develop → Simulator → JSContext
- Safari’s Web Inspector should open which has a Console and a Debugger
While sourcemaps may not be enabled by default, you can follow this guide or video to enable them and set break points at the right places in the source code.
However, every time the app is reloaded (using live reload, or by manually reloading), a new JSContext is created. Choosing «Automatically Show Web Inspectors for JSContexts» saves you from having to select the latest JSContext manually.
React Developer Tools
You can use the standalone version of React Developer Tools to debug the React component hierarchy. To use it, install the react-devtools package globally:
Note: Version 4 of react-devtools requires react-native version 0.62 or higher to work properly.
Источник
React native android logs


Easy and useful log methods for Android apps in debug or release mode, with minimal impact.
Works with RN 0.50+, Gradle plugin 3.1.x and Gradle 4.4 or later.
Default build is for minSdkVersion 21 and targetSdkVersion 27, but you can configure this.
NOTE:
In iOS, the default level is SUPPRESS , which disables the output. If you change it, console.log will be used.
Install the module from npm and link it:
Replace ‘compile’ with ‘implementation’ in your android/app/build.gradle. It must looks like:
For VS Code users
Optional: You can add the tag used by Log to the logCatArguments properties in .vscode/launch.json
This example will include React Native warnings and errors, and all the messages from App in the «OUTPUT» panel:
SDK version Settings
Optional: In your android/build.gradle file, set the SDK versions that your app is using.
Example with the predefined values:
Log messages in your JavaScript files:
. and see the output in the console through adb :
or in the OUPUT panel of VS Code, if you are using the React Native Tools extension.
Numeric levels, from most to least verbosity:
| Constant | Description |
|---|---|
| VERBOSE | Used by Log.v , outputs nothing unless you use Log.setLevel(Log.VERBOSE) |
| DEBUG | Priority constant for Log.d |
| INFO | Priority constant for Log.i |
| WARN | Priority constant for Log.w |
| ERROR | Priority constant for Log.e |
| SUPPRESS | This is a special constant used to disable logging |
Sets the tag to use by the logging methods without a tag parameter.
The predefined tag is «App».
setLevel(tag: string | null, level: number)
Allows you to change the logging level for a specific tag or, if you pass a null tag, the default level for all the tags.
The predefined level is DEBUG for debug builds and ERROR for release builds.
getLevel(tag?: string | null)
Return the level for a specific tag.
If tag is null , not specified, or does not have a specific level, this method return the default level for all the tags.
print(level: string, tag: string, msg: string)
print(level: string, msg: string)
Base method for all the one-letter logging methods.
The above methods are one-letter shortcuts to the print method with the corresponding priority level and can be invoked with or without the tag parameter:
method(tag: string, msg: string)
If you omit the tag , the one specified with setTag will be used, or the predefined tag «App».
MIT © 2018 Alberto Martínez
About
Easy and useful log methods for Android apps in debug or release mode, with minimal impact.
Источник
React native android logs

Easy and useful log methods for Android apps in debug or release mode, with minimal impact.
Works with RN 0.50+, Gradle plugin 3.1.x and Gradle 4.4 or later.
Default build is for minSdkVersion 21 and targetSdkVersion 27, but you can configure this.
NOTE:
In iOS, the default level is SUPPRESS , which disables the output. If you change it, console.log will be used.
Install the module from npm and link it:
Replace ‘compile’ with ‘implementation’ in your android/app/build.gradle. It must looks like:
For VS Code users
Optional: You can add the tag used by Log to the logCatArguments properties in .vscode/launch.json
This example will include React Native warnings and errors, and all the messages from App in the «OUTPUT» panel:
SDK version Settings
Optional: In your android/build.gradle file, set the SDK versions that your app is using.
Example with the predefined values:
Log messages in your JavaScript files:
. and see the output in the console through adb :
or in the OUPUT panel of VS Code, if you are using the React Native Tools extension.
Numeric levels, from most to least verbosity:
| Constant | Description |
|---|---|
| VERBOSE | Used by Log.v , outputs nothing unless you use Log.setLevel(Log.VERBOSE) |
| DEBUG | Priority constant for Log.d |
| INFO | Priority constant for Log.i |
| WARN | Priority constant for Log.w |
| ERROR | Priority constant for Log.e |
| SUPPRESS | This is a special constant used to disable logging |
Sets the tag to use by the logging methods without a tag parameter.
The predefined tag is «App».
setLevel(tag: string | null, level: number)
Allows you to change the logging level for a specific tag or, if you pass a null tag, the default level for all the tags.
The predefined level is DEBUG for debug builds and ERROR for release builds.
getLevel(tag?: string | null)
Return the level for a specific tag.
If tag is null , not specified, or does not have a specific level, this method return the default level for all the tags.
print(level: string, tag: string, msg: string)
print(level: string, msg: string)
Base method for all the one-letter logging methods.
The above methods are one-letter shortcuts to the print method with the corresponding priority level and can be invoked with or without the tag parameter:
method(tag: string, msg: string)
If you omit the tag , the one specified with setTag will be used, or the predefined tag «App».
Источник
Announcing React Native 0.63 with LogBox
Today we’re releasing React Native 0.63 that ships with LogBox turned on by default.
LogBox
We’ve heard frequent feedback from the community that errors and warnings are difficult to debug in React Native. To address these issues we took a look at the entire error, warning, and log system in React Native and redesigned it from the ground up.
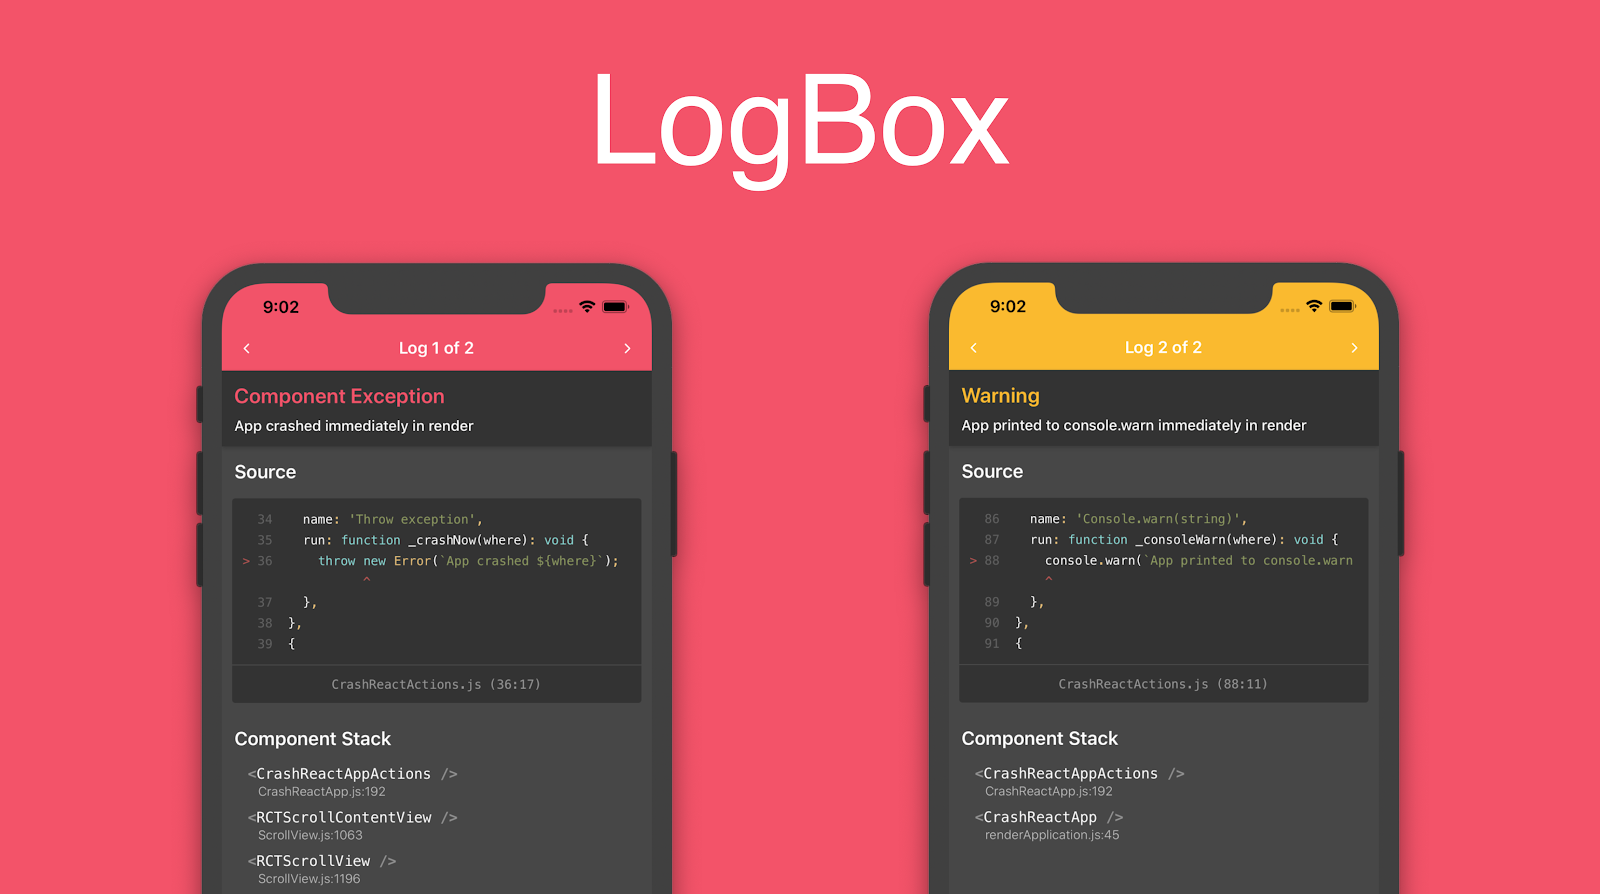
LogBox is a completely redesigned redbox, yellowbox, and logging experience in React Native. In 0.62 we introduced LogBox as an opt-in. In this release, we’re launching LogBox as the default experience in all of React Native.
LogBox addresses complaints that errors and warnings were too verbose, poorly formatted, or unactionable by focusing on three primary goals:
- Concise: Logs should provide the minimum amount of information necessary to debug an issue.
- Formatted: Logs should be formatted so that you can quickly find the information you need.
- Actionable: Logs should be actionable, so you can fix the issue and move on.
To achieve these goals, LogBox includes:
- Log notifications: We’ve redesigned the warning notifications and added support for errors so that all console.warn and console.log messages show up as notifications instead of covering your app.
- Code Frames: Every error and warning now includes a code frame that shows the source code of the log right inside the app, allowing you to quickly identify the source of your issue.
- Component Stacks: All component stacks are now stripped from error messages and put into their own section with the top three frames visible. This gives you a single, consistent space to expect stack frame information that doesn’t clutter the log message.
- Stack Frame Collapsing: By default we now collapse call stack frames not related to your application’s code so you can quickly see the issue in your app and not sift through React Native internals.
- Syntax Error Formatting: We’ve improved the formatting for syntax errors and added codeframes with syntax highlighting so you can see the source of the error, fix it, and continue coding without React Native getting in your way.
We’ve wrapped all of these features into an improved visual design that’s consistent between errors and warnings and allows paginating through all logs in one enjoyable UI.
With this change we’re also deprecating YellowBox in favor of LogBox APIs:
- LogBox.ignoreLogs() : This function replaces YellowBox.ignoreLogs([]) as a way to silence any logs that match the given strings or regexes.
- LogBox.ignoreAllLogs() : This function replaces console.disableYellowBox as a way to turn off error or warning notifications. Note: this only disables notifications, uncaught errors will still open a full screen LogBox.
In 0.63, we will warn when using these deprecated modules or methods. Please update your call sites off of these APIs before they are removed in 0.64.
For more information on LogBox and debugging react native, see the docs here.
Pressable
React Native is built to enable applications to meet user’s expectations of the platform. This includes avoiding “tells”—little things that give away that the experience was built with React Native. One major source of these tells has been the Touchable components: Button , TouchableWithoutFeedback , TouchableHighlight , TouchableOpacity , TouchableNativeFeedback , and TouchableBounce . These components make your application interactive by allowing you to provide visual feedback to user interactions. However, because they include built-in styles and effects that don’t match the platform interaction, users can tell when experiences are written with React Native.
Further, as React Native has grown and our bar for high-quality applications has gone up, these components haven’t grown with it. React Native now supports platforms like Web, Desktop, and TV, but support for additional input modalities has been lacking. React Native needs to support high-quality interaction experiences on all platforms.
To address these problems, we are shipping a new core component called Pressable . This component can be used to detect various types of interactions. The API was designed to provide direct access to the current state of interaction without having to maintain state manually in a parent component. It was also designed to enable platforms to extend it’s capabilities to include hover, blur, focus, and more. We expect that most people will build and share components utilizing Pressable under the hood instead of relying on the default experience of something like TouchableOpacity .
A simple example of a Pressable component in action
You can learn more about it from the documentation.
Native Colors (PlatformColor, DynamicColorIOS)
Every native platform has the concept of system-defined colors. Colors that automatically respond to system theme settings such as Light or Dark mode, accessibility settings such as a High Contrast mode, and even its context within the app such as the traits of a containing view or window.
While it is possible to detect some of these settings via the Appearance API and/or AccessibilityInfo and set your styles accordingly, such abstractions are not only costly to develop but are approximating the appearance of native colors. These inconsistencies are particularly noticeable when working on a hybrid application, where React Native elements co-exist next to the native ones.
React Native now provides an out-of-the-box solution to use these system colors. PlatformColor() is a new API that can be used like any other color in React Native.
For example, on iOS, the system provides a color called labelColor . That can be used in React Native with PlatformColor like this:
Sets the color of the Text component to labelColor as defined by iOS.
Android, on the other hand, provides colors like colorButtonNormal. You can use this color in React Native with:
Sets the background color of the View component to colorButtonNormal as defined by Android.
You can learn more about PlatformColor from the documentation. You can also check the actual code examples present in the RNTester.
DynamicColorIOS is an iOS only API that lets you define which color to use in light and dark mode. Similar to PlatformColor , this can be used anywhere you can use colors. DynamicColorIOS uses iOS’s colorWithDynamicProvider under the hood.
Changes the text color based on the system theme
You can learn more about DynamicColorIOS from the documentation.
Dropping iOS 9 and Node.js 8 support
After over four years from its release, we are dropping support for iOS 9. This change will allow us to move faster by being able to reduce the number of compatibility checks that need to be placed in the native code to detect whether a given feature was supported on a certain iOS version. With its market share of 1%, it shouldn’t have much negative impact on your customers.
At the same time, we are dropping support for Node 8. Its LTS maintenance cycle expired in December 2019. The current LTS is Node 10 and it is now the version that we are targeting. If you are still using Node 8 for the development of React Native applications, we encourage you to upgrade in order to receive all the latest security fixes and updates.
Other notable improvements
without explicit size: You can now render any inside any
component without setting its width and height explicitly, which wasn’t always possible. On previous releases of React Native, this would result in a RedBox.
Thanks
Thank you to the hundreds of contributors that helped make 0.63 possible!
Special thanks to Rick Hanlon for authoring the section on LogBox and Eli White for authoring the Pressable part of this article.
To see all the updates, take a look at the 0.63 changelog.
Источник


