- React Native on Apple Silicon M1 — The linked library ‘libPods-ProjectName.a’ is missing one or more architectures required by this target: x86_64
- 3 Answers 3
- How to Run and Build React Native on Macbook Pro M1 Apple Silicon
- How to Set up, Build and Run an React Native App on Macbook Pro M1 Chip
- React Native Build Failed on Macbook Pro M1
- Solution to Run and Build React Native on M1 Macbook Pro
- Updating React Native projects for M1 Mac development
- Setup Macbook M1 for Web and React Native development
- iTerm
- Xcode
- Homebrew
- What is Karabiner-Elements?
- ZSH and Oh My Zsh
- VSCode
- Themes
- Extensions
- Global NPM Packages I use
- For React Native Development
- Rosetta 2
- Conclusion
React Native on Apple Silicon M1 — The linked library ‘libPods-ProjectName.a’ is missing one or more architectures required by this target: x86_64
I’m trying to build a React Native project on a MacBook Pro with a M1 architecture, for iOS simulator.
The project built nicely on Intel architecture.
It also build on device and archive well on M1. But not on simulator.
I had this classical error when switching to the M1 chipset.
in /project-folder/ios/Pods/OpenSSL-Universal/ios/lib/libcrypto.a(cryptlib.o), building for iOS Simulator, but linking in object file built for iOS, file ‘/project-folder/ios/Pods/OpenSSL-Universal/ios/lib/libcrypto.a’ for architecture arm64
I added arm64 to excluded architectures.
I also added the following snippet but it also react the same way without it.
/project-folder/ios/ProjectName.xcodeproj The linked library ‘libPods-ProjectName.a’ is missing one or more architectures required by this target: x86_64.
I tried to add x86_64 on the list of architectures of the project, with no results.
I’m building from Xcode IDE. This error message appears for all iPhones I tried: 8, 11, 12 and all targets I tried: iOS 9, 10 and 13.

3 Answers 3
I had the same issue and finally, I fixed it. There are 2 main reasons for the errors:
arm64 architecture support & and Xcode 12 compatible version have not been provided by many popular third party libraries yet (like Firebase, AFNetworking, etc). Xcode 11 used to automatically translate building for arm64 for the simulator into building for x86_64 , but now that arm64 is a valid simulator architecture (it’s the Apple Silicon architecture), that translation no longer occurs.
Because the Valid Architectures build setting has been removed from Xcode 12, the Project file, opened in Xcode 12, will auto-generate a VALID_ARCHS macro in User-Defines, and this macro will make the build fail.
Final step was updating all pods by running below command inside the project folder:
Then I exclude the arm64 for the Simulator architecture, both from main project and the Pod project.
Источник
How to Run and Build React Native on Macbook Pro M1 Apple Silicon
Apple has just released its newest Macbook series using Apple’s own M1 chip. This offers better speed, both in performance and in battery life.
In this case, developers are interested in flocking to replace their old macbook with macbook with the M1 chip. However, in addition to the advantages offered by the MacBook Pro M1, there are also shortcomings in terms of application development. There are some applications that are not yet compatible with this Apple M1 chip.
How to Set up, Build and Run an React Native App on Macbook Pro M1 Chip
React Native is a JavaScript framework that allows native rendering of iOS and Android applications. This makes it easier for us to create two applications on different platforms with one source code. One of the difficulties faced in developing React Native applications through MacBook Pro / Macbook Air with this M1 chip is when we want to build / run the application.
Many developers have experienced failures in building their react native applications through this macbook M1. However, don’t worry, because I will share tips for you to deal with errors when building an iOS application on a MacBook Pro or MacBook Air M1 Apple Silicon chip.
React Native Build Failed on Macbook Pro M1
maybe you unable to run react-native run-ios on M1 Macbook. The error output that you will get when you build react native iOS is as below:
Solution to Run and Build React Native on M1 Macbook Pro
The solution to solve React Native build failed on M1 Macbook is to use Rosetta. What is rosetta?.
Rosetta is a dynamic binary translator developed by Apple Inc. for macOS, an application compatibility layer between different instruction set architectures. It gives developers and consumers a transition period in which to update their application software to run on newer hardware, by «translating» it to run on the different architecture.
If you’re using a MacBook Pro/Air with an M1/Apple silicon chip, you might be asked to install Rosetta in order to open an app.
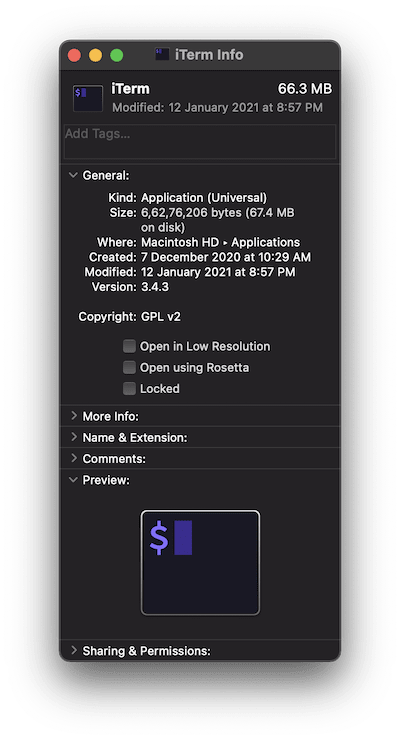
- Set Terminal App to use Rosetta :. Select the app in Finder. Applications/Utilities/Terminal (App terminals). From the File menu in the menu bar, choose Get Info. make checklist on: ( Open Using Rosetta ). See image below.
- Set Xcode to use Rosetta :. Select the Xcode app in Finder. Applications/Xcode (Xcode App). From the File menu in the menu bar, choose Get Info. make checklist on: ( Open Using Rosetta )
Next, delete the necessary folders so that the build process can be successful and smooth.
- delete the Pods/ folder in your-project-dir/ios/Pods
- delete podfile.lock in -> your-project-dir/ios/Podfile.lock
If you use the old code of react native, or if you experience an error like what I said the first time above, then you can follow the next steps below. However, if you’ve just built react native init on your macbook M1, then that shouldn’t be a problem and you should be able to build react native ios on your macbook smoothly.
The next step you have to do: Modify the Podfile in the iOS folder. your-project-dir/ios/Podfile. navigate to your react native project, and open it in the editor.
Find code below: ( your-project-dir/ios/Podfile )
And, replace with:
- The next step, install React native project as usual. Navigate to the root project directory, and run:
- Next, run npx react-native run-ios from your terminal.
The above method should be smooth and running well on iOS Emulator. Good Luck!.
Источник
Updating React Native projects for M1 Mac development
In this post I’ll walk through how to get the default React Native project to build in Xcode 12.4 on Apple silicon. The steps are the same as the ones I followed to update my app, but I’ll use the default project to keep things relevant. You can follow along to update your own project, but keep in mind that different modules you’ve added and their pods (i.e. Firebase) might not have yet added support for Apple silicon.
First, let’s get a basic project to work with.
Exit fullscreen mode
Some common errors you might run into without any further changes are
Exit fullscreen mode
Exit fullscreen mode
Exit fullscreen mode
The problem is that we’re building for the x86_64 iOS simulator, but building and linking with arm64 libraries and code. We have some settings to change. First, open Xcode
Exit fullscreen mode
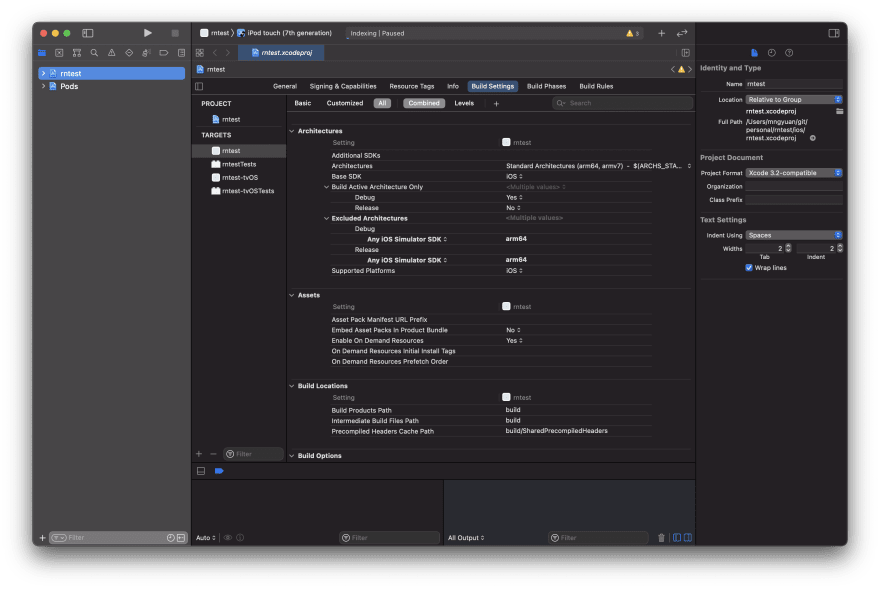
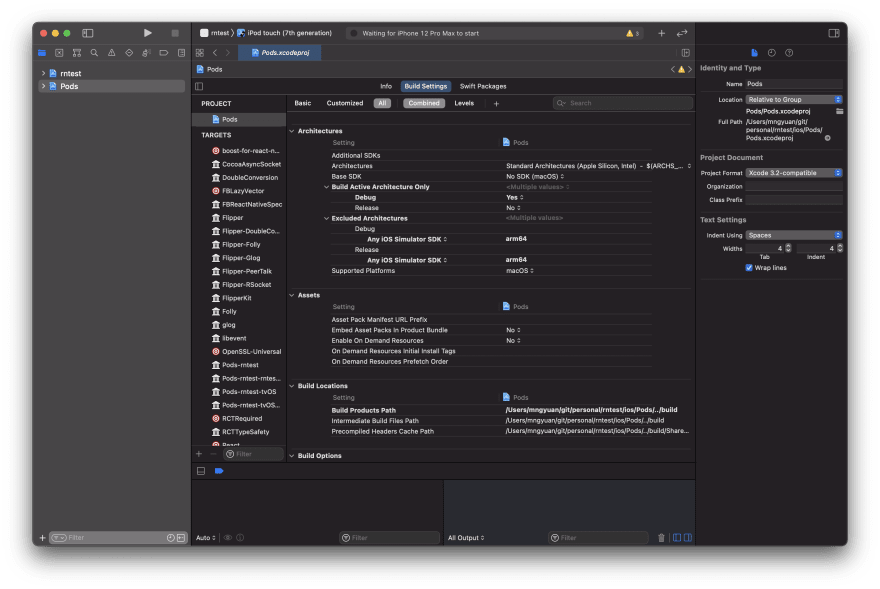
We’re going to exclude the arm64 architecture from our build. Under Targets, select your project -> Build Settings -> Excluded Architectures, and add Any IOS Simulator SDK : arm64 for both Debug and Release. Do the same for your Pods project.
If your project for some reason has VALID_ARCHS set, you’ll want to remove that key from your project as well (and the Pods project) at this stage.
We’re very close to done, but the version of Flipper installed in your pods is likely not new enough to include the fixes for M1 macs. Open ios/Podfile and apply the following
Exit fullscreen mode
And update your Pods
Exit fullscreen mode
If you performed a build which failed, you might want to clear DerivedData like so
Exit fullscreen mode
Now, perform a clean build by clearing your build folder (Cmd+Shift+K) and building (Cmd+R).
Everything should work now! If you’re still having problems they may be related to a specific Pod which doesn’t play nice with the M1 yet.
Источник
Setup Macbook M1 for Web and React Native development
Note: This article was updated in August 2021. The Macbook Pro M1 I was using crashed and stopped working without any reason on August 25, 2021. In just seven months of use.
It took time to get it repaired. That forced me to buy another laptop. While setting up the new laptop, I thought it is an excellent time to update this post.


lol @apple started shipping used/damaged products to India by boxing them as NEW?


I recently upgraded from Macbook Air 2017 to Macbook Pro with an M1 chip. My four-year-old Macbook Air was giving up. The performance to run heavy tasks like using the iOS simulator when developing and working on React Native apps was declining. I had long given up using the Android emulator and used an actual Android device for testing. December 2020 was the time I decided its time to upgrade.
I had a long internal discussion with myself for almost a month about whether I should upgrade to M1 or stick with Intel-based chips and spend them bucks. Don’t get me wrong here, M1 is not cheap either as I did go for a RAM upgrade to max limits, which is currently 16GB in the base model.
After going through some online reviews and research, the kind of performance I was expecting has been worth it so far (it is fast, no doubt). I received it two weeks back when writing this post, and since then, I have installed all the necessary tools and utilities that help me work on Web development and React Native apps.
My local environment currently includes:
OS apps:
- Brave
- Android Studio
- Insomnia as REST API client
- Xcode
- Slack or Discord (for work and community)
- There (to track team mate’s timezone)
- LICEcap (for gifs)
- Zoom (for work)
- GitHub Desktop App
- Cleanshot (for screenshots)
- Google Chrome
- set to default
- First things to do:
- Log in to: Gmail, Twitter, GitHub, Outlook
- Developer mode on
- Extensions:
- Detailed SEO extension
- Redefined GitHub
- Octolinker
- Twemex: Sidebar for Twitter
- Minimal Twitter
- Medium Enhanced Stats
- JSON Viewer
- Grammarly
- Toby to organize tabs
System Settings:
- Disable Ask Siri
- Disable Spotlight search except Applications, Calculator, Definition, and System Preferences.
- Trackpad:
- Fix direction: Scroll & Zoom > Natural off
- Right click: Point & Click > Secondary Click
- Disable dictionary lookup: Point & Click > Look up & data detectors off
- More gestures > Swipe between pages off & App Exposé off
- Finder settings:
- Preferences > Advanced > Show filename extensions
- Enable show path bar: View > Show Path Bar
- Dock:
- Turn auto hiding on
iTerm
My favorite terminal app that I have been using for years is iTerm. I am currently using two versions of iTerm on my setup. One with Rosetta 2 enabled and the default one. This way, I can only use the Rosetta 2 emulator when required. There are no performance issues I have found with using iTerm with Rosetta 2 for ARM-based applications.
If you’d like a similar setup, go to the Applications folder in your Macbook and duplicate the iTerm application.
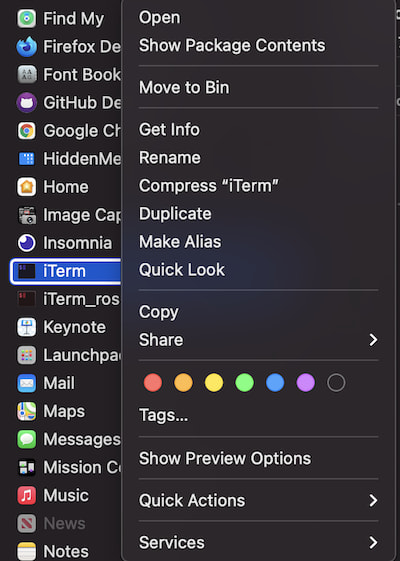
You can rename the duplicated iTerm app. I have renamed it to iTerm_rosetta to differentiate between the two. Right-click the duplicated app and click Get Info. In the General, check the box where it says Open using Rosetta.

Now, if you open the second terminal, it will be using Rosetta 2 emulator by default.
Other iTerm profile settings that I use:
Recently I started using Jetbrains Mono font.

For the overall looks and appearance, I use Dracula Pro Color Presets created by Zen Rocha.
And my last favorite thing is to split the working directory into two more different tabs using Command + D for horizontal panes.
Make sure to have the following setting configured from
General > Working Directory > select Advanced Configuration > click button Edit. > select Reuse previous session’s directory under Working Directory for New Split Panes.

For terminal prompt, I use Spaceship ZSH.
Xcode
After installing Git, for me, the next step is to install Xcode app from Apple’s App Store.
Then, install «command line tools». It is required by many of the formulae in Homebrew.
Exit fullscreen mode
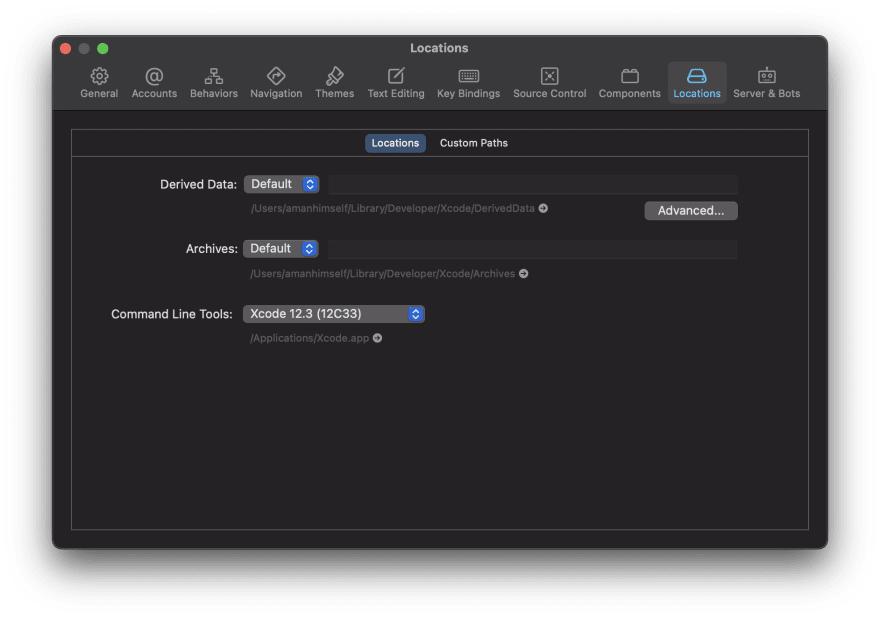
After installing it, make sure to open it for the first time, from the menu bar, open Xcode > Preferences > Locations and make sure that Command Line Tools point towards the current Xcode app.
Homebrew
On December 1, 2020, the Homebrew team announced on their website about the version release 2.6.0 . The most significant changes among others they listed were the support for macOS Big Sur, using brew commands instead of brew cask and beginning to support macOS M1 and Apple Silicon or ARM-based chips.
Using the terminal, you can install the Homebrew by executing the default command:
Exit fullscreen mode
brew installs:
- node/npm
- scrcpy (control Android devices connect via USB on mac)
- adoptopenjdk8 (required for React Native)
- Karabiner-Elements (remapping function keys)
- watchman (required for React Native)
What is Karabiner-Elements?
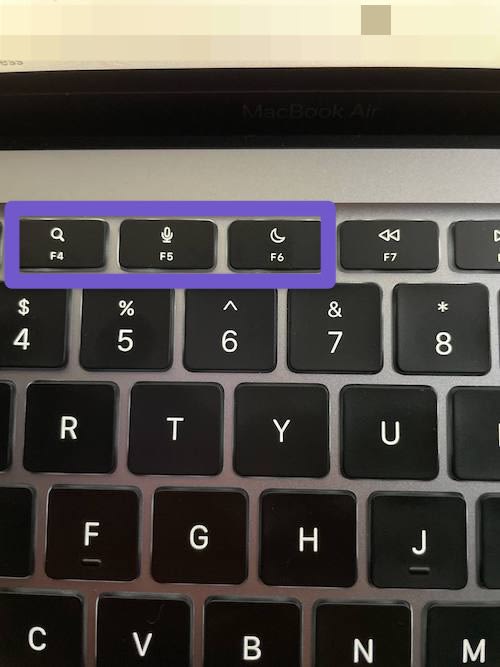
When I bought Macbook Air M1, it had function keys (that got me excited), but I don’t understand why Apple decided to replace function keys that would allow me to control Keyboard Brightness?! And moreover, replace it with «Do Not Disturb».
Why? That got me confused 🤷
I found this tool called karabiner Elements that can be installed as a brew formula:
Exit fullscreen mode
Here are the key mappings I am using now:

I did install Git using brew command:
Exit fullscreen mode
To authenticate GitHub to be used from the terminal environment, I’d recommend you to check out the official document on creating and accessing personal tokens.
🔥 Tip: As of Git version 2.28 there is a new config option to set the default branch to main . Set it globally and forget about it.
Exit fullscreen mode
ZSH and Oh My Zsh
ZSH is the default shell in macOS Big Sur. However, I like to use Oh My Zsh to manage the ZSH configuration, plugins, and a theme to prettify the terminal.
To install, run the command below:
Exit fullscreen mode
After installation, make sure that the file .zshrc is exporting the below path at the top:
Exit fullscreen mode
The first I like to do after setting up the bare minimum ZSH configuration is to install a plugin called
zsh-syntax-highlighting. It provides syntax highlighting for the ZSH shell. Execute the series below commands in the terminal window:
Exit fullscreen mode
Exit fullscreen mode
After installing the syntax highlight plugin, it starts to recognize the commands:

VSCode
VSCode and VS Code Insiders are currently supported on ARM chips (as of March 13, 2021). Download the installer for Insiders edition from here and for VSCode here.
I am still using the same VSCode configuration from my previous setup:
Exit fullscreen mode
Themes
I usually like to switch between a dark and a light theme.
- For the dark theme where I spent most of my time, I am was previously using morgan.codes-theme, but now I am using fairyFloss.
- Other themes I switch between:
- Quiet Light
- Cyberpunk
- For file icons, I love Material-Icon-Theme.
- For terminal prompt, I use Spaceship ZSH.
- Font: Jetbrains Mono font.
Extensions
I use VSCode editor for both writing code and writing blog posts. Thus, the list of extensions below is the combination of extensions that fulfills both of my purposes.
Global NPM Packages I use
- gatsby-cli To build and test out my personal blog built with Gatsby.
- expo-cli
- npm-check to check for outdated, incorrect, and unused dependencies.
- git-watch-log to watch a git repo and recent changes.
For React Native Development
- install node
- install Watchman to watch changes in the filesystem using the command: brew install watchman .
- install following gems:
Exit fullscreen mode
- install Java Development Kit using the command: brew install —cask adoptopenjdk/openjdk/adoptopenjdk8 .
- Currently, I am using Arctic Fox Canary that supports Apple’s based machines for Android Studio.
- Then install Android SDK (I do not prefer AVD and use an actual device for testing)
- scrcpy to display and control Android devices connect via USB on Mac.
⚛️ For more instructions on how to set up a development environment for React Native, please follow the official documentation here.
Rosetta 2
Update: I am not using the Rosetta environment to install anything on the secondary machine since August 2021. That is the reason I’ve mentioned it at the end of the post.
Rosetta 2 is the lifeline that allows you to run apps designed for Intel-based chips that use x86 architecture on ARM-based chips (in this case M1). This solution is provided by Apple in the form of an emulator and doesn’t come pre-installed. You have to install it manually. Fire up the Terminal application that comes pre-installed on the Big Sur and let your first command to execute be:
Exit fullscreen mode
If you decide not to put the flag —agree-to-license , you will be prompted by Apple’s interactive install, and you will have to agree to their terms and license conditions to use it.
Conclusion
That’s the setup I now use for my JavaScript, Node.js, React and React Native. I think it’s a good machine. Hopefully, M1 is just the beginning of a new era of powerful computers for daily work use 🤞
🤔 The only thing left for me is to find a way to transfer all laptop swag/stickers from my Macbook Air 2017 to Pro. I miss having them on this one.
Источник


