The following section only applies to projects with native code exposed. If you are using the managed expo-cli workflow, see the guide on Linking in the Expo documentation for the appropriate alternative.
Linking gives you a general interface to interact with both incoming and outgoing app links.
Every Link (URL) has a URL Scheme, some websites are prefixed with https:// or http:// and the http is the URL Scheme. Let’s call it scheme for short.
In addition to https , you’re likely also familiar with the mailto scheme. When you open a link with the mailto scheme, your operating system will open an installed mail application. Similarly, there are schemes for making phone calls and sending SMS. Read more about built-in URL schemes below.
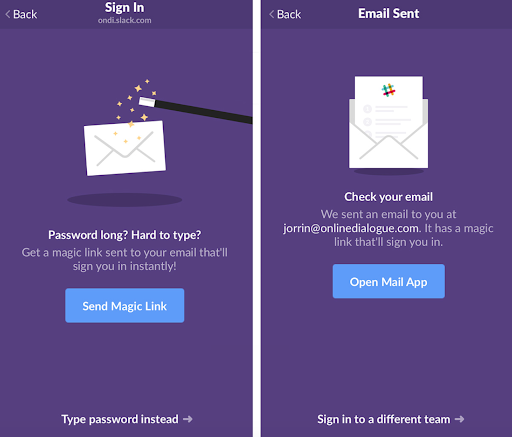
Like using the mailto scheme, it’s possible to link to other applications by using custom url schemes. For example, when you get a Magic Link email from Slack, the Launch Slack button is an anchor tag with an href that looks something like: slack://secret/magic-login/other-secret . Like with Slack, you can tell the operating system that you want to handle a custom scheme. When the Slack app opens, it receives the URL that was used to open it. This is often referred to as deep linking. Read more about how to get the deep link into your app.
Custom URL scheme isn’t the only way to open your application on mobile. You don’t want to use a custom URL scheme in links in the email because then the links would be broken on desktop. Instead, you want to use a regular https links such as https://www.myapp.io/records/1234546 . and on mobile you want that link open your app. Android calls it Deep Links (Universal Links — iOS).
Built-in URL Schemes
As mentioned in the introduction, there are some URL schemes for core functionality that exist on every platform. The following is a non-exhaustive list, but covers the most commonly used schemes.
Scheme
Description
iOS
Android
mailto
Open mail app, eg: mailto: [email protected]
✅
✅
tel
Open phone app, eg: tel:+123456789
✅
✅
sms
Open SMS app, eg: sms:+123456789
✅
✅
https / http
Open web browser app, eg: https://expo.io
✅
✅
Enabling Deep Links
If you want to enable deep links in your app, please read the below guide:
If you wish to receive the intent in an existing instance of MainActivity, you may set the launchMode of MainActivity to singleTask in AndroidManifest.xml . See documentation for more information.
NOTE: On iOS, you’ll need to add the LinkingIOS folder into your header search paths as described in step 3 here. If you also want to listen to incoming app links during your app’s execution, you’ll need to add the following lines to your *AppDelegate.m :
If you’re targeting iOS 8.x or older, you can use the following code instead:
If your app is using Universal Links, you’ll need to add the following code as well:
Handling Deep Links
There are two ways to handle URLs that open your app.
1. If the app is already open, the app is foregrounded and a Linking ‘url’ event is fired
You can handle these events with Linking.addEventListener(‘url’, callback) — it calls callback(< url >) with the linked URL
2. If the app is not already open, it is opened and the url is passed in as the initialURL
You can handle these events with Linking.getInitialURL() — it returns a Promise that resolves to the URL, if there is one.
Example
Open Links and Deep Links (Universal Links)
Open Custom Settings
Get the Deep Link
Send Intents (Android)
Reference
Methods
addEventListener()
Add a handler to Linking changes by listening to the url event type and providing the handler.
canOpenURL()
Determine whether or not an installed app can handle a given URL.
The method returns a Promise object. When it is determined whether or not the given URL can be handled, the promise is resolved and the first parameter is whether or not it can be opened.
The Promise will reject on Android if it was impossible to check if the URL can be opened or when targetting Android 11 (SDK 30) if you didn’t specify the relevant intent queries in AndroidManifest.xml . Similarly on iOS, the promise will reject if you didn’t add the specific scheme in the LSApplicationQueriesSchemes key inside Info.plist (see bellow).
Parameters:
Name
Type
Description
url
For web URLs, the protocol ( «http://» , «https://» ) must be set accordingly!
If your app is linked against an earlier version of iOS but is running in iOS 9.0 or later, you can call this method up to 50 times. After reaching that limit, subsequent calls always return false. If the user reinstalls or upgrades the app, iOS resets the limit.
As of iOS 9, your app also needs to provide the LSApplicationQueriesSchemes key inside Info.plist or canOpenURL() will always return false .
When targeting Android 11 (SDK 30) you must specify the intents for the schemes you which to handle in AndroidManifext.xml . A list of common intents can be found here.
For example to handle https schemes the following needs to be added to your manifest:
getInitialURL()
If the app launch was triggered by an app link, it will give the link url, otherwise it will give null .
getInitialURL may return null while debugging is enabled. Disable the debugger to ensure it gets passed.
openSettings()
Open the Settings app and displays the app’s custom settings, if it has any.
openURL()
Try to open the given url with any of the installed apps.
You can use other URLs, like a location (e.g. «geo:37.484847,-122.148386» on Android or «http://maps.apple.com/?ll=37.484847,-122.148386» on iOS), a contact, or any other URL that can be opened with the installed apps.
The method returns a Promise object. If the user confirms the open dialog or the url automatically opens, the promise is resolved. If the user cancels the open dialog or there are no registered applications for the url, the promise is rejected.
Parameters:
Name
Type
Description
url
This method will fail if the system doesn’t know how to open the specified URL. If you’re passing in a non-http(s) URL, it’s best to check canOpenURL() first.
For web URLs, the protocol ( «http://» , «https://» ) must be set accordingly!
This method may behave differently in a simulator e.g. «tel:» links are not able to be handled in the iOS simulator as there’s no access to the dialer app.
removeEventListener()
Deprecated. Use the remove() method on the event subscription returned by addEventListener() .
Источник
React Native Deep Linking for iOS and Android
We live in a new era where everything is connected and we share links more often than before. We also want our customer to reach the desired page, as quickly as possible regardless of the platform they are using. ne
If you are not using Deep Linking you are not having optimal customer experience.
Deep linking does not only mean to have a clickable link which opens up your app but it is a smart way to navigate to the desired page.
What is Deep Link?
Deep linking is a technique that allows an app to be opened to a specific UI or resource, in response to some external event. The “deep” refers to the depth of the page in an App hierarchical structure of pages. This is a very important feature for user engagement, it also makes the app more responsive and capable of navigation to arbitrary content in response to external events like Push Notification, Emails, web links etc.
You must have seen generic linking before like when using mailto:[email protected] it will open the default mail app with prefill my email. We will implement similar URL schemes in our example which will handle external URIs. Let’s suppose that we want a URI likemyapp://article/4 to open our app and link straight into an article screen which shows article number 4.
What problem Deep Link solve?
Web links don’t work with native mobile apps.
If you use your mobile device to open a link to an article, you are taken to the destination in your web browser even if you have the article app installed. This is a problem because the article app is a better user experience than the mobile version of the article app.
The different way of implementing Deep Linking?
There are two ways of implementing deep linking:
URL schemes are a well-known way of having deep linking, Universal links are the new way Apple has implemented to easily connect your webpage and your app under the same link.
URL schemes are more easy to implement then Universal Links
Setup the react native project for both ios and Android
We are using react-native CLI to create a project and in that, we will create two pages Home screen and then an Article page. Then we will create deep links like myapp://article/4 and myapp://hometo open these pages.
After creating a project we will add react-navigation and then use link command to link react native gesture handling.
It’s not necessary that you use react-navigation for Deep Linking. Since its most popular navigation library for React Native, that’s why we have used this in the tutorial.
Create an src folder in the root and add Article.js and Home.js file.
We have created a react component which renderd text Hello from Home!. Now we will create a file Article.js in src folder and add following code:
We have created two components Home.js and Article.js we will now add this in React navigation routes. Open App.js and update the following code:
We have created react navigation and created routes for two pages. We have configured our navigation container to extract the path from the app’s incoming URI.
Setting up for iOS
Lets first setup for iOS, then will configure for Android. Open the iOS project by clicking DeepLinkExample/ios/DeepLinkExample.xcodeproj/
Open info.plist by clicking on top and then click on URL Types and add URL schemes. Update it as myapp. (whatever name you want to give to your app)
Then open AppDelegate.m in root folder and add import following header:
And then add this code above @end.
We are done with the change for iOS, lets now test it for ios.
Testing DeepLink in iOS
To test DeepLink you need to run the app using react-native run ios or through Xcode. Then open safari browser on simulator and type: myapp://article/5, it will automatically open the app and open Article with no 5.
You can also open DeepLink by running following command on your terminal:
Configuring deep link for Android
To configure the external linking in Android, we need to create a new intent in the manifest. Open /src/main/AndroidManifest.xml add the new intent-filter inside the MainActivity entry with a VIEW type action:
We are all set for Android.
Testing Deeplink on Android
To test Deep Linking, open project in Android Studio and Click on Run -> Edit Configuration. and the change Launch options to URL and update URL to myapp://article/13
Now run the application by clicking Run button on Android Studio:
You can also open deep link though terminal using:
Setting up Universal Linking
Now lets setup Universal link for your app. First will suggest to check out Apple Doc.
We need to first create apple-app-site-association for your app. Upload an apple-app-site-association file to your web server
In our case it will look like this:
Few of the important point to note for the file:
It should be publically available.
It should be served as application/json mime type
File should be less than or equal to 128 Kb
It should be served over Https
Then log into developer.apple.com with your account and Enable Associated Domains in your app identifier.
Now Launch Xcode and select the Capabilities tab. Enable Associated Domains and add two values.
You are all set for Univeral Link !!
Wrapping up ?
Deep linking is a very important feature for user engagement. Its also a foundation for setting up push notification, Email Marketing, Social Sharing etc. So don’t wait to implement this in your app.
Happy Connecting the world with your app !!
Источник
Understanding deep linking in React Native
June 3, 2021 7 min read 1971
Introduction
Deep linking and universal links are the gateways into your application. Deep linking is already part of a seamless experience that any mobile application should have.
Ultimately, they help to reduce churn and increase loyalty of your user base. Implementing them correctly will have a direct impact on your ability to master campaigns and run promotions within your application.
The deep linking question is as important today as ever before, specifically taking into consideration Identifier for Advertisers (IDFA) and a rising number of walled gardens. Well-executed deep linking will enable your retargeting campaigns and bring engagement to a new level, allowing end users to have seamless one-click experience between the web and your application.
Once users discover your application and install it, deep linking becomes a perfect tool to retain newly acquired users in your app.
In this article, I outline existing ways on how to implement deep linking and how to test it using React Native Typescript codebase.
You can find the full source code for this project available on GitHub.
What is deep linking and why is it important?
Deep linking, in a nutshell, is a way to redirect users from a webpage into your application in order to show a specific screen with a requested content. It can be a product, an article, secure content behind a paywall, or a login screen.
One of the most famous examples is the link to Slack that they send to your email, which gets opened right inside the application, authorizing you to use it with your account — no password needed.
Deep linking is paramount in 2021. Every effort to lead your users into the app and improve their engagement will heavily depend on the strategy based on top of the deep linking.
We made a custom demo for . No really. Click here to check it out .
To summarize the main points why deep linking is important:
Marketing campaigns
User retention
Seamless redirects between web and mobile
Content delivery behind a paywall or login authentication
Increasing customer lifecycle
Improving loyalty
Minimizing churn
Improved search engine ranking
Implementing deep linking requires a more intricate understanding of iOS and Android for extra configuration of each platform in your React Native project.
Take, for example, this syntax diagram of the following URL:
Whenever you navigate to a website using, for example, https://reactivelions.com, you use a URL in which the URL scheme is “https”. In the example above, billing-app is a URL scheme for your deep linking URL.
Deep linking and universal linking in iOS
Starting with iOS 9, Apple introduced universal links to reduce confusion and simplify the user experience.
The idea behind using universal links is to connect specific website URLs that match content on your website with content inside your application. This URL would act the same way as the deep linking URL I have shown in the previous section:
Configuring universal links requires extra steps on both the server side and mobile side.
First you start with the server side, where you need to upload a JSON formatted file that defines association of the website with a mobile application and its specific routes.
Let’s say you run the example.com domain and you want to create an association file. Start by creating a folder or a route in your root domain .well-known , then add JSON content inside the apple-app-site-association :
Add JSON content to define website associations:
How to configure your Xcode project
To demonstrate how deep linking works, we are going to build a simple test application. This application will have straightforward navigation between the Home and Billing screens using the @react-navigation component:
Open your Xcode workspace:
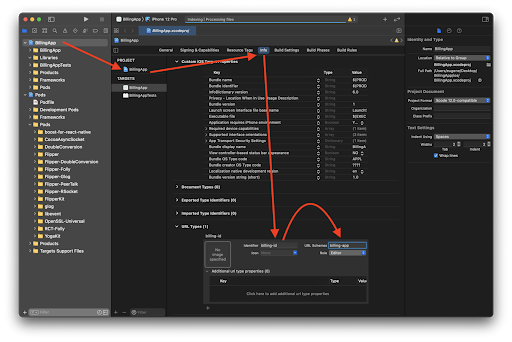
In your Xcode window, select your newly created project in the left pane (in our case it’s BillingApp). Next, select the BillingApp target inside the newly opened left pane of the internal view for the BillingApp.xcodeproj .
Navigate to the Info section in the top center of that view, then go to the very bottom and click the plus (+) sign under URL Types. Make sure to add billing-id as your new Identifier and specify URL Schemes as billing-app.
By following these steps above, you’ve enabled iOS project configuration to use deep links like billing-app://billing/4 inside your Objective C and JavaScript code later on.
After configuring Xcode, the next step will be focused on React Native. I will start with linking part of the React Native core called LinkingIOS . You can read more about it in the official documentation here.
Its main goal is to construct a bridge that will enable a JavaScript thread to receive updates from the native part of your application, which you can read more about in the AppDelegate.m part below.
Go to ios/Podfile and add this line under target:
And then make sure to update your pods using this command:
The next step is to enable the main entry points of your application to have control over the callbacks that are being called when the application gets opened via deep linking.
In this case we implement the function openURL with options and pass its context to RCTLinkingManager via its native module called RCTLinkingManager .
For the universal links we will need to implement a callback function continueUserActivity , which will also pass in context of the app and current universal link into the JavaScript context via RCTLinkingManager .
Deep linking in Android
Android deep linking works slightly differently in comparison to iOS. This configuration operates on top of Android Intents, an abstraction of an operation to be performed. Most of the configuration is stored under AndroidManifest.xml and works by actually pointing to which Intent will be opened when the deep link is executed.
How to configure your Android Studio project
Inside your Android manifest android/app/src/main/AndroidManifest.xml we need to do the following:
Configure the Intent filter
Define the main View action and specify two main categories: DEFAULT and BROWSABLE
Finalize the configuration by setting the scheme to billing-app and defining the main route as billing
This way Android will know that this app has deep linking configured for this route billing-app://billing/* :
Navigation and deep linking
In most production-grade applications you’ll end up having multiple screens, and you are most likely to end up using some form of component that implements this navigation for you. However, you can opt-out and use deep linking without navigation context by invoking React Native’s core library via JavaScript by calling Linking directly.
You can do this inside your React Native code using these two methods:
If the app is already open:
If the application is not already open and you want to get the initial URL, use this call:
Use the acquired deep linking URL to show different content, based on the logic of your application.
If you’re using @react-navigation you can opt-in to configure deep linking using its routing logic.
For this you need to define your prefixes for both universal linking and deep linking. You will also need to define config with its screens , including nested screens if your application has many screens and is very complex.
Here’s an example of how this configuration looks for our application:
In the code section above, we introduced universal linking and walked through the steps needed to define universal link association on your website’s server end. In Android there’s something similar called Verified Android App Links.
Using Android App Links helps you avoid the confusion of opening deep links with other applications that aren’t yours. Android usually suggests using a browser to open unverified deep links whenever it is unsure if they are App Links (and not deep links).
To enable App Links verification, you will need to change intent declaration in your manifest file like so:
To create app-verified links you will need to generate a JSON verification file that will be placed in the same .well-known folder as in the Xcode section:
This command will generate association with your domain by signing the configuration with your keystore file:
Then place the generated file to your website using this path:
How to test deep links
After going through all configurations and implementations, you want to ensure you’ve set everything up correctly and that deep links work on each platform of your choice.
Before you test universal links or Android App Verified Links, make sure that all JSON files are uploaded, available, and up to date for each of your domains. Depending on your web infrastructure, you might even want to refresh your Content Delivery Network (CDN) cache.
A successful deep linking test means that, after opening a deep link in the browser, you are forwarded to your application and you can see the desired screen with the given content.
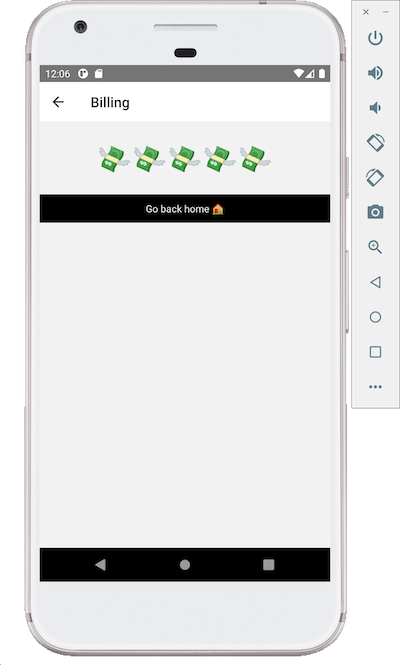
When you go to the billing screen you can specify a number, and the application will render the same number of emojis with flying dollar banknotes. Our application has Home and Billing screens.
If you try to go to the Billing screen from your Home screen, it won’t pass any content, and therefore it will not render any emojis.
In your terminal, you can use these commands to test deep linking for each platform. Play around by changing the number at the end of your deep linking URL to see different numbers of emojis.
You can also open Safari and enter billing-app://billing/5 in your address bar, then click go.
Android
Next steps
You might have noticed that I used TypeScript to write the code for this project. For this project I’ve implemented custom property types that require custom declaration for each screen. Check props.ts to see these type declarations.
As I mentioned earlier, if you’re building a production-grade application, you’re most likely to end up building complex routing and will need nesting routes to be implemented with your navigator library.
Nesting navigation will enable you to decompose each screen to smaller components and have sub routes based on your business logic. Learn more about building nesting routes using @react-navigation here.
Looking forward to seeing what you build with this!
LogRocket: Instantly recreate issues in your React Native apps.
LogRocket is a React Native monitoring solution that helps you reproduce issues instantly, prioritize bugs, and understand performance in your React Native apps.
LogRocket also helps you increase conversion rates and product usage by showing you exactly how users are interacting with your app. LogRocket’s product analytics features surface the reasons why users don’t complete a particular flow or don’t adopt a new feature.
Start proactively monitoring your React Native apps — try LogRocket for free.