OneSignal Push Notification Service Documentation
OneSignal Help & Documentation
Welcome to the OneSignal New IA developer hub. You’ll find comprehensive guides and documentation to help you start working with OneSignal New IA as quickly as possible, as well as support if you get stuck. Let’s jump right in!
Troubleshooting React-Native
The following issues has been marked as repeating, therefore we decided to devote them a separate section.
Check this page first for common issues based on React Native Setup.
For Android and/or iOS Platform issues see:
For faster assistance, please provide:
- Your OneSignal App Id
- Details, logs, and/or screenshots of the issue.
- Steps to reproduce
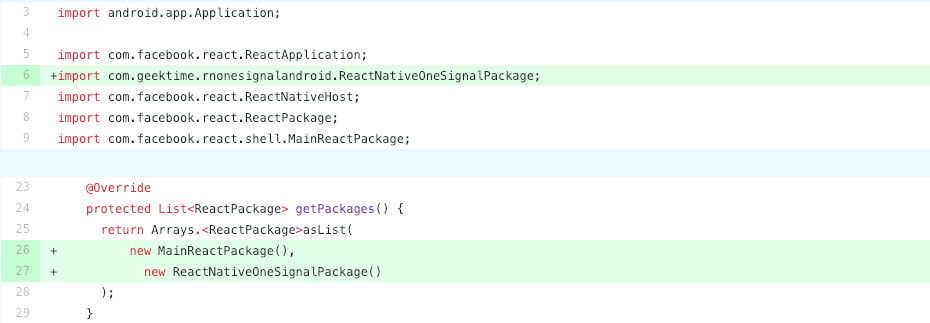
We need to check to make sure that react-native-link worked correctly (done automatically by RN 0.60+). Inside of MainApplication.java , make sure that you are now returning the RNOneSignal package like this. Other dependencies, such as react-native-navigation , will often override the default ReactApplication class, so it is important to make sure you are returning the OneSignal package if you’ve made changes to this class.
SDK location not found. Define location with an ANDROID_SDK_ROOT environment variable or by setting the sdk.dir path in your project’s local properties file at ‘/Users/user/react-native-onesignal/examples/RNOneSignal/android/local.properties’.
Open the > android directory and add a file called local.properties
Within local.properties place your android sdk path, should be similar to this but replace with your directory path:
Run pod deintegrate && pod install in your ios directory. Make sure this command installs the latest native version of the OneSignal iOS SDK.
If you’re having trouble re-installing your pods, try deleting your Podfile.lock file and re-run.
- Go to your Project Settings and select the OneSignalNotificationServiceExtension target.
- Go to Build Settings and search for Header Search Paths.
- Add $(SRCROOT)/../node_modules/react-native-onesignal/ios and set it as recursive
If you are having trouble getting events such as opened to fire correctly, there can be several causes.
The most common cause of event listeners not firing is if you use a component as an event listener that later gets unmounted. For example, if you have a sub-component in your app like a Profile Page, and you add that profile component as an event listener, everything will work when the profile page is mounted. However, when the user navigates to a different page in your app, the Profile page will get unmounted and your event listeners will be removed.
To troubleshoot this: use console.log statements for both addEventListener and removeEventListener , and make sure the last log statement was from code that was adding an event listener.
Please note that iOS and Android can be aggressive about preventing background app execution. This means that, in many cases, the received event will not fire when your app is in the background. Please consider using an Extension/Extender service in your app, but this will require writing native Objective-C/Java.
Many developers put UI code in their opened or received event listeners, and when it doesn’t work, immediately blame OneSignal’s SDK for not firing the event listener, even though it generally turns out to be an issue with the UI related code. Please double check to make sure the event gets called using console.log or breakpoints.
If you added the Notification Service Extension using Swift this sometimes complicates things a bit. Unless you want to customize how the extension service works (almost no one ever needs to do this), it is recommend to delete your extension service target completely, and re-create it with Objective-C, as outlined in our setup guide.
Please make sure you have correctly followed the Adding the Gradle Plugin guide.
Please double check the iOS Installation section as missing a step or entering an incorrect path will create these errors.
If you have detached from Expo or CRNA, you might need to fix versions of the Google Play Services that this library is using to make it work nicely with ExpoKit (as of SDK23). Please make follow the Adding the Gradle Plugin guide which will make sure the correct versions are used.
Please see the examples/RNOneSignal/redux-index.js file for example code and comments. Note that it will not compile, but instead serves as a template for how to handle Redux integration in general, and specifically including the edge case for intercepting the onOpened event when a User taps a push notification and prompts the app to open from a previously unopened state.
If you see this type of error:
This error means there was a mixture of different Firebase modules included in your app. If you add our OneSignal Gradle Plugin this will fix the version issue in your project and should resolve that runtime error.
Источник
OneSignal Push Notification Service Documentation
OneSignal Help & Documentation
Welcome to the OneSignal New IA developer hub. You’ll find comprehensive guides and documentation to help you start working with OneSignal New IA as quickly as possible, as well as support if you get stuck. Let’s jump right in!
React Native & Expo SDK Setup
Instructions for adding the OneSignal React Native & Expo SDK to your app for iOS, Android, and derivatives like Amazon
- OneSignal Account
- Your OneSignal App Id, available in Settings > Keys & IDs.
- An iOS 9+ or iPadOS device (iPhone, iPad, iPod Touch) to test on. The Xcode simulator doesn’t support push notifications so you must test on a real device.
- A Mac with Xcode 12+.
- An iOS Push Certificate.
- An Android 4.0.3+ device or emulator with «Google Play Store (Services)» installed.
- A Google/Firebase Server API Key.
- Project using AndroidX.
Follow these instructions if your app is distributed on the Amazon AppStore and/or the Huawei AppGallery.
Running Example Project
For your convenience, we created an example project, based on React Native 0.63.
You can run this project to test configurations, debug, and build upon it.
- git clone https://github.com/OneSignal/react-native-onesignal
- cd react-native-onesignal && cd examples && cd RNOneSignal
- yarn
- Running the Android example app: react-native run-android
- Running the iOS example app:
- Open the RNOneSignal project in Xcode
- Change the Signing Team and Bundle Identifier for both the RNOneSignal target as well as the OneSignalNotificationServiceExtension
- The Service Extension bundle id should be .OneSignalNotificationServiceExtension
- Build
OneSignal is a native library and leverages the Google FCM and Apple APNS protocols. There are 2 options for adding OneSignal to your Expo Project:
- Try the OneSignal Expo Plugin. Recommended if you are using a Managed Expo Workflow. Follow the plugin’s README for details.
- Use an Expo Bare Workflow. Follow Expo’s guide on Ejecting from the Managed Workflow.
2.1 Install the SDK using Yarn or NPM
- Yarn: yarn add react-native-onesignal
- NPM npm install —save react-native-onesignal
2.2 Link OneSignal (for RN versions react-native link react-native-onesignal
At the very top of your Android project’s app/build.gradle , add the following code so it begins at line 1 of the file:
4.1 Run cd ios && pod install
4.2 Add Required Capabilities
In your project’s ios directory, open the .xcworkspace file in Xcode.
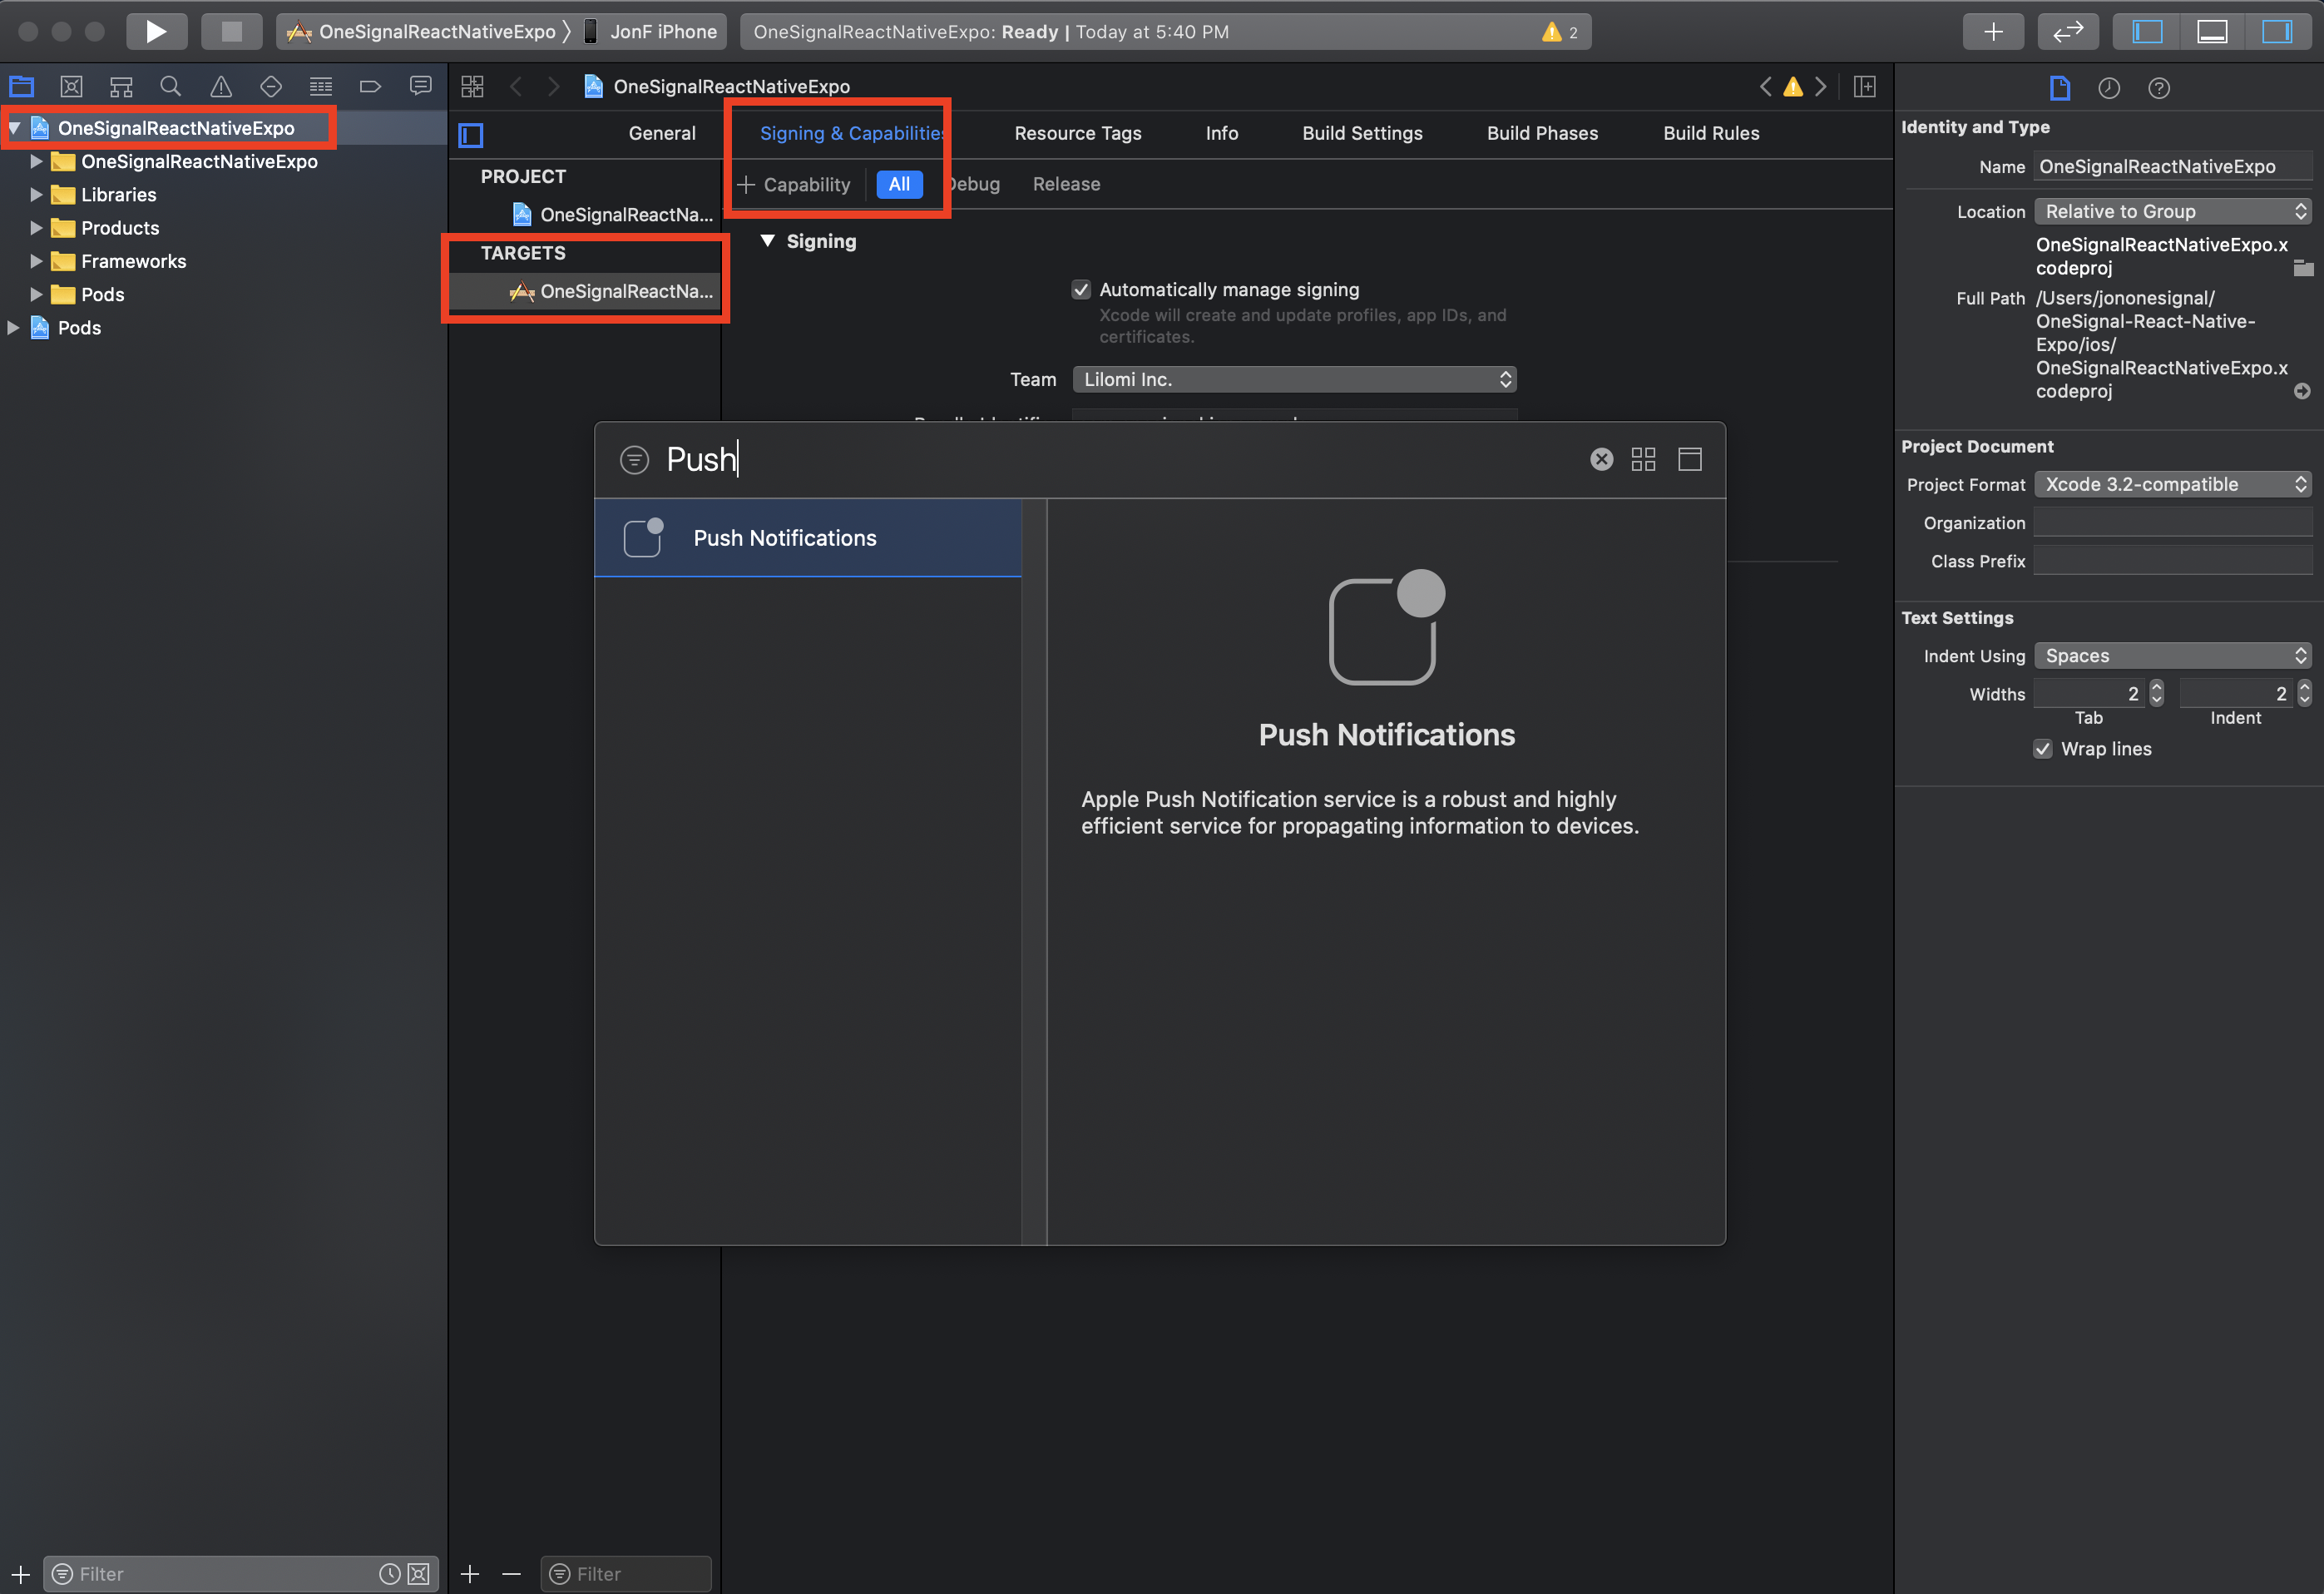
Select the root project and main app target. In Signing & Capabilities, select All and + Capability. Add «Push Notifications».
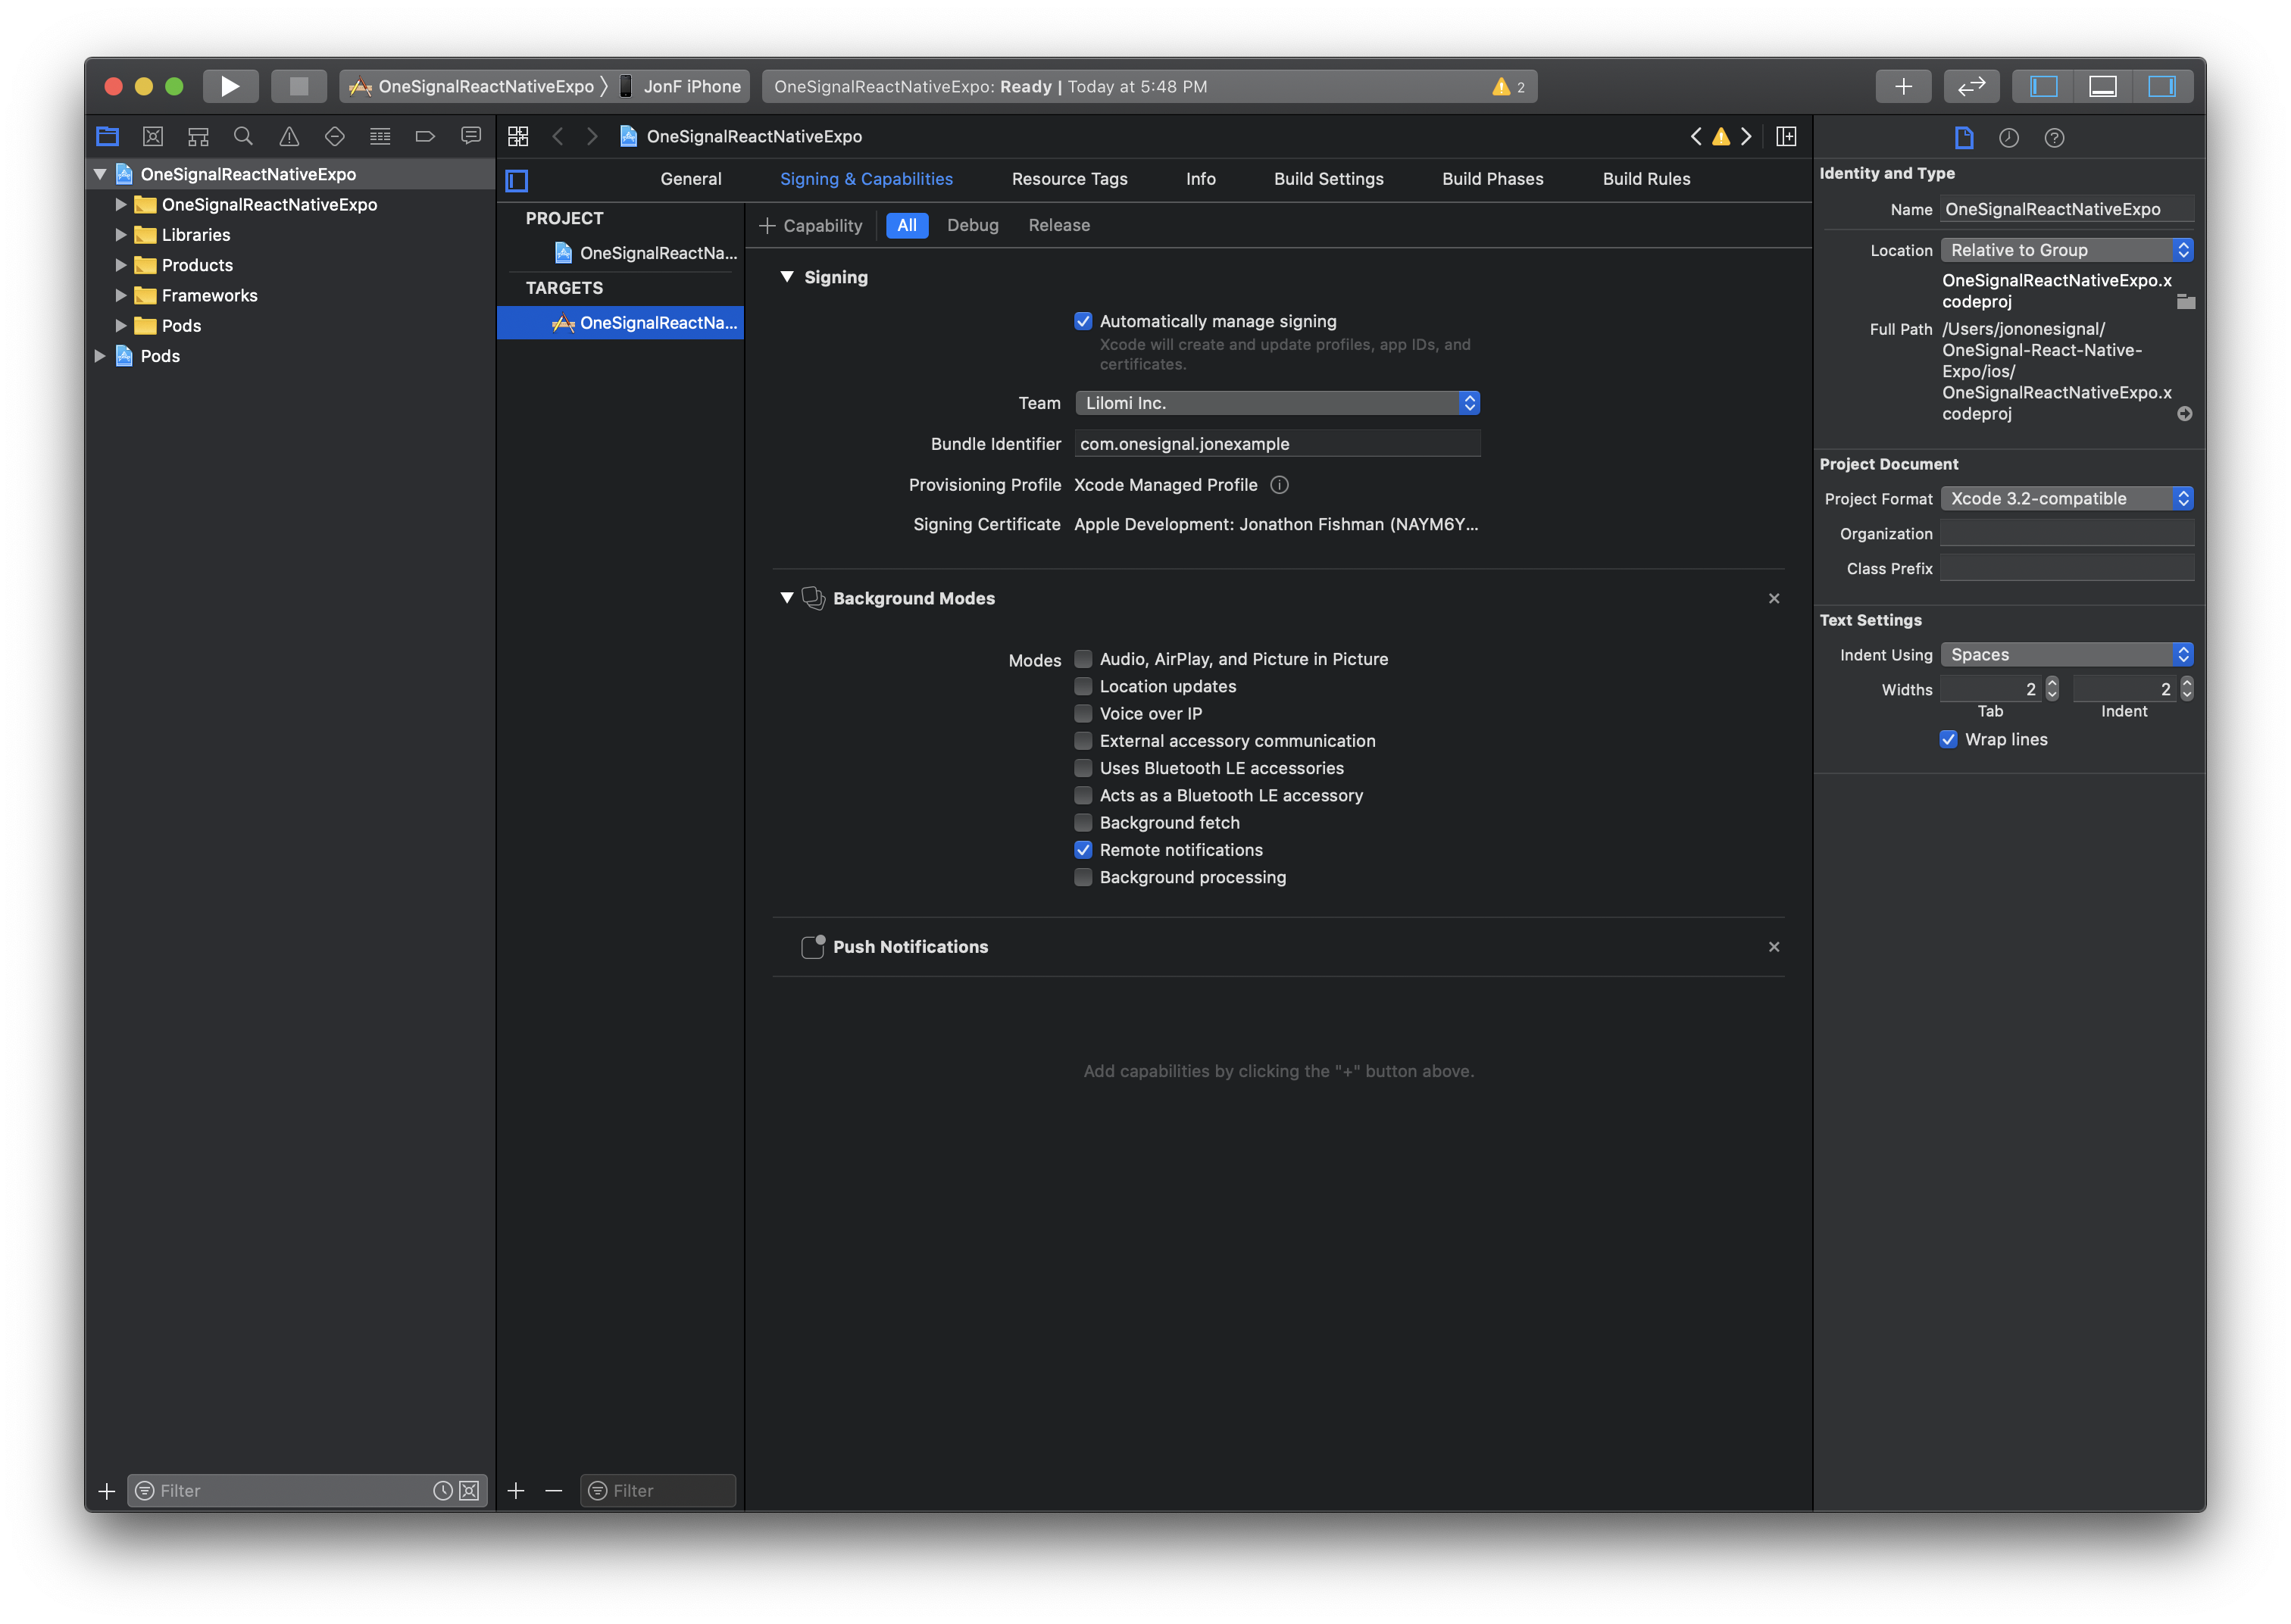
Click + Capability to add Background Modes and check Remote notifications.
4.3 Add a Notification Service Extension
The OneSignalNotificationServiceExtension allows your application to receive rich notifications with images and/or buttons, and to report analytics about which notifications users receive.
4.3.1 In Xcode Select File > New > Target.
4.3.2 Select Notification Service Extension then press Next .

4.3.3 Enter the product name as OneSignalNotificationServiceExtension and press Finish . Do not press «Activate» on the dialog shown after this.

4.3.4 Press Cancel on the Activate scheme prompt.
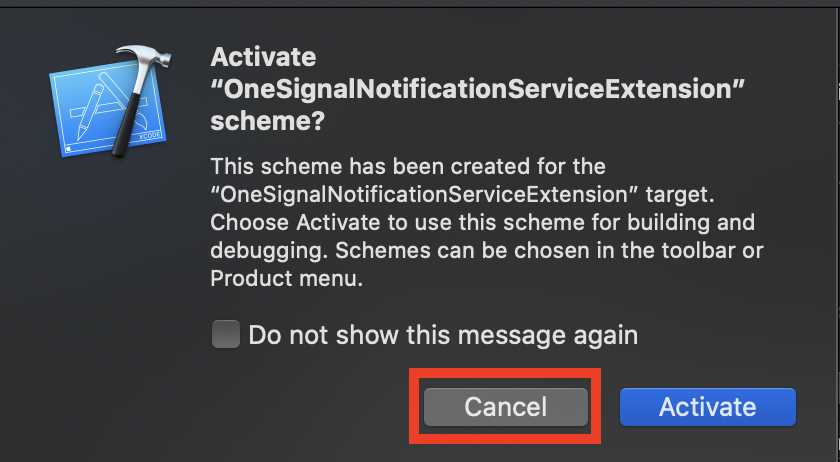
By canceling, you are keeping Xcode debugging your app, instead of just the extension. If you activate by accident, you can always switch back to debug your app within Xcode (next to the play button).
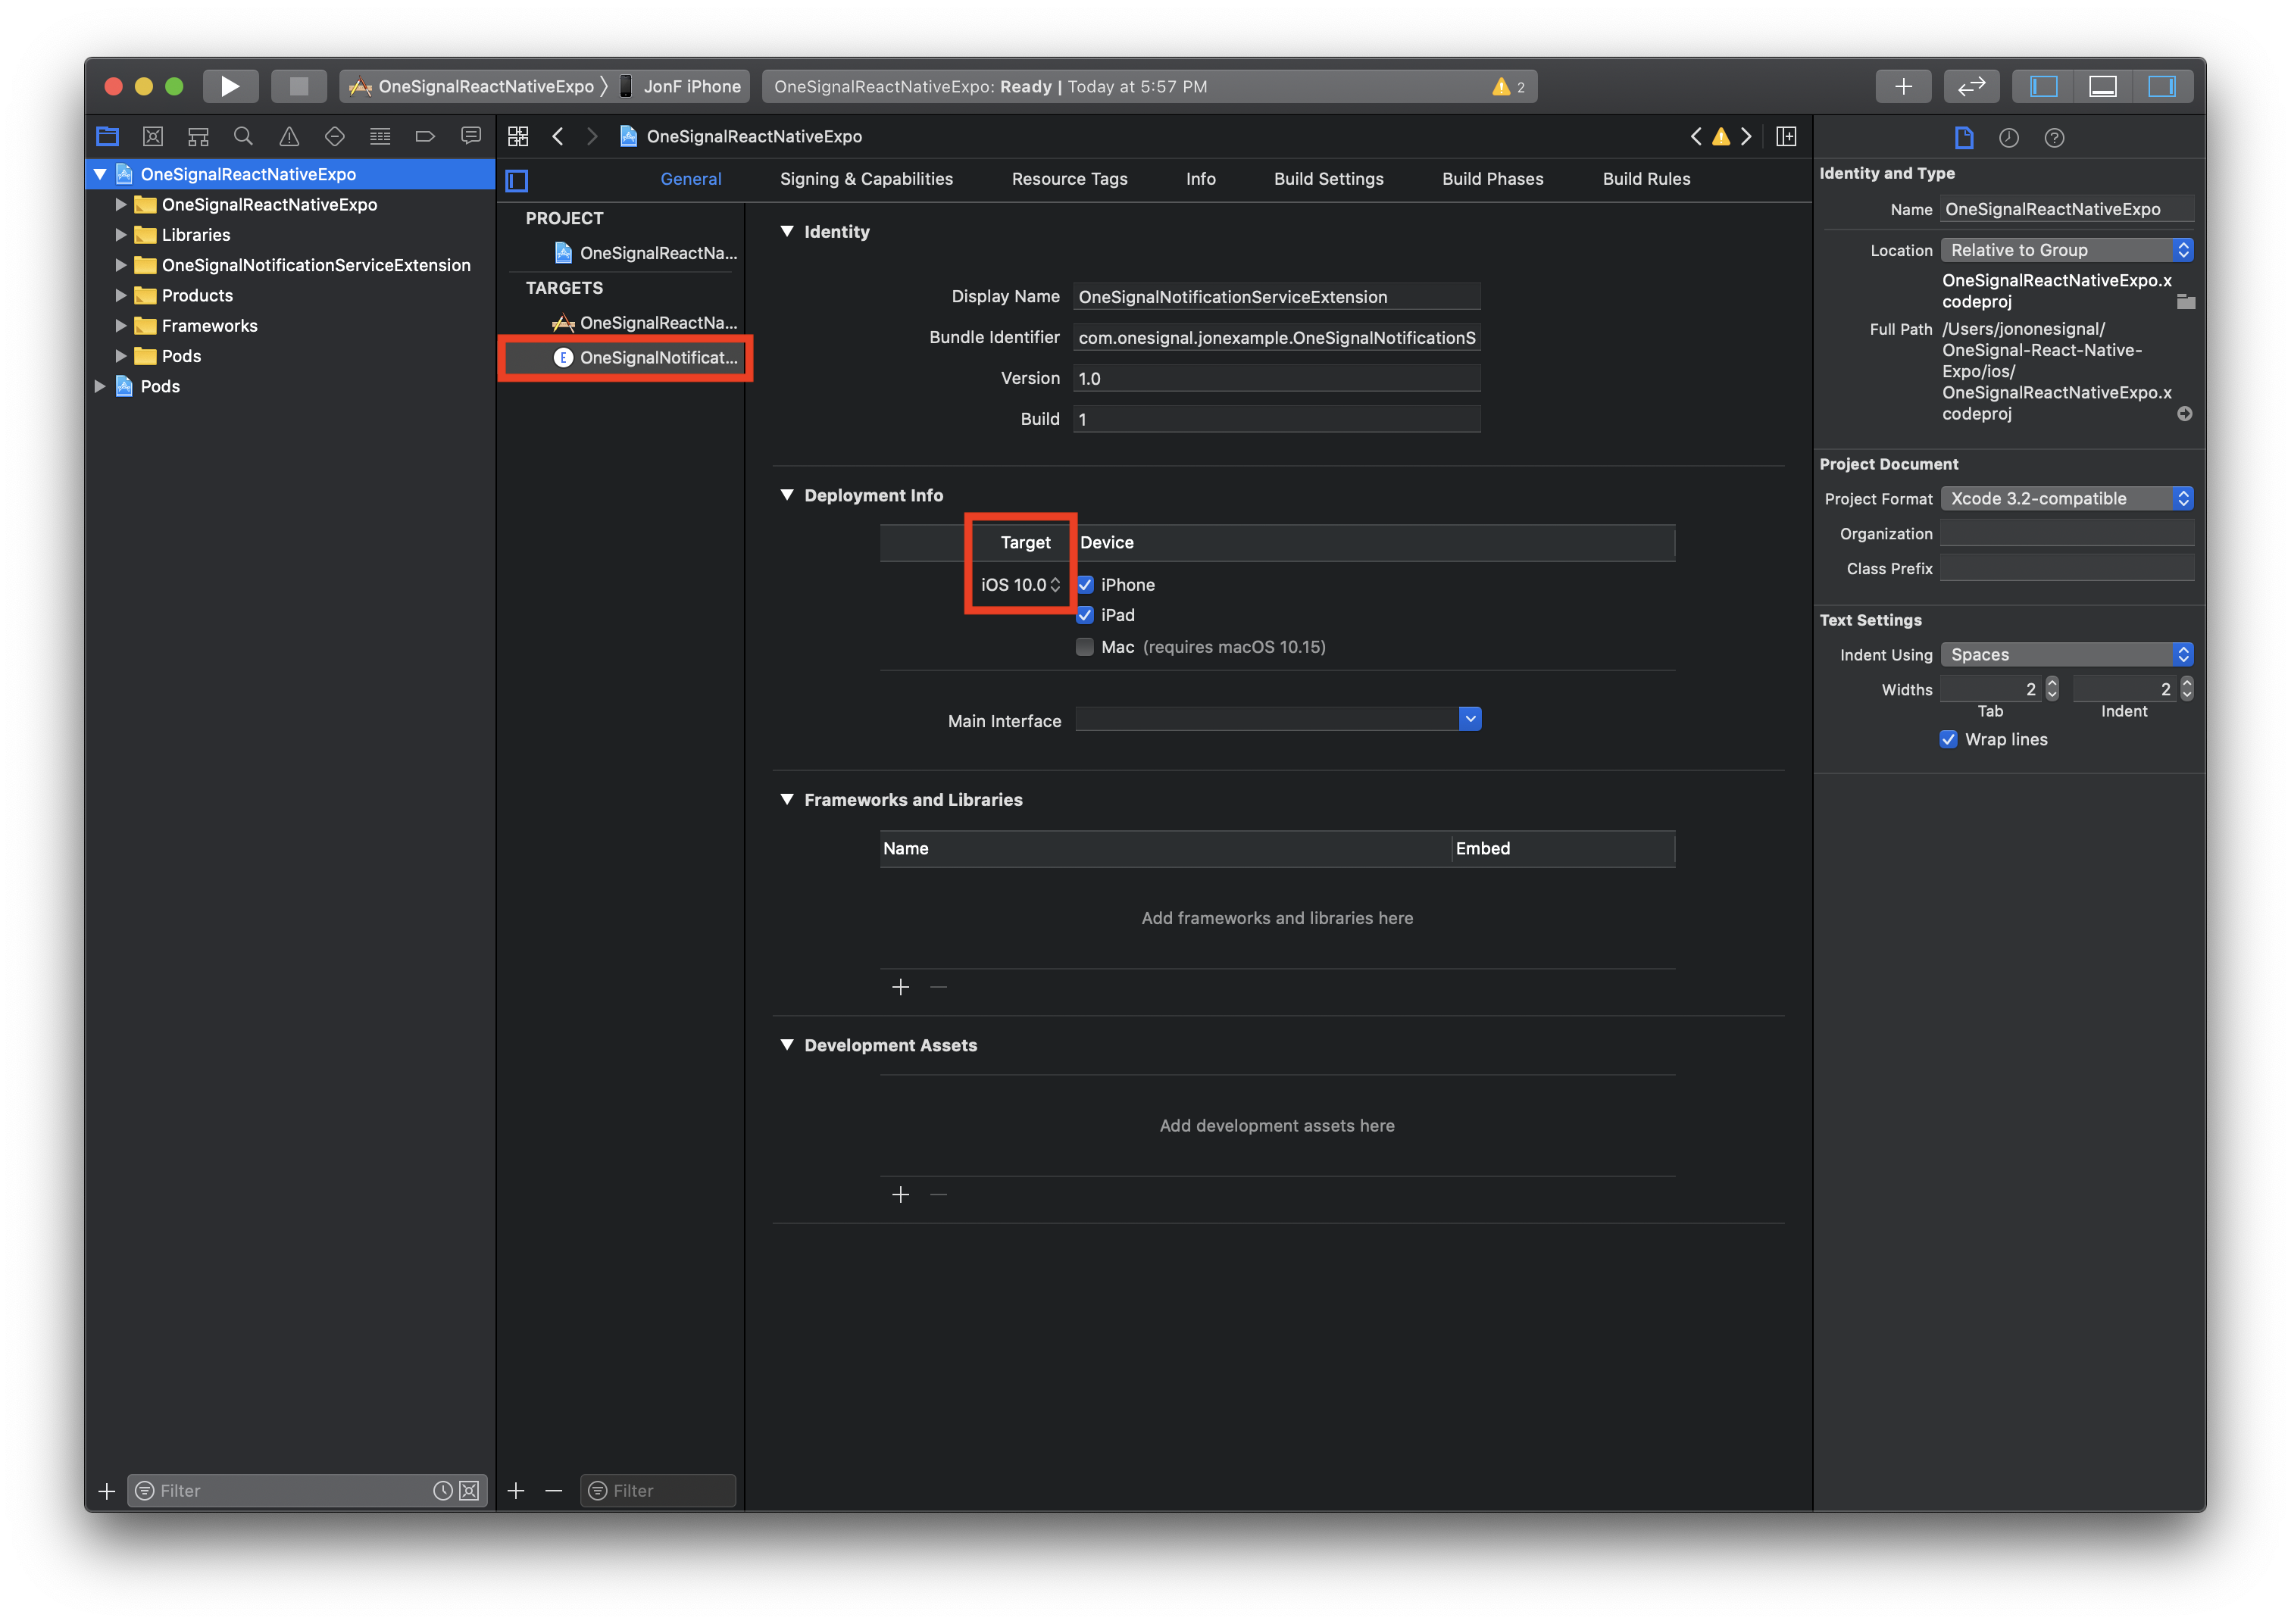
4.3.5 In the Project Navigator, select the top-level project directory and select the OneSignalNotificationServiceExtension target.
Ensure the Deployment Target is set to iOS 10 for maximum platform compatibility.
4.3.6 In your Project Root > ios > Podfile , add the notification service extension outside the main target (should be at the same level as your main target):
Close Xcode. While still in the ios directory, run pod install again.
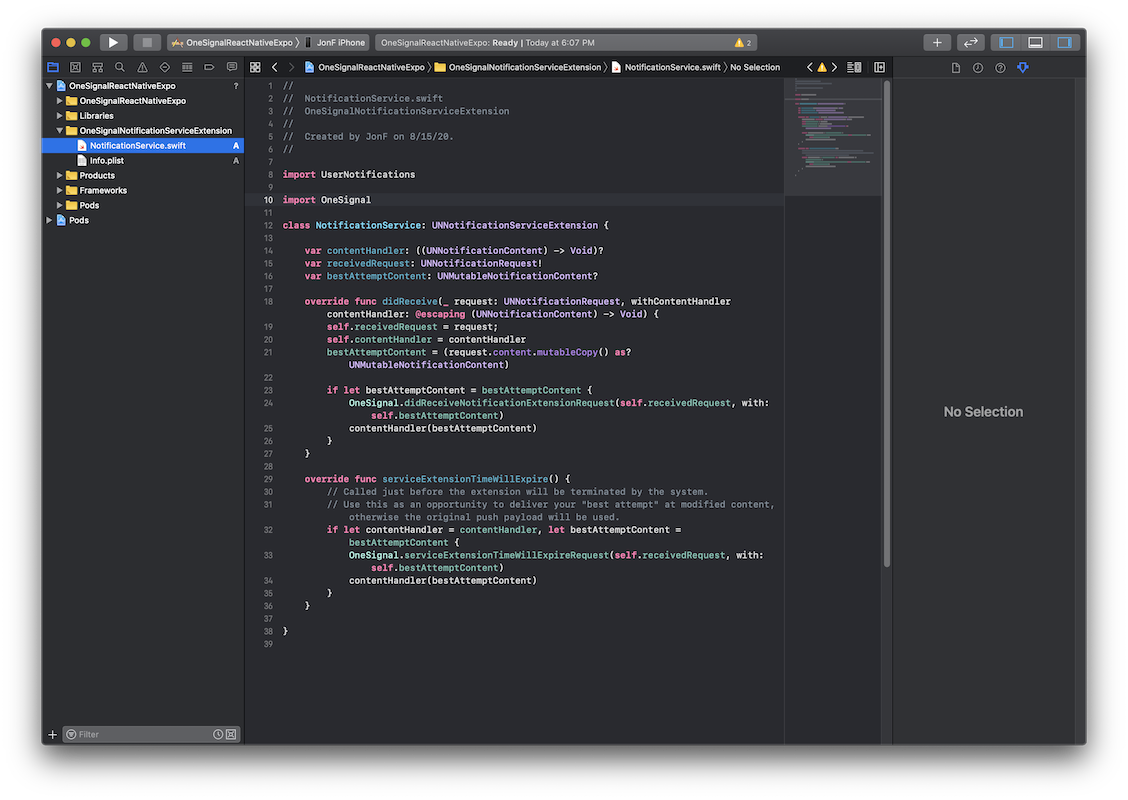
Re-Open the . xcworkspace file in Xcode. In the OneSignalNotificationServiceExtension directory > NotificationService.m or NotificationService.swift file, replace the whole file contents with the code below:
Ignore any build errors at this point, we will resolve these later by importing the OneSignal library.
4.4 Add App Group
In order for your application to use Confirmed Deliveries and increment/decrement Badges through push notifications, you need to set up an App Group for your application.
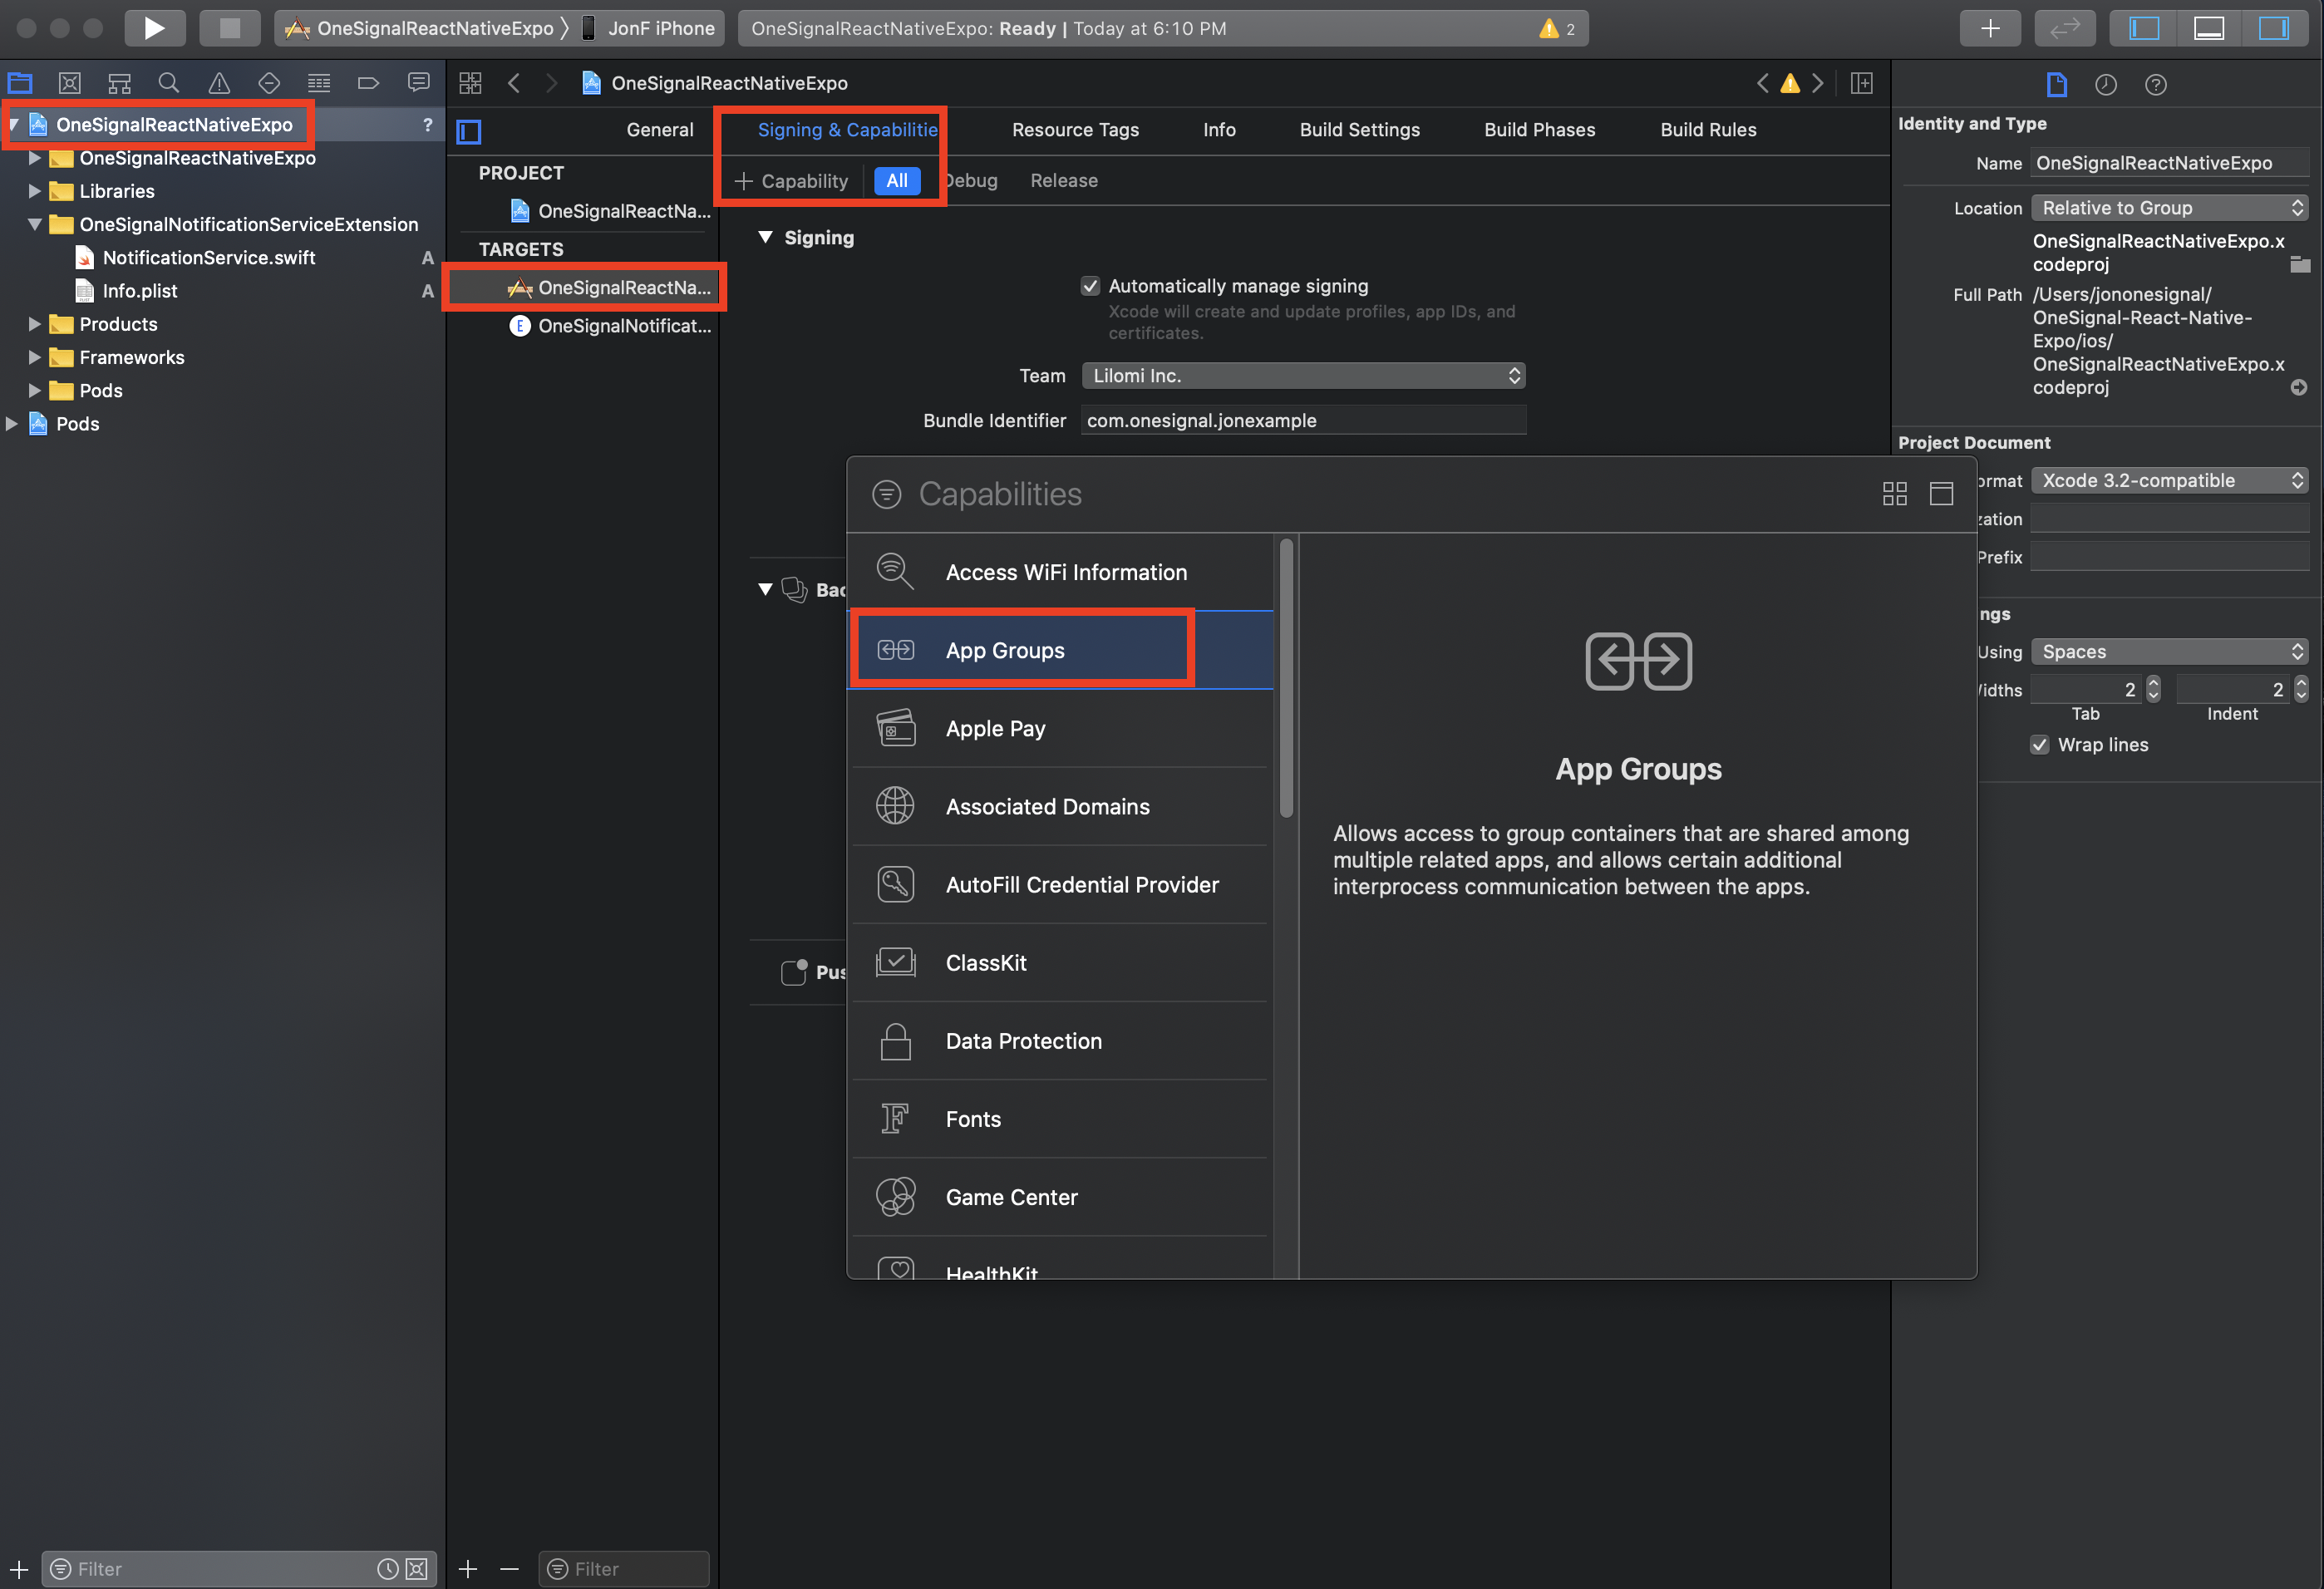
4.4.1 In your main app target go back to Signing & Capabilities > All > + Capability and add App Groups
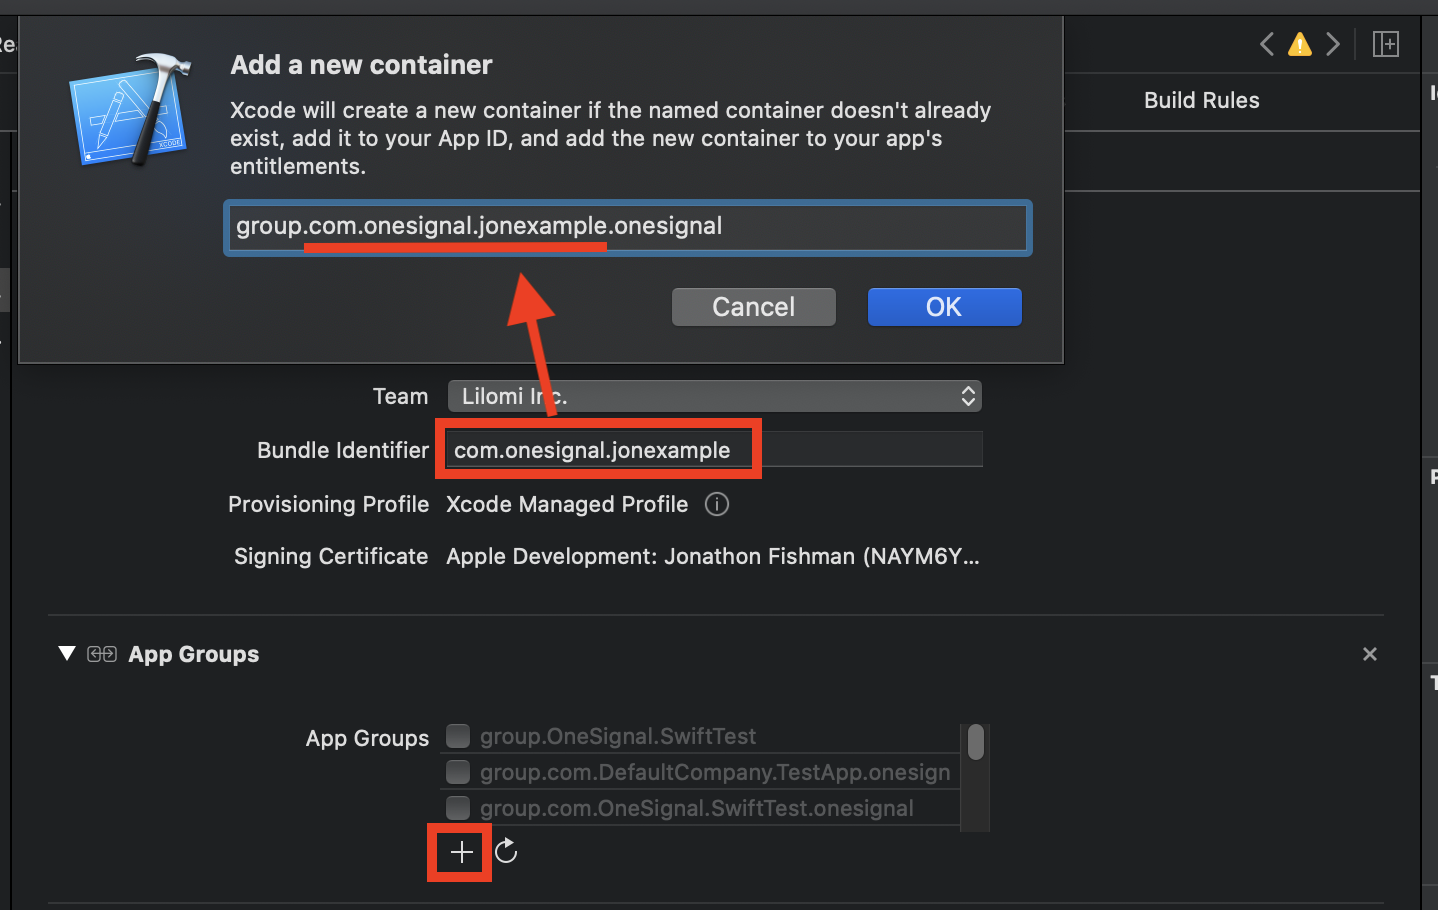
4.4.2 Under the newly added “App Groups” capability click the + button.
Set the “App Groups” container to be group.YOUR_BUNDLE_IDENTIFIER.onesignal where YOUR_BUNDLE_IDENTIFIER is the same as shown in «Bundle Identifier» then press OK.
4.4.3 Repeat this process for the OneSignalNotificationServiceExtension
Make sure the «App Groups» container is the same for both targets! Do not include OneSignalNotificationServiceExtension . Then press OK.
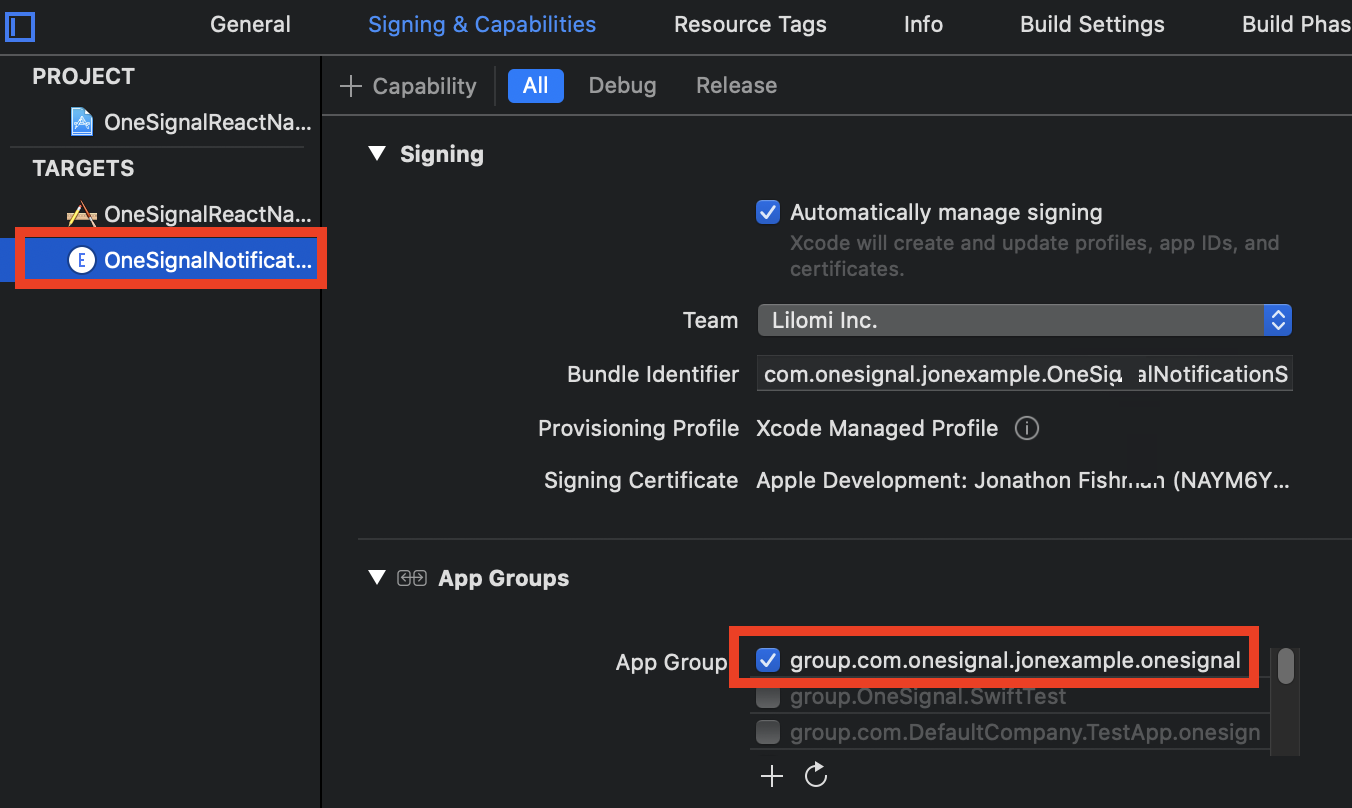
If you require more details or troubleshooting help, see the iOS SDK App Groups setup guide.
In your App.js or index.js initialize OneSignal and try the example methods below:
Event Listeners & Components
We suggest using a base/root component to add as an event listener. If you choose a sub-component that is only shown in some situations (such as using a homepage as an event listener), the component may unmount later on as the user navigates elsewhere in your app.
If you encounter problems with one or more of the events listeners, please see our troubleshooting documentation here.
When you install react-native-onesignal it will automatically include a specific version of the OneSignal iOS native SDK that is known to work with it. Only follow the instructions below if there is a native OneSignal SDK fix you need that isn’t included already in the latest react-native-onesignal update.
- Download the latest OneSignal iOS native release.
- Delete libOneSignal.a and OneSignal.h from node_modules/react-native-onesignal/ios/
- From /iOS_SDK/OneSignalSDK/Framework/OneSignal.framework/Versions/A/ , copy OneSignal to /node_modules/react-native-onesignal/ios/ and rename it libOneSignal.a
- Copy OneSignal.h from /iOS_SDK/OneSignalSDK/Framework/OneSignal.framework/Versions/A/Headers to /node_modules/react-native-onesignal/ios/
Run your app on a physical device to make sure it builds correctly. Note that the iOS Simulator does not support receiving remote push notifications.
- Android devices should be subscribed to push notifications immediately upon opening the app.
- iOS devices should be prompted to subscribe to push notifications if you used the example setup code provided.
Check your OneSignal Dashboard Audience > All Users to see your Device Record.
Then head over to Messages > New Push to Send your first Push Notification from OneSignal.
If you run into any issues please see our React Native troubleshooting guide.
For faster assistance, please provide:
- Your OneSignal App Id
- Details, logs, and/or screenshots of the issue.
- Steps to reproduce
Recommended
After initialization, OneSignal will automatically collect common user data by default. Use the following methods to set your own custom userIds, emails, phone numbers, and other user-level properties.
Required if using integrations.
Recommended for messaging across multiple channels (push, email, sms).
OneSignal creates channel-level device records under a unique Id called the player_id . A single user can have multiple player_id records based on how many devices, email addresses, and phone numbers they use to interact with your app.
If your app has its own login system to track users, call setExternalUserId at any time to link all channels to a single user. For more details, see External User Ids.
Recommended if using Email and SMS messaging.
Use the provided SDK methods to capture email and phone number when provided. Follow the channel quickstart guides for setup:
Optional
All other event and user properties can be set using Data Tags. Setting this data is required for more complex segmentation and message personalization.
Optional
Android devices are subscribed to notifications automatically when your app is installed, so this section only applies to your iOS release.
Apple’s Human Interface Guidelines recommend that apps «Create an alert, modal view, or other interface that describes the types of information they want to send and gives people a clear way to opt in or out.»
OneSignal provides an easy option for a «soft-prompt» using In-App Messages to meet this recommendation and have a better user experience. This also permits you to ask for permission again in the future, since the native permission prompt can no longer be shown in your app if the user clicks deny.
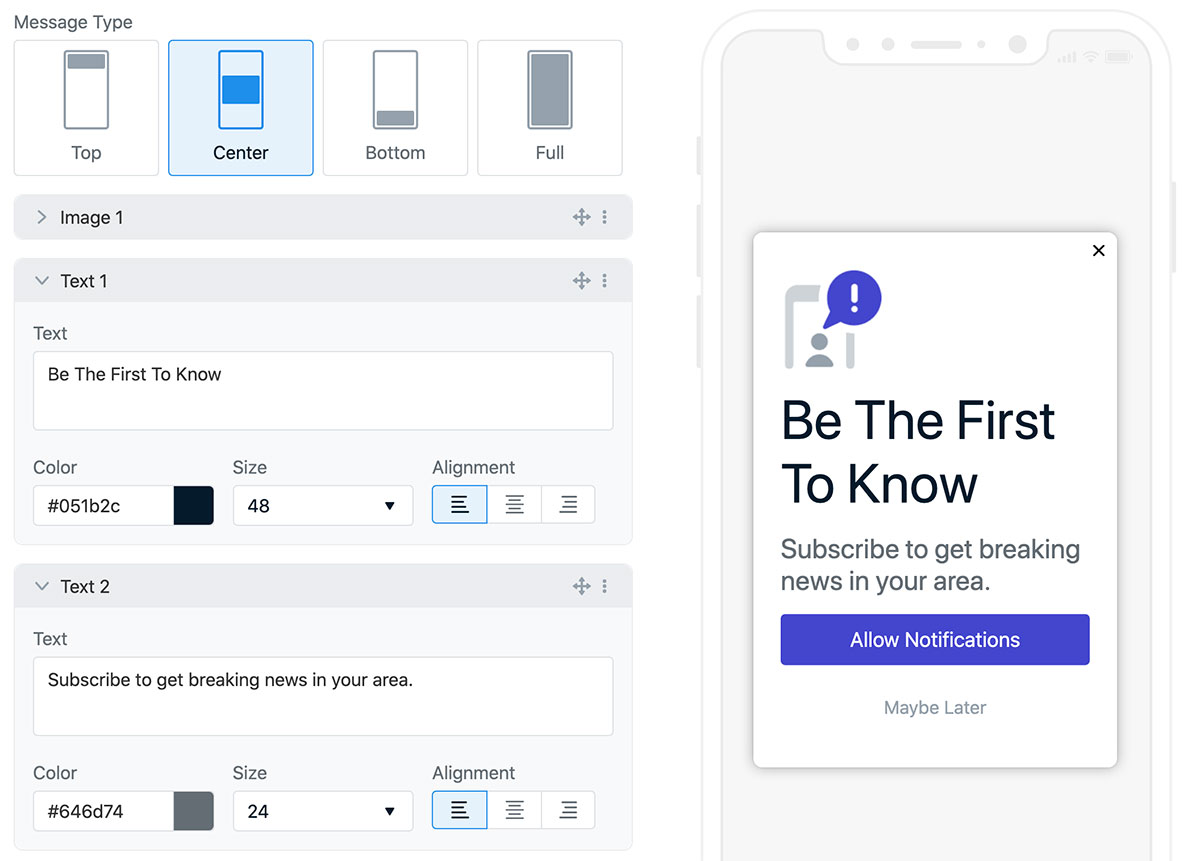
See our iOS Push Opt-In Prompt for details on implementing this.
Источник


