- React Native Generate APK — Debug and Release APK
- Debug APK
- What can I use it for?
- Prerequisite:
- How to generate one in 3 steps?
- Release APK
- Publishing to Google Play Store
- Generating an upload key
- Setting up Gradle variables
- Adding signing config to your app’s Gradle config
- Generating the release AAB
- Testing the release build of your app
- Publishing to other stores
- Enabling Proguard to reduce the size of the APK (optional)
- Migrating old Android React Native apps to use App Signing by Google Play
- Default Permissions
- Running On Device
- Running your app on Android devices
- Development OS
- 1. Enable Debugging over USB
- 2. Plug in your device via USB
- 3. Run your app
- Connecting to the development server
- Method 1: Using adb reverse (recommended)
- Method 2: Connect via Wi-Fi
- Building your app for production
- 1. Enable Debugging over USB
- 2. Plug in your device via USB
- 3. Run your app
- Connecting to the development server
- Method 1: Using adb reverse (recommended)
- Method 2: Connect via Wi-Fi
- Building your app for production
- 1. Enable Debugging over USB
- 2. Plug in your device via USB
- 3. Run your app
- Connecting to the development server
- Method 1: Using adb reverse (recommended)
- Method 2: Connect via Wi-Fi
- Building your app for production
- Running your app on iOS devices
- Development OS
- 1. Plug in your device via USB
- 2. Configure code signing
- 3. Build and Run your app
- Connecting to the development server
- Troubleshooting
- 1. Wi-Fi network.
- 2. IP address
- Building your app for production
React Native Generate APK — Debug and Release APK


An Android Package Kit (APK) is the package file format used by the Android OS for distribution and installation of mobile apps. It is similar to the .exe file you have on Windows OS, a .apk file is for android.
Debug APK
What can I use it for?
A debug .apk file will allow you to install and test your app before publishing to app stores. Mind you, this is not yet ready for publishing, and there are quite a few things you’ll need to do to before you can publish. Nevertheless, it’ll be useful for initial distribution and testing.
You’ll need to enable debugging options on your phone to run this apk.
Prerequisite:
How to generate one in 3 steps?
Step 1: Go to the root of the project in the terminal and run the below command:
react-native bundle —platform android —dev false —entry-file index.js —bundle-output android/app/src/main/assets/index.android.bundle —assets-dest android/app/src/main/res
Step 2: Go to android directory:
Step 3: Now in this android folder, run this command
There! you’ll find the apk file in the following path:
yourProject/android/app/build/outputs/apk/debug/app-debug.apk
Release APK
You will need a Java generated signing key which is a keystore file used to generate a React Native executable binary for Android. You can create one using the keytool in the terminal with the following command
keytool -genkey -v -keystore your_key_name.keystore -alias your_key_alias -keyalg RSA -keysize 2048 -validity 10000
Once you run the keytool utility, you’ll be prompted to type in a password. * Make sure you remember the password
You can change your_key_name with any name you want, as well as your_key_alias. This key uses key-size 2048, instead of default 1024 for security reason.
Step 2. Adding Keystore to your project
Firstly, you need to copy the file your_key_name.keystore and paste it under the android/app directory in your React Native project folder.
mv my-release-key.keystore /android/app
You need to open your android\app\build.gradle file and add the keystore configuration. There are two ways of configuring the project with keystore. First, the common and unsecured way:
This is not a good security practice since you store the password in plain text. Instead of storing your keystore password in .gradle file, you can stipulate the build process to prompt you for these passwords if you are building from the command line.
To prompt for password with the Gradle build file, change the above config as:
Place your terminal directory to android using:
cd android
For Windows,
gradlew assembleRelease
For Linux and Mac OSX:
./gradlew assembleRelease
Источник
Publishing to Google Play Store
Android requires that all apps be digitally signed with a certificate before they can be installed. In order to distribute your Android application via Google Play store it needs to be signed with a release key that then needs to be used for all future updates. Since 2017 it is possible for Google Play to manage signing releases automatically thanks to App Signing by Google Play functionality. However, before your application binary is uploaded to Google Play it needs to be signed with an upload key. The Signing Your Applications page on Android Developers documentation describes the topic in detail. This guide covers the process in brief, as well as lists the steps required to package the JavaScript bundle.
Generating an upload key
You can generate a private signing key using keytool . On Windows keytool must be run from C:\Program Files\Java\jdkx.x.x_x\bin .
This command prompts you for passwords for the keystore and key and for the Distinguished Name fields for your key. It then generates the keystore as a file called my-upload-key.keystore .
The keystore contains a single key, valid for 10000 days. The alias is a name that you will use later when signing your app, so remember to take note of the alias.
On Mac, if you’re not sure where your JDK bin folder is, then perform the following command to find it:
It will output the directory of the JDK, which will look something like this:
Navigate to that directory by using the command cd /your/jdk/path and use the keytool command with sudo permission as shown below.
Note: Remember to keep the keystore file private. In case you’ve lost upload key or it’s been compromised you should follow these instructions.
Setting up Gradle variables
- Place the my-upload-key.keystore file under the android/app directory in your project folder.
- Edit the file
/.gradle/gradle.properties or android/gradle.properties , and add the following (replace ***** with the correct keystore password, alias and key password),
These are going to be global Gradle variables, which we can later use in our Gradle config to sign our app.
Note about using git: Saving the above Gradle variables in
/.gradle/gradle.properties instead of android/gradle.properties prevents them from being checked in to git. You may have to create the
/.gradle/gradle.properties file in your user’s home directory before you can add the variables.
Note about security: If you are not keen on storing your passwords in plaintext, and you are running macOS, you can also store your credentials in the Keychain Access app. Then you can skip the two last rows in
Adding signing config to your app’s Gradle config
The last configuration step that needs to be done is to setup release builds to be signed using upload key. Edit the file android/app/build.gradle in your project folder, and add the signing config,
Generating the release AAB
Run the following in a terminal:
Gradle’s bundleRelease will bundle all the JavaScript needed to run your app into the AAB (Android App Bundle). If you need to change the way the JavaScript bundle and/or drawable resources are bundled (e.g. if you changed the default file/folder names or the general structure of the project), have a look at android/app/build.gradle to see how you can update it to reflect these changes.
Note: Make sure gradle.properties does not include org.gradle.configureondemand=true as that will make the release build skip bundling JS and assets into the app binary.
The generated AAB can be found under android/app/build/outputs/bundle/release/app.aab , and is ready to be uploaded to Google Play.
In order for Google Play to accept AAB format the App Signing by Google Play needs to be configured for your application on the Google Play Console. If you are updating an existing app that doesn’t use App Signing by Google Play, please check our migration section to learn how to perform that configuration change.
Testing the release build of your app
Before uploading the release build to the Play Store, make sure you test it thoroughly. First uninstall any previous version of the app you already have installed. Install it on the device using the following command in the project root:
Note that —variant release is only available if you’ve set up signing as described above.
You can terminate any running bundler instances, since all your framework and JavaScript code is bundled in the APK’s assets.
Publishing to other stores
By default, the generated APK has the native code for both x86 and ARMv7a CPU architectures. This makes it easier to share APKs that run on almost all Android devices. However, this has the downside that there will be some unused native code on any device, leading to unnecessarily bigger APKs.
You can create an APK for each CPU by changing the following line in android/app/build.gradle:
Upload both these files to markets which support device targeting, such as Google Play and Amazon AppStore, and the users will automatically get the appropriate APK. If you want to upload to other markets, such as APKFiles, which do not support multiple APKs for a single app, change the following line as well to create the default universal APK with binaries for both CPUs.
Enabling Proguard to reduce the size of the APK (optional)
Proguard is a tool that can slightly reduce the size of the APK. It does this by stripping parts of the React Native Java bytecode (and its dependencies) that your app is not using.
IMPORTANT: Make sure to thoroughly test your app if you’ve enabled Proguard. Proguard often requires configuration specific to each native library you’re using. See app/proguard-rules.pro .
To enable Proguard, edit android/app/build.gradle :
Migrating old Android React Native apps to use App Signing by Google Play
If you are migrating from previous version of React Native chances are your app does not use App Signing by Google Play feature. We recommend you enable that in order to take advantage from things like automatic app splitting. In order to migrate from the old way of signing you need to start by generating new upload key and then replacing release signing config in android/app/build.gradle to use the upload key instead of the release one (see section about adding signing config to gradle). Once that’s done you should follow the instructions from Google Play Help website in order to send your original release key to Google Play.
Default Permissions
By default, INTERNET permission is added to your Android app as pretty much all apps use it. SYSTEM_ALERT_WINDOW permission is added to your Android APK in debug mode but it will be removed in production.
Источник
Running On Device
It’s always a good idea to test your app on an actual device before releasing it to your users. This document will guide you through the necessary steps to run your React Native app on a device and to get it ready for production.
If you used Expo CLI or Create React Native App to set up your project, you can preview your app on a device by scanning the QR code with the Expo app—but in order to build and run your app on a device, you will need to eject and install the native code dependencies from the environment setup guide.
Running your app on Android devices
Development OS
1. Enable Debugging over USB
Most Android devices can only install and run apps downloaded from Google Play, by default. You will need to enable USB Debugging on your device in order to install your app during development.
To enable USB debugging on your device, you will first need to enable the «Developer options» menu by going to Settings → About phone → Software information and then tapping the Build number row at the bottom seven times. You can then go back to Settings → Developer options to enable «USB debugging».
2. Plug in your device via USB
Let’s now set up an Android device to run our React Native projects. Go ahead and plug in your device via USB to your development machine.
Now check that your device is properly connecting to ADB, the Android Debug Bridge, by running adb devices .
Seeing device in the right column means the device is connected. You must have only one device connected at a time.
3. Run your app
Type the following in your command prompt to install and launch your app on the device:
If you get a «bridge configuration isn’t available» error, see Using adb reverse.
Hint: You can also use the React Native CLI to generate and run a Release build (e.g. npx react-native run-android —variant=release ).
Connecting to the development server
You can also iterate quickly on a device by connecting to the development server running on your development machine. There are several ways of accomplishing this, depending on whether you have access to a USB cable or a Wi-Fi network.
Method 1: Using adb reverse (recommended)
You can use this method if your device is running Android 5.0 (Lollipop) or newer, it has USB debugging enabled, and it is connected via USB to your development machine.
Run the following in a command prompt:
To find the device name, run the following adb command:
You can now enable Live reloading from the Developer menu. Your app will reload whenever your JavaScript code has changed.
Method 2: Connect via Wi-Fi
You can also connect to the development server over Wi-Fi. You’ll first need to install the app on your device using a USB cable, but once that has been done you can debug wirelessly by following these instructions. You’ll need your development machine’s current IP address before proceeding.
You can find the IP address in System Preferences → Network.
- Make sure your laptop and your phone are on the same Wi-Fi network.
- Open your React Native app on your device.
- You’ll see a red screen with an error. This is OK. The following steps will fix that.
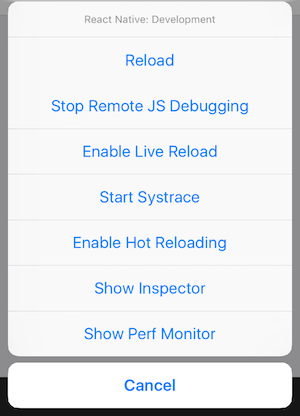
- Open the in-app Developer menu.
- Go to Dev Settings → Debug server host & port for device.
- Type in your machine’s IP address and the port of the local dev server (e.g. 10.0.1.1:8081).
- Go back to the Developer menu and select Reload JS.
You can now enable Live reloading from the Developer menu. Your app will reload whenever your JavaScript code has changed.
Building your app for production
You have built a great app using React Native, and you are now itching to release it in the Play Store. The process is the same as any other native Android app, with some additional considerations to take into account. Follow the guide for generating a signed APK to learn more.
1. Enable Debugging over USB
Most Android devices can only install and run apps downloaded from Google Play, by default. You will need to enable USB Debugging on your device in order to install your app during development.
To enable USB debugging on your device, you will first need to enable the «Developer options» menu by going to Settings → About phone → Software information and then tapping the Build number row at the bottom seven times. You can then go back to Settings → Developer options to enable «USB debugging».
2. Plug in your device via USB
Let’s now set up an Android device to run our React Native projects. Go ahead and plug in your device via USB to your development machine.
Now check that your device is properly connecting to ADB, the Android Debug Bridge, by running adb devices .
Seeing device in the right column means the device is connected. You must have only one device connected at a time.
3. Run your app
Type the following in your command prompt to install and launch your app on the device:
Select your project in the Xcode Project Navigator, then select your main target (it should share the same name as your project). Look for the «Signing & Capabilities» tab. Go to «Signing» and make sure your Apple developer account or team is selected under the Team dropdown. Do the same for the tests target (it ends with Tests, and is below your main target).
Hint: You can also use the React Native CLI to generate and run a Release build (e.g. npx react-native run-android —variant=release ).
Connecting to the development server
You can also iterate quickly on a device by connecting to the development server running on your development machine. There are several ways of accomplishing this, depending on whether you have access to a USB cable or a Wi-Fi network.
Method 1: Using adb reverse (recommended)
You can use this method if your device is running Android 5.0 (Lollipop) or newer, it has USB debugging enabled, and it is connected via USB to your development machine.
Run the following in a command prompt:
To find the device name, run the following adb command:
You can now enable Live reloading from the Developer menu. Your app will reload whenever your JavaScript code has changed.
Method 2: Connect via Wi-Fi
You can also connect to the development server over Wi-Fi. You’ll first need to install the app on your device using a USB cable, but once that has been done you can debug wirelessly by following these instructions. You’ll need your development machine’s current IP address before proceeding.
Open the command prompt and type ipconfig to find your machine’s IP address (more info).
- Make sure your laptop and your phone are on the same Wi-Fi network.
- Open your React Native app on your device.
- You’ll see a red screen with an error. This is OK. The following steps will fix that.
- Open the in-app Developer menu.
- Go to Dev Settings → Debug server host & port for device.
- Type in your machine’s IP address and the port of the local dev server (e.g. 10.0.1.1:8081).
- Go back to the Developer menu and select Reload JS.
You can now enable Live reloading from the Developer menu. Your app will reload whenever your JavaScript code has changed.
Building your app for production
You have built a great app using React Native, and you are now itching to release it in the Play Store. The process is the same as any other native Android app, with some additional considerations to take into account. Follow the guide for generating a signed APK to learn more.
1. Enable Debugging over USB
Most Android devices can only install and run apps downloaded from Google Play, by default. You will need to enable USB Debugging on your device in order to install your app during development.
To enable USB debugging on your device, you will first need to enable the «Developer options» menu by going to Settings → About phone → Software information and then tapping the Build number row at the bottom seven times. You can then go back to Settings → Developer options to enable «USB debugging».
2. Plug in your device via USB
Let’s now set up an Android device to run our React Native projects. Go ahead and plug in your device via USB to your development machine.
Next, check the manufacturer code by using lsusb (on mac, you must first install lsusb). lsusb should output something like this:
These lines represent the USB devices currently connected to your machine.
You want the line that represents your phone. If you’re in doubt, try unplugging your phone and running the command again:
You’ll see that after removing the phone, the line which has the phone model («Motorola PCS» in this case) disappeared from the list. This is the line that we care about.
Bus 001 Device 003: ID 22b8:2e76 Motorola PCS
From the above line, you want to grab the first four digits from the device ID:
In this case, it’s 22b8 . That’s the identifier for Motorola.
You’ll need to input this into your udev rules in order to get up and running:
Make sure that you replace 22b8 with the identifier you get in the above command.
Now check that your device is properly connecting to ADB, the Android Debug Bridge, by running adb devices .
Seeing device in the right column means the device is connected. You must have only one device connected at a time.
3. Run your app
Type the following in your command prompt to install and launch your app on the device:
If you get a «bridge configuration isn’t available» error, see Using adb reverse.
Hint: You can also use the React Native CLI to generate and run a Release build (e.g. npx react-native run-android —variant=release ).
Connecting to the development server
You can also iterate quickly on a device by connecting to the development server running on your development machine. There are several ways of accomplishing this, depending on whether you have access to a USB cable or a Wi-Fi network.
Method 1: Using adb reverse (recommended)
You can use this method if your device is running Android 5.0 (Lollipop) or newer, it has USB debugging enabled, and it is connected via USB to your development machine.
Run the following in a command prompt:
To find the device name, run the following adb command:
You can now enable Live reloading from the Developer menu. Your app will reload whenever your JavaScript code has changed.
Method 2: Connect via Wi-Fi
You can also connect to the development server over Wi-Fi. You’ll first need to install the app on your device using a USB cable, but once that has been done you can debug wirelessly by following these instructions. You’ll need your development machine’s current IP address before proceeding.
Open a terminal and type /sbin/ifconfig to find your machine’s IP address.
- Make sure your laptop and your phone are on the same Wi-Fi network.
- Open your React Native app on your device.
- You’ll see a red screen with an error. This is OK. The following steps will fix that.
- Open the in-app Developer menu.
- Go to Dev Settings → Debug server host & port for device.
- Type in your machine’s IP address and the port of the local dev server (e.g. 10.0.1.1:8081).
- Go back to the Developer menu and select Reload JS.
You can now enable Live reloading from the Developer menu. Your app will reload whenever your JavaScript code has changed.
Building your app for production
You have built a great app using React Native, and you are now itching to release it in the Play Store. The process is the same as any other native Android app, with some additional considerations to take into account. Follow the guide for generating a signed APK to learn more.
Running your app on iOS devices
Development OS
1. Plug in your device via USB
Connect your iOS device to your Mac using a USB to Lightning cable. Navigate to the ios folder in your project, then open the .xcodeproj file, or if you are using CocoaPods open .xcworkspace , within it using Xcode.
If this is your first time running an app on your iOS device, you may need to register your device for development. Open the Product menu from Xcode’s menubar, then go to Destination. Look for and select your device from the list. Xcode will then register your device for development.
2. Configure code signing
Register for an Apple developer account if you don’t have one yet.
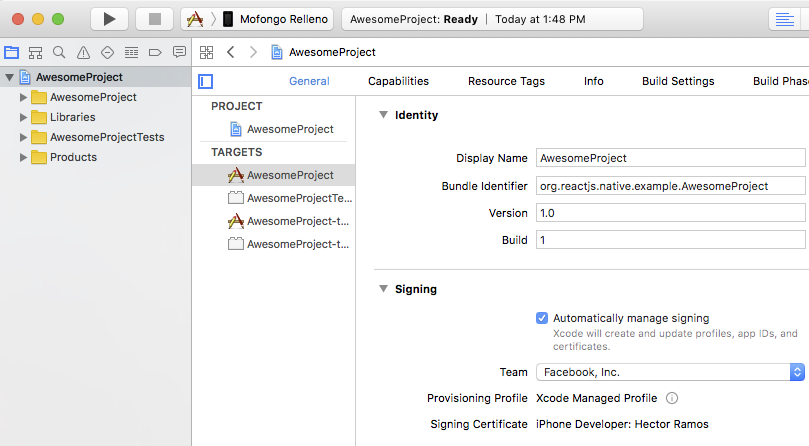
Select your project in the Xcode Project Navigator, then select your main target (it should share the same name as your project). Look for the «General» tab. Go to «Signing» and make sure your Apple developer account or team is selected under the Team dropdown. Do the same for the tests target (it ends with Tests, and is below your main target).
Repeat this step for the Tests target in your project.
3. Build and Run your app
If everything is set up correctly, your device will be listed as the build target in the Xcode toolbar, and it will also appear in the Devices pane ( ⇧⌘2 ). You can now press the Build and run button ( ⌘R ) or select Run from the Product menu. Your app will launch on your device shortly.
If you run into any issues, please take a look at Apple’s Launching Your App on a Device docs.
Connecting to the development server
You can also iterate quickly on a device using the development server. You only have to be on the same Wi-Fi network as your computer. Shake your device to open the Developer menu, then enable Live Reload. Your app will reload whenever your JavaScript code has changed.
Troubleshooting
If you have any issues, ensure that your Mac and device are on the same network and can reach each other. Many open wireless networks with captive portals are configured to prevent devices from reaching other devices on the network. You may use your device’s Personal Hotspot feature in this case. You may also share your internet (WiFi/Ethernet) connection from your Mac to your device via USB and connect to the bundler through this tunnel for very high transfer speeds.
When trying to connect to the development server you might get a red screen with an error saying:
Connection to http://localhost:8081/debugger-proxy?role=client timed out. Are you running node proxy? If you are running on the device, check if you have the right IP address in RCTWebSocketExecutor.m .
To solve this issue check the following points.
1. Wi-Fi network.
Make sure your laptop and your phone are on the same Wi-Fi network.
2. IP address
Make sure that the build script detected the IP address of your machine correctly (e.g. 10.0.1.123).
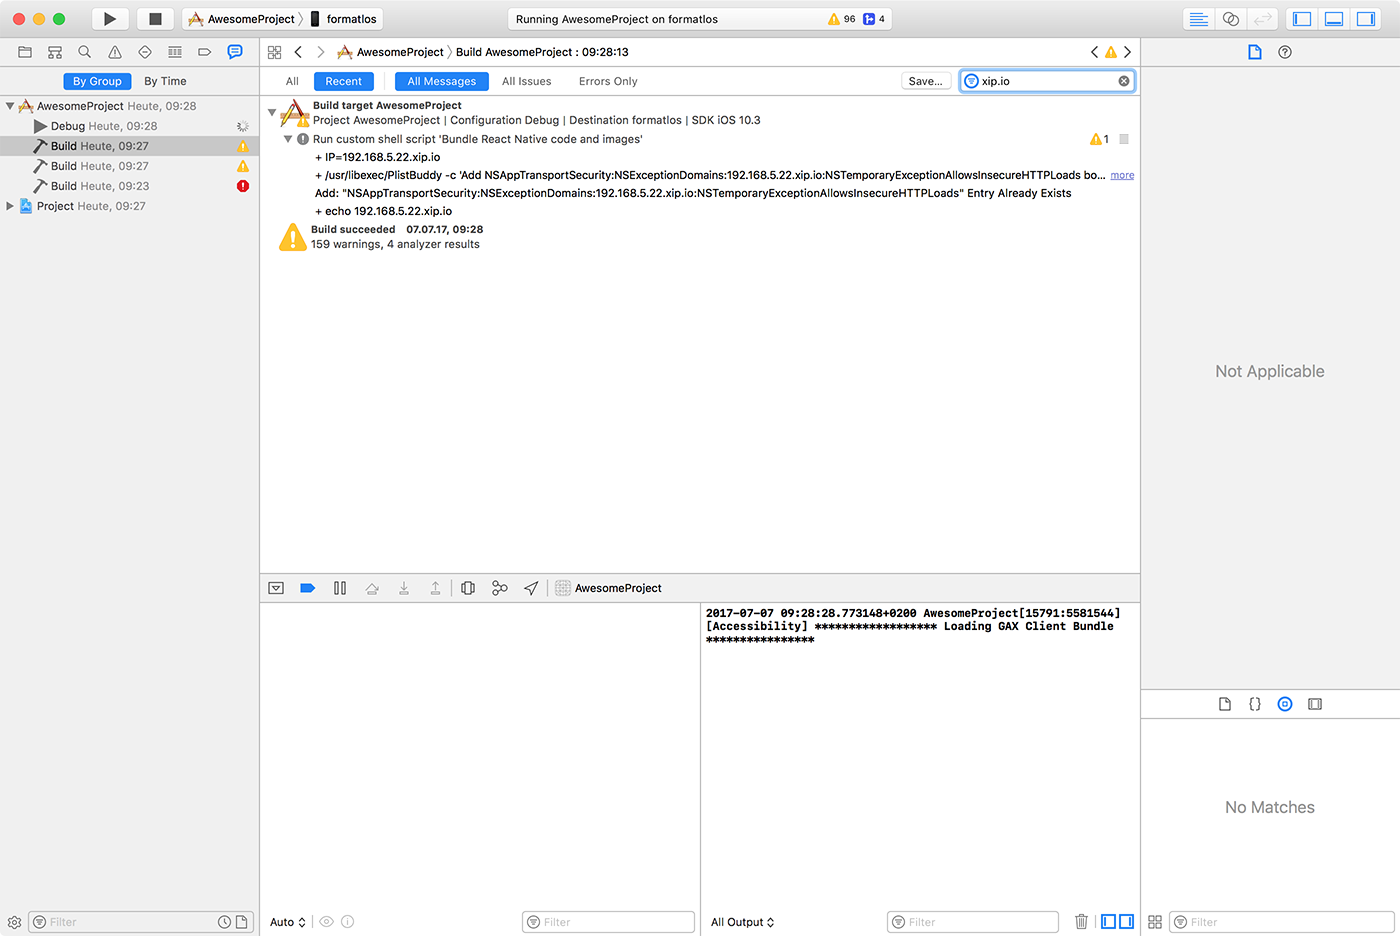
Open the Report navigator tab, select the last Build and search for IP= followed by an IP address. The IP address which gets embedded in the app should match your machines IP address.
Building your app for production
You have built a great app using React Native, and you are now itching to release it in the App Store. The process is the same as any other native iOS app, with some additional considerations to take into account. Follow the guide for publishing to the Apple App Store to learn more.
A Mac is required in order to build your app for iOS devices. Alternatively, you can refer to our environment setup guide to learn how to build your app using Expo CLI, which will allow you to run your app using the Expo client app.
A Mac is required in order to build your app for iOS devices. Alternatively, you can refer to our environment setup guide to learn how to build your app using Expo CLI, which will allow you to run your app using the Expo client app.
Источник


