- Android: Обработка СМС
- 0. Вместо вступления
- 1. Перехватываем СМС
- 2. Обрабатываем СМС
- Read sms messages programatically in Android
- Read SMS
- Permissions
- Register Broadcast Receiver in Manifest
- SmsListener Interface
- Broadcast Receiver
- Getting the Message in Activity
- Create a simple ViewPager Tabs in Android
- Handle No Internet Connectivity in Android Activity
- Create a Simple Pedometer and Step Counter in Android
- 9 Responses
- Automatic SMS verification with SMS retriever API in Android
- Prerequisites
- Step 01
- Step 02
- Step 03
- ** Construct Verification Message
- Computing your app’s hash string
- Send the verification message by SMS
- ** Things you must do **
- Detecting & sending SMS on Android 📮
- Runtime permissions, BroadcastReceiver & SmsManger.
- Motivation
- Overview
- 1. Asking for permission
- 2. Sending SMS through our app
- 3. Listening for incoming SMS
Android: Обработка СМС
0. Вместо вступления
Периодически (когда у меня выпадает свободный вечер, и наш «клуб» организует игру) я играю в регбол. «Клуб» организован таким образом, что в день игры всем участникам приходит СМС такого вида:
Регбол! Сегодня в 19-30. Двор школы №30: ул. Володарского, 20. Открытая площадка с резиновым покрытием. Тел. 8 (951) ***-**-**.
И вот я подумал — почему бы не написать небольшое приложение, которое будет отлавливать эти сообщения, и забивать их в гугл-календарь. Зачем? Да, в основном, just for fun, ибо я не настолько занятой человек, чтобы мне были жизненно необходимы автоматические секретари.
Итак, приложение будет уметь следующее:
- Следить за входящими сообщениями. Если пришло сообщение от адресата RM FIGHT, то нужно сверить текст сообщения с шаблоном, и при совпадении создать мероприятие в гугл-календаре. Если же текст сообщения с шаблоном не совпадает (например, просто какие-то новости пришли), то сохраняем сообщение в базе, чтобы потом можно было его прочитать.
- Показывать сообщения от этого адресата, не попадающие в категорию «Оповещение об игре» (новости, реклама и т.д.).
В рамках статьи я полагаю, что у читателя есть базовые знания — как создать проект, что такое файл Manifest, и с чего вообще начинать разработку под андроид — на этот счет есть куча разных туториалов, и здесь на этом останавливаться не будем. В то же время статья не предназначена для продвинутых андроид-девелоперов, в ней будут рассматриваться достаточно базовые вещи, вроде мониторинга и обработки смс, работы с базой данных, подключения по HTTP.
Итак, приступим. Кстати, используемая версия SDK — 14 (Android 4.0).
1. Перехватываем СМС
Для мониторинга входящих СМС первым делом нам необходимо запросить разрешение на их получение. Для этого в файл AndroidManifest.xml необходимо добавить запись вида:
Следующим шагом будет реализация монитора для прослушивания входящих сообщений. Для этого в манифест-файле регистрируем receiver:
Здесь мы установили приоритет равным 100, чтобы наше приложение получило доступ к входящему СМС раньше стандартного обработчика СМС, которое имеет нулевой приоритет. После того, как наше приложение обработает сообщение, нет смысла отдавать его системе, и помещать в папку Входящие.
Теперь создаем класс, расширяющий BroadcastReceiver :
В этом классе реализуется абстрактный метод onReceive() , который вызывается системой каждый раз при получении сообщения. В методе прописываем:
Здесь мы получаем сообщение с помощью метода intent.getExtras().get(«pdus») , который возвращает массив объектов в формате PDU — эти объекты мы потом приводим к типу SmsMessage с помощью метода createFromPdu() .
Теперь внимание. То, что мы делаем после получения сообщения, должно исполняться быстро. Broadcast receiver получает в системе высокий приоритет, но он работает в фоновом режиме и должен выполняться за короткое время, так что наши возможности ограничены. Например, мы можем сгенерировать уведомление или запустить службу, чтобы продолжить обработку в ней. Поэтому мы проверим отправителя сообщения, и если это уведомление об игре — мы вытащим текст сообщения и запустим службу, в которой уже и будем проводить обработку этого сообщения.
Дописываем в методе onReceive() :
Здесь мы составляем текст сообщения (в случае, когда сообщение было длинным и пришло в нескольких смс-ках, каждая отдельная часть хранится в messages[i] ) и вызываем метод abortBroadcast() , чтобы предотвратить дальнейшую обработку сообщения другими приложениями.
2. Обрабатываем СМС
В предыдущем пункте мы остановились на том, что запускаем службу для обработки смс с помощью метода startService() . Собственно, что такое службы и с чем их едят хорошо описано на официальном сайте, поэтому здесь на этом останавливаться не будем.
Создаем класс SmsService , расширяющий класс Service :
Поскольку у нас локальная служба, метод onBind() возвращает null.
Для вывода уведомлений нам понадобится вспомогательный метод showNotification():
В методе onStartCommand() прописываем:
Осталось, собственно, реализовать метод smsProcess() , который добавит смс в базу и сформирует мероприятие в гугл-календаре. Этим и займемся в следующей части статьи.
UPDATE: выложил код на GitHub. Со второй частью статьи пока не успеваю, слишком уж загружен по работе. Надеюсь в ближайшее время с этим вопросом разберусь.
Источник
Read sms messages programatically in Android
by Anu S Pillai · Published March 4, 2017 · Updated March 20, 2017

Read SMS
In this tutorial we will see how to listen and read SMS programatically in Android. This feature is widely used in Apps to read OTPs and Secret Codes automatically without the need of the user to look and type the OTP manually.
Permissions
First lets add all the necessary permissions in Android Manifest which is required to listen to incoming SMS and read it. Copy – Paste the below code in your Manifest.
Register Broadcast Receiver in Manifest
Now lets register the broadcast receiver in the Android Manifest. Add below code inside the tag. We will create the SmsReceiver.java class shortly.
SmsListener Interface
Now lets create an Interface file SmsListener.java with the below code. This interface will help us notify the activity whenever a new SMS is received by the Broadcast receiver.
Broadcast Receiver
Now lets move on to create our Broadcast receiver which will listen to incoming sms. We have already registered the receiver in Manifest above. Create a Java file SmsReceiver.java and copy paste the below code in it.
Getting the Message in Activity
Lets create our MainActivity.java class in which we will receive the text and do some actions as per our requirements.
Please let me know your Suggestions / Queries in comments.
Follow GadgetSaint on Facebook / Twitter for updates.
Wanna start your blog or site in 5 mins? Check out Official WordPress recommended web hosting Bluehost.
The Admin at GadgetSaint.com
- Next story Update : Fetch calories and steps using Google Fit API for any date
- Previous story Create a Splash Screen with Video in Android
Create a simple ViewPager Tabs in Android
by Anu S Pillai · Published April 22, 2017
Handle No Internet Connectivity in Android Activity
December 7, 2016
by Anu S Pillai · Published December 7, 2016 · Last modified April 15, 2017
Create a Simple Pedometer and Step Counter in Android
by Anu S Pillai · Published March 30, 2017 · Last modified July 6, 2019
9 Responses
I have tried to follow your example. However, I get the following errors:
Error:(7, 34) error: cannot find symbol class BroadcastReceiver
Error:(13, 27) error: cannot find symbol class Context
Error:(13, 44) error: cannot find symbol class Intent
Error:(12, 5) error: method does not override or implement a method from a supertype
Error:(14, 9) error: cannot find symbol class Bundle
Error:(19, 13) error: cannot find symbol class SmsMessage
Error:(19, 37) error: cannot find symbol variable SmsMessage
Any advice would be appreciated.
Hover @ the names and you will get the suggestions to import the files .
hope it will help you . 🙂
Nice Blog,but please give some more explanation of code to get understand
Источник
Automatic SMS verification with SMS retriever API in Android

Nowadays, SMS verification is the best way that is being used by mobile applications for login purpose. There are many ways to automatically fill the OTP field by reading the message in our phone using READ_SMS permission. But, Google has strictly prohibited the usage of that permission for security purposes. You can read the full explanation here.
Since we can’t use the READ_SMS permission anymore, Google has given some other choices to implement automatic SMS verification using SMS Retriever API. With the SMS Retriever API, we can perform SMS-based user verification in our Android app automatically, without requiring the user to manually type verification codes, and without requiring any extra app permissions
* No need any sms permission for sms retriever api
In this article, we will learn our SMS Retriever API and see how this can be easily used for SMS verification. So, let’s get started.
Prerequisites
The SMS Retriever API is available only on Android devices with Play services version 10.2 and newer.
Step 01
Add the dependency in-app level Gradle file:
Step 02
Create SMS Broadcast Receiver to receive the message:
When a client’s phone receives any message containing a unique string, SMS Retriever API will broadcast the message with SmsRetriever.SMS_RETRIEVED_ACTION intent. Then, we should use a broadcast receiver to receive the verification message. In the BroadcastReceiver ‘s onReceive handler, we will get the text of the verification message from the Intent’s extras, then extract the verification code with regular expression:
Step 03
Init & Register the SMS Broadcast Receiver:
- Init this BroadcastReceiver with the intent filter SmsRetriever.SMS_RETRIEVED_ACTION in onCreate()
- Register the receiver in onResume()
- Unregister the receiver in onPause()
Start Sms Retriver API in onCreate()
Full MainActivity class looks like this:
Our coding is done! Now its time to construct the message.
** Construct Verification Message
Yes SMS retriever API doesn’t require any permission, but you have to make sure that the message follow these criteria:
- Be no longer than 140 bytes
- Contain a one-time code
- End with an 11-character hash string that identifies your app
Computing your app’s hash string
Google Play services uses the hash string to determine which verification messages to send to your app. The hash string is made of your app’s package name and your app’s public key certificate. To generate the hash string:
Let’s create a class named is AppSignatureHelper and paste the below code. This is the simplest way to get hash string. You can generate using CMD as well. Once you got hash string then that deletes helper class.
However, if you use the helper class, be sure to remove it from your app after you get the hash string. Do not use hash strings dynamically computed on the client in your verification messages.
Send the verification message by SMS
After you construct the verification message, send the message to the user’s phone number using any SMS system.
** Things you must do **
- Once you completed get the hash code to remove the AppSignatureHelper class from your project before going to live or production.
- In Android, Debug and Release APK’s have different hash string, Kindly make sure you get hash code from release build.
Be sure to give claps if you find something useful from this article. Find the source code from GitHub here.
Источник
Detecting & sending SMS on Android 📮
Runtime permissions, BroadcastReceiver & SmsManger.

Aug 1, 2017 · 5 min read
Motivation
With so many different ways to communicate (I’m 👀 at you Google Developers), one might find odd talking about integrating the old-school SMS service in your app. Truth is, besides the usual 2-step-verification and related services, there are some areas on the planet 🌍 where data is still rare and/or very expensive, so if we are to tackle the next billion, most of these new users are in emerging markets so, SMS might be a good alternative or at least something to consider.
With relative low effort you can have your app using SMS as a data source while providing a pleasing UX, a material design UI (beats plain text👌).
Note: I’m using the Bus-eta project as a implementation example, you can read more about the it in my previous post. I’ve also created a simplified and easier to understand project, check the available on GitHub.
Overview
- Ask for SMS permissions (both manifest and runtime)
- Send SMS using the system’s SmsManager
- Setting up a BroadcastReceiver to listen and handle for incoming SMS.
1. Asking for permission
We’ll need to ask for some permissions in order for our app to work with SMS, start by declaring in your AndroidManifest
Now our pre-M users will be asked to accept these permission when they choose to install the app through the PlayStore.
But, as of beginning in Android 6.0 (API level 23), permissions must be requested at runtime, so we still need to make our app Marshmallow ready, otherwise a big % of users won’t be able to use sms, resulting in a very useless and frustrating effort from our part.

So whenever you need to use SMS, check if the app has permissions if not, request:
It’s important to not request beforehand, I personally hate it when I start a new app and I get asked for random permissions, sometimes I haven’t even used the app, so don’t be lazy, and only ask when needed.
Requesting the permission will present the user with the follow system AlertDialog:

As you can see the message given by the system is quite strong, unless it’s straightforward to your users why your app would need to access SMS, I would recommend you to show a simple explanation beforehand to avoid some of your more paranoid users (like me) to deny and render the whole feature useless.
Give the user some some context, is simple:
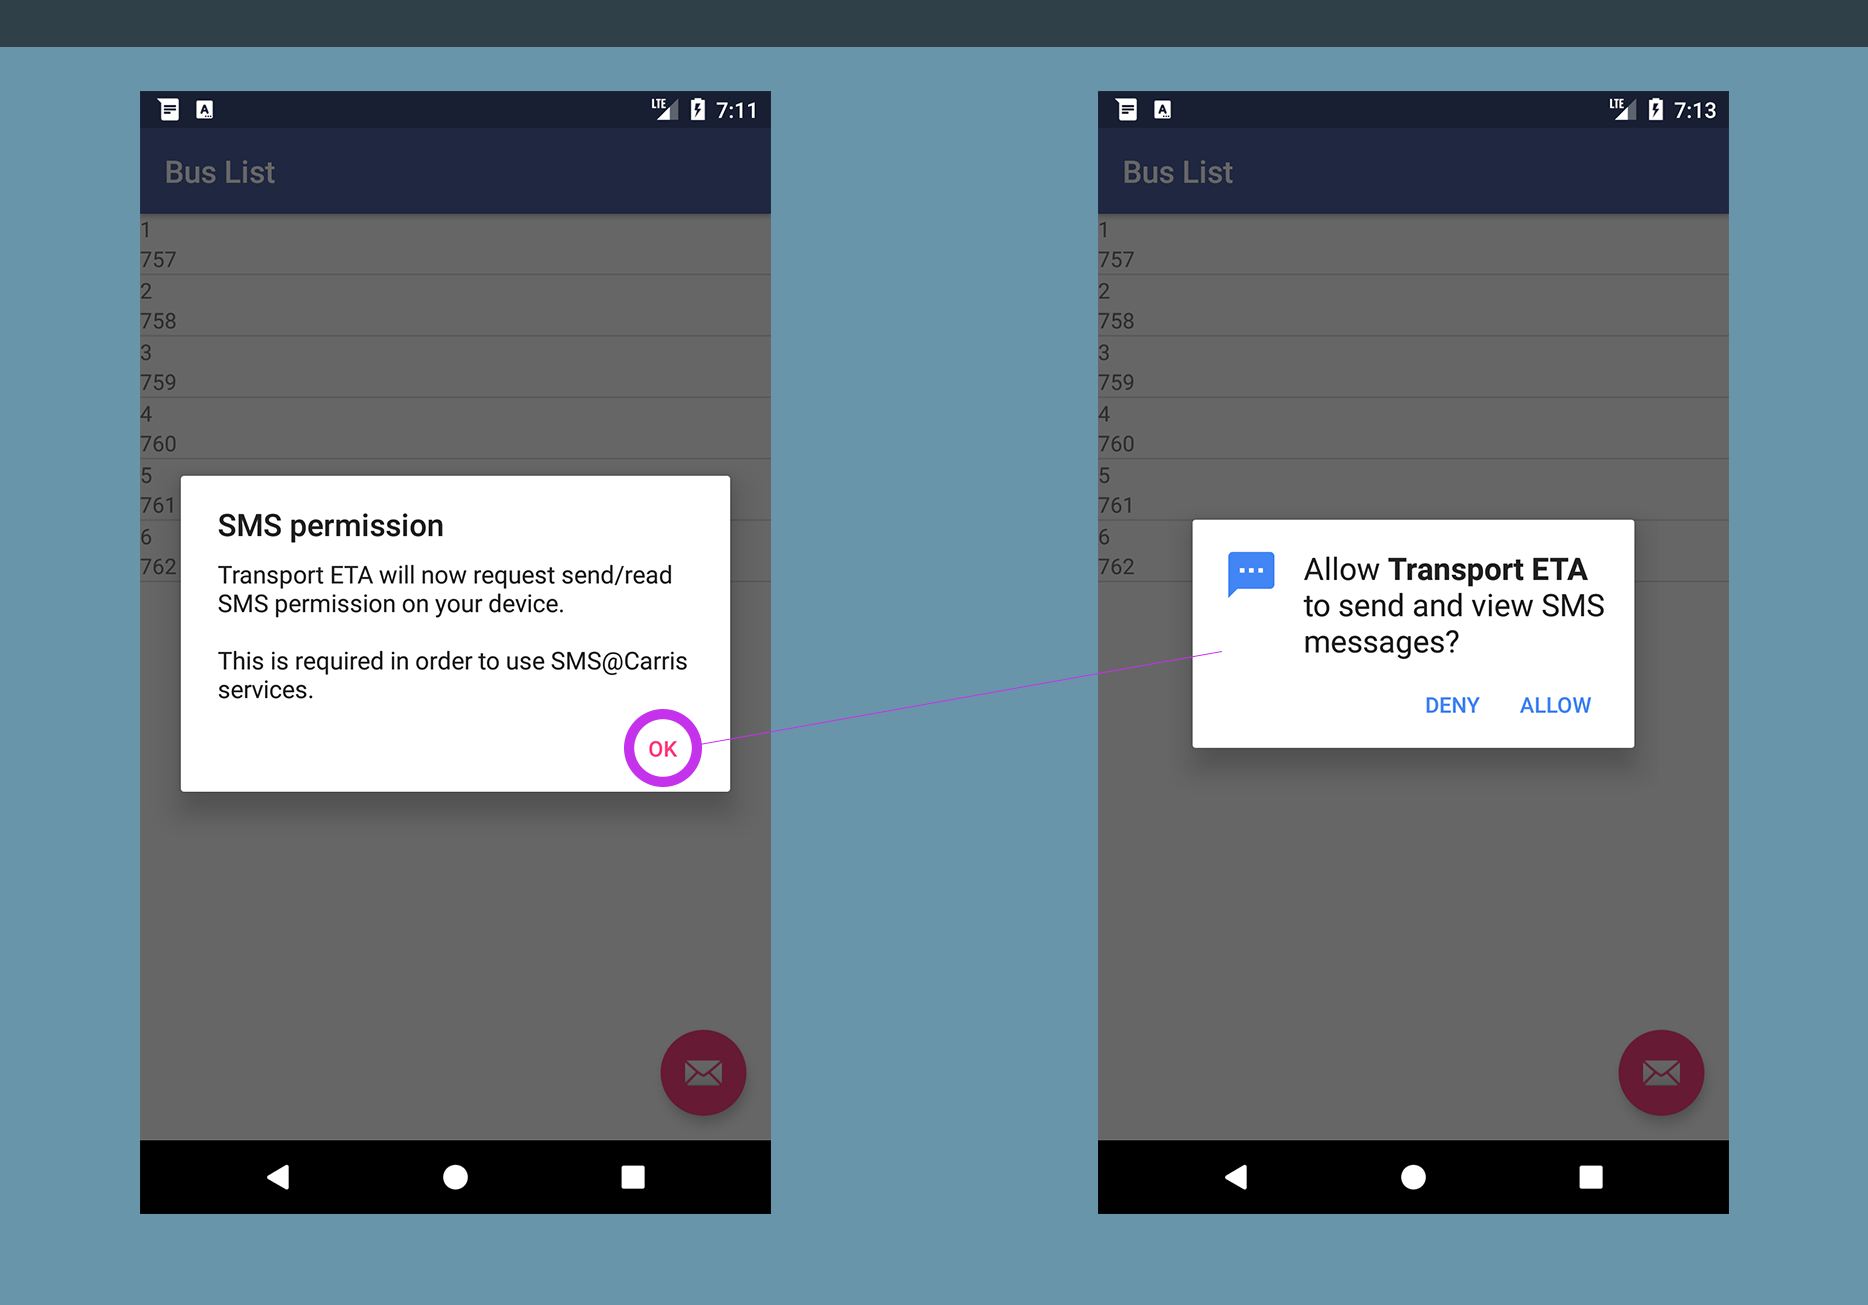
With minimal effort, our users are presented with simple but crucial information. Now they know why they should allow the app to access such sensitive data.
After the user decides we need to handle the permission response:
Note: Similar to calling startActivityForResult() , the SMS_PERMISSION_CODE is just a constant variable, it should match for both asking the permission, and handling the response.
2. Sending SMS through our app
Now that we have the required permissions we’ll use the default SmsManager in order to send our text:
Voilá! Our App will use the device’s default sms-messenger-app to send the sms 🙂 👌.

It’s considered good practice to inform the user normal fees apply, our app is just a dolled up version of the usual/default process. 💸
3. Listening for incoming SMS
Nowadays apps rarely have a one-way communication flow, so in order to listen to incoming SMS’s we need to setup our custom BroadcastReceiver
Of course you could always create a simple BroadcastReceiver and have the logic present on your Activity, but I prefer to keep this wrapper under a custom SmsBroadcastReceiver and only passing a listener for when the data is received. Avoiding ugly code floating around and unnecessary coupling.
Looking at line 47 of the above gist you can see that I’ve implemented some stricter conditions to when the listener is called, this suits my specific case, I only want to detect sms that come from a specific number and have a starting pattern of “SMS@CARRIS” which is passed via constructor:
This way we may ignore any other incoming sms, now we need to register ou receiver, in my case I want to listen while the app is open, so I’ll register in my Application class
The final step is assigning a listener, will only be called if the conditions are met:
You can also register your broadcast receiver via the manifest by adding the following line to your AndroidManifest :
And handle all the logic inside your own BroadcasReceiver, this way you keep all of your business logic wrapped inside your own class. For my case I want to have more control and adaptability, but using the manifest is the same as registering in your Application . My actual project has a Controller which handles a lot of the underlying edge cases that may surface with these custom implementations, but are outside of the article’s scope.
While using BroadcastReceivers beware of the priority setting, (but don’t abuse it 🙌).
Источник


