- Sending and Receiving Data with Sockets
- Receive messages in an Android app
- Handling messages
- Edit the app manifest
- Override onMessageReceived
- Kotlin+KTX
- Override onDeletedMessages
- Handle notification messages in a backgrounded app
- Background Restricted Apps (Android P or newer)
- Receive FCM messages in direct boot mode
- Prerequisites
- Enable direct boot mode message handling in your app
- Сокеты в Android
- Сервер
- Клиент
Sending and Receiving Data with Sockets
Network sockets are the endpoints of internet connections between devices. Basically we need two types of sockets to handle the connection — client and server. The main difference between them is that a server socket is listening for incoming connection requests. In this snippet I will try to show you a simple connection between an Android client device and a Java server app over a local network. (Warning: Using AsyncTask might not be the most modern way to do that!)
We will be using AsyncTask to make connection as a background task, Callback Interface for managing the incoming messages, Handler for updating GUI and TCPClient class representing the client. I will explain this on the Network Remote example — easy client-server app for shutting down the computer.
We are using AsyncTask to avoid StrictMode fatal error for network access ( Look in references ). The StrictMode policy is simply forbidding us to affect on UI Thread.
In this AsyncTask we are creating TCPClient object ( explained below ). In the TCPClient constructor we are passing Handler object for changing the UI, COMMAND — the String with the «shutdown -s» command for shutting down the computer, IP number — the servers ip number; Callback object — when we are getting servers response, the callback method ‘messageCallbackReceiver’ is starting ‘publishProgress’ method, which is publishing progress to ‘onProgressUpdate’ AsyncTask’s method.
After receiving proper message, we are sending command, or if we received wrong message, we are sending message «wrong» and stopping client. After this we are being transferred to the ‘onPostExecute’ method:
So step by step:
- AsyncTask is creating TCPClient object
- In TCPClient constructor we are passing Handler, Command, IP Number and Callback object
- When TCPClient begins connection, it sends message «shutdown» to the server
- When we are receiving message from server, the callback is passing it to ‘onProgressUpdate’
- If the received message ( response from server ) is equal to «shutdown», we are sending COMMAND to server
- After sending it we are stopping client, which is transferring us to ‘onPostExecute’ method.
- Meanwhile, the handler is receiving empty messages with ‘msg.what’ integers defined in MainActivity, which are responsible for updating the GUI
Example of how the widget UI is updated
This class is responsible for maintaining the connection. I will explain it step by step:
In the first step we can see the objects passed from ShutdownAsyncTask and others. Additionally we can see the sendMessage and stopClient methods.
The magic happens here — in ‘run()’ method. Here we are using ‘try-catch’ tools for handling exceptions ( server not enabled, ip not proper etc. ). As you can see below, we have infinite while() loop for listening to the incoming messages. We can simply stop it and finalize with ‘stopClient()’ method ( used in ShutdownAsyncTask’s ‘onProgressUpdate’ method)
The last thing in the client is the Callback interface. We have it in the TCPClient class in the end:
- Strict Mode Policy — Vogella’s blog post about this exception
- Sockets — Android Developers API about Sockets implementation in Android
- TurnMeOffMobile — The post was based on this app. Simple TCP Client as Android widget with connection handled by AsyncTasks + IP number finding dynamically.
Read about sockets generally on the Oracle Sockets Tutorial.
We need a way to send data to a computer from our android device. Easiest way is given the local ip address of the computer on the network to simply send data via a socket:
- http://android-er.blogspot.com/2011/01/simple-communication-using.html — Guide to sending data via a socket
- http://stackoverflow.com/a/20131985/313399 — stackoverflow snippet which connects to a host, and can send data to it via an asynctask
- http://stackoverflow.com/questions/6309201/sending-tcp-data-from-android-as-client-no-data-being-sent — stackoverflow snippet sending data to an ip address via a socket
- http://thinkandroid.wordpress.com/2010/03/27/incorporating-socket-programming-into-your-applications/ (client piece is phone, server piece needs to be on computer)
- TurnMeOffMobile — Simple TCP Client as Android widget with connection handled by AsyncTasks + IP number finding dynamically.
To send messages between an Android phone and a computer, the computer needs to be running a program that listens for messages sent on the socket coming from the phone:
Источник
Receive messages in an Android app
Firebase notifications behave differently depending on the foreground/background state of the receiving app. If you want foregrounded apps to receive notification messages or data messages, you’ll need to write code to handle the onMessageReceived callback. For an explanation of the difference between notification and data messages, see Message types.
Handling messages
To receive messages, use a service that extends FirebaseMessagingService . Your service should override the onMessageReceived and onDeletedMessages callbacks. It should handle any message within 20 seconds of receipt (10 seconds on Android Marshmallow). The time window may be shorter depending on OS delays incurred ahead of calling onMessageReceived . After that time, various OS behaviors such as Android O’s background execution limits may interfere with your ability to complete your work. For more information see our overview on message priority.
onMessageReceived is provided for most message types, with the following exceptions:
Notification messages delivered when your app is in the background. In this case, the notification is delivered to the device’s system tray. A user tap on a notification opens the app launcher by default.
Messages with both notification and data payload, when received in the background. In this case, the notification is delivered to the device’s system tray, and the data payload is delivered in the extras of the intent of your launcher Activity.
| App state | Notification | Data | Both |
|---|---|---|---|
| Foreground | onMessageReceived | onMessageReceived | onMessageReceived |
| Background | System tray | onMessageReceived | Notification: system tray Data: in extras of the intent. |
For more information about message types, see Notifications and data messages. For all messages where onMessageReceived is provided, your service should handle any message within 20 seconds of receipt (10 seconds on Android Marshmallow). The time window may be shorter depending on OS delays incurred ahead of calling onMessageReceived . After that, various OS behaviors such as Android O’s background execution limits may interfere with your ability to complete your work. For more information see our overview on message priority.
Edit the app manifest
To use FirebaseMessagingService , you need to add the following in your app manifest:
Also, you’re recommended to set default values to customize the appearance of notifications. You can specify a custom default icon and a custom default color that are applied whenever equivalent values are not set in the notification payload.
Add these lines inside the application tag to set the custom default icon and custom color:
Android displays the custom default icon for
- All notification messages sent from the Notifications composer.
- Any notification message that does not explicitly set the icon in the notification payload.
Android uses the custom default color for
- All notification messages sent from the Notifications composer.
- Any notification message that does not explicitly set the color in the notification payload.
If no custom default icon is set and no icon is set in the notification payload, Android displays the application icon rendered in white.
Override onMessageReceived
By overriding the method FirebaseMessagingService.onMessageReceived , you can perform actions based on the received RemoteMessage object and get the message data:
Kotlin+KTX
Override onDeletedMessages
Handle notification messages in a backgrounded app
When your app is in the background, Android directs notification messages to the system tray. A user tap on the notification opens the app launcher by default.
This includes messages that contain both notification and data payload (and all messages sent from the Notifications console). In these cases, the notification is delivered to the device’s system tray, and the data payload is delivered in the extras of the intent of your launcher Activity.
For insight into message delivery to your app, see the FCM reporting dashboard, which records the number of messages sent and opened on Apple and Android devices, along with data for «impressions» (notifications seen by users) for Android apps.
Background Restricted Apps (Android P or newer)
Receive FCM messages in direct boot mode
Developers who want to send FCM messages to apps even before the device is unlocked can enable an Android app to receive messages when the device is in direct boot mode. For instance, you might want users of your app to receive alarm notifications even on a locked device.
When building out this use case, observe the general best practices and restrictions for direct boot mode. It’s particularly important to consider the visibility of direct boot-enabled messages; any user with access to the device can view these messages without entering user credentials.
Prerequisites
- The device must be set up for direct boot mode.
- The device must have a recent version of Google Play services installed (19.0.54 or later).
- The app must be using the FCM SDK ( com.google.firebase:firebase-messaging ) to receive FCM messages.
Enable direct boot mode message handling in your app
In the app-level Gradle file, add a dependency on the FCM direct boot support library:
Make the app’s FirebaseMessagingService direct boot aware by adding the android:directBootAware=»true» attribute in the app manifest:
It is important to ensure that this FirebaseMessagingService can run in direct boot mode. Check for the following requirements:
- The service should not access credential protected storage while running in direct boot mode.
- The service should not attempt to use components, such as Activities , BroadcastReceivers , or other Services that are not marked as direct boot aware while running in direct boot mode.
- Any libraries that the service uses must also not access credential protected storage nor call non-directBootAware components while running in direct boot mode. This means that any libraries the app uses that are called from the service either will need to be direct boot aware, or the app will need to check if it’s running in direct boot mode and not call them in that mode. For example, Firebase SDKs work with direct boot (they can be included in an app without crashing it in direct boot mode), but many Firebase APIs do not support being called in direct boot mode.
- If the app is using a custom Application , the Application will also need to be direct boot aware (no access to credential protected storage in direct boot mode).
For guidance on sending messages to devices in direct boot mode, see Send direct boot-enabled messages.
Except as otherwise noted, the content of this page is licensed under the Creative Commons Attribution 4.0 License, and code samples are licensed under the Apache 2.0 License. For details, see the Google Developers Site Policies. Java is a registered trademark of Oracle and/or its affiliates.
Источник
Сокеты в Android

Существует очень много приложений (на Android и на любых других ОС), которые взаимодействуют друг с другом с помощью соединения по сети. Например, к таким приложениям можно отнести любой месседжер: WhatsApp, Viber и т.д. Как правило, соединение между приложениями достигается путём использования сокетов.
Сокеты — это интерфейс, который позволяет связывать между собой различные устройства, находящиеся в одной сети. Сокеты бывают двух типов: клиент и сервер. Различие между ними заключается в том, что сервер прослушивает входящие соединения и обрабатывает поступающие запросы, а клиент к этому серверу подключается. Когда сервер запущен, он начинает прослушивать заданный порт на наличие входящих соединений. Клиент при подключении должен знать IP-адрес сервера и порт.
В связи с этим одним из основных применений сокетов служит использование их в качестве средства коммуникации.
В Android сокеты по умолчанию используют для передачи данных протокол TCP/IP вместо UDP. Важной особенностью этого протокола является гарантированная доставка пакетов с данными от одной конечной точки до другой, что делает этот протокол более надёжным. Протокол UDP не гарантирует доставку пакетов, поэтому этот протокол следует использовать, когда надёжность менее важна, чем скорость передачи.
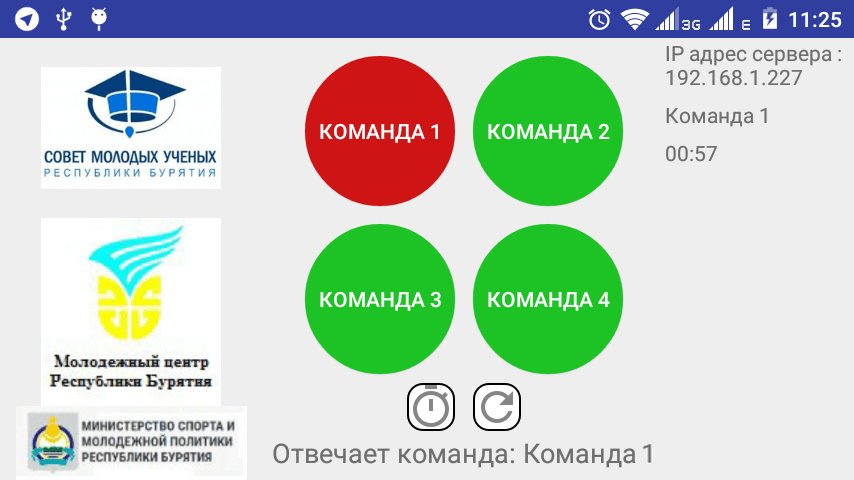
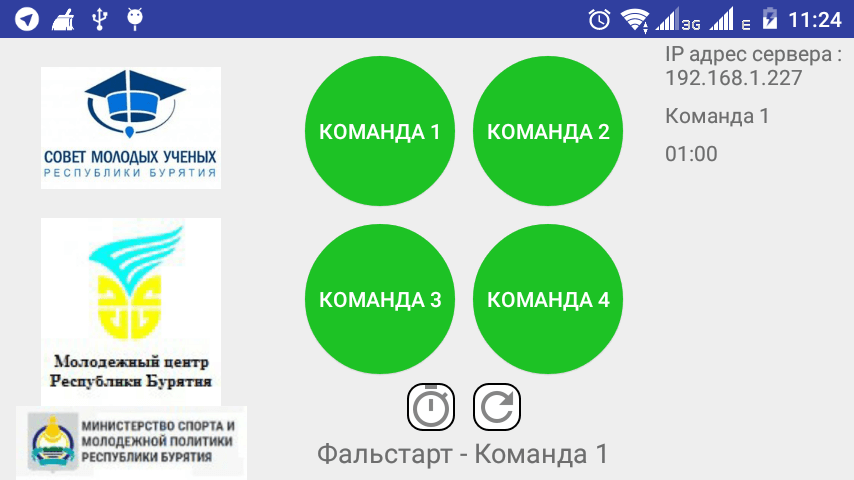
Для реализации сокетов в Android используются классы Socket, предоставляющий методы для работы с клиентскими сокетами, и ServerSocket, предоставляющий методы для работы с серверными сокетами. Рассмотрим на примере нашего приложения «Эрудит«, как можно реализовать многопоточное приложение на основе сокетов. Суть приложения заключается в том, что в игре принимают участие судья (сервер) и 4 игрока (клиенты). Судья задаёт вопрос, после чего запускает таймер и игроки должны нажать кнопку, ответить на него.
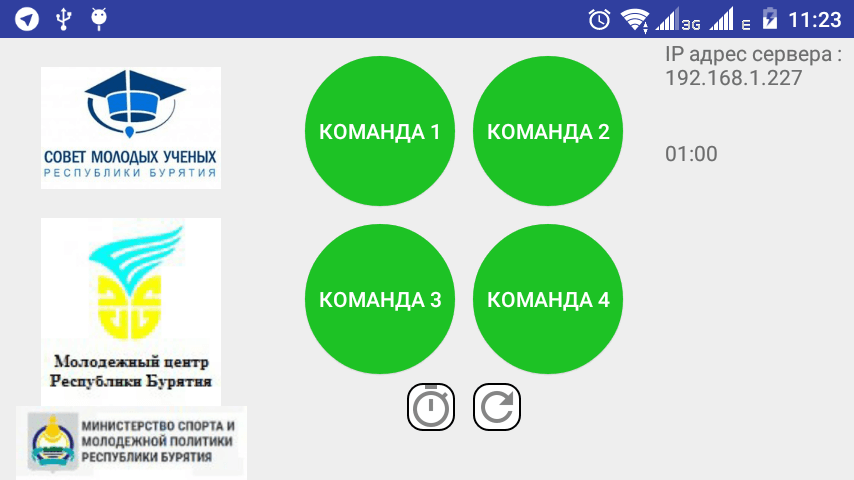
Сервер
В роли сервера здесь будет выступать судья, поскольку он должен принимать ответы от всех команд и контролировать процесс игры. Для начала создадим класс SocketServer, наследующий от Thread.
Примечание: В этом классе неспроста используется наследование от Thread, поскольку операции, связанные с сетью, следует выполнять в отдельном от главного потоке. В противном случае приложение будет крашиться с исключением android.os.NetworkOnMainThreadException. По этой причине здесь и далее вся работа с сокетами будет выполняться в потоках.
Данный класс будет служить «обёрткой» для ServerSocket, чтобы можно было удобнее взаимодействовать с ним. Поскольку мы используем наследование от Thread, необходимо реализовать метод run(), внутри которого будет помещена логика работы сервера.
Задача сервера заключается в том, чтобы слушать заданный порт и принимать входящие подключения. Однако поскольку у нас должно быть 4 клиента, их нужно как-то различать. Для этих целей создадим класс UserManager, целью которого будет связывание сокета, полученного в результате метода accept() с пользователем, который установил соединение.
Здесь аналогичным образов в потоке запускаем созданный сокет и ставим его на прослушивание. Параллельно с этим создаём экземпляр класса User, код которого представлен ниже. Он служит для хранения данных о пользователях и их сообщениях
После того, как сообщение было получено, проверяется наличие в нём команд в методе hasCommand(). Например, команда LOGIN_NAME сообщает никнейм подключившегося игрока, а команда CLOSED_CONNECTION — о закрытии соединения. Если никакой команды нет — просто передаём сообщение через интерфейс.
При подключении нового пользователя передаём в интерфейс данные о нём с помощью метода userConnected(), аналогично при дисконнекте вызываем userDisconnected().
Метод close() закрывает соединение с клиентом.
Метод sendMessage() отправляет сообщение клиенту.
Теперь пробросим интерфейс в класс SocketServer.
В SocketServer создадим экземпляр класса UserManager и список, содержащий объекты этого класса. При создании нового сокета он передаётся в конструктор UserManager, после чего запускается поток.
Чтобы остановить сервер, напишем метод close() со следующим кодом.
Для начала здесь нужно закрыть все соединения с клиентами, после этого остановить прослушивание и остановить сокет методом close().
Отправка сообщений клиентам происходит следующим образом.
Метод sendMessage() отправляет сообщение всем, кроме выбранного пользователя. Он используется, когда отправляется сообщение о том, что отвечает команда N, другим командам.
Метод sendMessageTo() отправляет сообщение только одному пользователю, поиск пользователя происходит по идентификатору.
Метод sendToAll() отправляет сообщение всем подключённым пользователям.
Теперь нужно создать интерфейс, который будет передавать данные в основной поток. Для этого создадим интерфейс со следующим кодом.
Теперь в главном потоке нужно создать экземпляр класса SocketServer и пробросить интерфейс.
Метод updatePlayer() обновляет список подключенных игроков при подключении\отключении кого-либо из игроков.
Примечание: если из потока нужно обновить элементы интерфейса, то следует вызывать runOnUiThread(), который позволяет выполнять код в UI-потоке.
Метод parseMessage() определяет, что за сообщение пришло. Сначала следует проверка на то, что на вопрос уже даётся ответ. В этом случае игроку, отправившему это сообщение, отправляется ответ о том, что на вопрос уже даётся ответ. После этого идёт проверка на то, запущен ли таймер. Если таймер не был запущен, то необходимо отправить игроку сообщение о фальстарте. После всех проверок определяется, какой пользователь отправил сообщение и загорается соответствующая кнопка на экране.
Примечание: поскольку отправлять сообщения в UI-потоке нельзя, здесь используется следующая конструкция.
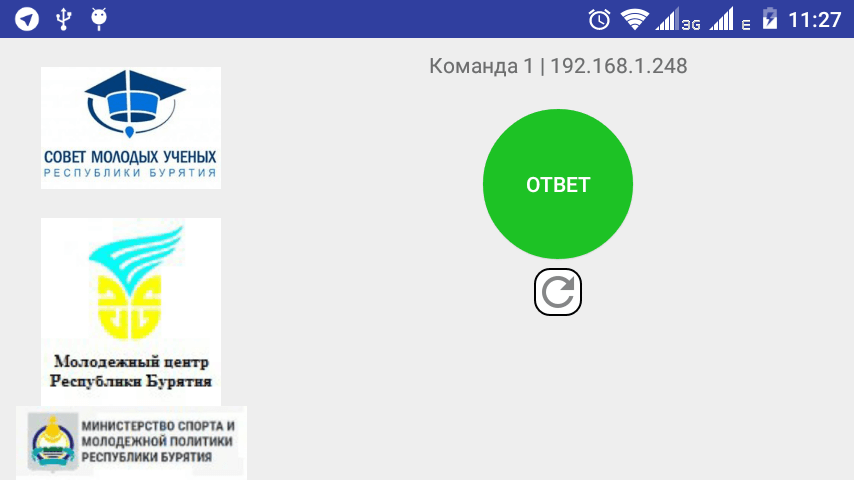
Клиент
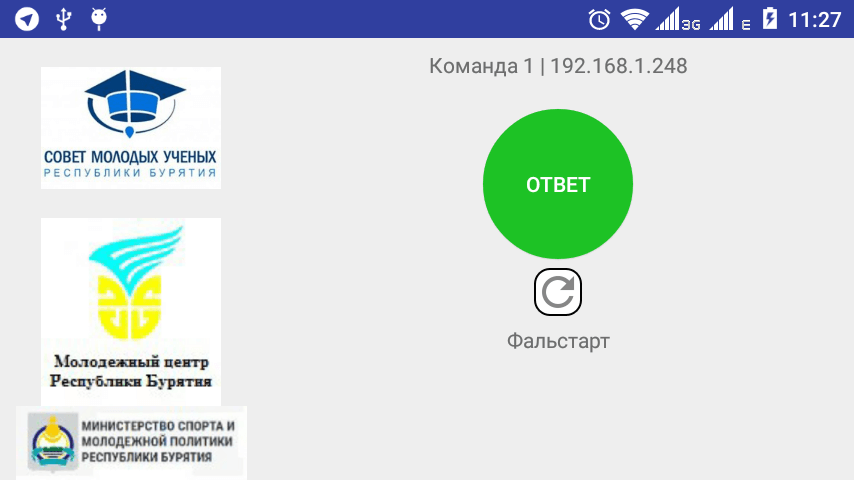
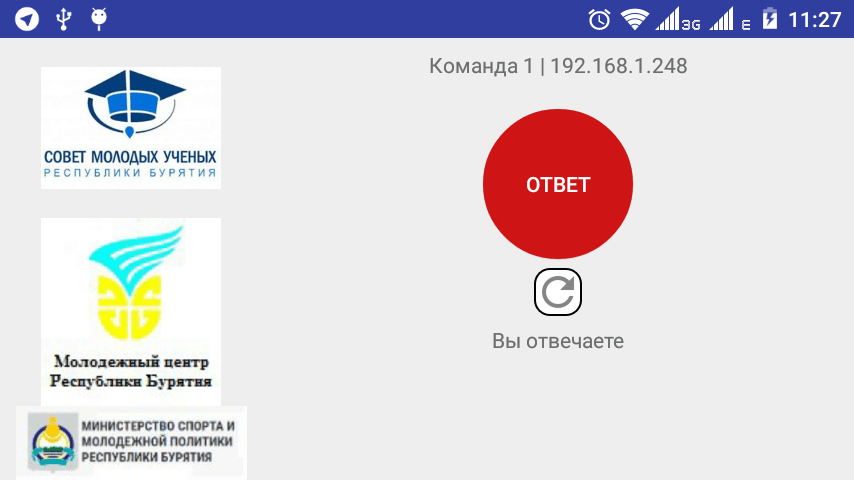
Клиент это игрок, который отвечает на вопрос, заданный судьёй. После сигнала он должен нажать на кнопку, чтобы дать ответ на вопрос.
Для реализации клиентского сокета создадим класс SocketClient.
Метод run() запускает клиент и содержит логику работы сокета. Внутри него создаётся экземпляр класса Socket, который подключается к конечной точке с заданными IP-адресом и портом. Затем вызывается метод onConnected() интерфейса OnMessageReceived, уведомляющий главный поток о том, что сокет установил соединение. После этого вызывается метод sendMessage(), отправляющий сообщения на сервер, в котором передаётся команда LOGIN_NAME и название команды. После этого запускается бесконечный цикл, в котором клиент ждёт сообщения от сервера. Получив сообщение, происходит вызов метода messageReceived() интерфейса OnMessageReceived, который передает сообщение в главный поток.
Метод isConnected() проверяет, подключился ли клиент к серверу.
Метод isRunning() проверяет, запущен ли клиент.
Метод stopClient() разрывает соединение с сервером, предварительно посылая сообщение с командой CLOSED_CONNECTION.
Теперь создадим на активности экземпляр класса SocketClient и пробросим интерфейс.
После того, как будут заданы название команды и IP-адрес сервера, запустится метод connectToServer(), создающий поток, в котором инициализируется экземпляр SocketClient. Внутри него реализован интерфейс с методами onConnected() и messageReceived().
В методе onConnected() мы получаем событие, что клиент установил соединение, и вызываем метод sendPing(), который будет каждые 2 секунды посылать на сервер пинги. Это необходимо для более надежного соединения, поскольку отследить на стороне клиента, что сервер прекратил работу, может быть весьма затруднительно. В случае, если соединение теряется, начинает вызываться метод connectToServer() до тех пор, пока соединение не восстановится.
В методе messageReceived() определяется, какое сообщение пришло от сервера, и в зависимости от этого выполняются соответствующие операции.
- ANSWERED — уведомляет о том, что она вопрос уже отвечает другая команда. Возвращает кнопку в исходное состояние.
- BEEP — сообщает о том, что таймер был запущен и нужно воспроизвести сигнал. Для этого вызывается метод playBeep(), который с помощью класса MediaPlayer воспроизводит MP3-файл, хранящийся в папке Assets.
- RESET — сбрасывает все данные (поле ответа от сервера, состояние кнопки). Это сообщение приходит, когда какая-либо команда ответила на вопрос и нужно восстановить все состояния для нового вопроса.
- FALSE_START — сообщает игроку, что он нажал кнопку раньше, чем был запущен таймер. Возвращает кнопку в исходное состояние.
- По умолчанию: просто выводит сообщение от сервера на экран.
Когда вызывается метод активности onPause(), клиент останавливается с помощью следующего кода.
При возврате в активность восстановить соединение можно вручную, нажать на кнопку переподключения, которая вызовет метод connectToServer().
Сообщение об ответе на сервер посылается с помощью метода sendAnswer(), который вызывается при нажатии на кнопку.
Таким образом, в результате приведенного выше кода мы создали приложение, работающее на сокетах, которые обеспечивают взаимодействие между сервером и несколькими клиентами.
Источник


