- If you can’t send or receive messages on your iPhone, iPad, or iPod touch
- Try these steps first
- If you see a red exclamation point
- If you see a green message bubble
- If you receive messages on one device but not the other
- If you have issues with a group message
- Add or remove your phone number in Messages or FaceTime
- Set up your phone number
- Remove your phone number
- Turn your phone number on or off for your Mac
- Turn your phone number on or off for your iPad or iPod touch
- If you can’t see or select your number in Messages or FaceTime
- Use Messages on your iPhone, iPad, or iPod touch
- Send a message
- Reply from the Lock screen
- Use Shared with You
- Pin important conversations
- Change your name and photo
- Delete a message or conversation
- Turn on Hide alerts
If you can’t send or receive messages on your iPhone, iPad, or iPod touch
If you see an alert when you send a message, or if you can’t send or receive messages, learn what to do.
Try these steps first
- Restart your device:
- iPhone
- iPad
- iPod touch
- Check your network connection. To send a message as iMessage or MMS, you need a cellular data or Wi-Fi connection. To send an SMS message, you need cellular network connection. If you turn on Wi-Fi Calling, you can send SMS messages over Wi-Fi.
- Check with your carrier to see if the type of message you’re trying to send, like MMS or SMS, is supported.
- If you’re trying to send group MMS messages on an iPhone, go to Settings > Messages and turn on MMS Messaging. If you don’t see an option to turn on MMS Messaging or Group Messaging on your iPhone, then your carrier might not support this feature.
- Make sure that your device has enough space to receive images and videos.
- Make sure that you entered the correct phone number or email address for the contact.
If you see a Waiting for Activation alert, learn what to do.
If you still need help, find your issue below to learn what to do next.
Message not delivered
You see a green message bubble
Not receiving messages on a device
Issues with group messages
![]()
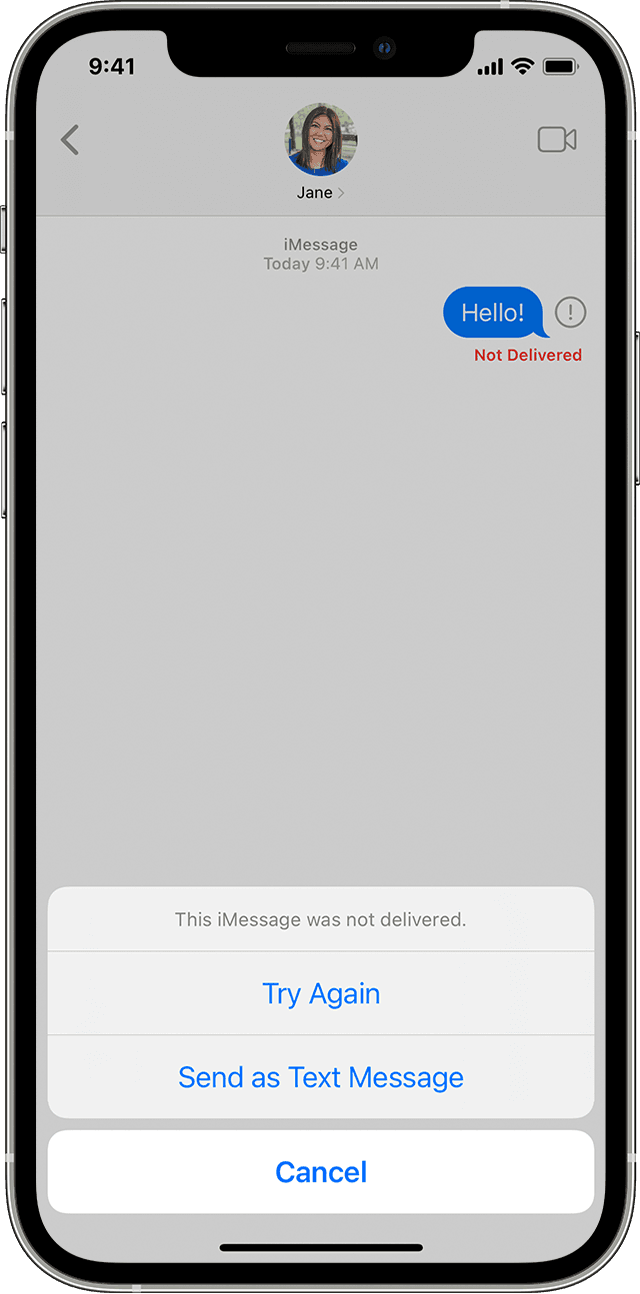
If you see a red exclamation point
If you try to send a message and you see with an alert that says Not Delivered, follow these steps:
- Check your network connection.
- Tap , then tap Try Again.
- If you still can’t send the message, tap , then tap Send as Text Message. Messaging rates may apply. Contact your carrier for more information.


If you see a green message bubble
If you see a green message bubble instead of a blue one, then that message was sent using MMS/SMS instead of iMessage. There are several reasons for this:
- The person that you sent the message to doesn’t have an Apple device.
- iMessage is turned off on your device or on your recipient’s device. To check if iMessage is turned on for your device, go to Settings > Messages > iMessage.
- iMessage is temporarily unavailable on your device or on your recipient’s device.
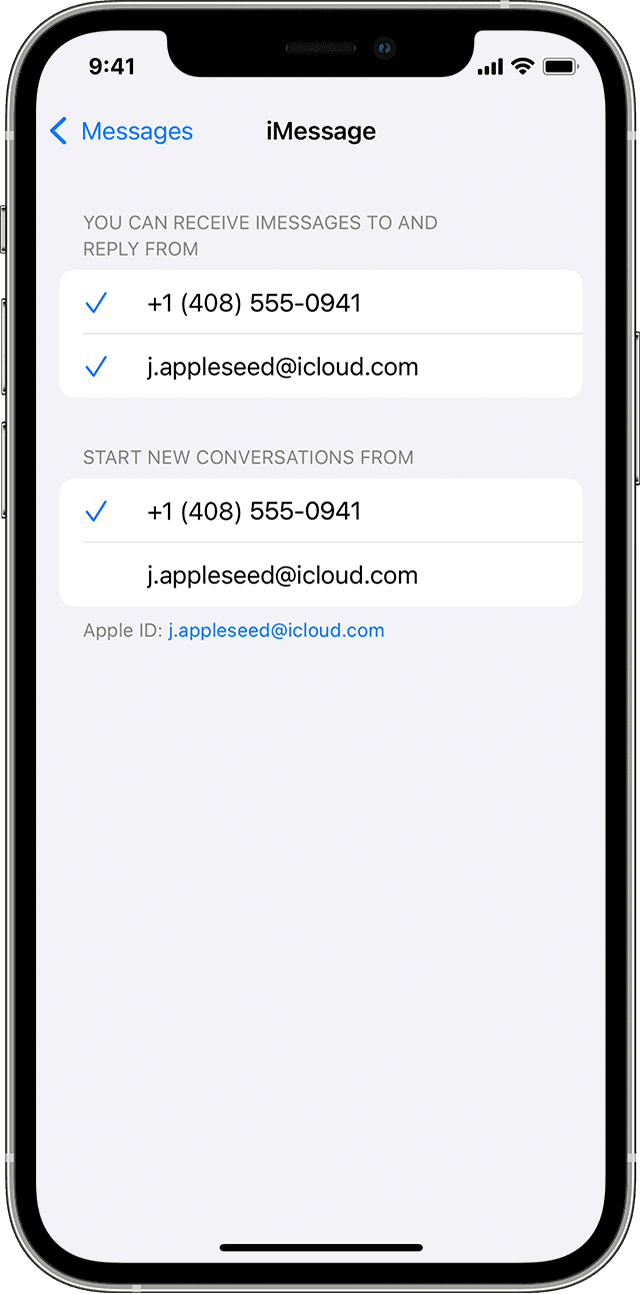
If you receive messages on one device but not the other
If you have an iPhone and another iOS or iPadOS device, like an iPad, your iMessage settings might be set to receive and start messages from your Apple ID instead of your phone number. To check if your phone number is set to send and receive messages, go to Settings > Messages, and tap Send & Receive.
If you don’t see your phone number, you can link your iPhone number to your Apple ID so you can send and receive iMessages from your phone number. You can also set up Text Message Forwarding so you can send and receive MMS and SMS messages on all of your Apple devices.
If you have issues with a group message
If you’re in a group message and stop receiving messages, check to see if you left the conversation. Open Messages and tap the group message. If you see a message that says you left the conversation, then either you left the conversation or you were removed from the group message. You can rejoin a group message only if someone in the group adds you.
To start a new group message:
- Open Messages and tap the Compose button .
- Enter the phone numbers or email addresses of your contacts.
- Type your message, then tap the Send button .
If you have other issues with a group message, you might need to delete the conversation and start a new one. To delete a group message:
- Open Messages and find the conversation that you want to delete.
- Swipe left over the conversation.
- Tap Delete.
When you delete a message, you can’t recover it. If you want to save parts of a message, take a screenshot. To save an attachment in a message, tap the Download button . The photo or image will be saved to your Library in the Photos app.
Источник
Add or remove your phone number in Messages or FaceTime
You can use the phone number of your iPhone with Messages and FaceTime on your Mac, iPad, or iPod touch.
Set up or remove your phone number
Turn your number on or off for Mac
Turn your number on or off for iPad or iPod touch
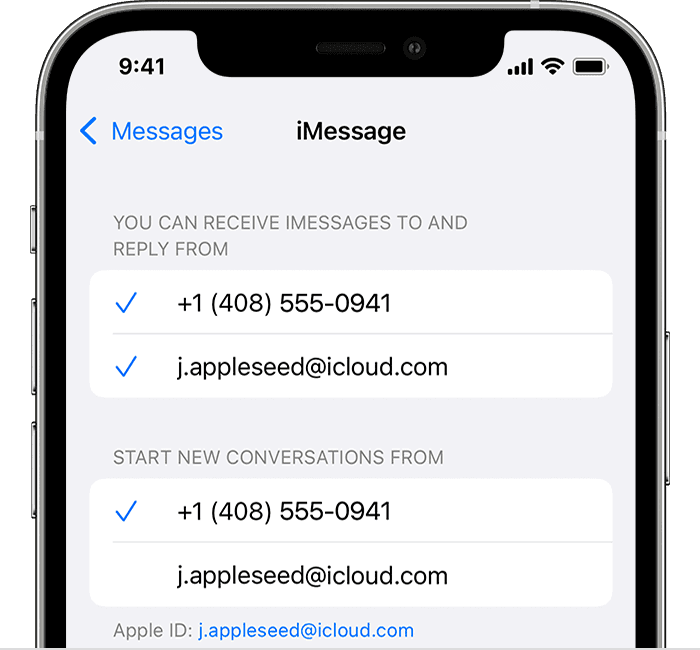
Set up your phone number
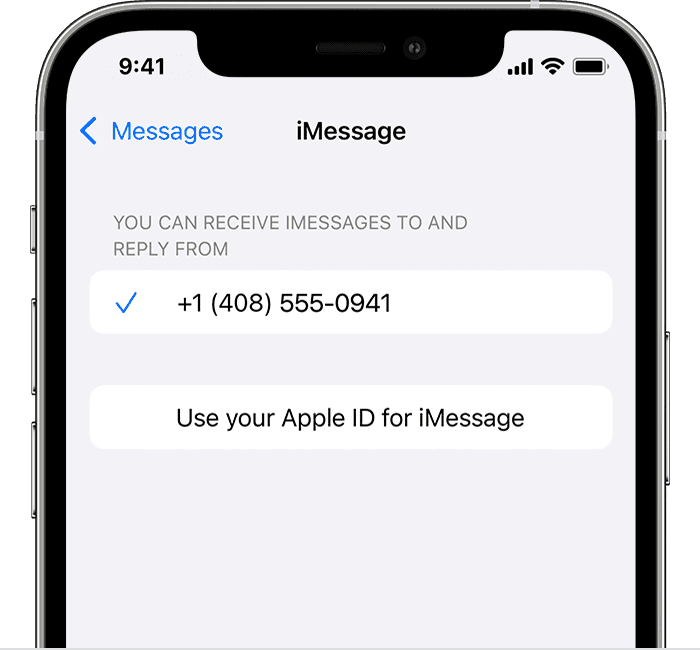
- Go to Settings > Messages and make sure that iMessage is on. You might need to wait a moment for it to activate.
- Tap Send & Receive. If you see “Use your Apple ID for iMessage,” tap it and sign in with the same Apple ID that you use on your Mac, iPad, and iPod touch.

- In the «You can receive iMessages to and Reply From» section, make sure that your phone number and Apple ID are selected.
- Go to Settings > FaceTime and make sure that your phone number and Apple ID are selected in the «You can be reached by FaceTime at» section.
On your other devices, you can now turn on the phone number that you just set up:
If you use this feature and share your Apple ID with someone, you can’t prevent them from seeing your conversations. Instead of using the same Apple ID as someone else, set up Family Sharing.
Remove your phone number
If you don’t want calls or messages for your iPhone on your iPad, iPod touch, or Mac, you can remove your phone number. There are two ways to do this:
- On your iPhone, go to Settings > Messages > Send & Receive. Select your Apple ID at the bottom of the screen and tap Sign Out. Then go to Settings > FaceTime, select your Apple ID and tap Sign Out.
- If the phone number that you want to remove belongs to an iPhone that you can’t access, change your Apple ID password. This removes all phone numbers from your iPad, iPod touch, and Mac. Calls or messages for the removed numbers won’t appear on those devices anymore.
Turn your phone number on or off for your Mac
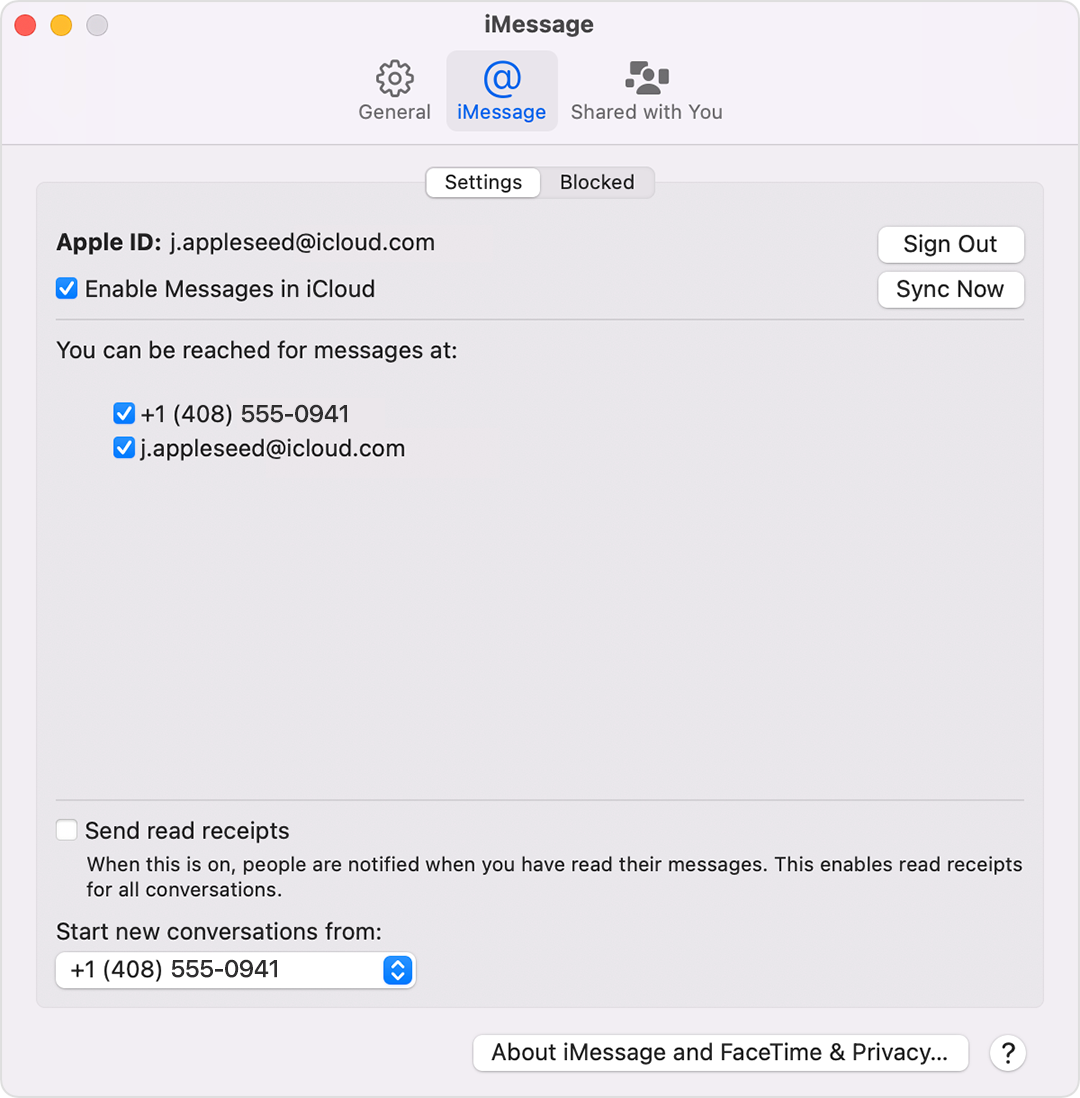
After you set up your phone number, you can turn it on or off for Messages and FaceTime on your Mac.
- Open Messages or FaceTime. If asked, sign in with the Apple ID that you’re using with Messages and FaceTime on your iPhone.
- For Messages, choose Messages > Preferences, then click iMessage. For FaceTime, choose FaceTime > Preferences, then click Settings.
- Turn your phone number on or off:
- To turn on your phone number, select it and your Apple ID in the list. If you don’t see your phone number, get help with your settings or contact Apple Support. If you see a number that isn’t yours, change your Apple ID password.
- To turn off your phone number, deselect it in the list.
- If you want recipients to see your phone number and not your Apple ID, select your phone number from the “Start new conversations from” or ”Start new calls from” pop-up menu.
Turn your phone number on or off for your iPad or iPod touch
After you set up your phone number, you can turn it on or off for Messages and FaceTime on your iPad or iPod touch.
- For Messages, go to Settings > Messages and make sure that iMessage is on. If asked, sign in with the Apple ID you’re using with Messages and FaceTime on your iPhone. Then tap Send & Receive.
- For FaceTime, go to Settings > FaceTime. If asked, sign in with the Apple ID that you’re using with Messages and FaceTime on your iPhone.
- Turn your phone number on or off:
- To turn on your phone number, select it and your Apple ID in the “You can be reached” section. If you don’t see your phone number, get help with your settings or contact Apple Support. If you see a number that isn’t yours, change your Apple ID password.
- To turn off your phone number, uncheck it.
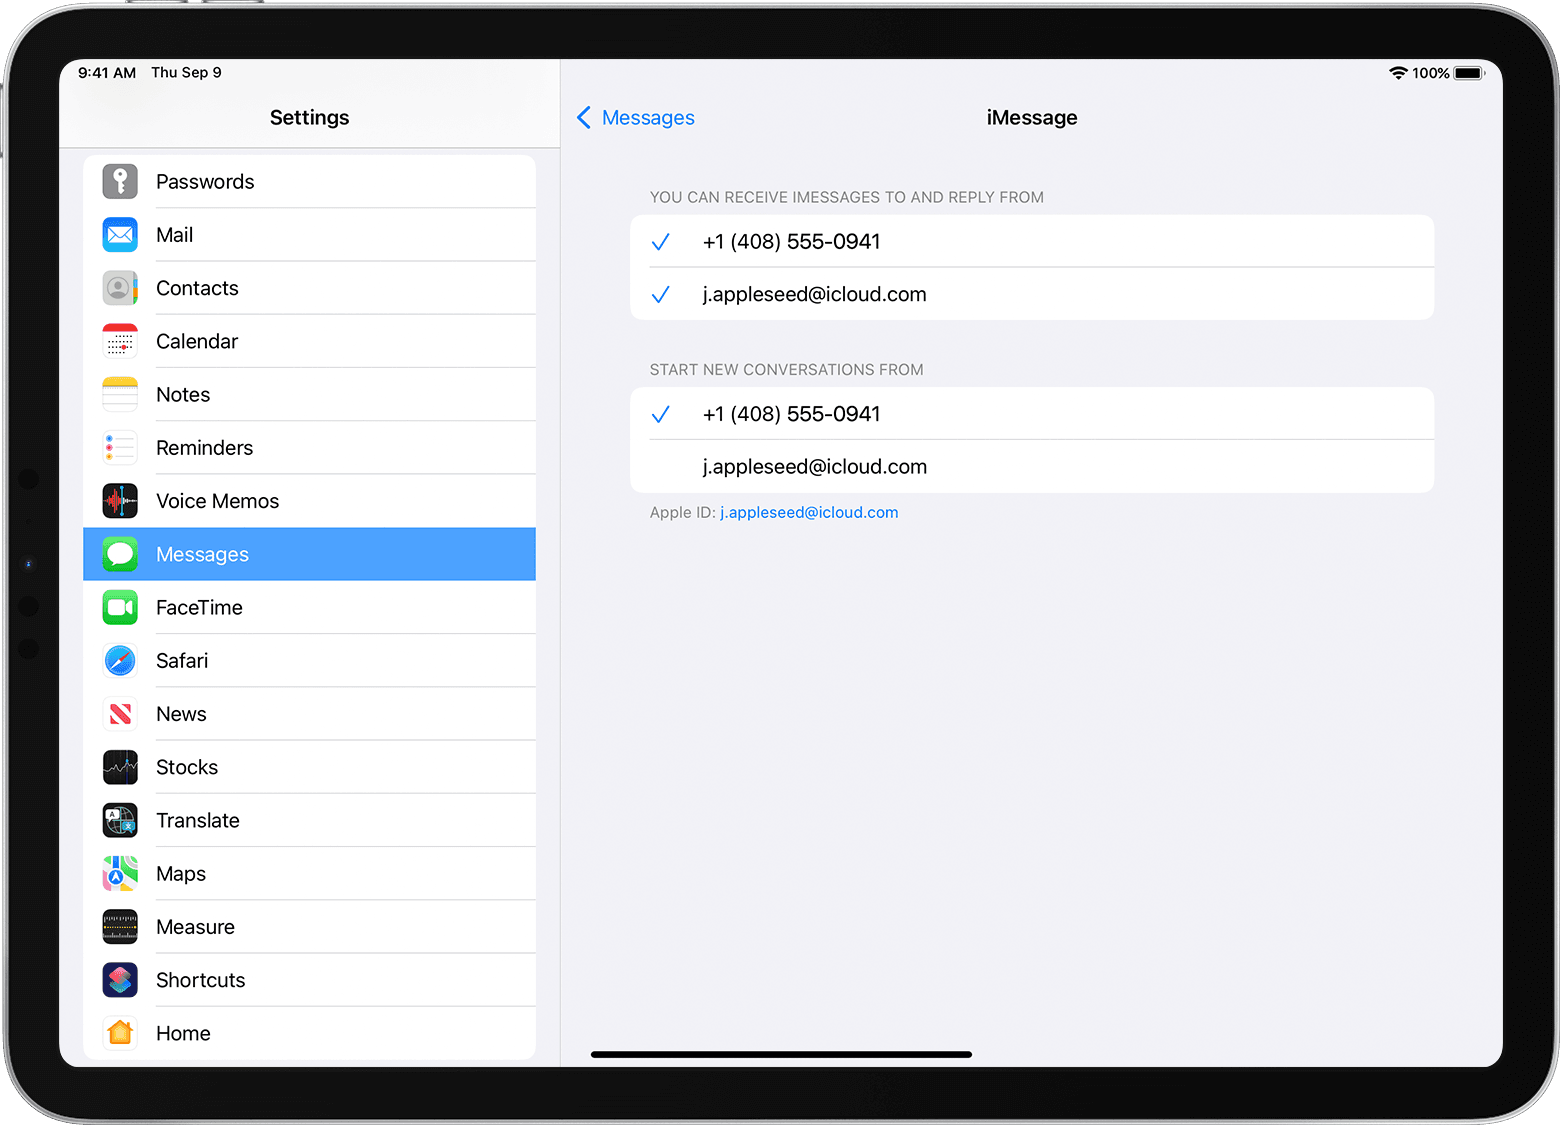
If you can’t see or select your number in Messages or FaceTime
- Make sure that you’re using the latest software for your Mac or iOS device.
- Make sure that you correctly followed the iPhone steps to set up your phone number. You should be using the same Apple ID on all of your devices.
- In the “You can be reached” section of Messages and FaceTime settings, make sure that there are checkmarks beside your phone number and Apple ID:
If your phone number is unchecked and you can’t select it, or you have some other issue, follow these steps:
- On your Mac:
- In Messages, choose Messages > Preferences, then click iMessage. Click Sign Out.
- In FaceTime, choose FaceTime > Preferences, then click Sign Out.
- On your iPhone, iPad, and iPod touch:
- Go to Settings > Messages > Send & Receive. Tap your Apple ID, then tap Sign Out.
- Go to Settings > FaceTime. Tap your Apple ID, then tap Sign Out.
- On your iPhone:
- Go back to Settings > Messages and make sure that iMessage is turned on.
- Tap Send & Receive, then choose “Use your Apple ID for iMessage” and sign in with your Apple ID.
- Using the same Apple ID, sign back in to Messages and FaceTime on your other devices.
If you still need help, change your Apple ID password and repeat the setup steps. If that doesn’t work, contact Apple Support.
Источник
Use Messages on your iPhone, iPad, or iPod touch
Stay connected to the conversations that matter the most. Send texts, photos, videos, and more. Then personalize your messages with animated effects, pin your important conversations, send inline replies, and add mentions.
Send a message
- Open Messages.
- Tap the Compose button to start a new message. Or go to an existing conversation.
- Type your message, then tap the Send button .
With iOS 14 and iPadOS 14 and later, you can also use inline replies and mentions to call attention to specific messages and people within the messages.
Reply from the Lock screen
- From the Lock screen, touch and hold the notification that you want to reply to. Or depending on your device, you might need to swipe left over the notification and tap View. *
- Type your message.
- Tap the Send button .
If you have an iPhone X or later, or an iPad with Face ID, and can’t reply to a message from the Lock screen, go to Settings > Face ID & Passcode, and turn on Reply with Message. If you have an iPhone SE (2nd generation), iPhone 8 or earlier, or an iPad, go to Settings > Touch ID & Passcode > Allow Access When Locked, and turn on Reply with Message.
* Touch and hold is available on most devices that support iOS 13 and later, or iPadOS. On iPhone SE (2nd generation), you’ll need to swipe left on the notification, then tap View to reply to a message from the Lock screen.
Use Shared with You
With iOS 15 and iPadOS 15, content that’s shared with you in the Messages app is automatically organized in a Shared with You section in the corresponding app. Shared with You works with Photos, Safari, News, Music, Podcasts, and the Apple TV app.
Content that’s shared with you is labeled in the corresponding app, so you can see who shared the content with you. With a simple tap on the name, you can easily reply to the share and continue the conversation in Messages.
To disable Automatic Sharing or a certain app from using Shared with You, go to Settings > Messages > Shared with You, and turn off Automatic Sharing or the app.
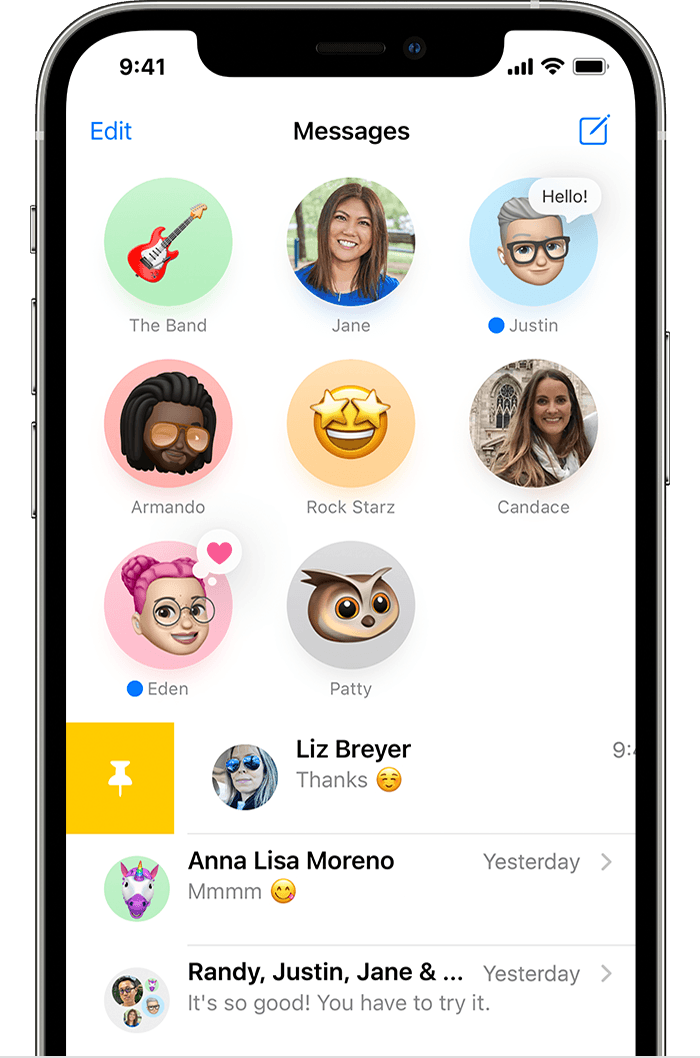
Pin important conversations
With Messages in iOS 14 and iPadOS 14 and later, you can pin up to nine conversations. When you pin a conversation it shows up at the top of the Messages app, so it’s easy to get to.
To pin a conversation, open Messages, then swipe right over the conversation. Or follow these steps:
- Open Messages, then tap Edit or the More button .
- Tap Edit Pins , then tap the Pin button .
- Tap Done.
![]()
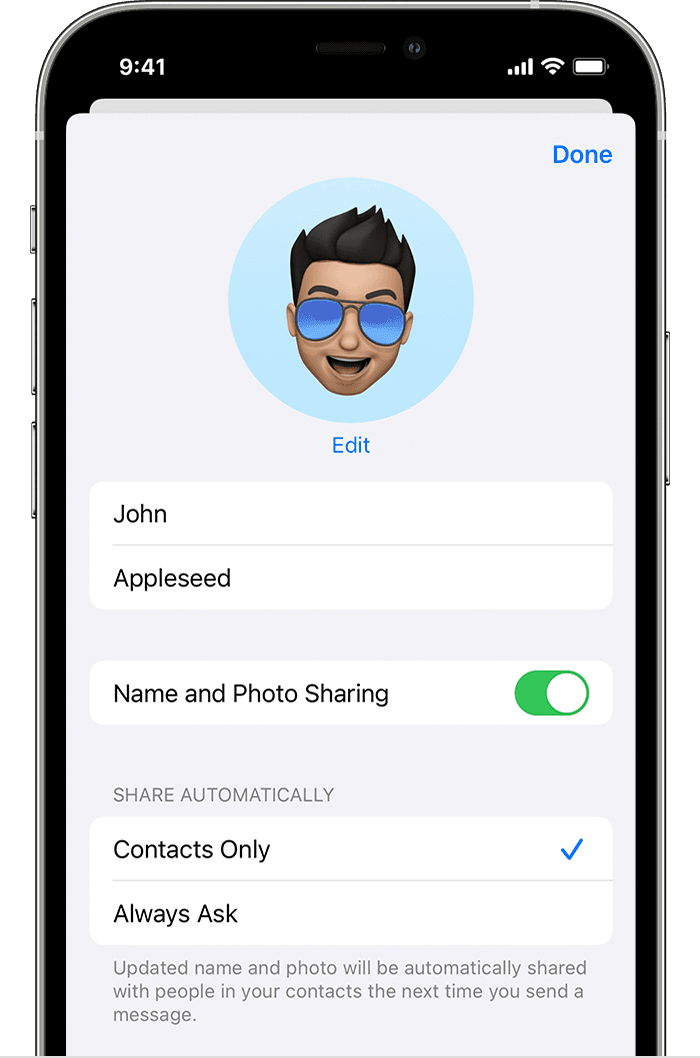
Change your name and photo
- Open Messages and tap Edit in the upper-left corner.
- Tap Edit Name and Photo .
- Edit your name. Or tap the image circle to choose an image, photo, emoji or Memoji.
- Tap Done.
Your name and photo can be shared with anyone using iMessage, but you’ll be asked to confirm that you want to share with someone when sending or replying to a new message. You can also turn sharing on and off. Just complete steps 1-2, and turn Name and Photo Sharing on or off.
![]()
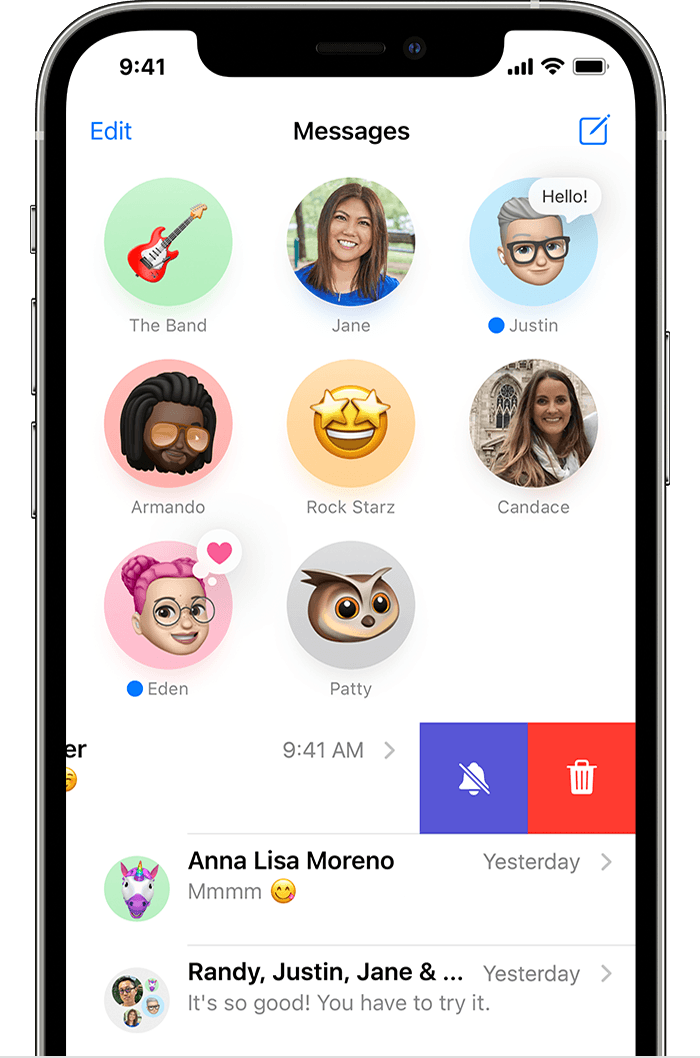
Delete a message or conversation
When you delete a message or conversation, you can’t get it back. So make sure that you save important information from your messages.
To delete a single message:
- Touch and hold the message bubble that you want to delete, then tap More .
- Tap the Trash button , then tap Delete Message. If you want to delete all messages in the thread, tap Delete All in the upper-left corner. Then tap Delete Conversation.
As long as the conversation isn’t pinned, you can also swipe left over the conversation, tap Delete, then tap Delete again to confirm. To delete more than one conversation, open Messages and tap Edit in the upper-left corner. Tap Select Messages, then tap the circle next to the conversations and tap Delete in the bottom-right corner.
To keep your messages for a certain amount of time, go to Settings > Messages > Keep Messages. Then select how long you want to keep your messages.
Turn on Hide alerts
- Open Messages.
- Swipe left over the conversation that you want to mute.
- Tap the Alerts button .
When Hide Alerts is on, the Alerts button appears next to the conversation. This stops notifications only for that conversation, not your device. You’ll still receive all other messages and see notifications for them on your Lock screen.
Источник


