- Запись звука и отображение громкости на Android
- Доступ к микрофону
- Запись звука
- Кнопка записи
- Громкость
- Анимация
- Создание собственного Android-диктофона с помощью Kotlin
- Создание пользовательского интерфейса
- Запрос требуемых разрешений
- Запись и сохранение аудио
- Добавление OnClickListeners
- Настройка MediaRecorder
- Запись и сохранение аудио
- Исходный код
- Заключение
- Recording Audio on Android with Examples
- What is MediaRecorder?
- How to use MediaRecorder
- What is MediaPlayer?
- How to use MediaPlayer
- What is AudioRecord?
- How to use AudioRecord
- What is AudioTrack?
- How to use AudioTrack
- Other options
- What should I use?
Запись звука и отображение громкости на Android
Всем привет! Меня зовут Юрий Дорофеев, я Android-разработчик и преподаватель в Mail.ru Group. Если вы когда-нибудь записывали аудиосообщения, то видели, как анимируется интерфейс в зависимости от громкости вашего голоса. Давайте повторим этот эффект:
Доступ к микрофону
Чтобы начать запись внутри Android-приложения, нужно сначала дать ему доступ к этой функциональности. Создадим в Android-манифесте тег uses-permission и укажем разрешение RECORD_AUDIO :
Также нам придётся запросить его в runtime’е при помощи ActivityCompat.requestPermission :
Запись звука
Для записи звука создадим класс RecordController . У него должны быть два основных метода: start и stop . Для записи голоса хорошо подходит кодек ААС:
Записывать аудио будем во временную директорию:
После окончания записи нужно применить к медиарекордеру stop и release :
Чтобы работать с состоянием, нужно его каким-то образом получать. Для этого сделаем функцию, которая будет говорить, ведётся ли сейчас запись:
Кнопка записи
Теперь сделаем кнопку записи. Создадим новое View и расположим его в центре экрана. Почему это не кнопка, а View ? Потому что мы сейчас будем её анимировать и нам не нужны стандартные визуальные эффекты нажатия, тени и прочего.
По клику на кнопку будем выполнять методы start или stop . При первом клике мы начинаем запись, а при втором останавливаем, поэтому берём из рекордера состояние, в зависимости от которого применяем нужную логику:
Если сейчас запустим приложение, то кнопка будет кликаться и даже будет работать запись аудио, но визуально это никак не отображается.
Громкость
Теперь давайте сделаем отслеживание громкости записи. Добавим соответствующую функцию:
Данна функция возвращает максимальное значение со времени последнего вызова.
При начале записи активируем таймер для опрашивания громкости. Пусть он каждые 100 мс забирает данные:
Анимация
Теперь решим следующую задачу: при нажатии кнопки визуально непонятно, идёт ли запись и насколько громко. Создадим метод handleVolume , реагирующий на громкость и меняющий размер кнопки. У View есть множество способов анимирования, самый простой — это animate , который позволяет очень удобно задавать простые анимации.
Насколько нужно увеличивать кнопку? MediaRecorder возвращает значение громкости в виде 16-ти битного int с максимальным значением 32767. Давайте рассчитаем, насколько далеко мы находимся от этого предела, чтобы пропорционально увеличить кнопку:
Интересно, что эта анимация работает автоматически: если мы несколько раз в цикле запустим animate , то наложения не произойдёт, каждая новая анимация будет завершать предыдущую. Только надо не забыть завершать запись и анимацию в методах onDestroy или onPause на случай поворота экрана или других событий, связанных с Activity .
Для более живой анимации воспользуемся OvershootInterpolator ‘ом, он позволяет выходить за границы доступного диапазона: кнопка будет словно пульсировать, кратковременно выходя за верхнюю границу:
Всё оказалось достаточно просто. Можно вместо изменения размера рисовать гистограмму громкости или ещё что-нибудь, что придёт в голову вам или вашему дизайнеру 😀
Источник
Создание собственного Android-диктофона с помощью Kotlin

Мультимедийный фреймворк Android поддерживает запись и воспроизведение аудио. В этой статье я покажу, как разработать простое приложение для звукозаписи, которое будет записывать аудио и сохранять его в локальном хранилище Android-устройства с помощью MediaRecorder из Android SDK.
Вы также узнаете, как запросить разрешения у пользователя в режиме реального времени и как работать с локальным хранилищем Android-устройства.
Создание пользовательского интерфейса
Сперва нам нужно создать интерфейс для звукозаписи. Это простой layout с тремя кнопками, которые будут использоваться для запуска, приостановки/возобновления и остановки записи.
Запрос требуемых разрешений
После создания пользовательского интерфейса мы можем начать использовать MediaRecorder для реализации основной функциональности нашего приложения. Но сначала нам нужно запросить необходимые разрешения для записи аудио и доступа к локальному хранилищу. Cделаем мы это это с помощью нескольких простых строк кода в нашем файле AndroidManifest.xml :
Также нужно проверить, одобрил ли пользователь разрешения, прежде чем мы сможем использовать наш MediaRecorder . Сделаем это в Activity MainActivity.kt :
Примечание: позже эти строки кода будут перемещены в OnClickListener кнопки начала записи аудио, чтобы мы могли убедиться, что MediaRecorder не будет запущен без необходимых разрешений.
Запись и сохранение аудио
Добавление OnClickListeners
Добавим слушатели к кнопкам, чтобы они реагировали на пользовательские события. Как я упоминал ранее, проверка на наличие необходимых разрешений будет добавлена в OnClickListener кнопки начала записи аудио:
Настройка MediaRecorder
Далее нам нужно указать путь для сохранения аудио и настроить MediaRecorder.
Мы берём путь к корню нашего внешнего хранилища и добавляем в него имя нашей записи и тип файла. После этого мы создаём объект MediaRecorder и определяем источник звука, аудиокодер, формат и файл для записи.
Запись и сохранение аудио
Код, используемый для запуска MediaRecorder , определяется в OnClickListener кнопки начала записи аудио:
Как видите, нужно вызвать функцию prepare , прежде чем мы сможем начать запись. Мы также встраиваем вызов в блок try-catch, чтобы приложение не сломалось при сбое функции prepare .
OnClickListeners кнопки остановки записи очень похож на код выше.
Здесь мы проверяем, работает ли в данный момент MediaRecorder , прежде чем мы остановим запись, потому что наше приложение сломается, если метод stop будет вызван, в то время как MediaRecorder не будет запущен. После этого мы меняем переменную состояния на false , чтобы пользователь не мог снова нажать кнопку остановки.
Нам осталось определить OnClickListener для кнопки приостановки/возобновления.
В этих двух методах мы проверяем, работает ли MediaRecorder . Если работает, мы приостановим запись и изменим текст кнопки для возобновления. При повторном нажатии запись возобновится.
Наконец, мы можем записать аудио и прослушать его, открыв файл recording.mp3 , который будет сохранён в нашем локальном хранилище. Просто откройте проводник файлов и сделайте поиск по имени файла recording.mp3 .
Исходный код
Вот полный исходный код нашего приложения:
Заключение
Теперь вы знаете, как работает MediaRecorder , как запрашивать разрешения в режиме реального времени и почему это важно делать. Вы также узнали о локальном хранилище вашего устройства Android и о том, как хранить в нём данные.
Более сложная версия этого приложения, в которой есть некоторые дополнительные функции, такие как воспроизведение ваших записей с помощью MediaPlayer , доступна на Github.
Источник
Recording Audio on Android with Examples
Knowing how to effectively record audio from a phone is valuable for mobile developers, but is especially essential for apps that use services like Dolby.io to process media. The wide range of hardware in Android devices can make it difficult to develop applications that need to capture and play back audio. However, Android provides several media frameworks to abstract the audio recording process, and others have developed external libraries that make it possible to incorporate high-performance audio into an application. This article will explain how to use the MediaRecorder, MediaPlayer, AudioRecord, and AudioTrack frameworks in Java, touch briefly on other options for audio capture and playback, and lastly will review their respective pros and cons.
Note: You can find a sample application that uses these classes in the dolbyio-samples/blog-android-audio-recording-examples repository.
What is MediaRecorder?
MediaRecorder is Android’s high-level framework for capturing audio and/or video. It records to a file directly, which can then be played back using MediaPlayer (covered later in this post). An application specifies several parameters, namely the encoding and the file location, and MediaRecorder handles the rest. While relatively simple to configure, MediaRecorder offers minimal customizability, and is best for simple use cases when audio is not central to the functionality of the app.
How to use MediaRecorder
The following steps and code samples demonstrate how to use MediaRecorder to record audio to a file in an application’s internal storage. If you need to record video as well, see the official Android guide on the Camera API.
This example, as well as the following examples for other audio classes, will follow a general outline with steps as defined below:
- Declare permissions (only needed once for an application)
- Instantiate/configure the object
- Attempt to start recording/playback
As with all applications that need access to an audio input, declare the permission in the AndroidManifest.xml file. For API level 23 and above, the application should request permission to record audio the first time the user interacts with it.
Next, instantiate MediaRecorder and set the necessary properties. Most commonly, this consists of setting an audio source, an output format, a file path, and an encoder. The order in which these calls are made matters; note that the file path and audio encoders can only be specified after an output format is set. Failure to pay attention to this order may result in IllegalStateExceptions being thrown.
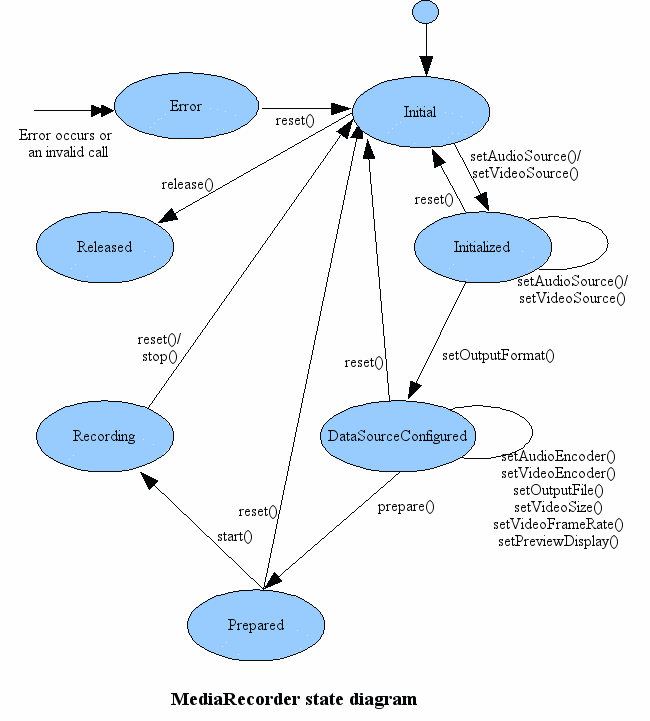
After the above properties are configured, the app should attempt to prepare the MediaRecorder object. If preparation is successful, the MediaRecorder is ready to use and can be started. Once started, the recording can be stopped, paused, and/or subsequently resumed. The following state diagram depicts how the different method calls transition the MediaRecorder between different phases.
Below is an example of how we might use MediaRecorder in a simple application. The startRecording() method can be called inside the onClickListener of a button, and takes as a parameter the location where the recording should be saved – for internal application storage, this can be obtained by calling getFilesDir().getPath() and appending a file name and format.
Note: Many audio sources apply at least minimal processing to the raw stream by default. To record only the unprocessed signal, use the UNPROCESSED source, or VOICE_RECOGNITION for older devices that don’t support the unprocessed property.
When the recording is finished, the application should release resources back to the operating system as soon as possible. The code below demonstrates how to properly end a recording.
The final recording can be found at the storage location specified by the file path. To play back this recording, we can use MediaPlayer.
What is MediaPlayer?
MediaPlayer is MediaRecorder’s counterpart on Android. Given a URI, URL, or reference to a file, it plays audio or video with both minimal setup and minimal customizability. Once initialized, MediaPlayer can be started, paused, and stopped, providing straightforward playback. For a complete list of media formats supported by the Android platform, see the official documentation.
How to use MediaPlayer
An instance of MediaPlayer can be initialized in one of two ways: by instantiating it with the corresponding constructor and configuring the object, or by calling a convenience method create() that takes a data source. If choosing the latter, be aware that the create() method prepares the media synchronously, which may cause the UI thread to freeze. The examples in this section will demonstrate the first method.
As with MediaRecorder, MediaPlayer has a myriad of different possible configurations and states that should be managed carefully to avoid errors. Refer to both the state diagram below and the rest of the official documentation.
After instantiating the MediaPlayer object, the application can set any desired audio attributes, such as specifying the media usage and content. A data source must then be set, which can be a raw resource directly from your application, a path to an audio file in internal storage, or a URL of media to be streamed over the internet. Only after setting a data source can the MediaPlayer be prepared. For local files, this is acceptable to do synchronously, but for streaming purposes, the MediaPlayer should be prepared asynchronously and an O nPreparedListener should be set. The code below continues where our MediaRecorder example left off, showing how to play an audio file saved in an app’s internal storage.
Like with MediaRecorder, it’s good practice to release the resources MediaPlayer uses once finished. When some user action, like a button press, stops playback, playback can be stopped as shown below. Otherwise, set an OnCompletionListener for MediaPlayer to release resources once the player reaches the end of the media source.
What is AudioRecord?
AudioRecord removes a layer of abstraction between the application and a device’s audio hardware, recording uncompressed audio with no way to write directly to a file. These APIs are the lowest level audio framework for Android that can still be used in the Java and Kotlin layer. While MediaRecorder performs its data writing operations inside a black box, AudioRecord requires an application to periodically read the newest audio data from the AudioRecord object’s internal buffer. While this lower-level framework creates more complexity, it also allows applications to build more advanced audio functionality.
How to use AudioRecord
After the application declares and obtains permission to record audio, an AudioRecord object can be initialized by passing several parameters into the constructor. (Alternatively, AudioRecord.Builder can be used, but the process is essentially the same for both). The constructor takes flags indicating the audio source, the sample rate in Hertz, whether the channel configuration is stereo or mono, and the size of the internal buffer for audio data. There are a few settings that are guaranteed to be supported on all Android devices; refer to the documentation to maximize compatibility.
Note: Make use of the getMinBufferSize() method when creating an AudioRecord object to ensure the internal buffer is sufficiently large given the device hardware. Also be sure to check that initialization didn’t fail silently before continuing. Both of these are demonstrated in the code sample below. Also note that we plan to write byte arrays, so we use 8-bit encoding, but be careful – this encoding is not necessary supported across devices. Use short arrays and 16-bit encoding to be fully sure of compatibility.
To actually obtain the audio data, a separate thread should be dedicated to polling the AudioRecord object to avoid freezing the app’s UI. Create a new Thread with a custom implementation of Runnable. Inside the run() method, we continuously read data from AudioRecord into a buffer until an external event (e.g., the press of a button) indicates we should stop. In the code below, after the AudioRecord object has started recording, the writeAudioData() method is called inside the run() method of the thread we just made. While this post won’t go into detail on how to use threading, you can read through this Android guide to learn more.
We take the raw audio bytes and write them to a file. AudioRecord uses PCM encoding, so that’s the kind of data the file will hold. The read() method fills the passed in array with the amount of bytes requested in the third parameter, and returns the amount of bytes successfully read. The thread will block until enough samples have been captured to deliver the requested number, meaning that whatever operations are done with the filled buffer should be completed before the next batch of samples is ready. Here, we perform a file write for the sake of simplicity, but to ensure that no data is missed, we would ideally handle this writing in a separate thread with an independent buffer.
As with all media capture frameworks, don’t forget to release the resources used by AudioRecord when finished.
What is AudioTrack?
Just like MediaRecorder and MediaPlayer, AudioRecord and AudioTrack can be used in tandem. The flow of data is pretty much the opposite of that for AudioRecord – PCM data from a file or other source is periodically pushed by the application to the AudioTrack object, which sends it to the device’s hardware to be consumed and played. AudioTrack can be used to either stream audio continuously or play short sounds that fit in memory (for example, sound effects in a mobile game).
How to use AudioTrack
Construct an instance of AudioTrack by passing the constructor parameters to configure the object, similar to AudioRecord. For API levels less than 21, the constructor takes specifications like the sample rate channel configuration type, and optionally a session ID to control which AudioEffects are applied to specific instances of AudioTrack or other media players. For newer API levels, however, this constructor is deprecated, and an application should use either AudioTrack.Builder (API 23) or an AudioTrack constructor that takes AudioAttributes and AudioFormat objects (API 21).
The example below uses the constructor method to initialize AudioTrack. While the static variables may look identical to the ones declared for AudioRecord, note the differences in the channel configuration ( CHANNEL_OUT_MONO ) and buffer size ( AudioTrack.getMinBufferSize() ) flags that indicate these parameters are used for output, not input.
Note: The same disclaimer above applies – we’re using 8-bit encoding at the risk of losing support on some Android devices, just to simplify the data writing process. One last thing to note in the constructor of AudioTrack: the media being played is from a file, too large to fit in memory, so the streaming mode is more appropriate for this use case.
To push data to the AudioTrack object to be played, we can follow the same pattern as we did for AudioRecord. Inside a dedicated thread, override the run method and make a call to readAudioData() , which does the bulk of the work. In it, we open a file input stream to read bytes of data from a recording, and write that data to the AudioTrack object. The write method is overloaded; see the documentation for other ways to give data to AudioTrack. Lastly, clean up memory and resources after playback has finished.
Other options
While MediaRecorder and AudioRecorder are the only built-in ways to record audio, they are by no means the only ones available to Android developers. Widely used libraries include ExoPlayer as an alternative to MediaPlayer and several C++ libraries for high performance audio.
ExoPlayer is an open source library for media playback, maintained by Google but not distributed as part of the Android SDK. Its structure is easily extendable and has features that are especially useful for streaming media over the internet. An instance of ExoPlayer takes custom MediaSource objects that can be built to correspond to the type and properties of the media, allowing an app to create custom configurations and maximize quality. To explore more capabilities of ExoPlayer, refer to the official developer guides. If your audio flow includes recording using AudioRecord and playing back using ExoPlayer, keep in mind that ExoPlayer doesn’t support PCM-encoded files (an easy fix is to add a WAV header to the raw file).
For applications where low latency and/or high performance is vital to audio features, you could consider using libraries written in C or C++ and incorporating them in your app using the Android NDK toolset. OpenSL ES is an API that operates at a lower level, standardizing audio functionality access across platforms and allowing applications to use hardware acceleration. OpenSL ES is ideal for multimedia creation apps (synthesizers, DJ apps, etc), mobile games, and similar applications. The Android NDK comes with its own OS-specific implementation of OpenSL ES. Also on the C side, AAudio is a relatively new API released by Google with similar use cases as OpenSL ES, designed to be fast and minimalist. Applications read or write data to AAudio streams, which are connected to pieces of audio hardware.
If compatibility across API levels is important for your application, Oboe is a C++ wrapper that switches between the OpenSL ES and AAudio APIs to give the best performance for a specific Android device’s hardware. Google encourages developers to consider using Oboe for real-time audio applications to take advantage of AAudio’s features while maintaining backwards compatibility.
What should I use?
After learning about the multitudes of options for audio recording and playback, the natural question is what to use for your specific application. Picking between frameworks and APIs always comes with tradeoffs, and the decision between audio libraries on Android is no different. For applications where performance isn’t a priority, or audio makes up a small component of the functionality, MediaRecorder and MediaPlayer might be an ideal combination to capture and play back audio without writing much complex code. Keep in mind that only the most common audio formats are supported, and the application won’t have access to the audio data as it’s being recorded. If you’re looking to perform some audio processing or otherwise need real-time audio, consider using AudioRecord and AudioTrack. The process of reading and writing data is more involved than using MediaRecorder, and any compression or transcoding can’t be done using the AudioRecord APIs. Another option is using AudioRecord to capture audio, then integrating ExoPlayer into the app for more extendable playback features. Lastly, C and C++ libraries facilitate the development of high performance audio applications, but require more domain-specific knowledge to use (as well as knowledge of a C-based language). Out of these libraries, Oboe is a good option – well-maintained with an active developer community.
Here’s a table to see at a quick glance which option might be appropriate for your application.
| MediaRecorder / MediaPlayer | AudioRecord / AudioTrack | ExoPlayer | OpenSLES | AAudio | |
|---|---|---|---|---|---|
| What works out of the box | ✅ | ❌ | ✅ | ❌ | ❌ |
| Language | Java/Kotlin | Java/Kotlin | Java/Kotlin | C | C |
| High Performance | ❌ | ✅ | ✅ | ✅ | ✅ |
| Access to Recording Audio Buffer | ❌ | ✅ | ❌ | ✅ | ✅ |
| Video | ✅ | ❌ | ✅ | ❌ | ❌ |
| Backwards-compatible | ✅ | ✅ | ✅ | ✅ | ❌ |
Ultimately, the best audio library to use will vary drastically depending on the scope and features of your application.
This article has outlined how to use several of the most common Android frameworks for audio, but plenty of other guides and resources exist online to help you learn more. Best of luck on your journey to create great audio experiences within your Android application!
Attribution: Portions of this page are reproduced from work created and shared by the Android Open Source Project and used according to terms described in the Creative Commons 3.0 Attribution License.
Источник


