- Избавляемся от рутины RecyclerView.Adapter с помощью DataBinding
- ViewHolder
- ViewModelAdapter
- Легкий DataBinding для Android
- Android — Kotlin
- Databinding in RecyclerView — Android — Kotlin
- Prerequisite:
- Implementation:
- AdapterClass:
- Comments
- RecyclerView With Data Binding in Android Kotlin: Example With Kotlin
- How RecyclerView works: RecyclerView With Data Binding in Android Kotlin
- Lets start creating RecyclerView
- Atomic Spin
- Atomic Object’s blog on everything we find fascinating.
- Data Binding with Live Data for RecyclerView in Kotlin
- A Simple Example
- Fixing the Live Data for RecyclerViews
Избавляемся от рутины RecyclerView.Adapter с помощью DataBinding

RecyclerView — основной UI элемент практически любого приложения. Написание адаптеров и ViewHolder’ов зачастую слишком рутинная работа и содержит достаточно boilerplate кода. В этой статье я хочу показать как с использованием DataBinding и паттерна MVVM можно написать абстрактный адаптер и напрочь забыть про ViewHolder’ы, inflate, ручной биндинг и прочую рутину.
ViewHolder
Мы все привыкли писать отдельный ViewHolder под каждый тип ячеек в таблице для хранения ссылок на отдельные вьюшки и связывания данных.
Можно сказать что DataBinding генерирует на лету тот код, что вы обычно пишите в ViewHolder’ах, поэтому надобность в них отпадает и мы легко можем использовать одну реализацию, хранящую в себе объект готового биндинга:
ViewDataBinding это базовый абстрактный класс для всех сгенерированных классов DataBinding’а и хоть мы и передаем его параметром шаблона для метода bind, DataBindingUtil сам поймет какой layout мы используем и какую реализацию в итоге использовать.
ViewModelAdapter
Разобравшись с ViewHolder’ом надо определиться чего мы хотим от нашего базового адаптера в итоге. Все, что мне требуется от адаптера в пределах MVVM архитектуры — отдать список объектов (ViewModel’ей), сказать какую разметку я хочу использовать для данных в этом списке классов и совершенно не беспокоиться о необходимой для этого логике.
Логику привязки данных на себя берет DataBinding, но это уже совершенно другая статья, коих в интернете уже достаточно.
Напишем логику для конфигурации нашего адаптера:
Для каждого класса объектов таблицы будем хранить пару layoutId и bindingId.
- layoutId — как понятно из имени и аннотации @LayoutRes это соответствующая разметка ячейки.
- bindingId — это сгенерированный идентификатор переменной, используемый в соответствующей разметке. Он нам понадобится для того, чтобы забиндить объект таблицы в написанный ранее ViewHolder, а точнее в ViewDataBinding.
Остается лишь реализовать абстрактные функции RecyclerView.Adapter:
- getItemViewType — так как layoutId уникален для разных ячеек мы с легкостью можем использовать его как viewType.
- onCreateViewHolder — не забываем что viewType это наш layoutId.
- onBindViewHolder — все что требуется для привязки данных объекта к разметке — сообщить DataBinding’у о том, что в данной ячейке теперь новый объект, всю остальную логику он возьмет на себя.
На этом вся основная логика ViewModelAdapter описана, однако остается одна проблема — обработка кликов по ячейкам. Обычно эту логику описывают в Activity, но я не любитель транслировать логику вверх по иерархии, если без этого ну никак не обойтись, поэтому реализую ее прямо в адаптере, но вы можете реализовывать ее там где вам удобно.
Для реализации обработки кликов добавим в ViewModelAdapter такое понятие как sharedObject, объект который будет биндится на все ячейки таблицы (не обязательно, если в разметке не найдет variable с данным bindingID ничего не упадет).
Теперь рассмотрим как это все в итоге работает:
Как пример я реализовал адаптер для бокового меню (используйте NavigationView из стандартной библиотеки если у вас нет необходимости отойти от Material Design).
И как пример layout: cell_navigation_item.xml
Как видите все достаточно просто, нет никакой лишней логики. Мы можем объявлять сколько угодно типов ячеек вызовом 1 функции. Мы можем позабыть о ручном связывании данных для UI.
Данный адаптер успешно проходит боевые испытания на протяжении полугода в нескольких крупных проектах.
С удовольствием отвечу на ваши вопросы в комментариях.
Источник
Легкий DataBinding для Android

Здравствуйте уважаемые читатели. Все мы любим и используем DataBinding, который представила компания Google несколько лет назад, для связи модели данных с вьюшками через ViewModel. В этой статье, хочу поделиться с вами, как можно унифицировать этот процесс с помощью языка Kotlin, и уместить создание адаптеров для RecyclerView (далее RV), ViewPager и ViewPager2 в несколько строчек кода.
Начну с того, что раньше разрабатывали кастомные адаптеры, которые под капотом создавали ViewHolder’ы, и их написание, а тем более поддержка, занимала достаточно большое количество времени. Ниже приведу пример типичного адаптера для RV:
С тем как проект увеличивается, подобных адаптеров может становиться намного больше. Помню, однажды, адаптер был настолько огромный, в несколько сотен строчек кода, что разобраться, что там происходит, а тем более добавить что-то новое занимало колосальное количество времени, так как он работал с разными моделями данных, а так же должен был создавать различные отображения для каждого типа данных. Честно скажу, это было тяжело.
Затем появился DataBinding и большую часть по связыванию данных перекладывалась на него, но адаптеры все равно приходилось писать вручную, изменились только методы onCreateViewHolder , где вместо инфлэйтинга через LayoutInflater , использовался DataBindingUtil.inflate , а при создании вьюхолдеров данные связывались непосредственно с самой вьюшкой через ссылку на созданный объект байдинга.
Выглядит уже лучше, но что если в RV, по прежнему должны отображаться элементы лайаута с разными типами данных, то такая реализация не сильно помогла решить проблему больших адаптеров. И здесь на помощь приходит аннотация BindingAdapter из библиотеки androidx.databinding. С ее помощью, можно создать универсальное решение, которое скрывает реализацию создания адаптера для RV, если использовать вспомогательный объект-конфигуратор DataBindingRecyclerViewConfig , в котором содержится ряд свойств для настройки адаптера.
В результате на свет появилась библиотека, которая называется EasyRecyclerBinding. В нее так же вошли BindingAdapters для ViewPager и ViewPager2. Теперь процесс связывания данных выглядит следующим образом:
1) В лайауте фрагмента, необходимо добавить специальные переменные, которые содержат список отображаемых моделей данных и конфигурацию, указав их атрибутами для RV, — app:items и app:rv_config .
ViewModel, соответственно, содержит список моделей данных для адаптера, которые должны отображаться в RV, а фрагмент конфигурацию DataBindingRecyclerViewConfig.
Сам лайаут для элемента списка, должен содержать ссылку на модель данных, чтобы связать их вместе.
2) Во фрагменте нам нужно получить конфигурацию для адаптера и передать её в отображение через инстанс dataBinding, используя специальную функцию-конструктор createRecyclerConfig , которая создаст и вернет инстанс DataBindingRecyclerViewConfig, указав при этом id лайаута для выбранной модели, и название свойства, к которому будет прикреплена данная модель.
Это все, что нужно сделать, чтобы связать данные из ViewModel с отображением списка в RV. Так же при создании адаптера можно назначить слушатели событий для байдинга вьюхолдера, такие как onItemClick, onItemCreate, onItemBind и другие.
А чтобы использовать вьюхолдеры с разными визуальными лайаутами, к которым привязаны свои модели отображения данных, необходимо имплементировать в них специальный интерфейс из библиотеки EasyRecyclerBinding — IBindingModel и переопределить поле layoutResId , — id лайаута, который будет отображаться для этой модели в списке.
Реализация для фрагмента с разными вьюхолдерами не сильно отличается от вышеприведенной, кроме того, используется другая функция-конструктор createRecyclerMultiConfig для конфигурации адаптера, в которой уже не нужно указывать тип привязанных данных и сгенерированный класс байдинга.
Таким образом, создание адаптеров для отображения данных в RV, превратилось в простую задачу состоящую из пары строчек кода, где разработчику уже не надо думать о том, как поддерживать, фактически, не нужную часть presentation слоя. И даже, если модель данных изменится, достаточно будет поменять только её отображение, и связать его с новыми данными, не заботясь о поддержке адаптеров.
Аналогичный процесс создания адаптеров для ViewPager и ViewPager2, представлен в примере на github вместе с открытым кодом, ссылку на который, я разместил в конце статьи. В настоящий момент библиотека еще дорабатывается, и хочется получить адекватный фидбек, и пожелания по дальнейшему ее развитию. Так же в неё вошли вспомогательные функции для удобного создания байдинга, в том числе в связке с ViewModel. (LayoutInflater.createBinding, Fragment.createBindingWithViewModel, etc)
Спасибо, что дочитали до конца. Приятного кодинга и хорошего настроения)
Источник
Android — Kotlin
A blog to explore things in Android App Development using Kotlin.
Databinding in RecyclerView — Android — Kotlin
- Get link
- Other Apps
Already we have seen the basics of Databinding and how to use it in previous post.
Now let’s see how to use Databinding in RecyclerView. And Its gonna be a short post. 😉
You can find the Project in GitHub.
Prerequisite:
build.gradle
First, we have enable dataBinding in app-level build.gradle
Next, we have add the following plugin.
apply plugin: ‘kotlin-kapt’
Next, we have to include dependency for databinding, (Not needed, if using Android Studio 3.2 or above, since its already bundled)
Implementation:
RecyclerActivity.kt
Lets create data for RecyclerView and then set the layoutManager and the data to it. Then lets set an adapter for that RecyclerView.
AdapterClass:
Next, ViewHolder have to be created as follows:
Here,
BR — generated class ;
BR.model — ‘model’ is variable name declared in layout ;
Then, we have to bind the data according to its position.

- Get link
- Other Apps
Comments
Thanks a lot, this is hard to find on the internet.
Nice one ..Got a brief idea. Thanking for the knowlege ..Keep sharing
.
Thanks for sharing. It would be great if you can share github repo.
Appsinvo was founded in 2015 and it is india-based company. Appsinvo is a Top Mobile App Development Company in India, USA and UK that develops unique, easy to use, high functionality and seamless operation that makes your web and mobile app more innovative. Since 2015, we have been delivering our services for the last 5 years in 120 countries and we have developed more than 300 mobile apps that makes more than 150 clients happy and satisfied with our services.
Mobile App development company in Asia
Top Mobile App Development Company
Top Mobile App Development Company in Noida
Mobile App Development Company in Delhi
Top Mobile App Development Companies in Australia
Top Mobile App Development Company in Qatar
Top Mobile App Development Company in kuwait
Top Mobile App Development Companies in Sydney
Mobile App Development Company in Europe
Mobile App Development Company in Dubai
Источник
RecyclerView With Data Binding in Android Kotlin: Example With Kotlin
RecyclerView is an advanced and flexible version of a ListView. We use RecyclerView when we have to display a large number of elements in one activity. If you don’t know how many views you have to load into the list, then RecyclerView is the best option for you. So, in this example, we will learn how to create RecyclerView With Data Binding in Android using Kotlin.
RecyclerView is better than a ListView because it saves a lot of memory because it reuses the Views when you scroll the activity rather than creating the views at the beginning of the Activity. When all the views are loaded in the beginning it wastes memory because there are many views that are loaded but cannot be seen on the screen. So, this wastes the memory and makes the app heavier in size.
In Application development, the memory cost feature is of great importance. Android system runs lots of apps so if your app is really heavy in size then it will not respond timely.
 RecyclerView With Data Binding in Android Kotlin
How RecyclerView works: RecyclerView With Data Binding in Android Kotlin
RecyclerView works in three parts.
- The Layout
- ViewHolder
- Adapter
The layout is created for each and every item to be loaded in the RecyclerView.
To save the memory ViewHolder is used because it caches the views.
The adapter fills the ViewHolders with data and returns the information of the data.
Lets start creating RecyclerView
In this example I will be showing a list of countries into a RecyclerView.
1- First of all create a new Android Studio Project with an empty Activity. Select KOTLIN as the default language for the project.
2- Name your project with “RecyclerViewKotlin” or you can name it whatever you want.
Источник
Atomic Spin
Atomic Object’s blog on everything we find fascinating.
Data Binding with Live Data for RecyclerView in Kotlin
When working on an app in Kotlin or Android, it’s very common to use RecyclerViews to display lists of information. Typically, this data will be built up in ViewModels and passed to a list adapter. This works fine for most things and allows interaction with the items. Usually, they don’t need to change directly in the current fragment.
In some cases, however, you want the items to change directly by some live data in the ViewModel. One example might be when you have a list of options and want to display the current selection. This will require data binding with live data for the RecyclerView.
A Simple Example
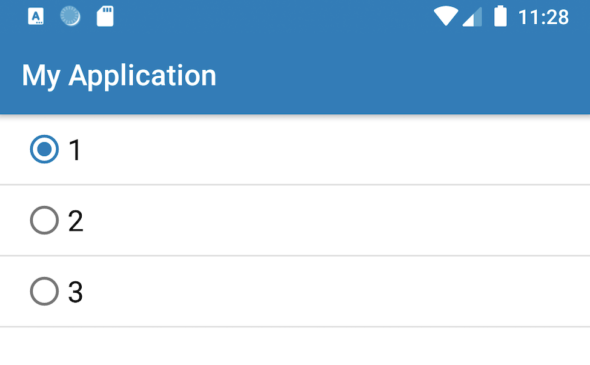
To keep things simple, I’ll provide sample code for a RecyclerView with an options selection.
First, we’ll look at the MainViewModel that contains live data for the current selected option ID and a function that will change the selected option.
The main fragment is simple enough, just a RecyclerView in a ConstraintLayout.
This is the item layout that will be used in the RecyclerView. Note that we will data-bind the optionID and ViewModel. This allows us to set an onClick method to toggle function in the ViewModel, passing the optionID. And we can observe the selectedID from the ViewModel to show if the RadioButton should be checked.
Next, we’ll look at the MainFragment. Note that the layout is inflated, and the list adapter has been created and set to the RecyclerView. We submit a list of ints to the adapter.
The MainListAdapter creates the binding for each item and binds the data. There’s nothing really fancy here.
The DataBoundViewHolder simply extends the ViewHolder to be used for layouts that have data binding.
Lastly, the DataBoundListAdapter will allow us to create any list adapters in our app that will work with data binding.
With our code out of the way, what do we get when running the app?
Not much, apparently. We can see that our list is visible and the text is set on each option, but clicking them does nothing. Why? We have data binding, we pass the ViewModel, and we observe data. But it doesn’t work.
The issue is that the RecyclerView ViewHolders are not able to observe changes to live data. This is because they are not LifecycleOwners, unlike what we might have for fragments.
Fixing the Live Data for RecyclerViews
The solution to the problem is quite simple. We need to make the ViewHolders LifecycleOwners.
Because the ViewHolders can be added and removed as the RecyclerView list changes, we need to update the state of the lifecycle.
In the DataBoundListAdapter, we need to set the LifecycleOwner of the binding and override the attach and detach functions to trigger the lifecycle changes. Since they only get destroyed when the fragment is destroyed a list of them needs to be maintained so we can destroy all the viewHolder lifecycles when the fragment is destroyed.
After these small changes, we can rerun our app.
We can see now that the radio buttons change when we click them. Those simple changes allow us to give any RecyclerView ViewHolder data binding and observable live data.
This is a more generic approach than what is provided in this post on Lua Software Code.
This post has been updated from the original, there’s some things that won’t be available or work out of the box, the appExecutors, autoCleared, Injectable, @Inject. These are provided in the dependencyInjection folder and is mostly code from Google example projects.
The code for this project can be found here.
Источник


