- How to Create User Interface Login & Register with Android Studio
- Adjustment of several layouts :
- Connect fragments with viewpager
- Registration Form Validation in Android Studio
- Registration form in Android with validation
- material design Signup screen
- Create Activity SignUp
- Validate registration form
- Validate Name
- Validate Username
- Validate Email
- Validate PhoneNo
- Validate Password
- Android Server Login And Registration With PHP MySQL in Android Studio
- How to create android user registration app including same email exists condition with User Login and insert User Name, Email, Password on dynamic online server in android studio tutorial with all the source code.
- Project File Description :
- Contents in this project Android Server Login And Registration With PHP MySQL :
- 1. Watch live demo :
- 2. Create database including table on your hosting server :
- 3. Create PHP script to receive and insert registration and login details into MySQL database :
- 5. Add internet permission :
- 6. Start Coding for project Android Server Login & Register :
- Android Login and Register with SQLite Database Tutorial
- What is SQLite?
- Let’s Get it Working
- Step 1) Update build.gradle file.
- Step 2) Update strings.xml.
- Step 3) Update colors.xml.
- Step 4) Update styles.xml.
- Step 5) Add Logo Image.
- Step 6) Create a User model class.
- Step 7) Create a DatabaseHelper class.
- Step 8) Create activity_login.xml.
- Step 8) Create InputValidation class.
- Step 9) Create a LoginActivity class.
- Step 10) Create activity_register.xml.
- Step 11) Create RegisterActivity class.
- Step 12) Create activity_users_list.xml.
- Step 13) Writing the Adapter Class.
- Step 14) Create UsersListActivity class.
- Step 15) Update AndroidManifest.xml.
- To learn this tutorial using KOTLIN Language Click here.
How to Create User Interface Login & Register with Android Studio
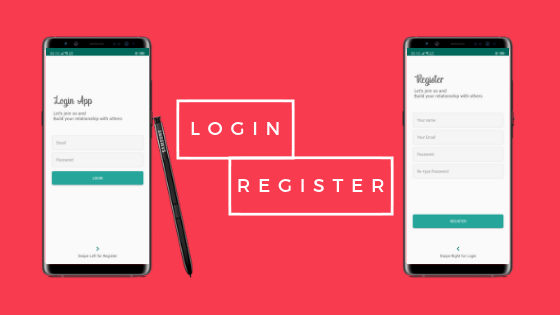
ok, this is my first article in Medium. In this section, I want to share with you about the User Interface on Android and we will create a Login page and a Register page. Some components that I will use:
1. Viewpager
2. Fragment
3. Edittext
4. Button
5. Textview
6. Imageview
What about the results? let’s coding (follow step by step)
- Of course we must already have an Android Studio. if not, you can download it first on the official Android Studio website. If you already have one, please open your Android studio.
2. We create a new project by clicking “Start a new Android Studio project”. Fill in the application name column with “LoginApp”, then click next.

3. Select the minimum SDK you need or want, then click next.


4. Select “Empty Activity” and click next. After that, the “Activity Name” and “Layout Name” columns will appear, in this section just leave it like that, then click finish.

After you click finish, Android Studio will make you an Application with the name “LoginApp”.
After the application is successfully built, you can simply make adjustments to the following sections:
Open the colors.xml file in app/res/values/colors.xml, and change it like this:
Create a folder with the name “font” in the res folder, by right clicking on the res directory, select new / directory and name it “font”. After that, copy this font into font directory. (download the font 1 and font 2).
Create some Drawable Resource File in the drawable directory, by right-clicking on the drawable directory, select new / Drawable Resource File.
After that open file styles.xml and change like this :
Add the theme property in the Main Activity in the manifest, in the app / manifests / AndroidManifest.xml folder
So the AndroidManifest.xml file will be as follows:
After all the steps above are done, then make 2 fragments with the name fragment_login and fragment_register in the layout directory, by right-clicking on the layout directory, New/Fragment/Fragment (Blank)

Uncheck:
include fragment factory methods? and include interface methods?

Adjustment of several layouts :
change the activity_main.xml layout, fragment_login.xml and fragment_register.xml so that it will be as below
Open the strings.xml file in the res / values / strings.xml directory and change it to something like the following :
So that the overall structure of the project will be as follows :

Connect fragments with viewpager
Create an inner class in the MainActivity.java class with the name AuthenticationPapterAdapter. This class is a derivative of the FragmentPagerAdapter class and serves to connect Fragments with ViewPager,
Then call the class in the onCreate() method in MainActivity.java and connect with viewpager
So the MainActivity.java class will be like this
The display of the final application will be like this
Источник
Registration Form Validation in Android Studio

Registration form in Android with validation
material design Signup screen
Firstly, make material design signup screen for user registration form with validation.We will validate full name, username, email, phoneno, password.Then we have to assign id’s to all the fields. If you guys don’t know how to make material design signup screen and assign id’s so you guys can check aur previoues tutorial, click here
Create Activity SignUp
After making SignUp material design screen, then we have to create “signup” activity.
Then in this “signup” activity .We have to create register user function on GO button because by clicking on GO button, all the data in the fields help the user to SignUp.
Make sure while creating “registeruser” function, it should be public and single parameter of view.
In this “registeruser” function, we have to get all values in string for registration form in android with validation and store it in firebase.
To get more detail and code, please see aur tutorial, click here
Validate registration form
Validate Name
Firstly, we have to validate name. So. for this, make function boolean and it should be named “validatename()”.
Inside this function, we have to get data from aur text field like this
String val = regName.getEditText().getText().toString();
Then, we have to check if the field is empty or not. If the field is empty, simply, call that field and set error. As we are using material design edit text field. So, we already have set error space inside the layout of edit text. We have to set error that ” field cannot be empty” otherwise return false if field is empty.
In else section, similarly set text field error and pass null, so this null remove error generated for first time. Again when user entered data, erroe will be gone and return true.
Code is given below
Validate Username
For the username, what we want to do is. field should not be empty. Then we have to add length limitation, if the length of field is greater than 15, seterror “username too long” and return false.
Add a variable string. It will check if there any space between username it generate error. For this simply, if the field not matches the requirment of no whidespace between username. Then generate error “white spaces not allowed” and return false.
Code of username given below.
Validate Email
In validate email, we have to make boolean function “validateemail()”, same as we done in validate username above. The things we have to add in validate email is, we have to make another string which is called rigix. Then we have to validate email, if value in text field not match with email pattern, it will show error”invalid email”and return false.
Code give below
Validate PhoneNo
Then, we have to validate “PhoneNO”. Check, either the field are empty or not. If the field is empty, simply, call that field and set error. As we are using material design edit text field. We have to set error that ” field cannot be empty” otherwise return false if field is empty.
In else section, similarly set text field error and pass null, so this null remove error generated for first time. Again when user entered data, error will be gone and return true.
Code given below.
Validate Password
In this validate password. Firstly, we have to make boolean function “validatepassword”. Then we have to make string for password. You guys can set password type as per your requirment as shown in code.
Then, inside validate password. We have to check, if the password doesnot match with password pattern. It will set error”Invalid password” and return false.
Code is given below.
After validating all function above. Then we have to call all the function one by one in register user function. If any of these function are not valid then it return to registeruser and show error, otherwise it will store and show data in firebase. thats how the registration in android with validation takes place.
Источник
Android Server Login And Registration With PHP MySQL in Android Studio
How to create android user registration app including same email exists condition with User Login and insert User Name, Email, Password on dynamic online server in android studio tutorial with all the source code.
Project Description : In this tutorial we would going to create an android application with three different activities performs the task of User Registration where application user insert their First Name, Last Name, Email and Password. All that details would store – insert directly into MySQL database present on online hosting server. The technology to insert All the data on server including receiving and inserting data is performed using PHP language. After register user would goto login screen where he put its Email and Password to login into application. After successfully login user would redirect to the User Profile Dashboard screen. So here is the complete step by step tutorial for Android Server Login And Registration With PHP MySQL.
Main features in this project :
- User Registration Form Including same email exist condition so duplicate email user would not register again.
Project File Description :
Activity Files in this project:
- MainActivity.java
- UserLoginActivity.java
- DashboardActivity.java
Java files in this project :
Layout files in this project :
- activity_main.xml
- activity_user_login.xml
- activity_dashboard.xml
PHP files in this project :
- DatabaseConfig.php
- UserRegistration.php
- UserLogin.php
Contents in this project Android Server Login And Registration With PHP MySQL :
- Watch Live Demo Video.
- Create database including table on your hosting server.
- Create PHP script to receive and insert registration and login details into MySQL database.
- Start a new android application project.
- Add internet permission.
- Start Coding.
1. Watch live demo :
2. Create database including table on your hosting server :
Next step is to create a database on your online server and inside that database create a fresh table which will used to insert User registration details like i did in below screenshot.

3. Create PHP script to receive and insert registration and login details into MySQL database :
Code for DatabaseConfig.php file.
Code for UserRegistration.php file.
Code for UserLogin.php file.
4. Start a new android application project .
5. Add internet permission :
Open your Project’s AndroidManifest.xml file and add below internet permission.
6. Start Coding for project Android Server Login & Register :
Источник
Android Login and Register with SQLite Database Tutorial
In software applications, it is mostly required to store users and app data locally. Android SDK provides several APIs for developers to save user and app data, So SQLite is one of the ways of storing data. For many applications, SQLite is the backbone of the app whether it’s used directly or via some third-party wrapper. In this tutorial, we will see how to use SQLite in our app directly.
What is SQLite?
SQLite is a lightweight database that comes with android. It is an Open-Source embedded SQL database engine. This provides a relational database management structure for storing user-defined records in the form of tables.
Key point to understand regarding SQLite :-
– SQLite is a RDBMS (Relational Database Management System)
– SQLite is written in C programming language
– SQLite is embedded within the Android operating system, so you don’t need anything external on Android to use SQLite
– To manipulate data (insert, update, delete) in SQLite database – we’ll use SQL (Structured Query Language)
Let’s Get it Working
In this tutorial we are going to learn how to use SQLite. To really understand the usage of SQLite we will create an app . The App contains simple Login form, Registration form and listing of registered user. This app shows how SQLite database operations are performed. I assume that you have created a new android project. Source Code is available on GitHub.


Step 1) Update build.gradle file.
Before you can use Material Design in your projects you need to add the following compile line to your Gradle dependencies block in your build.gradle file and rebuilt the project .
Step 2) Update strings.xml.
Add the below string values to the string.xml located in res => values => strings.xml.
Step 3) Update colors.xml.
Add the below color values to the colors.xml located in res => values => colors.xml.
Step 4) Update styles.xml.
Add the below style values to the styles.xml located in res => values => styles.xml.
Step 5) Add Logo Image.
Download the below logo image and add it to the drawable folder located in res => drawable.
Android Tutorials Hub Logo
Step 6) Create a User model class.
Create a new package named modal and create a User class with all getter and setter methods to maintain single contact as an object.
Step 7) Create a DatabaseHelper class.
Create a new package named SQL and create a DatabaseHelper class. Extend this class with SQLiteOpenHelper to manage database creation and version management. I have also written some methods to manipulate data in the database.
Methods and functionality
– addUser :- add a user to the database.
– getAllUser :- fetch users data from the database.
– updateUser :- update the user in the database on the basis of the user id.
– deleteUser :- delete user from the database on the basis of the user id.
– checkUser :- check whether the user exists in the database.
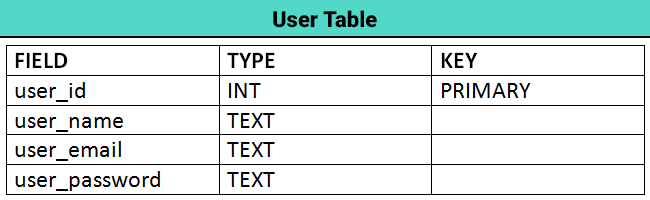
User Table Schema
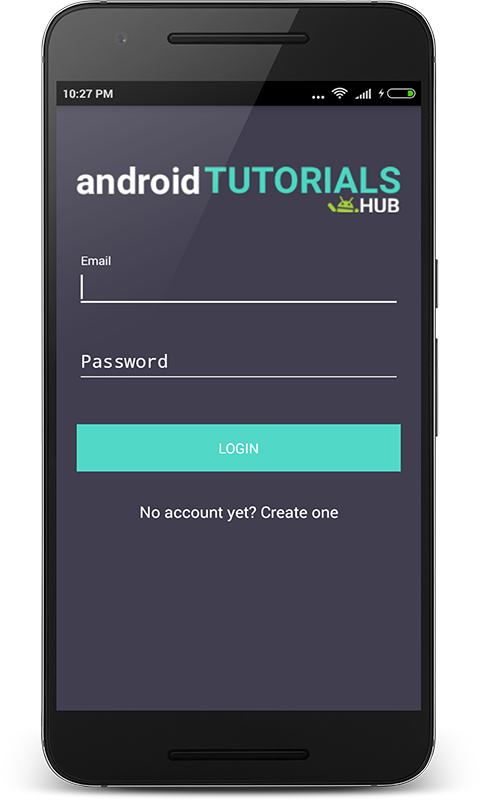
Step 8) Create activity_login.xml.
Now create a layout file for the LoginActivity.java i.e activity_login.xml and add the below code in your layout file. The code will create a simple login form containing logo on the top, 2 input fields email and password, login button, and registration screen navigation link.
activity_login.xml would result in a screen like this:
Step 8) Create InputValidation class.
Create a package named helpers and create a class in it named InputValidation.java and add below code in it. The code will create validation methods for the input field. Validation like empty input, valid email and etc.
Step 9) Create a LoginActivity class.
Now create a package named activities and create a class named LoginActivity and add below code. Here i have written the code to validate the input fields Email and Password using the InputValidation class which I described above. Also, code for navigation to registration screen on the click of registration link and to user list screen after clicking on the login button if credentials are valid.
The Screen below shows the login form with input validation display the error message if values entered in input fields are not valid.
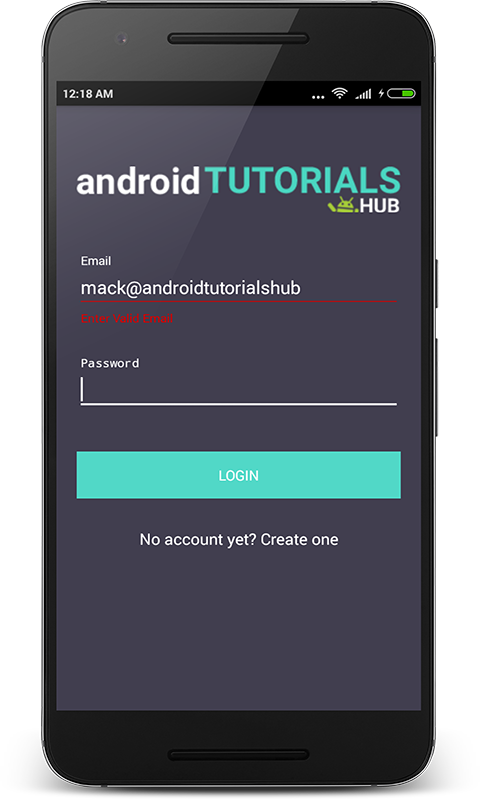
Login Screen with Input Validation
The Screen below shows the login form with input validation display the snack bar with a message if values entered in input fields are not validated from the SQLite database.
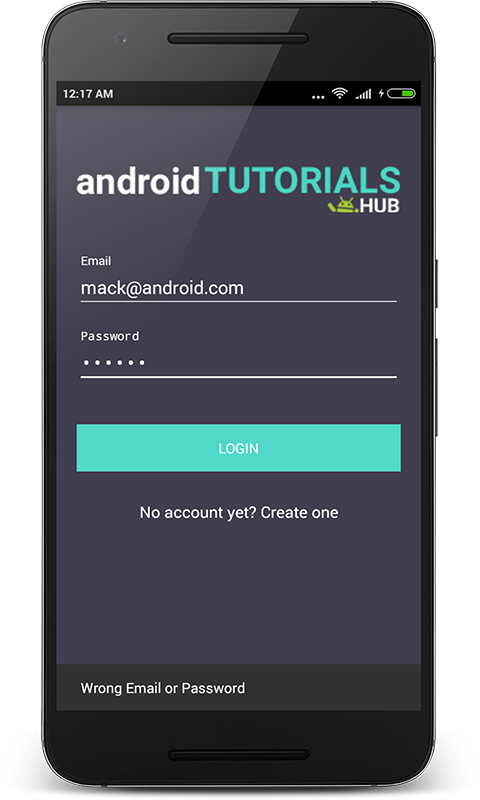
Login Screen With SQLite Validation
Step 10) Create activity_register.xml.
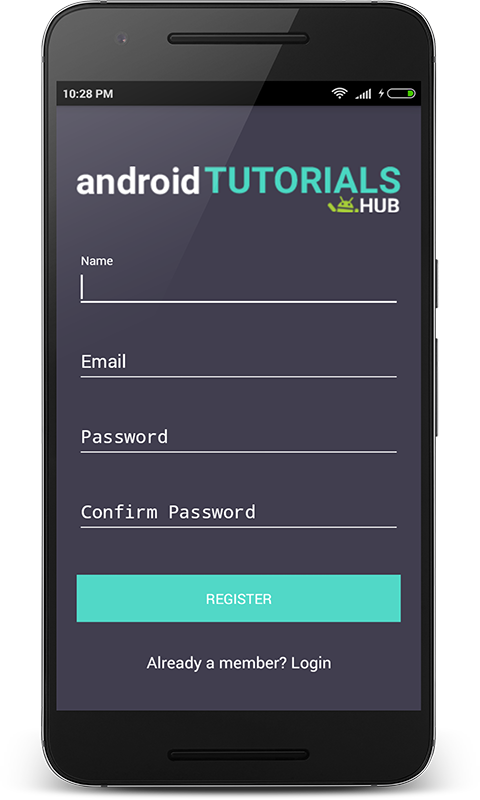
Now create a layout file for the RegisterActivity.java i.e activity_register.xml and add the below code in your layout file. The code will create a simple registration form containing a logo on the top, 4 input fields name, email, password, and confirm password, register button, and login screen navigation link.
activity_register.xml would result in a screen like this:
Step 11) Create RegisterActivity class.
Now create a package named activities and create a class named RegisterActivity and add below code. Here I have written the code to validate the input fields Name, Email, Password, and Confirm Password using the InputValidation class which I described above. Also, code for navigation to the login screen on the click of login link and shows snackbar with success message for registration.
The Screen below shows the registration form with input validation display the error message if values entered in input fields are not valid.
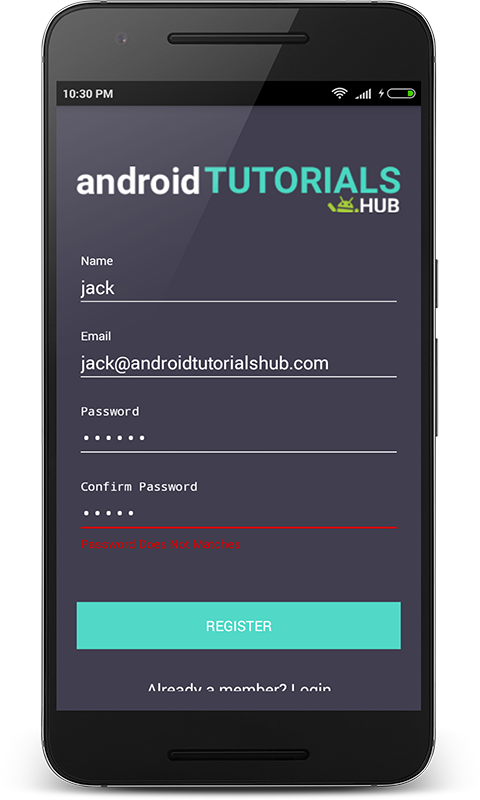
Register Screen with Input Validation
The Screen below shows the filled registration form with valid values.
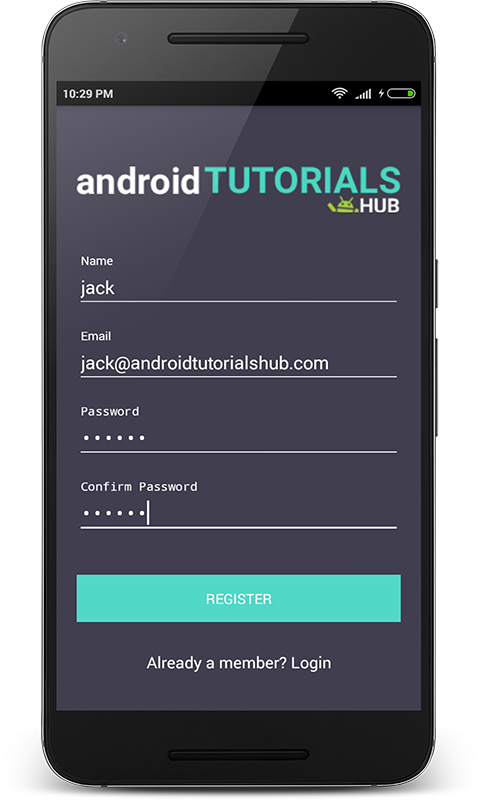
Register Screen with filled input fields
The Screen below shows the register form display the snackbar with the registration success message.
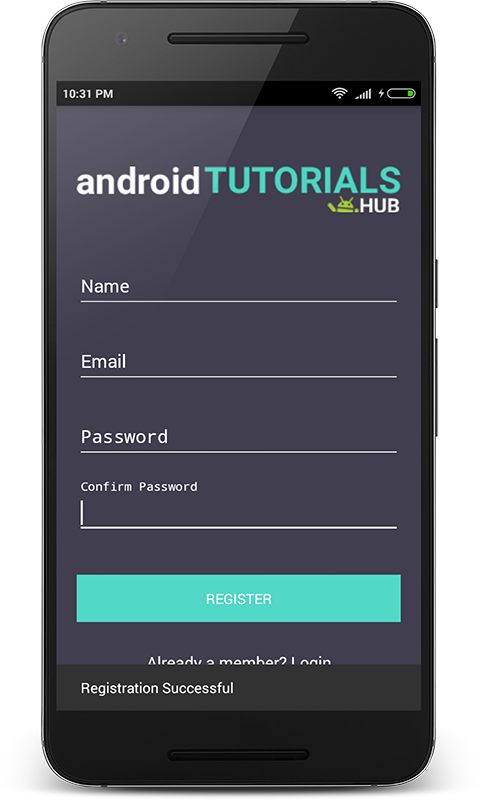
Register Screen with Registration Success Message
Step 12) Create activity_users_list.xml.
Now create a layout file for the UsersListActivity.java i.e activity_users_list.xml and add the below code in your layout file. The code will create a simple view containing two views one view i.e LinearLayout shows the welcome message with email id of the logged in user and another view i.e RecyclerView shows the list of registered users in the app.
activity_users_list.xml would result in a screen like this:
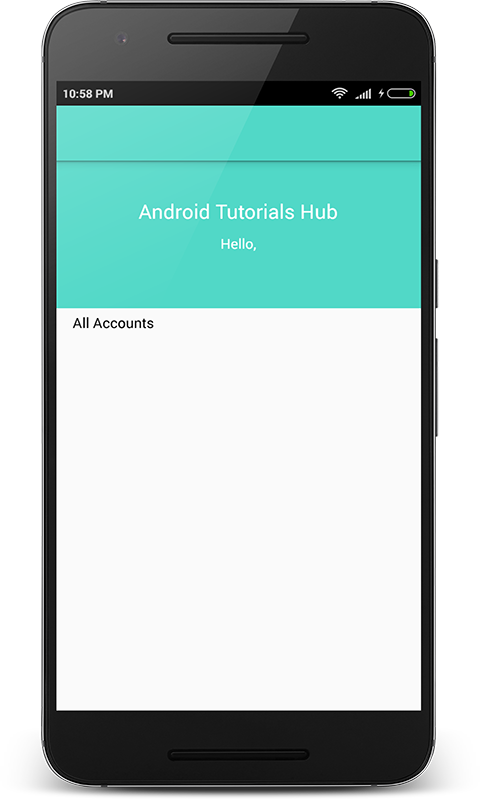
User List Screen
Step 13) Writing the Adapter Class.
Now create a package named adapters and create a class named UsersRecyclerAdapter and add below code. Here onCreateViewHolder() method inflates item_user_recycler.xml. In onBindViewHolder() method the appropriate User data (name, email, and password) set to each row.
item_user_recycler.xml
Step 14) Create UsersListActivity class.
Now create a package named activities and create a class named UsersListActivity and add below code. Here i have written the code to show the email id of the logged in user and the list of registered users.
The Screen below after user login shows the brand name, email id of logged in user, and registered users list.
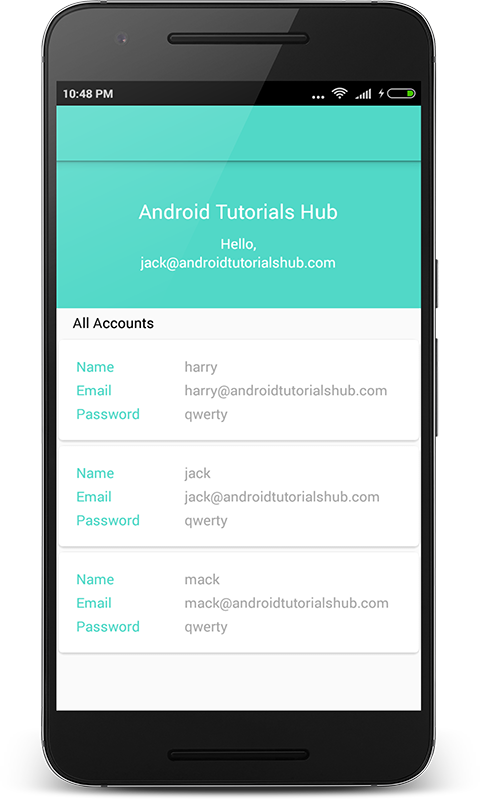
User List Screen After Login
Step 15) Update AndroidManifest.xml.
To learn this tutorial using KOTLIN Language Click here.
Please feel free to comment as well as ask questions. And, yeah! If this post helps you please do share!
Enjoy Coding and Share Knowledge
Источник


