- Android RelativeLayout Example
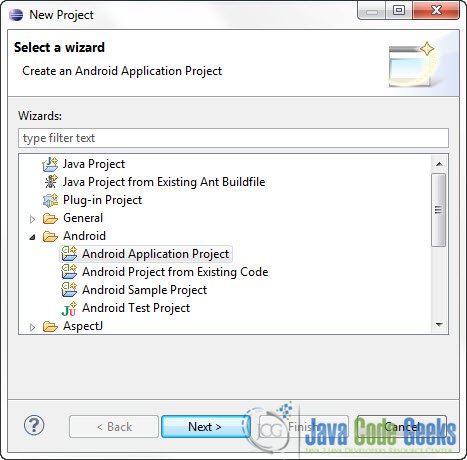
- 1. Create a new Android Project
- 2. RelativeLayout example
- 3. Run the application
- Android Relative Layout
- Relative Layout
- RelativeLayout Attributes
- Example
- Xamarin. Android RelativeLayout
- Ресурсы
- Урок 2. Работа с RelativeLayout на примере UserInfoScreen
- Видео версия урока
- Изменение activity_user_info, используя RelativeLayout.
Android RelativeLayout Example
Posted by: Ilias Tsagklis in RelativeLayout January 17th, 2013 0 Views
In Android there are may ways you can arrange the components of your Application on the screen. One of the most common layouts is the RelativeLayout . In this tutorial we are going to see how RelativeLayout works with some input components.
There is a good reason why it’s called RelativeLayout . That’s because it let’s you arrange the components on your screen in positions relative to each other. For example, you have button1 on your screen and you want to put button2 , on top or right or left of button1 . RelativeLayout uses android:layout_below , android:layout_toRightOf etc… to let you do that. It’s one of the most flexible layouts out there.
For this tutorial, we will use the following tools in a Windows 64-bit platform:
- JDK 1.7
- Eclipse 4.2 Juno
- Android SKD 4.2
1. Create a new Android Project
Open Eclipse IDE and go to File -> New -> Project -> Android -> Android Application Project and click Next.
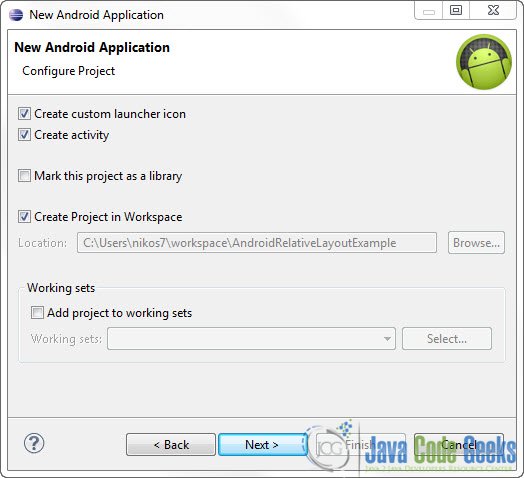
You have to specify the Application Name, the Project Name and the Package name in the appropriate text fields and then click Next.

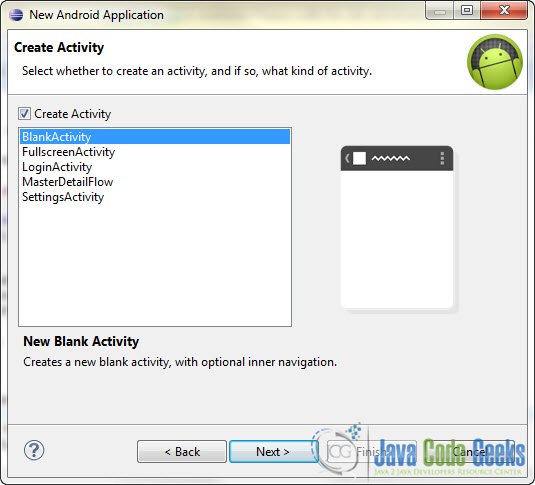
In the next window make sure the “Create activity” option is selected in order to create a new activity for your project, and click Next. This is optional as you can create a new activity after creating the project, but you can do it all in one step.
Select “BlankActivity” and click Next.
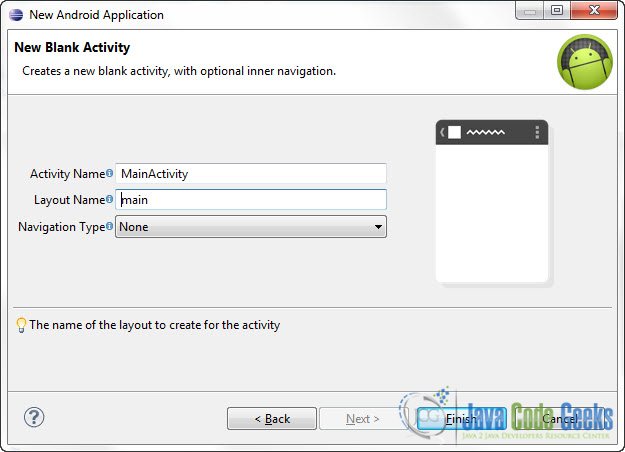
You will be asked to specify some information about the new activity. In the Layout Name text field you have to specify the name of the file that will contain the layout description of your app. In our case the file res/layout/main.xml will be created. Then, click Finish.
2. RelativeLayout example
Open res/layout/main.xml file :

And paste the following code :
I think that the above code is pretty self explanatory, but there are one or two attributes that need a bit more of your attention. The android:layout_below, android:layout_toRightOf attributes have a very clear role, as we explained in the introduction of this tutorial. Now let’s take a look at the “Submit” button and the android:layout_alignParentRight attribute. The parent of this element is the element that we used to relatively position the button. In this case the @+id/editText item. The android:layout_alignParentRight dictates that the button will be right-alligned on the bottom of the editText component, as you can see below on the Graphical Layout editor:
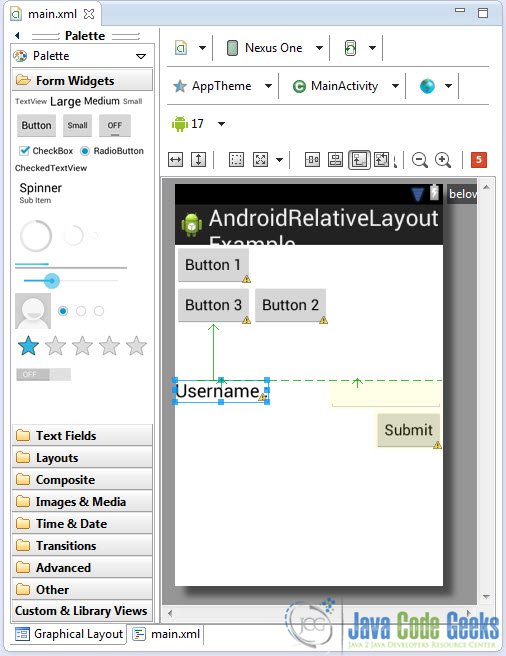
Now you can drag these items around the screen using your mouse and then turn back to the xml mode to see the new values of the attributes. This will help you to understand RelativeLayout much better.
3. Run the application
We don’t really have to write any code for this tutorial, so go ahead and run the application to see how the layout looks on your emulator:
Источник
Android Relative Layout
Android RelativeLayout enables you to specify how child views are positioned relative to each other. The position of each view can be specified as relative to sibling elements or relative to the parent.
Relative Layout
RelativeLayout Attributes
Following are the important attributes specific to RelativeLayout −
| Sr.No. | Attribute & Description | ||||||||||||
|---|---|---|---|---|---|---|---|---|---|---|---|---|---|
| 1 |
| Sr.No. | Attribute & Description | |||||||||
|---|---|---|---|---|---|---|---|---|---|---|
| 1 |
| Step | Description |
|---|---|
| 1 | You will use Android Studio IDE to create an Android application and name it as demo under a package com.example.demo as explained in the Hello World Example chapter. |
| 2 | Modify the default content of res/layout/activity_main.xml file to include few widgets in Relative layout. |
| 3 | Define required constants in res/values/strings.xml file |
| 4 | Run the application to launch Android emulator and verify the result of the changes done in the application. |
Following is the content of the modified main activity file src/com.example.demo/MainActivity.java. This file can include each of the fundamental lifecycle methods.
Following will be the content of res/layout/activity_main.xml file −
Following will be the content of res/values/strings.xml to define two new constants −
Let’s try to run our modified Hello World! application we just modified. I assume you had created your AVD while doing environment setup. To run the app from Android Studio, open one of your project’s activity files and click Run  icon from the toolbar. Android Studio installs the app on your AVD and starts it and if everything is fine with your setup and application, it will display following Emulator window −
Источник
Xamarin. Android RelativeLayout
RelativeLayout ViewGroup , отображающий дочерний элемент View элементы в относительном положении. Положение объекта View может быть задано относительно родственных элементов (например, в левом или нижнем углу заданного элемента) или в позициях, относящихся к элементу RelativeLayout область (например, выравнивание по нижнему краю, слева от центра).
RelativeLayout — Это очень мощная служебная программа для разработки пользовательского интерфейса, так как она может исключить вложенные ViewGroup элементы. Если вы можете найти себя с помощью нескольких вложенных LinearLayout группы, возможно, вы сможете заменить их одним из них RelativeLayout .
Запустите новый проект с именем хеллорелативелайаут.
Откройте файл Resources/Layout/Main. axml и вставьте в него следующее:
Обратите внимание на каждый android:layout_* атрибут, например layout_below ,, layout_alignParentRight и layout_toLeftOf . При использовании RelativeLayout можно использовать эти атрибуты, чтобы описать, как их следует располагать View . Каждый из этих атрибутов определяет другой тип относительного положения. Некоторые атрибуты используют идентификатор ресурса одноуровневого элемента View для определения его собственной относительной координаты. Например, Последнее определяется в соответствии с левым и равным- Button Top-of, View ОПРЕДЕЛЯЕМым идентификатором ok (который является предыдущим Button ).
Все доступные атрибуты макета определяются в RelativeLayout.LayoutParams .
Убедитесь, что вы загрузили этот макет в OnCreate() Method
SetContentView(int) Метод загружает файл макета для Activity , ЗАданный идентификатором ресурса, Resource.Layout.Main относится к файлу макета SetContentView(int) .
Запустите приложение. Вы должны увидеть следующий макет:

Ресурсы
части этой страницы являются изменениями на основе работы, созданной и совместно используемой Project Android с открытым кодом, и используются в соответствии с терминами, описанными в лицензии Creative commons attribution 2,5.
Источник
Урок 2. Работа с RelativeLayout на примере UserInfoScreen
Код начала урока:
Видео версия урока
Изменение activity_user_info, используя RelativeLayout.
В прошлом уроке мы с вами сделали экран отображения данных пользователя, используя контейнер (ViewGroup) LinearLayout . В этом уроке мы создадим этот экран заново, используя RelativeLayout .
В следующих уроках на этом экране будут добавляться ещё дополнительные элементы, поэтому замена контейнера на RelativeLayout сделана не просто для учебных целей.
Исходя из названия, RelativeLayout (рус. относительный макет или если перефразировать – макет с относительным расположением элементов) может располагать элементы относительно друг друга. У его вложенных элементов есть ряд параметров для указания зависимостей относительно остальных элементов или же самого RelativeLayout .
Элементы внутри RelativeLayout имеют свойства отвечающие за их расположение по вертикали и горизонтали. По умолчанию горизонтальное свойство расположения прижато к левому краю RelativeLayout , а вертикальное к верхнему. Получается по умолчанию расположение элементов зависят от верхнего и левого края родительского контейнера RelativeLayout . Часто такое зависящее от чего-то расположение для удобства называют зависимостью. Например, установить для текста зависимость снизу от кнопки и справа от родительского контейнера. Если вы не укажете ни одной зависимости, то все элементы будут располагаться один над одним в верхнем левом углу. Причём элемент, который будет ниже всего в xml файле будет находиться поверх остальных.
Давайте изменим структуру нашего activity_user_info.xml файла. Заменим корневой элемент на RelativeLayout (удалив свойство android:orientation=»vertical» потому что оно не применяется к RelativeLayout ) и вставим версию нашего layout , когда все элементы лежат на одном уровне (без вложенного контейнера LinearLayout ) :
Смотрим, как он выглядит на вкладке Design :

Теперь нам необходимо исправить эту ситуацию. В левом верхнем углу должен остаться user_image_view , а user_name_text_view должен находиться под ним. Для этого применим свойство android:layout_below=»@id/user_image_view» . Оно делает именно то, что нам надо. У RelativeLayout есть такие же свойства только для других направлений:
- android:layout_below – находиться под элементом.
- android:layout_above – находиться над элементом.
- android:layout_toStartOf – находиться слева(в начале) от элемента.
- android:layout_toEndOf – находиться справа (в конце) от элемента
Сейчас нам достаточно добавить зависимость android:layout_below для каждого нижестоящего элемента:
В результате видим:

Выглядит уже лучше, но последний элемент( followers_text_view ) должен находиться не под following_text_view , а справа от него. Мы хотим, чтобы наш элемент находился снизу от user_location_text_view и справа от following_text_view . Добавим атрибуты android:layout_below=»@id/user_location_text_view» и android:layout_toEndOf=»@+id/following_text_view» к элементу followers_text_view .
После этого видим, что мы получили такой же layout , как в предыдущем уроке:

Какие преимущества от того, что мы используем RelativeLayout ? Мы убрали вложенный контейнер LinearLayout . В данном примере это было не критично, но вообще важно помнить, что слишком глубокая вложенность приводит к снижению производительности пользовательского интерфейса. Хорошей практикой является вложенность не больше 10 уровней.
Осталась ещё одна вещь, которую надо помнить, когда используете RelativeLayout . Нельзя объявлять круговые (транзитивные) зависимости. Т.е. если мы зададим кнопке свойство android:layout_toStartOf=»@+id/search_edit_text» , а к EditText добавим зависимость android:layout_toStartOf=»@+id/search_button» , то приложение выдаст исключение java.lang.IllegalStateException: Circular dependencies cannot exist in RelativeLayout . Можете проверить это, если не верите 🙂
- RelativeLayout позволяет элементам указывать зависимости как относительно друг друга, так и относительно сторон самого родительского контейнера RelativeLayout .
- Его нужно использовать, когда мы видим не линейную структуру элементов.
- RelativeLayout позволяет избавиться от вложенности контейнеров в отличие от LinearLayout
Источник


