- Подготовка к публикации в Play Store Flutter приложения
- Алексей Добрый
- Иконка приложения
- Подпись приложения
- Создание хранилища ключей
- Связь хранилища ключей с приложением
- Конфигурация подписи в gradle
- Активация Proguard
- Шаг 1 — конфигурация Proguard
- Шаг 2 — активация обусфикации и/или минификации
- Проверим манифест приложения
- Проверим конфигурацию сборки
- Сборка релиза
- Сборка app bundle
- Тестирование app bundle
- Оффлайн, используя bundle tools
- Онлайн, используя Google Play
- Сборка APK
- Android release FAQ
- Sign up for more like this.
- SQLite dumps
- Nuxt 3 beta
- «O» большое — скорость алгоритма
- Build and release an Android app
- Adding a launcher icon
- Enabling Material Components
- Signing the app
- Create an upload keystore
- Reference the keystore from the app
- Configure signing in gradle
- Shrinking your code with R8
- Enabling multidex support
- Reviewing the app manifest
- Reviewing the build configuration
- Building the app for release
- Build an app bundle
- Test the app bundle
- Offline using the bundle tool
- Online using Google Play
- Build an APK
- Install an APK on a device
- Publishing to the Google Play Store
- Updating the app’s version number
- Android release FAQ
- When should I build app bundles versus APKs?
- What is a fat APK?
- What are the supported target architectures?
- How do I sign the app bundle created by flutter build appbundle ?
- How do I build a release from within Android Studio?
Подготовка к публикации в Play Store Flutter приложения
Алексей Добрый

В привычном цикле разработки Flutter приложения мы запускаем flutter run или используем опции Run или Debug в IDE. По умолчанию Flutter создает версию приложения для отладки.
И вот версия для публикации готова к размещению, например в Google Play Store. Перед тем как публиковать приложение необходимо несколько завершающих штрихов:
- Добавить иконку приложения (launchpad icon)
- Подписать приложение (signing)
- Активировать Proguard
- Проверить манифест приложения (AndroidManifest.xml)
- Проверить конфигурацию сборки (build.gradle)
- Создать версию приложения для публикации (—release)
- Опубликовать в Google Play Store
- Еще раз посмотреть Android release FAQ
Иконка приложения
Когда новое Flutter приложение создается, туда добавляется иконка по-умолчанию (логотип Flutter). Для настройки иконки можно воспользоваться пакетом flutter_launcher_icons. Альтернативный вариант, сделать всё самостоятельно, выполнив следующие шаги:
- Изучить, или хотя бы просмотреть рекомендации и правила Material Design Product icons.
- В директории /android/app/src/main/res/ , поместить файлы иконки в директории соотвествующие соглашению. Стандартные mimmap -директории демонстрируют правильное именование.
- В файле AndroidManifest.xml в теге application обновить атрибут android:icon для соответствия иконкам (из предыдушего шага), ( для напримера —
- Для проверки, что иконка заменилась, запустить приложение и проверить «иконку запуска»
Подпись приложения
Для публикации приложения в Play Store необходимо подписать приложение цифровой подписью.
Создание хранилища ключей
сохраняйте файл от публичного доступа и конечно не публикуйте его в репозитории проекта
формат файла начиная с версии JAVA 9 по -умолчанию PKS12. Если вы создавали файл ранее, то keytool предложит конвертировать файл в формат PKS12.
Связь хранилища ключей с приложением
и здесь тоже, хранить файл key.properties в секрете и не публиковать его в репозиторий проекта
Конфигурация подписи в gradle
на информацию о файле конфигурации
2. Заменить конфигурацию сборки релиза
на следующую информацию, содержащую параметры подписи
Теперь сборка релиза будет подписываться автоматически.
Активация Proguard
По умолчанию Flutter не проводит обусфикацию и минификацию кода Android. Если есть намерение использовать сторонние библиотеки Java, Kotlin или Android, то имеет смысл снизить размер APK и защитить код от «reverse engineering».
Шаг 1 — конфигурация Proguard
Создать файл /android/app/proguard-rules.pro и добавить правила
Эти правила относятся только ко Flutter, для других библиотек нужны свои собственные правила, ну например для Firebase.
Шаг 2 — активация обусфикации и/или минификации
Откроем /android/app/build.gradle , найдём определение buildTypes . Внутри конфигурации release , добавим minifyEnabled и useProguard , а также укажем файл с конфигурацией Proguard.
конечно минификация и обусфикация увеличать время компиляции файла
Проверим манифест приложения
- application : отредактируйте android:label в теге application чтобы установить реальное, правильное имя приложения.
- uses-permissions : Добавьте разрешение android.permissions.INTERNET если приложению требуется доступ в Интернет. Стандартный шаблон приложения не включает этот тег, но позволяет устанавливать соединение в процессе разработки между приложением и инструментами Flutter.
Проверим конфигурацию сборки
Проверить файл конфигурации Gradle, build.gradle , расположенный в /android/app и убедиться, что установленные значения верны:
- defaultConfig
- applicationId — указан уникальный идентификатор приложения
- versionCode и versionName : указать внутреннюю версию приложения (число), и строковую версию приложения (для показа пользователям)
- minSdkVersion и targetSdkVersion : указать минимальный уровнь API, и уровень API для которого было разработано приложение.
versionCode — это положительное число, которое используется в качестве внутренней версии приложения. Это число используется только для определения является ли одна версия более новой чем другая. Чем больше число, тем новее версия. Пользователи не видят эти версии. Максимально допустимое число — 2100000000.
versionName — строка, используемая в качестве номера версии, показываемой пользователям. Единственная цель versionName — отображение пользователю.
Сборка релиза
Есть два возможных варианта публикации в Play Store
Сборка app bundle
Если была произведена настройка подписи, то пакет будет подписан автоматически. Перейти в директорию приложения и выполнить
сейчас (2019) это рекомендованный способ публикации приложений
версии сборки и приложения определяются на основе файла pubspec.yaml . version: 1.0.0+1 — версия приложения это первые три цифры разделенных точками, а версия сборки это число после знака + . Это значения можно переопределить при выполнеии команды используя опции —build-name (versionName) и —build-number (versionCode).
Тестирование app bundle
Есть несколько путей чтобы протестировать app bundle, здесь представлены два
Оффлайн, используя bundle tools
- Если еще не имеет bundletools , то получаем это здесь
- Генерируем набор APK из пакета приложения
- Устанавливаем APK на присоединенные устройства
Онлайн, используя Google Play
- Загрузить пакет в GooglePlay и протестировать. Можно использовать alpha или beta-релизы перед реальной публикацией приложения.
- Процесс загрузки пакета приложения
Сборка APK
Несмотря на то, что сборка пакета приложения считается приоритетной перед сборкой APK. Могут быть случаи когда пакеты поддерживаются механизмом распространения. Тогда надо будет выпустить APK для каждой цели ABI (Application Binary Interface).
Если цифровая подпись уже настроена в приложении, все APK будут подписаны:
на выходе получим два APK
Если убрать опцию —split-per-abi , то получим один «жирный» файл содержащий весь код для всех ABI целей. И пользователю также придется загружать код который не совместим с его платформой.
Для установки APK на устройство, подключим его через USB и выполним команду flutter install
Android release FAQ
Sign up for more like this.

SQLite dumps
Установить SQLite в Ubuntu sudo apt install sqlite3 libsqlite3-devОткрыть конкретную базу данных, консоль: sqlite3
/database.sqlite3 sqlite>Для сохранения дампа базы используется команда .dump: sqlite> .output dump.sql sqlite> .dump sqlite> .exitДля сохранения отдельной таблицы sqlite> .output users.sql sqlite> .dump users sqlite>

Nuxt 3 beta
И так, через 468 дней после первого коммита Nuxt 3 вышел в бета-версии. Более года интенсивной разработки Nuxt 3. Документация и код. Новая основа Помимо Vue3 и Vite, Nuxt 3 содержит новый серверный движок, который открывает новые возможности. Это JavaScript сервер приложений который переносим среди множества современных облачных провайдеров. В

«O» большое — скорость алгоритма
Специальное соглашение «О-большое» описывает скорость работы алгоритма. Важно понимать, знать насколько быстро или медленно работают алгоритмы. Время выполнения алгоритма может расти с разной скоростью. Например при поиске элементов. Допустим один шаг, одна итерация алгоритма выполняется 1мс. Значит при обработке 100 элементов время выполнения будет 100мс. Для бинарного поиска, чтобы найти
Источник
Build and release an Android app
During a typical development cycle, you test an app using flutter run at the command line, or by using the Run and Debug options in your IDE. By default, Flutter builds a debug version of your app.
When you’re ready to prepare a release version of your app, for example to publish to the Google Play Store, this page can help. Before publishing, you might want to put some finishing touches on your app. This page covers the following topics:
Note: Throughout this page, [project] refers to the directory that your application is in. While following these instructions, substitute [project] with your app’s directory.
Adding a launcher icon
When a new Flutter app is created, it has a default launcher icon. To customize this icon, you might want to check out the flutter_launcher_icons package.
Alternatively, you can do it manually using the following steps:
Review the Material Design product icons guidelines for icon design.
In the [project]/android/app/src/main/res/ directory, place your icon files in folders named using configuration qualifiers. The default mipmap- folders demonstrate the correct naming convention.
In AndroidManifest.xml , update the application tag’s android:icon attribute to reference icons from the previous step (for example, ).
To verify that the icon has been replaced, run your app and inspect the app icon in the Launcher.
Enabling Material Components
If your app uses Platform Views, you may want to enable Material Components by following the steps described in the Getting Started guide for Android.
- Add the dependency on Android’s Material in /android/app/build.gradle :
To find out the latest version, visit Google Maven.
- Set the light theme in /android/app/src/main/res/values/styles.xml :
- Set the dark theme in /android/app/src/main/res/values-night/styles.xml
Signing the app
To publish on the Play Store, you need to give your app a digital signature. Use the following instructions to sign your app.
On Android, there are two signing keys: deployment and upload. The end-users download the .apk signed with the ‘deployment key’. An ‘upload key’ is used to authenticate the .aab / .apk uploaded by developers onto the Play Store and is re-signed with the deployment key once in the Play Store.
- It’s highly recommended to use the automatic cloud managed signing for the deployment key. For more information, see the official Play Store documentation.
Create an upload keystore
If you have an existing keystore, skip to the next step. If not, create one by either:
Running the following at the command line:
On Mac/Linux, use the following command:
On Windows, use the following command:
This command stores the upload-keystore.jks file in your home directory. If you want to store it elsewhere, change the argument you pass to the -keystore parameter. However, keep the keystore file private; don’t check it into public source control!
Note:
The keytool command might not be in your path—it’s part of Java, which is installed as part of Android Studio. For the concrete path, run flutter doctor -v and locate the path printed after ‘Java binary at:’. Then use that fully qualified path replacing java (at the end) with keytool . If your path includes space-separated names, such as Program Files , use platform-appropriate notation for the names. For example, on Mac/Linux use Program\ Files , and on Windows use «Program Files» .
The -storetype JKS tag is only required for Java 9 or newer. As of the Java 9 release, the keystore type defaults to PKS12.
Reference the keystore from the app
Create a file named [project]/android/key.properties that contains a reference to your keystore:
Warning: Keep the key.properties file private; don’t check it into public source control.
Configure signing in gradle
Configure gradle to use your upload key when building your app in release mode by editing the [project]/android/app/build.gradle file.
Add the keystore information from your properties file before the android block:
Load the key.properties file into the keystoreProperties object.
Find the buildTypes block:
And replace it with the following signing configuration info:
Release builds of your app will now be signed automatically.
Note: You may need to run flutter clean after changing the gradle file. This prevents cached builds from affecting the signing process.
For more information on signing your app, see Sign your app on developer.android.com.
Shrinking your code with R8
R8 is the new code shrinker from Google, and it’s enabled by default when you build a release APK or AAB. To disable R8, pass the —no-shrink flag to flutter build apk or flutter build appbundle .
Note: Obfuscation and minification can considerably extend compile time of the Android application.
Enabling multidex support
When writing large apps or making use of large plugins, you may encounter Android’s dex limit of 64k methods when targeting a minimum API of 20 or below. This may also be encountered when running debug versions of your app via flutter run that does not have shrinking enabled.
Flutter tool supports easily enabling multidex. The simplest way is to opt into multidex support when prompted. The tool detects multidex build errors and will ask before making changes to your Android project. Opting in allows Flutter to automatically depend on androidx.multidex:multidex and use a generated FlutterMultiDexApplication as the project’s application.
Note: Multidex support is natively included when targeting min sdk 21+.
You might also choose to manually support multidex by following Android’s guides and modifying your project’s Android directory configuration. A multidex keep file must be specified to include:
Also, include any other classes used in app startup. See the official Android documentation for more detailed guidance on adding multidex support manually.
Reviewing the app manifest
Review the default App Manifest file, AndroidManifest.xml , located in [project]/android/app/src/main and verify that the values are correct, especially the following:
application Edit the android:label in the application tag to reflect the final name of the app. uses-permission Add the android.permission.INTERNET permission if your application code needs Internet access. The standard template does not include this tag but allows Internet access during development to enable communication between Flutter tools and a running app.
Reviewing the build configuration
Review the default Gradle build file, build.gradle , located in [project]/android/app and verify the values are correct, especially the following values in the defaultConfig block:
applicationId Specify the final, unique (Application Id)appid versionCode & versionName Specify the internal app version number, and the version number display string. You can do this by setting the version property in the pubspec.yaml file. Consult the version information guidance in the versions documentation. minSdkVersion , compilesdkVersion , & targetSdkVersion Specify the minimum API level, the API level on which the app was compiled, and the maximum API level on which the app is designed to run. Consult the API level section in the versions documentation for details. buildToolsVersion Specify the version of Android SDK Build Tools that your app uses. Alternatively, you can use the Android Gradle Plugin in Android Studio, which will automatically import the minimum required Build Tools for your app without the need for this property.
Building the app for release
You have two possible release formats when publishing to the Play Store.
Note: The Google Play Store prefers the app bundle format. For more information, see Android App Bundle and About Android App Bundles.
Warning: Recently, the Flutter team has received several reports from developers indicating they are experiencing app crashes on certain devices on Android 6.0. If you are targeting Android 6.0, use the following steps:
If you build an App Bundle Edit android/gradle.properties and add the flag: android.bundle.enableUncompressedNativeLibs=false .
If you build an APK Make sure android/app/src/AndroidManifest.xml doesn’t set android:extractNativeLibs=false in the tag.
For more information, see the public issue.
Build an app bundle
This section describes how to build a release app bundle. If you completed the signing steps, the app bundle will be signed. At this point, you might consider obfuscating your Dart code to make it more difficult to reverse engineer. Obfuscating your code involves adding a couple flags to your build command, and maintaining additional files to de-obfuscate stack traces.
From the command line:
- Enter cd [project]
- Run flutter build appbundle
(Running flutter build defaults to a release build.)
The release bundle for your app is created at [project]/build/app/outputs/bundle/release/app.aab .
By default, the app bundle contains your Dart code and the Flutter runtime compiled for armeabi-v7a (ARM 32-bit), arm64-v8a (ARM 64-bit), and x86-64 (x86 64-bit).
Test the app bundle
An app bundle can be tested in multiple ways—this section describes two.
Offline using the bundle tool
- If you haven’t done so already, download bundletool from the GitHub repository.
- Generate a set of APKs from your app bundle.
- Deploy the APKs to connected devices.
Online using Google Play
- Upload your bundle to Google Play to test it. You can use the internal test track, or the alpha or beta channels to test the bundle before releasing it in production.
- Follow these steps to upload your bundle to the Play Store.
Build an APK
Although app bundles are preferred over APKs, there are stores that don’t yet support app bundles. In this case, build a release APK for each target ABI (Application Binary Interface).
If you completed the signing steps, the APK will be signed. At this point, you might consider obfuscating your Dart code to make it more difficult to reverse engineer. Obfuscating your code involves adding a couple flags to your build command.
From the command line:
- Enter cd [project]
- Run flutter build apk —split-per-abi
(The flutter build command defaults to —release .)
This command results in three APK files:
- [project]/build/app/outputs/apk/release/app-armeabi-v7a-release.apk
- [project]/build/app/outputs/apk/release/app-arm64-v8a-release.apk
- [project]/build/app/outputs/apk/release/app-x86_64-release.apk
Removing the —split-per-abi flag results in a fat APK that contains your code compiled for all the target ABIs. Such APKs are larger in size than their split counterparts, causing the user to download native binaries that are not applicable to their device’s architecture.
Install an APK on a device
Follow these steps to install the APK on a connected Android device.
From the command line:
- Connect your Android device to your computer with a USB cable.
- Enter cd [project] .
- Run flutter install .
Publishing to the Google Play Store
For detailed instructions on publishing your app to the Google Play Store, see the Google Play launch documentation.
Updating the app’s version number
The default version number of the app is 1.0.0 . To update it, navigate to the pubspec.yaml file and update the following line:
The version number is three numbers separated by dots, such as 1.0.0 in the example above, followed by an optional build number such as 1 in the example above, separated by a + .
Both the version and the build number may be overridden in Flutter’s build by specifying —build-name and —build-number , respectively.
In Android, build-name is used as versionName while build-number used as versionCode . For more information, see Version your app in the Android documentation.
After updating the version number in the pubspec file, run flutter pub get from the top of the project, or use the Pub get button in your IDE. This updates the versionName and versionCode in the local.properties file, which are later updated in the build.gradle file when you rebuild the Flutter app.
Android release FAQ
Here are some commonly asked questions about deployment for Android apps.
When should I build app bundles versus APKs?
The Google Play Store recommends that you deploy app bundles over APKs because they allow a more efficient delivery of the application to your users. However, if you’re distributing your application by means other than the Play Store, an APK may be your only option.
What is a fat APK?
A fat APK is a single APK that contains binaries for multiple ABIs embedded within it. This has the benefit that the single APK runs on multiple architectures and thus has wider compatibility, but it has the drawback that its file size is much larger, causing users to download and store more bytes when installing your application. When building APKs instead of app bundles, it is strongly recommended to build split APKs, as described in build an APK using the —split-per-abi flag.
What are the supported target architectures?
When building your application in release mode, Flutter apps can be compiled for armeabi-v7a (ARM 32-bit), arm64-v8a (ARM 64-bit), and x86-64 (x86 64-bit). Flutter does not currently support building for x86 Android (See Issue 9253).
How do I sign the app bundle created by flutter build appbundle ?
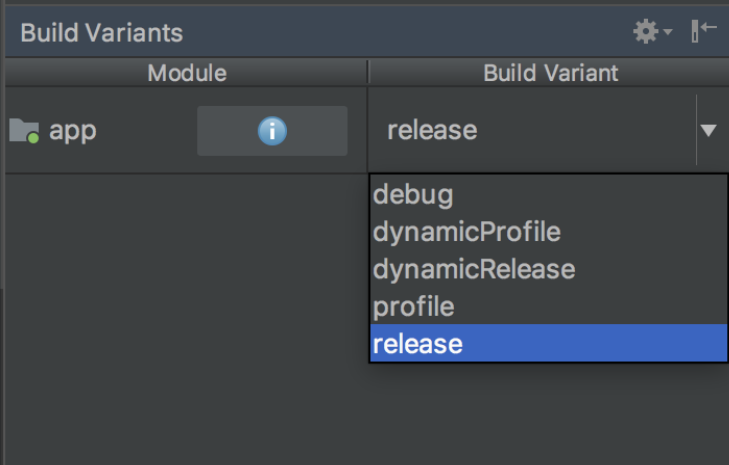
How do I build a release from within Android Studio?
In Android Studio, open the existing android/ folder under your app’s folder. Then, select build.gradle (Module: app) in the project panel:

Next, select the build variant. Click Build > Select Build Variant in the main menu. Select any of the variants in the Build Variants panel (debug is the default):
The resulting app bundle or APK files are located in build/app/outputs within your app’s folder.
Except as otherwise noted, this work is licensed under a Creative Commons Attribution 4.0 International License, and code samples are licensed under the BSD License.
Источник


