- 5 лучших приложений для подключения к удалённому рабочему столу для Android
- AnyDesk
- Удалённый рабочий стол Chrome
- Microsoft Remote Desktop (RDP для Android)
- Splashtop Personal Remote PC
- TeamViewer
- 5 best remote desktop apps for Android
- The best remote desktop apps for Android
- AnyDesk
- Chrome Remote Desktop
- Microsoft Remote Desktop
- Splashtop Personal Remote PC
- TeamViewer
- Get started with the Android client
- Download the Remote Desktop client
- Add a Remote Desktop connection
- Add remote resources
- Remove remote resources
- Pin a connection to your home screen
- Manage general app settings
- Manage display settings
- Manage your RD Gateways
- Manage your user accounts
- Start a Remote Desktop connection
- Use the connection bar
- Use the session selection bar
- Use the command bar
- Touch gestures and mouse modes
- Join the Beta channel
5 лучших приложений для подключения к удалённому рабочему столу для Android

Удалённый доступ к рабочему столу компьютера – одна из самых малоизвестных функций для продвинутых пользователей. Однако она доступна даже на смартфонах с Android. Есть два способа получить доступ к компьютеру со смартфона – с помощью транслирования контента и с помощью удалённого рабочего стола. Сегодня мы сосредоточимся на втором.
Ниже мы собрали для вас лучшие удалённые рабочие столы для Android!
AnyDesk

AnyDesk – достойный вариант удалённого рабочего стола для Android. Вы можете подключить свой смартфон к компьютеру и управлять им со смартфона. У приложения простой и понятный интерфейс, и работает оно без каких-либо проблем. Оно бесплатное, но у него есть свои недостатки. Мы рекомендуем установить приложение и решить, подходит ли оно вам.
Удалённый рабочий стол Chrome

Удалённый рабочий стол Chrome – самое популярное из подобных приложений. На компьютер нужно установить специальную программу, а на смартфон – это приложение. Приложение работает отлично. Оно быстрее и проще других вариантов, хоть и давно не обновлялось. Не удивляйтесь, если в нём будут возникать ошибки.
Microsoft Remote Desktop (RDP для Android)

Microsoft Remote Desktop – самый серьёзный бесплатный конкурент для Удалённого рабочего стола Chrome. Работает он примерно так же. Вы устанавливаете программу на компьютер и это приложение на смартфон. Чтобы использовать это приложение, вам не нужно устанавливать Google Chrome. Однако работа приложений на одном уровне. Тем не менее, это достойная альтернатива приложению Chrome.
Splashtop Personal Remote PC
Splashtop – менее популярное, но достойное приложение. Оно работает так же, как предыдущие. Вы можете получить доступ к чему угодно на компьютере со своего смартфона по локальной сети. Можно добавить доступ откуда угодно за дополнительную плату. Таким образом вы сможете получать доступ к компьютеру с любой WFi-сети или по мобильному интернету. Вы также можете получать доступ к веб-камере, чтобы следить за домом. Приложение работает отлично.
TeamViewer
TeamViewer – самый очевидный выбор среди удалённых рабочих столов. Приложение предоставляет удалённый доступ к компьютеру со смартфона. Оно немного сложнее, чем другие, но работает замечательно. Оно также поддерживает передачу файлов, шифрование и передачу аудио и видео в реальном времени. С помощью приложения вы даже можете помогать друзьям и коллегам. Приложение бесплатно для личного пользования, но есть и платная подписка.
Источник
5 best remote desktop apps for Android

Remote access to a desktop is one of the most niche power-user features out there. However, it is perfectly doable on an Android device. There are two basic ways to do it. Users can remote into their Android device from a computer. We covered that functionality in our best screen mirroring apps for Android list. This list focuses more on accessing your desktop computer from your Android device. There are a bunch of apps that boast remote access as a feature. However, only some of them are actually good. Here are the best remote desktop apps for Android!
The best remote desktop apps for Android
AnyDesk
Price: Free / $79-$229 per year

AnyDesk is a serviceable option in the remote desktop space on Android. It works like any other remote desktop app. You connect your phone to your computer and then use your computer from your phone. It worked pretty well in our testing and it uses a simple UI. There weren’t any real issues with it. The app is free for personal use. The prices we listed are for commercial use mostly. It definitely has its flaws, but we also put apps in lists for a reason. Give it a try and see if you like it. Worst case, you don’t and have four other options. VNC Viewer and this app competed for the fifth slot on this list so it’s right up there as well.
Chrome Remote Desktop
Price: Free
Chrome Remote Desktop is one of the most popular remote desktop apps. Users install the app from the Chrome Web Store on their computer and then this app from Google Play. From there, follow the installation instructions and you should be able to connect. The app worked most of the time in our testing. It’s quicker and simpler than many of the other options, including TeamViewer. However, it’s also been two years since Chrome Remote Desktop saw an update as of the writing of this article. We recommend trying this one first, but don’t be shocked if it’s not a flawless performance.
Microsoft Remote Desktop
Price: Free
Microsoft Remote Desktop is arguably Chrome Remote Desktop’s biggest free competitor. It works about the same way. You simply enable remote access on your Windows PC and install this app on your phone. The two should let your devices connect to one another. The positive part is you not needing a Google Chrome installation for this one to work on Windows devices. The bad news is the performance is about the same so you’re not really getting a better product. In any case, PC users should definitely try this one first since it’s first-party software and it may prove to be more stable over a longer period of time. Microsoft has another remote desktop app (Google Play), but it’s more for Windows Server and Enterprise.
Splashtop Personal Remote PC
Price: Free / $5 per month / $16.99 per year
Splashtop is a less popular, but still fairly successful remote desktop app. It works like the others with dual apps on your computer and Android device. You can access anything on your computer from your phone on your local network. You can add access from anywhere for $5 per month or $16.99 per year. This lets you access your device on any network, including any WiFi network or mobile data. The app also lets you access your webcam to check up on your home without too much trouble. It worked as well as Chrome and Microsoft did in our testing.
TeamViewer
Price: Free for personal use
TeamViewer is kind of the obvious choice for remote desktop apps. It gives remote access to your computer from your Android device. It’s a little bit more complicated of a setup, but it works just as well as one would expect. It also includes features like file transfers in both directions, encryption, and real-time sound and HD video transmission. There are features included for helping, say, a friend or coworker. However, it works perfectly fine for just goofing around on your computer as well. The app is entirely free for personal use. Those who use it for business need a subscription.
If we missed any great remote desktop apps for Android, tell us about them in the comments! You can also click here to check out our latest Android app and game lists!
Источник
Get started with the Android client
Applies to: Windows Server 2022, Windows Server 2019, Android 7.0 and later
You can use the Remote Desktop client for Android to work with Windows apps and desktops directly from your Android device or a Chromebook that supports the Google Play Store.
This article will show you how to get started using the client. If you have any additional questions, make sure to check our FAQ.
- Curious about the new releases for the Android client? Check out What’s new for the Android client.
- The Android client supports devices running Android 6.0 and later, as well as Chromebooks with ChromeOS 53 and later. Learn more about Android applications on Chrome at Chrome OS Systems Supporting Android Apps.
Download the Remote Desktop client
Here’s how to set up the Remote Desktop client on your Android device:
- Download the Microsoft Remote Desktop client from Google Play.
- Launch RD client from your list of apps.
- Add a Remote Desktop connection or remote resources. Remote Desktop connections let you connect directly to a Windows PC and remote resources to access apps and desktops published to you by an admin.
Add a Remote Desktop connection
Now that you have the client on your device, you can add Remote Desktop connections to access your remote resources.
Before you add a connection, if you haven’t done so already, set up your PC to accept remote connections.
To add a Remote Desktop connection:
In the Connection Center, tap +, and then tap Desktop.
Enter the name of the remote PC into PC name. This name can be a Windows computer name, an Internet domain name, or an IP address. You can also append port information to the PC name (for example, MyDesktop:3389 or 10.0.0.1:3389). This field is the only required field.
Select the User name you use to access the Remote PC.
- Select Enter every time for the client to ask for your credentials every time you connect to the remote PC.
- Select Add user account to save an account that you use frequently so you don’t have to enter credentials every time you sign in. To learn more about user accounts, see Manage your user accounts.
You can also tap on Show additional options to set the following optional parameters:
- In Friendly name, you can enter an easy-to-remember name for the PC you’re connecting to. If you don’t specify a friendly name, the PC name is displayed instead.
- The Gateway is the Remote Desktop gateway you’ll use to connect to a computer from an external network. Contact your system administrator for more information.
- Sound selects the device your remote session uses for audio. You can choose to play sound on your local device, the remote device, or not at all.
- Customize display resolution sets the resolution for the remote session. When turned off, the resolution specified in global settings is used.
- Swap mouse buttons switches the commands sent by right and left mouse gestures. Ideal for left-handed users.
- Connect to admin session lets you connect to an admin session on the remote PC.
- Redirect local storage enables local storage redirection. This setting is disabled by default.
When you’re done, tap Save.
Need to edit these settings? Tap the More options menu (. ) next to the name of the desktop, and then tap Edit.
Want to remove the connection? Again, tap the More options menu (. ), and then tap Remove.
If you get an error name «0xf07» that says something like «We couldn’t connect to the remote PC because the password associated with the user account has expired,» try again with a new password.
Add remote resources
Remote resources are RemoteApp programs, session-based desktops, and virtual desktops published by your admin. The Android client supports resources published from Remote Desktop Services, Windows 365, and Azure Virtual Desktop deployments.
To add remote resources:
- In the Connection Center, tap +, and then tap Remote Resource Feed.
- Enter the Feed URL. This URL can be a URL or an email address:
- The URL is the RD Web Access server provided to you by your admin. If you’re accessing resources from Azure Virtual Desktop or Windows 365, you can use one of the following URLs:
- If you’re using Azure Virtual Desktop (classic), use: https://rdweb.wvd.microsoft.com/api/feeddiscovery/webfeeddiscovery.aspx .
- If you’re using Azure Virtual Desktop, use: https://rdweb.wvd.microsoft.com/api/arm/feeddiscovery .
- If you’re using Windows 365, use: https://rdweb.wvd.microsoft.com/api/arm/feeddiscovery .
- If you plan to use Email, enter your email address in this field. Filling out this field tells the client to search for an RD Web Access server associated with your email address if it was configured by your admin.
- The URL is the RD Web Access server provided to you by your admin. If you’re accessing resources from Azure Virtual Desktop or Windows 365, you can use one of the following URLs:
- Tap Next.
- Provide your sign-in information when prompted. The credentials you should use can vary based on the deployment and can include:
- The User name that has permission to access the resources.
- The Password associated with the user name.
- Additional factor, which you may be prompted for a if authentication was configured that way by your admin.
- When you’re done, tap Save.
The remote resources will be displayed in the Connection Center.
Remove remote resources
To remove remote resources:
- In the Connection Center, tap the overflow menu (. ) next to the remote resource.
- Tap Remove.
- Confirm you’ve removed the resource.
Pin a connection to your home screen
The Remote Desktop client supports using the Android widget feature to pin connections to your home screen. The widget adding process depends on which type of Android device and Android OS version you’re using.
To add a widget:
- Tap Apps to launch the apps menu.
- Tap Widgets.
- Swipe through the widgets and look for the Remote Desktop icon with the description: Pin Remote Desktop.
- Tap and hold that Remote Desktop widget and move it to the home screen.
- When you release the icon, you’ll see the saved remote desktops. Choose the connection that you want to save to your home screen.
Now you can start the remote desktop connection directly from your home screen by tapping it.
If you rename the desktop connection in the Remote Desktop client, its pinned label won’t update.
Manage general app settings
To change the general app settings, go to the Connection Center, tap Settings, and then tap General.
You can set the following general settings:
- Show desktop previews lets you see a preview of a desktop in the Connection Center before you connect to it. This setting is enabled by default.
- Pinch to zoom remote session lets you use pinch-to-zoom gestures. If the app you’re using through Remote Desktop supports multi-touch (introduced in Windows 8), disable this feature.
- Enable Use scancode input when available if your remote app doesn’t respond properly to keyboard input sent as scancode. Input is sent as unicode when disabled.
- Help improve Remote Desktop sends anonymous data about how you use Remote Desktop for Android to Microsoft. We use this data to improve the client. To learn more about our privacy policy and what kinds of data we collect, see the Microsoft Privacy Statement. This setting is enabled by default.
Manage display settings
To change the display settings tap Settings, and then tap Display from the Connection Center.
You can set the following display settings:
Orientation sets the preferred orientation (landscape or portrait) for your session.
If you connect to a PC running Windows 8 or earlier, the session won’t scale correctly if the orientation of the device changes. To make the client scale correctly, disconnect from the PC, then reconnect in the orientation you want to use. You can also ensure correct scaling by using a PC with Windows 10 instead.
Resolution sets the remote resolution you want to use for desktop connections globally. If you have already set a custom resolution for an individual connection, this setting won’t change that.
When you change the display settings, the changes only apply to new connections you make after the you changed the setting. To apply your changes to the session you’re currently connected to, refresh your session by disconnecting and reconnecting.
Manage your RD Gateways
A Remote Desktop Gateway (RD Gateway) lets you connect to a remote computer on a private network from anywhere on the Internet. You can create and manage your gateways using the Remote Desktop client.
To set up a new RD Gateway:
- In the Connection Center, tap Settings, and then tap Gateways.
- Tap + to add a new gateway.
- Enter the following information:
- Enter the name of the computer you want to use as a gateway into Server name. This name can be a Windows computer name, an Internet domain name, or an IP address. You can also add port information to the server name (for example: RDGateway:443 or 10.0.0.1:443).
- Select the User account you’ll use to access the RD Gateway.
- Select Use desktop user account to use the same credentials that you specified for the remote PC.
- Select Add user account to save an account that you use frequently so you don’t have to enter credentials every time you sign in. For more information, see Manage your user accounts.
To delete an RD Gateway:
- In the Connection Center, tap Settings, and then tap Gateways.
- Tap and hold a gateway in the list to select it. You can select multiple gateways at once.
- Tap the trash can to delete the selected gateway.
Manage your user accounts
You can save user accounts to use whenever you connect to a remote desktop or remote resources.
To save a user account:
- In the Connection Center, tap Settings, and then tap User accounts.
- Tap + to add a new user account.
- Enter the following information:
- The User Name to save for use with a remote connection. You can enter the user name in any of the following formats: user_name, domain\user_name, or user_name@domain.com.
- The Password for the user you specified. Every user account that you want to save to use for remote connections needs to have a password associated with it.
- When you’re done, tap Save.
To delete a saved user account:
- In the Connection Center, tap Settings, and then tap User accounts.
- Tap and hold a user account in the list to select it. You can select multiple users at the same time.
- Tap the trash can to delete the selected user.
Start a Remote Desktop connection
Now that you’ve set up your Remote Desktop Android client, let’s learn how to start a Remote Desktop session.
To start a session:
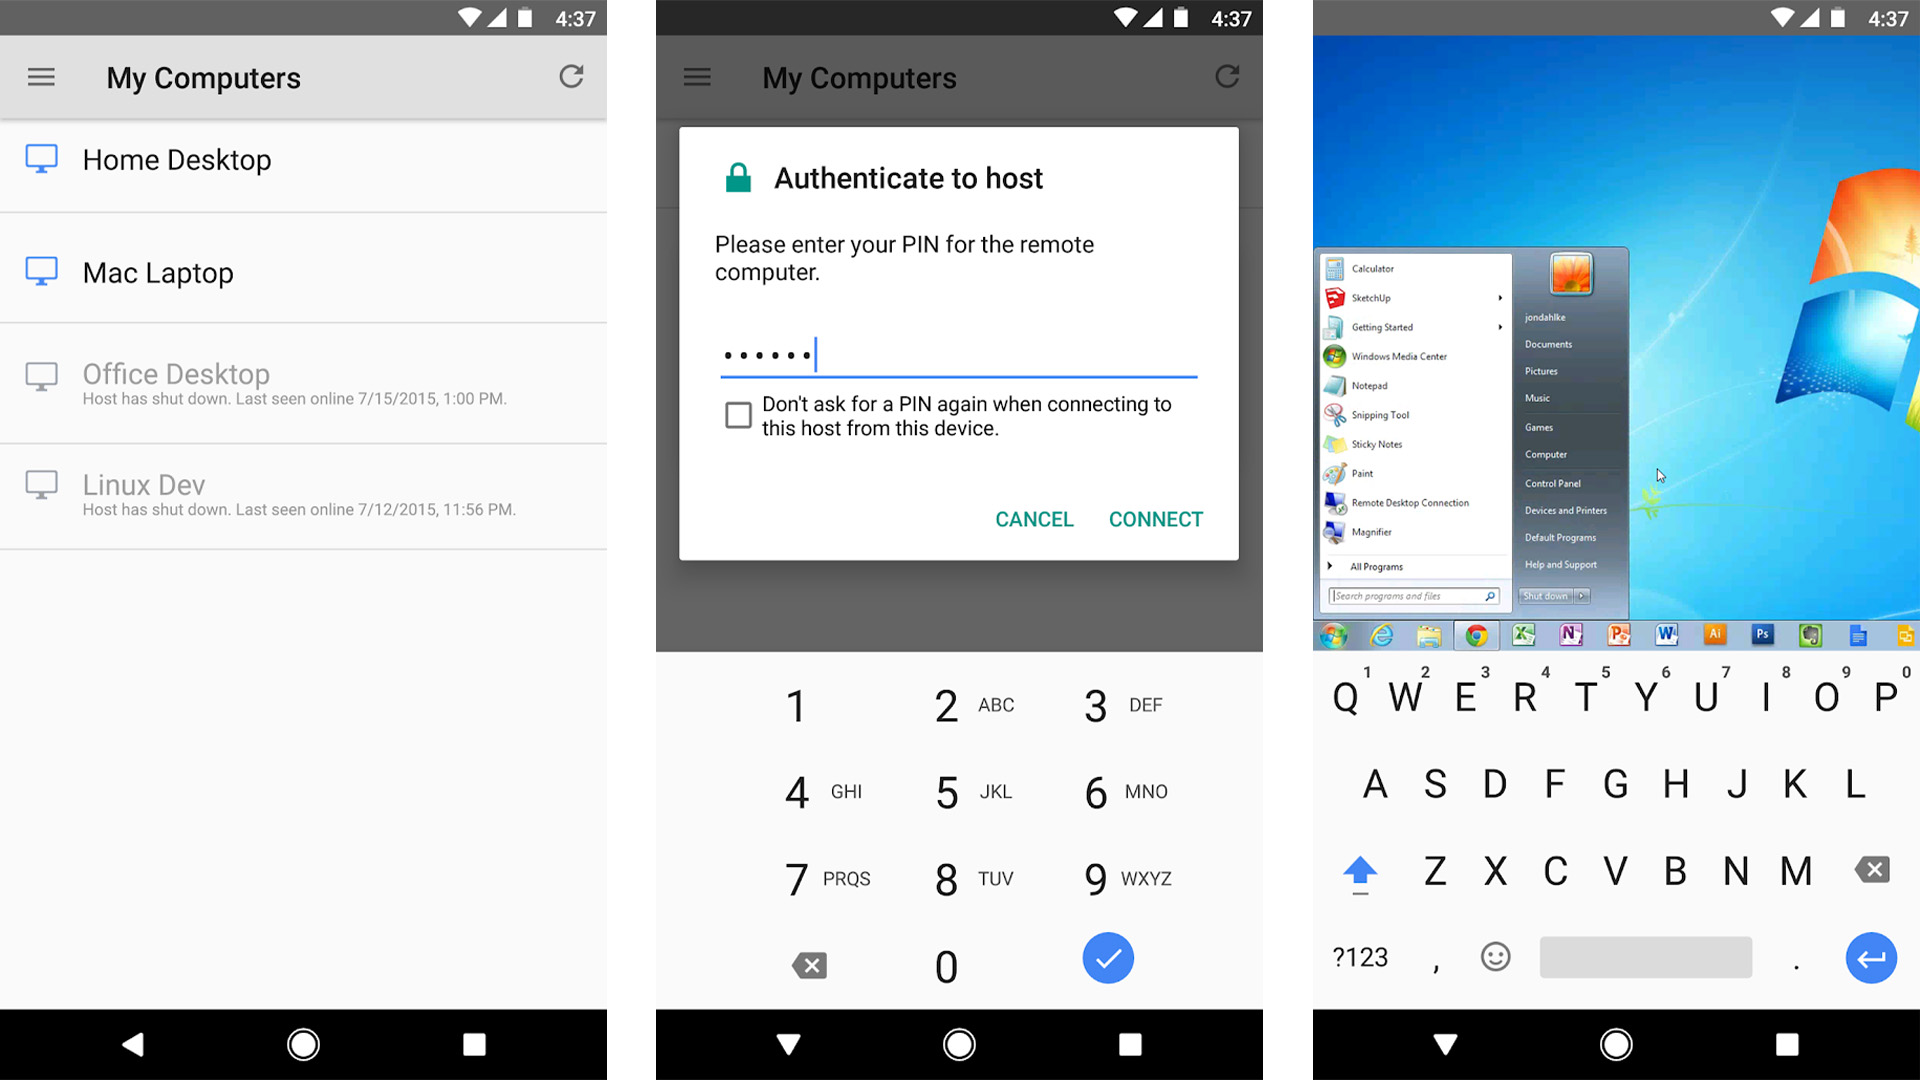
- Tap the name of your Remote Desktop connection to start the session.
- If you’re asked to verify the certificate for the remote desktop, tap Connect. You can also select Don’t ask me again for connections to this computer to always accept the certificate by default.
Use the connection bar
The connection bar gives you access to additional navigation controls. By default, the connection bar is placed in the middle at the top of the screen. Drag the bar to the left or right to move it.
- Pan Control: The pan control enables the screen to be enlarged and moved around. Pan control is only available for direct touch.
- To show the pan control, tap the pan icon in the connection bar to display the pan control and zoom the screen. Tap the pan icon again to hide the control and return the screen to its original size.
- To use the pan control, tap and hold it, then drag it in the direction you want to move the screen.
- To move the pan control, double-tap and hold it to move the control around on the screen.
- Additional options: Tap the additional options icon to display the session selection bar and command bar.
- Keyboard: Tap the keyboard icon to display or hide the keyboard. The pan control is displayed automatically when the keyboard is displayed.
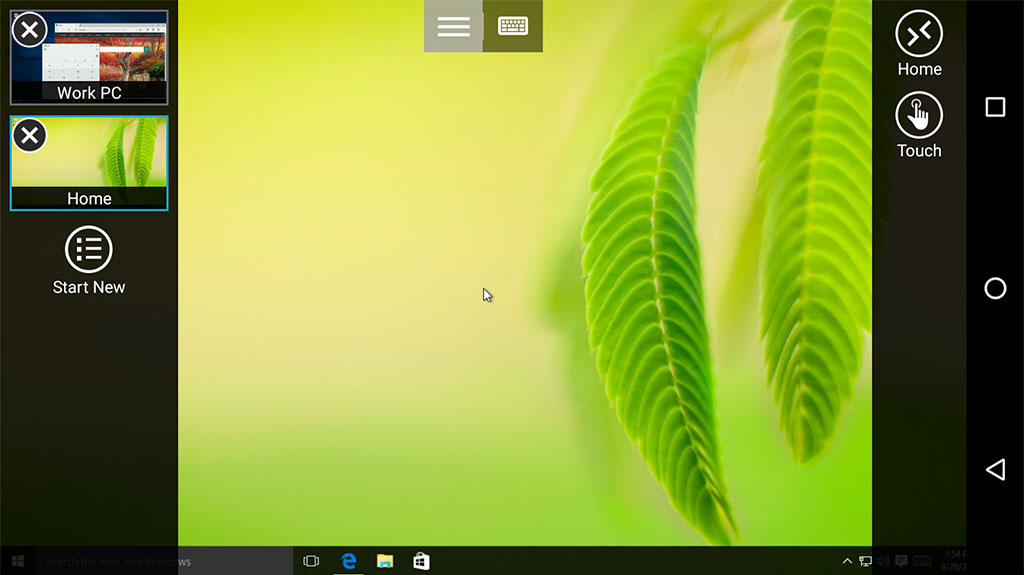
Use the session selection bar
You can have multiple connections open to different PCs at the same time. Tap the connection bar to display the session selection bar on the left side of the screen. The session selection bar lets you view your open connections and switch between them.
When you’re connected to remote resources, you can switch between apps within that session by tapping the expander menu ( > ) and choosing from the list of available items.
To start a new session within your current connection, tap Start New, then choose from the list of available items.
To disconnect a session, tap X in the left side of the session tile.
Use the command bar
Tap the connection bar to display the command bar on the right side of the screen. On the command bar, you can switch between mouse modes (direct touch and mouse pointer) or tap the Home button to return to the Connection Center. You can also tap the Back button to return to the Connection Center. Returning to the Connection Center won’t disconnect your active session.
Touch gestures and mouse modes
The Remote Desktop for Android client uses standard touch gestures. You can also use touch gestures to replicate mouse actions on the remote desktop. The following table explains which gestures match which mouse actions in each mouse mode.
Native touch gestures are supported in Direct Touch mode in Windows 8 or later.
| Mouse mode | Mouse action | Gesture |
|---|---|---|
| Direct touch | Left-click | Tap with one finger |
| Direct touch | Right-click | Tap with one finger and hold, then release |
| Mouse pointer | Zoom | Use two fingers and pinch to zoom out or move fingers apart to zoom in. |
| Mouse pointer | Left-click | Tap with one finger |
| Mouse pointer | Left-click and drag | Double-tap and hold with one finger, then drag |
| Mouse pointer | Right-click | Tap with two fingers |
| Mouse pointer | Right-click and drag | Double-tap and hold with two fingers, then drag |
| Mouse pointer | Mouse wheel | Tap and hold with two fingers, then drag up or down |
Join the Beta channel
If you want to help us test new builds or find issues in upcoming version updates before they’re released, you should join our Beta channel. Enterprise admins can use the Beta channel to validate new versions of the Android client for their users.
To join the Beta, download our Beta client and give consent to access preview versions and download the client. You’ll receive preview versions directly through the Google Play Store.
Источник


