- Как я могу удалить кнопку или сделать ее невидимой в Android?
- How to Remove Shadow of Floating Action Button in Android?
- Kotlin Android – Remove Shadow of Floating Action Button
- Example – Remove Shadow of FAB via Layout File
- Example – Change Icon Color of FAB Programmatically
- Conclusion
- Buttons
- Responding to Click Events
- Kotlin
- Using an OnClickListener
- Kotlin
- Styling Your Button
- Borderless button
- Custom background
- How to Remove Shadow of Floating Action Button in Android?
- Kotlin Android – Remove Shadow of Floating Action Button
- Example – Remove Shadow of FAB via Layout File
- Example – Change Icon Color of FAB Programmatically
- Conclusion
- How to add Extended Floating Action Button in Android | Android Studio | Java
- Step 1: add the dependency
- Step 2: add the drawable files
- Step 3: design the XML file
- Step 4: add the functionality
Как я могу удалить кнопку или сделать ее невидимой в Android?
Как удалить кнопку на Android или сделать ее невидимой?
Установите видимость кнопки на GONE (кнопка будет полностью «удалена» – пространство кнопок будет доступно для других виджетов) или INVISIBLE (кнопка станет «прозрачной» – ее пространство не будет доступно для других виджетов):
Сначала сделайте кнопку невидимой в xml-файле. Затем установите кнопку, видимую в java-коде, если это необходимо.
Чтобы удалить кнопку в java-коде :
Для прозрачной кнопки в java-коде :
Чтобы удалить кнопку в файле Xml :
К прозрачной кнопке в файле Xml :
Это представление невидимо, и оно не требует места для компоновки.
Но если вы просто хотите сделать его невидимым:
Использовать setVisibility в кнопке или изображенииViwe или …..
Чтобы удалить кнопку в java-коде:
К прозрачной кнопке в java-коде
Вы должны сделать вам xml-код кнопки, как показано ниже:
скрытых:
Видимость: нет
показать:
Видимость: невидимая
Видимость: видимая
Делает это видимым, если невидимым и невидимым, если видимо
Чтобы полностью удалить кнопку из родительского макета:
Элементы управления просмотром (TextView, EditText, Button, Image и т. Д.) Имеют свойство видимости. Это может быть установлено в одно из трех значений:
Видимый – отображается
Невидимый – скрытый, но зарезервированный
Gone – Скрыто полностью
Чтобы установить видимость в коде, используйте общедоступную константу, доступную в статическом классе View:
Источник
How to Remove Shadow of Floating Action Button in Android?
Kotlin Android – Remove Shadow of Floating Action Button
To remove shadow of Floating Action Button in Kotlin Android, set the elevation attribute (in layout file) to 0dp or set compatElevation parameter (in Kotlin program) of FAB with floating point value of 0.0f.

To remove the shadow of Floating Action Button in layout file, set the elevation attribute with zero value as shown in the following code snippet.
Please note that the elevation attribute is referenced from xmlns:app=”http://schemas.android.com/apk/res-auto” namespace. Hence, we used app:elevation in the XML.
To remove the shadow of Floating Action Button dynamically or programmatically in Kotlin activity file, set compatElevation parameter of the FAB with 0.0F.
Example – Remove Shadow of FAB via Layout File
Create an Android Application with Empty Activity and modify the activity_main.xml with the following code.
activity_main.xml
Keep the MainActivity.kt unchanged.
Run this Android Application, and we would get the output as shown in the following screenshot, with the shadow removed for Floating Action Button (FAB).
Example – Change Icon Color of FAB Programmatically
Create an Android Application with Empty Activity and modify the activity_main.xml and MainActivity.kt with the following code.
In this example, we will remove the shadow of FAB programmatically in MainActivity.kt file.
activity_main.xml
MainActivity.kt
Run this Android Application, and we would get the output as shown in the following screenshot, with the shadow removed for Floating Action Button (FAB).
Conclusion
In this Kotlin Android Tutorial, we learned how to remove shadow for Floating Action Button (FAB) via layout file or programmatically in Kotlin Activity file, with examples.
Источник
Buttons
A button consists of text or an icon (or both text and an icon) that communicates what action occurs when the user touches it.
Depending on whether you want a button with text, an icon, or both, you can create the button in your layout in three ways:
- With text, using the Button class:
- With an icon, using the ImageButton class:
- With text and an icon, using the Button class with the android:drawableLeft attribute:
Key classes are the following:
Responding to Click Events
When the user clicks a button, the Button object receives an on-click event.
To define the click event handler for a button, add the android:onClick attribute to the element in your XML layout. The value for this attribute must be the name of the method you want to call in response to a click event. The Activity hosting the layout must then implement the corresponding method.
For example, here’s a layout with a button using android:onClick :
Within the Activity that hosts this layout, the following method handles the click event:
Kotlin
The method you declare in the android:onClick attribute must have a signature exactly as shown above. Specifically, the method must:
- Be public
- Return void
- Define a View as its only parameter (this will be the View that was clicked)
Using an OnClickListener
You can also declare the click event handler programmatically rather than in an XML layout. This might be necessary if you instantiate the Button at runtime or you need to declare the click behavior in a Fragment subclass.
To declare the event handler programmatically, create an View.OnClickListener object and assign it to the button by calling setOnClickListener(View.OnClickListener) . For example:
Kotlin
Styling Your Button
The appearance of your button (background image and font) may vary from one device to another, because devices by different manufacturers often have different default styles for input controls.
You can control exactly how your controls are styled using a theme that you apply to your entire application. For instance, to ensure that all devices running Android 4.0 and higher use the Holo theme in your app, declare android:theme=»@android:style/Theme.Holo» in your manifest’s element. Also read the blog post, Holo Everywhere for information about using the Holo theme while supporting older devices.
To customize individual buttons with a different background, specify the android:background attribute with a drawable or color resource. Alternatively, you can apply a style for the button, which works in a manner similar to HTML styles to define multiple style properties such as the background, font, size, and others. For more information about applying styles, see Styles and Themes.
Borderless button
One design that can be useful is a «borderless» button. Borderless buttons resemble basic buttons except that they have no borders or background but still change appearance during different states, such as when clicked.
To create a borderless button, apply the borderlessButtonStyle style to the button. For example:
Custom background
If you want to truly redefine the appearance of your button, you can specify a custom background. Instead of supplying a simple bitmap or color, however, your background should be a state list resource that changes appearance depending on the button’s current state.
You can define the state list in an XML file that defines three different images or colors to use for the different button states.
To create a state list drawable for your button background:
- Create three bitmaps for the button background that represent the default, pressed, and focused button states.
To ensure that your images fit buttons of various sizes, create the bitmaps as Nine-patch bitmaps.
Источник
How to Remove Shadow of Floating Action Button in Android?
Kotlin Android – Remove Shadow of Floating Action Button
To remove shadow of Floating Action Button in Kotlin Android, set the elevation attribute (in layout file) to 0dp or set compatElevation parameter (in Kotlin program) of FAB with floating point value of 0.0f.
To remove the shadow of Floating Action Button in layout file, set the elevation attribute with zero value as shown in the following code snippet.
Please note that the elevation attribute is referenced from xmlns:app=”http://schemas.android.com/apk/res-auto” namespace. Hence, we used app:elevation in the XML.
To remove the shadow of Floating Action Button dynamically or programmatically in Kotlin activity file, set compatElevation parameter of the FAB with 0.0F.
Example – Remove Shadow of FAB via Layout File
Create an Android Application with Empty Activity and modify the activity_main.xml with the following code.
activity_main.xml
Keep the MainActivity.kt unchanged.
Run this Android Application, and we would get the output as shown in the following screenshot, with the shadow removed for Floating Action Button (FAB).
Example – Change Icon Color of FAB Programmatically
Create an Android Application with Empty Activity and modify the activity_main.xml and MainActivity.kt with the following code.
In this example, we will remove the shadow of FAB programmatically in MainActivity.kt file.
activity_main.xml
MainActivity.kt
Run this Android Application, and we would get the output as shown in the following screenshot, with the shadow removed for Floating Action Button (FAB).
Conclusion
In this Kotlin Android Tutorial, we learned how to remove shadow for Floating Action Button (FAB) via layout file or programmatically in Kotlin Activity file, with examples.
Источник
How to add Extended Floating Action Button in Android | Android Studio | Java

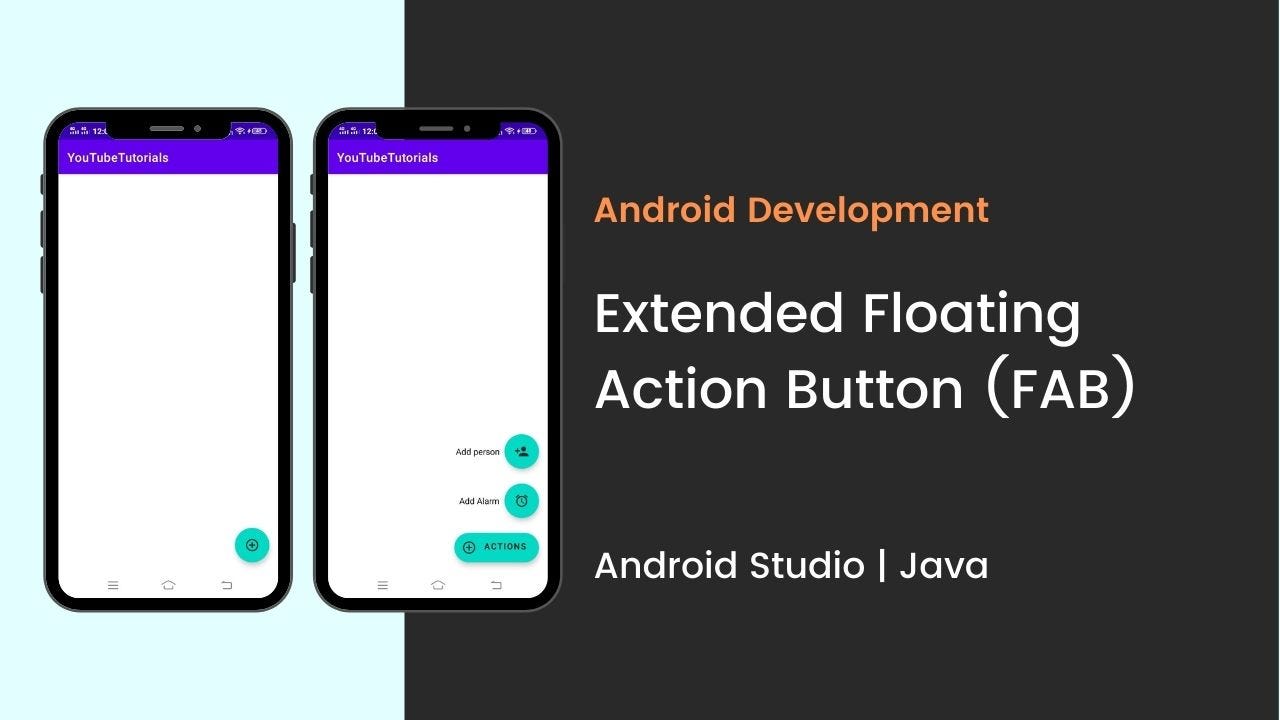
How to add Extended Floating Action Button in Android | Android Studio | Java.
In this tutorial, we are going to create an extended floating action button in android. A floating action button (FAB) performs the primary, or most common, action on a screen. It appears in front of all screen content, typically as a circular shape with an icon in its center.
Extended Floating Action Button is the newly introduced class with Material Components library in Android.
Material Components is introduced with SDK 28 or Android P. It’s a superset of Support Design Library with lots of new additions and improvements. And, in this tutorial, we are going to create an extended floating action button.
So, let’s start creating the extended FAB.
Before going to create let’s see what you’re going to see.
Step 1: add the dependency
make sure to add the material design dependency in your build.gradle app file.
Step 2: add the drawable files
before going to design the main XML file, first, import the drawable files. Below drawable files that I used in my project.

Step 3: design the XML file
now, design the main XML file, add the Extended Floating Action Button that is set as the parent FAB and also add the child FAB. Here as a child FAB, I used two FABs.
parent FAB: Action
child FAB 1: Alarm
child FAB 2: Person
Step 4: add the functionality
now in the main JAVA file add the functionality for the extended FAB and add the click listener in the child FAB.
Источник


