Использование программы Apple Software Update для Windows
Программа Apple Software Update помогает гарантировать, что в Windows используется актуальное программное обеспечение Apple.
При установке iTunes или iCloud для Windows на компьютер PC — или при использовании Ассистента Boot Camp для установки Windows на компьютер Mac — устанавливается также программа Apple Software Update для Windows.
Программа Apple Software Update следит за актуальностью программного обеспечения Apple на компьютере с ОС Windows. Также она загружает последние обновления безопасности и ПО Apple в ОС Windows, установленной на компьютере Mac.

Запуск программы Apple Software Update
- Щелкните значок Windows в левом нижнем углу экрана Windows.
- Введите Apple Software Update в поле поиска.
- Щелкните пункт Apple Software Update при его появлении в диалоговом окне результатов поиска.
Программа Apple Software Update проверяет наличие доступных обновлений. Установите флажки рядом с обновлениями, которые требуется установить, нажмите кнопку «Установить», а затем следуйте инструкциям на экране. 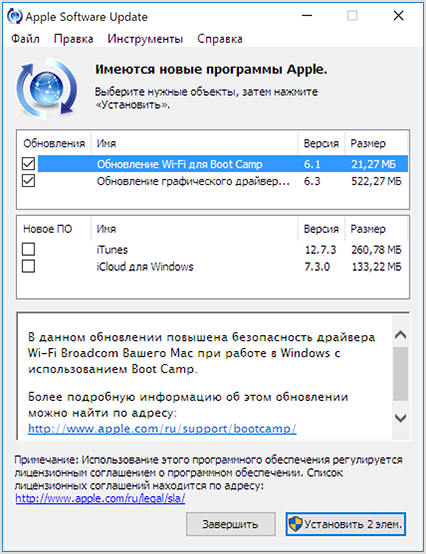
Программа Apple Software Update для Windows запускается один раз в неделю для проверки наличия обновлений. В настройках программы можно изменить частоту запуска на «Ежедневно», «Еженедельно», «Ежемесячно» или «Никогда». 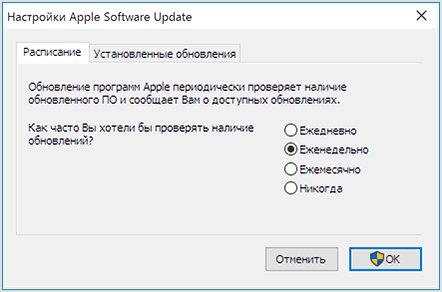
Дополнительная информация
Дополнительные сведения об использовании Boot Camp для установки Windows на компьютер Mac см. на странице поддержки Boot Camp.
Информация о продуктах, произведенных не компанией Apple, или о независимых веб-сайтах, неподконтрольных и не тестируемых компанией Apple, не носит рекомендательного или одобрительного характера. Компания Apple не несет никакой ответственности за выбор, функциональность и использование веб-сайтов или продукции сторонних производителей. Компания Apple также не несет ответственности за точность или достоверность данных, размещенных на веб-сайтах сторонних производителей. Обратитесь к поставщику за дополнительной информацией.
Источник
Question: Q: I can’t uninstall Apple Software Update.
In trying to uninstall ITunes, I was given a checklist from Apple Support to uninstall certain programs in a specific order. I need to reinstall ITunes, and they said that I needed to remove it first. I am running a Windows 7, 64 bit HP laptop. No program is removing this and it very specifically says to not remove them out of order.
Below are the instructions sent to me. (I tried to copy and paste. However, it doesn’t look good, so I will include the link that Apple sent to me.)
Can someone please help?
Remove and reinstall iTunes and related software components for Windows Vista, Windows 7, or Windows 8
Learn how to completely uninstall iTunes and its related software components from Windows Vista, Windows 7, or Windows 8.
In some rare instances, you might need to remove iTunes and related software components before reinstalling iTunes. If you’re directed to reinstall iTunes by AppleCare, an article, or an alert dialog, you can do so by following the steps below.
Media you’ve bought from the iTunes Store or songs you’ve imported from CDs are saved in your My Music folder by default. They won’t be deleted by removing iTunes. Although it’s highly unlikely that you’ll lose any of your iTunes Library when following the steps below, first make sure that your iTunes library is backed up. See iTunes: Back up your iTunes library by copying to an external hard drive for more information.
If you have issues installing iTunes, try the options outlined in Issues installing iTunes for Windows.
If you’ve received errors regarding inaccessible registry keys during installation, try the steps found in «Could not open key» message when installing iTunes, QuickTime or Apple components for Windows.
- Remove iTunes and related components from the Control Panel. Use the Control Panel to uninstall iTunes and related software components in the following order. Then restart your computer.
- iTunes
- Apple Software Update
- Apple Mobile Device Support
- Bonjour
- Apple Application Support (iTunes 9 or later)
Don’t uninstall these components in a different order, or only uninstall some of them. Doing so might have unintended affects. To remove the components:
- Quit the following programs if they are running:
- iTunes
- Apple Software Update
- Windows 8: Click File Explorer > Settings > Control Panel.
Windows Vista or Windows 7: From the Start menu, click Control Panel. - In Control Panel, click «Uninstall a program.» The Programs and Features Control Panel will open.

Alternately, if you don’t see «Uninstall a program,» click Programs and Features. - Select iTunes.
- Click Uninstall.
On some systems, iTunes might install two versions of Apple Application Support. This is expected. If both are present, be sure to uninstall both versions. - When asked if you would like to remove iTunes, choose Yes.
- After the uninstallation is complete, don’t restart your computer if you’re prompted.
- If you see other iTunes entries in the list, remove them by repeating steps 4–6.
- Using steps 4–6, also remove all instances of:
- Apple Software Update
- Apple Mobile Device Support
- Bonjour
- Apple Application Support
- Restart your computer.
- Make sure that iTunes and its related components are completely uninstalled. In most cases, removing iTunes and its related components from the Control Panel will remove all supporting files belonging to those programs. In some rare cases, files might be left behind. After following the steps above, confirm that the following files and folders have been removed. If any are left, remove them.
- C:\Program Files\Bonjour
- C:\Program Files\Common Files\Apple\Mobile Device Support
- C:\Program Files\Common Files\Apple\Apple Application Support
- C:\Program Files\Common Files\Apple\CoreFP
- C:\Program Files\iTunes\
- C:\Program Files\iPod\
Follow these additional steps if you receive a «Cannot delete iPodService.exe: It is being used by another person or program.» message.
If you have a 64-bit version of Windows, confirm that the following folders have been removed:
- C:\Program Files (x86)\Bonjour
- C:\Program Files (x86)\Common Files\Apple\Mobile Device Support
- C:\Program Files (x86)\Common Files\Apple\Apple Application Support
- C:\Program Files (x86)\Common Files\Apple\CoreFP
- C:\Program Files (x86)\iTunes\
- C:\Program Files (x86)\iPod\
Follow these additional steps if you receive a «Cannot delete iPodService.exe: It is being used by another person or program.» message.
To remove these files:
- Windows Vista or Windows 7: From the Start menu, select Computer.
Windows 8: Click File Explorer. - Open Local Disk (C:) located in Computer, or whichever hard disk your programs are installed on.
- Open the Program Files folder.
- Right-click the Bonjour folder (if it exists). Select Delete from the shortcut menu. Choose Yes when asked to confirm the deletion.
- Right-click the iPod folder (if it exists). Select Delete from the shortcut menu. Choose Yes when asked to confirm the deletion.
Follow these additional steps if you receive a «Cannot delete iPodService.exe: It is being used by another person or program.» message. - Right-click the iTunes folder (if it exists). Select Delete from the shortcut menu. Choose Yes when asked to confirm the deletion.
- Open the Common Files folder.
- Open the Apple folder.
- Right-click the Mobile Device Support folder (if it exists). Select Delete from the shortcut menu. Choose Yes when asked to confirm the deletion.
- Right-click the Apple Application Support folder (if it exists). Select Delete from the shortcut menu. Choose Yes when asked to confirm the deletion.
- Right-click the CoreFP folder (if it exists). Select Delete from the shortcut menu. Choose Yes when asked to confirm the deletion.
If you’re running a 64-bit version of Windows, continue with step 12. Otherwise, skip to step 23.
- Windows Vista or Windows 7: From the Start menu, select Computer.
Windows 8: Click File Explorer. - Open Local Disk (C:) located in Computer, or whichever hard disk your programs are installed on.
- Open the Program Files (x86) folder.
- Right-click the Bonjour folder (if it exists). Select Delete from the shortcut menu. Choose Yes when asked to confirm the deletion.
- Right-click the iPod folder (if it exists). Select Delete from the shortcut menu. Choose Yes when asked to confirm the deletion.
Follow these additional steps if you receive a «Cannot delete iPodService.exe: It is being used by another person or program.» message. - Right-click the iTunes folder (if it exists). Select Delete from the shortcut menu. Choose Yes when asked to confirm the deletion.
- Open the Common Files folder.
- Open the Apple folder.
- Right-click the Mobile Device Support folder (if it exists). Select Delete from the shortcut menu. Choose Yes when asked to confirm the deletion.
- Right-click the Apple Application Support folder (if it exists). Select Delete from the shortcut menu. Choose Yes when asked to confirm the deletion.
- Right-click the CoreFP folder (if it exists). Select Delete from the shortcut menu. Choose Yes when asked to confirm the deletion.
- From the Start menu, select Computer.
- Open Local Disk (C:) in Computer, or whichever hard disk your operating system is installed on.
- Right-click the Recycle Bin and select Empty Recycle Bin.
- Reinstall iTunes and related components After verifying that iTunes is completely uninstalled, restart your computer. Then download and install the latest version of iTunes. If the issue persists, look for more information on the iTunes Support page, including help with specific messages.
Follow these steps if the message «Cannot delete iPodService.exe: It is being used by another person or program» appears when you try to delete the iPod folder.
- Make sure that iTunes and the iPod Updater utility aren’t open.
- Press and hold Control-Alt-Delete.
- Select Start Task Manager.
- Click the Processes tab.
- Locate the iPodService.exe in the list.
- Click iPodService.exe and choose End Process.
- Quit the Task Manager.


Important: Information about products not manufactured by Apple is provided for information purposes only and does not constitute Apple’s recommendation or endorsement. Please contact the vendor for additional information.
Источник
Как удалить Apple Software Update из Windows?

Apple Software Update — дополнительный модуль, устанавливается в операционную систему вместе с браузером Safari, сервисным приложением iTunes и другими программными продуктами компании Apple. Его основная функция — выполнять обновление ПО. Он в автоматическом режиме слушает сетевые порты компьютера, отправляет/принимает данные с сервера.
Иногда Apple Software Update препятствует деинсталляции и переустановке приложений Apple. Вызывает программные конфликты, ошибки удаления, блокирует работу запущенного деинсталлятора (браузер, клиент не удаляется). Сбои в большинстве случаев происходят из-за функциональной специфики модуля Update (активные процессы, сетевые соединения).
Эти руководства помогут вам корректно удалить Apple Software Update из ОС Windows начисто, с возможностью последующей переустановки. Выбирайте любой из предложенных способов и приступайте к «уборке» компьютера.
Примечание. В инструкциях рассматривается удаление Apple Software Update вместе с iTunes в операционной системе Windows 8.
Способ №1: удаление штатными опциями
1. Закройте iTunes и другие приложения Apple.
2. Запустите Диспетчер задач: нажмите одновременно «Ctrl+Shift+Esc».

3. В окне диспетчера откройте вкладку «Процессы».
4. В блоке «Фоновые… » завершите все процессы, имеющие отношение к программному продукту Apple:
- Apple Software Update;
- Bonjour;
- iTunesHelper;
- iPodServices;
- MobileDevices и другие.
Щёлкните правой кнопкой по имени процесса. А затем в открывшемся контекстном меню нажмите «Снять задачу». Завершите все активные процессы ПО Apple.

Совет! Если вы сомневаетесь, имеет какое-либо отношение активный процесс к iTunes или нет, также щёлкните по нему правой кнопкой и выберите опцию «Открыть расположение… ». Можно удалить процесс из списка в Диспетчере, если в новом окне откроется директория (папка) программного обеспечения Apple.

5. Клацните правой кнопкой по иконке Windows в панели задач. В перечне опций выберите «Программы и компоненты».
Примечание. В Windows 7 этот раздел открывается так: Пуск → Панель управления → Удаление программы.

6. Последовательно удалите программные компоненты в следующем порядке:
- iTunes (Safari, другое ПО Apple).
- Apple Software Update.
- Mobile Device Support.
- Bonjour.
- Application Support (сразу 32-разрядную версию, а потом 64-х).
Примечание. Некоторые из приведённых элементов могут отсутствовать в системе. В таком случае приступайте к нейтрализации следующего по списку компонента.
Чтобы выполнить деинсталляцию элемента Apple в разделе «Программы и компоненты», сделайте следующее:

клацните правой кнопкой по названию;
выберите в открывшейся панели «Удалить»;
подтвердите запуск команды: в сообщении с запросом нажмите «Да»;

по завершении процедуры приступайте к удалению следующего элемента (соблюдайте указанную в списке последовательность).

Способ №2: очистка программой-деинсталлятором
Удаление «яблочных» программ, iTunes и Safari, а также модуля Update посредством специальной утилиты-уборщика позволяет выполнить более качественную очистку системы. Что особенно важно в тех случаях, когда владелец компьютера больше не желает пользоваться приложением и хочет избавить ОС Windows от всех его следов. Как в файловых директориях, так и в реестре.
В этой инструкции рассматривается вариант удаления компонентов Apple при помощи утилиты Uninstall Tool. За неимением таковой вы можете воспользоваться аналогами — Revo Uninstaller, Soft Organizer и др.
1. Запустите утилиту Uninstall Tool с правами администратора.

2. Выполните деинсталляцию объектов в соответствии с последовательностью, указанной в пункте №6 предыдущего руководства.
3. Начните с основного приложения (например, iTunes). Кликните по нему один раз левой кнопкой мышки.
4. В панели, расположенной по левую сторону от списка программ, клацните функцию «Деинсталляция».
5. После процедуры стандартного удаления в дополнительном окне запустите поиск остатков приложения (клацните «Ok»).


6. Удалите найденные Uninstall Tool оставшиеся файлы и записи в реестре приложения. Клацните в дополнительном окне кнопку «Удалить».

Успешной вам очистки компьютера!
Источник


