- Repo init github android
- Repo init github android
- seankross / init.md
- This comment has been minimized.
- NedyUdombat commented Jan 3, 2018
- This comment has been minimized.
- xairam commented Feb 4, 2018
- This comment has been minimized.
- BarbzYHOOL commented Mar 5, 2018 •
- This comment has been minimized.
- InTEGr8or commented Apr 25, 2018
- This comment has been minimized.
- Neptune998 commented Oct 10, 2019 •
- This comment has been minimized.
- cgthayer commented May 27, 2020
- Repo init github android
- Create a repo
- In this article
- Help us make these docs great!
Repo init github android
Инструкции по сборке Android из исходников

 Мануалы в помощь новичку и обсуждение для гуру!
Описание | Старая шапка | Собираем ядро для MTK | Первая помощь | Редактирование системных ресурсов Android | Средство обработки прошивок
Что такое ADB и с чем его едят, читаем тут. Отследить новую версию ADB можно в репо от Google.
ADB для Winodws — Скачать sha1:52b4816990d2d18a34645bbf20a31b38a7859d4c
ADB для Linux — Скачать sha1:31078104e5927d823c28550c01275c437a87def7
ADB для MacOSx — Скачать sha1:1403fa0d1bb57ec31170d7905e8505e3b0ed05ee
Что такое маркет и с чем его едят, читайте в этой теме.
Android 4.1.*: microgapps скачать
Android 4.2.*: microgapps Скачать
Android 4.3.*: microgapps Скачать
Android 4.4 : ART microgapps Скачать
Android 4.4.1: ART microgapps Скачать
Android 4.4.2: ART microgapps Скачать
Android 5.0.2: ART microgapps Скачать
Android 5.0.2: ART microgapps Скачать By Mansi
Android 5.1.0: ART minigapps Скачать faq
microgapps — пакет Google Apps с самым основным, только Google Play и framework. Остальное можно установить из Google Play.
minigapps — Пакет Google Apps с самым основным набором ПО от Google.
ART — совместимы с ART режимом, появился в версиях Android 4.4 KitKat.
FlymeOS 5/6 от rocker123
Скачать Огромная коллекция на XDA 4.x-6.x
Скачать OmniRom + Prebuilts 4.x-6.x От ctavropoholb
Скачать Qualcomm MSM8974 и MSM8939 От acdev
Скачать MIUI PatchRom miui5-7 От ctavropoholb
Скачать CyanogenMod 10.1 — 13 4.х.х-6.х.х От ctavropoholb
Скачать CyanogenMod 12.1 android-5.1.1_r18 От SteelBreaker
Скачать Prebuilts AOSP 5.0.x От assusdan
Скачать MIUI PatchRom KitKat v6 От vgdn1942
Скачать AOSP mirror repo От wladimir_tm
Скачать AOSP, AOKP, CM, MIUI 4.4.4 От vaibhavpandeyvpz
Скачать CyanogenMod 11 4.4.4 От Никита Pro Android
Скачать CyanogenMod 10 4.1 От Scorpio92666
Скачать CyanogenMod 7.2.0 2.3.x От pryanya96
Скачать AOSPA ParanoidAndroid 4.4.4 От mrAlmid
Скачать Ubuntu phablet 4.4.2_r1 От Каточимото
Скачать repo snapshots cm-10.2 — android5.1 От wladimir_tm
После чего, качаем исходники командой repo sync
Источник
Repo init github android
1. Grabbing the source
Repo is a tool provided by Google that simplifies using Git in the context of the Android source.
1.1 Installing dependencies and Repo
Several packages are needed in order to build crDroid
Install Repo tool
/bin/repo # Make Repo executable $ chmod a+x
1.2 Initializing Repo
This is what you will run each time you want to pull in upstream changes. Keep in mind that on your first run, it is expected to take a while as it will download all the required Android source files and their change histories.
At crDroid, we have an automated script that also builds and uploads your device to our official SourceForge page.
Show me more.
To submit changes/patches, please send a pull request on GitHub. We will review and merge.
3. How to become an Official Maintainer
Just message Gabriel over Telegram with the device you want to maintain.
4. crDroid features / overlays, translations, forum template and OTA
4.1 crDroid features / overlays
Set those overlays to proper paths
We use Crowdin for translations since is easy and everyone can do it.
To help out click here.
4.3 Forum template
Build ready? Tested all features and translations are smooth?
Why not share your build over your beloved forums?
To do so, we have made a small template to help out. Just edit what you need and let the downlods roll. 😎
So posted on forums and your users are enjoying your build.
Well you can help out your users by letting them know when you fix stuff in your builds with the help of our OTA app.
Since crDroid Oreo, if you want to be on the official maintainers list, you’ll need to provide OTA access.
You can set it up really easy by reading android_vendor_crDroidOTA repo description.
Источник
seankross / init.md
Create a new repository on the command line
Push an existing repository from the command line
This comment has been minimized.
Copy link Quote reply
NedyUdombat commented Jan 3, 2018
This did not work, any idea why?
This comment has been minimized.
Copy link Quote reply
xairam commented Feb 4, 2018
remote: Repository not found.
fatal: repository ‘https://github.com/xairam/repemo.git/’ not found
Seems like you need to create a repo 1st on github and than ppush it.
This comment has been minimized.
Copy link Quote reply
BarbzYHOOL commented Mar 5, 2018 •
The remote used is a SSH one and not HTTPS, can change it easily though. If using SSH, it requires SSH keys (and it won’t ask for password, so that’s useful)
This comment has been minimized.
Copy link Quote reply
InTEGr8or commented Apr 25, 2018
Please make sure you have the correct access rights
and the repository exists.
I don’t think this creates the remote repository on the server. It just creates a remote pointer in the local git repo.
This comment has been minimized.
Copy link Quote reply
Neptune998 commented Oct 10, 2019 •
After following above instructions.
https://github.com/Neptune998/C_Code.git
! [rejected] master -> master (fetch first)
error: failed to push some refs to ‘https://github.com/Neptune998/C_Code.git’
hint: Updates were rejected because the remote contains work that you do
hint: not have locally. This is usually caused by another repository pushing
hint: to the same ref. You may want to first integrate the remote changes
hint: (e.g., ‘git pull . ‘) before pushing again.
hint: See the ‘Note about fast-forwards’ in ‘git push —help’ for details.
This comment has been minimized.
Copy link Quote reply
cgthayer commented May 27, 2020
2020: Github doesn’t support creating repos quite out-of-the-box (you need the UI). But I believe enterprise users can use REST or GraphQL:
https://developer.github.com/enterprise/2.20/
You can’t perform that action at this time.
You signed in with another tab or window. Reload to refresh your session. You signed out in another tab or window. Reload to refresh your session.
Источник
Repo init github android
1. Grabbing the source
Repo is a tool provided by Google that simplifies using Git in the context of the Android source.
1.1 Installing dependencies and Repo
Several packages are needed in order to build crDroid
Install Repo tool
/bin/repo # Make Repo executable $ chmod a+x
1.2 Initializing Repo
This is what you will run each time you want to pull in upstream changes. Keep in mind that on your first run, it is expected to take a while as it will download all the required Android source files and their change histories.
At crDroid, we have an automated script that also builds and uploads your device to our official SourceForge page.
Show me more.
To submit changes/patches, please send a pull request on GitHub. We will review and merge.
3. How to become an Official Maintainer
Just message Gabriel over Telegram with the device you want to maintain.
4. crDroid features / overlays, translations, forum template and OTA
4.1 crDroid features / overlays
Set those overlays to proper paths
We use Crowdin for translations since is easy and everyone can do it.
To help out click here.
4.3 Forum template
Build ready? Tested all features and translations are smooth?
Why not share your build over your beloved forums?
To do so, we have made a small template to help out. Just edit what you need and let the downlods roll. 😎
So posted on forums and your users are enjoying your build.
Well you can help out your users by letting them know when you fix stuff in your builds with the help of our OTA app.
Since crDroid Oreo, if you want to be on the official maintainers list, you’ll need to provide OTA access.
You can set it up really easy by reading android_vendor_crDroidOTA repo description.
Источник
Create a repo
In this article
To put your project up on GitHub, you’ll need to create a repository for it to live in.
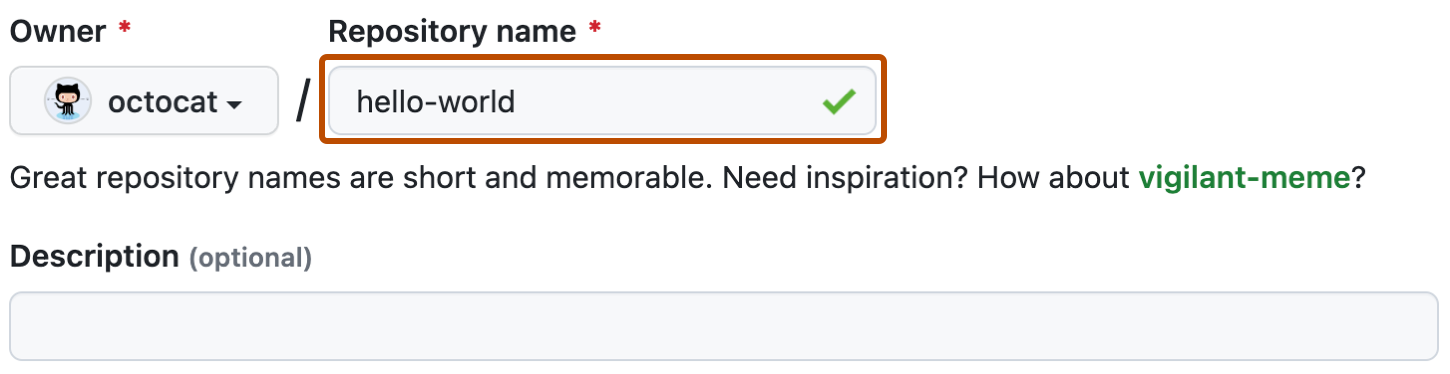
Create a repository
You can store a variety of projects in GitHub repositories, including open source projects. With open source projects, you can share code to make better, more reliable software. You can use repositories to collaborate with others and track your work. For more information, see «About repositories.»
Note: You can create public repositories for an open source project. When creating your public repository, make sure to include a license file that determines how you want your project to be shared with others. For more information on open source, specifically how to create and grow an open source project, we’ve created Open Source Guides that will help you foster a healthy open source community by recommending best practices for creating and maintaining repositories for your open source project. You can also take a free GitHub Learning Lab course on maintaining open source communities.
- In the upper-right corner of any page, use the
drop-down menu, and select New repository. 


Congratulations! You’ve successfully created your first repository, and initialized it with a README file.
To learn more about GitHub CLI, see «About GitHub CLI.»
- In the command line, navigate to the directory where you would like to create a local clone of your new project.
- To create a repository for your project, use the gh repo create subcommand. When prompted, select Create a new repository on GitHub from scratch and enter the name of your new project. If you want your project to belong to an organization instead of to your user account, specify the organization name and project name with organization-name/project-name .
- Follow the interactive prompts. To clone the repository locally, confirm yes when asked if you would like to clone the remote project directory.
- Alternatively, to skip the prompts supply the repository name and a visibility flag ( —public , —private , or —internal ). For example, gh repo create project-name —public . To clone the repository locally, pass the —clone flag. For more information about possible arguments, see the GitHub CLI manual.
Commit your first change
A commit is like a snapshot of all the files in your project at a particular point in time.
When you created your new repository, you initialized it with a README file. README files are a great place to describe your project in more detail, or add some documentation such as how to install or use your project. The contents of your README file are automatically shown on the front page of your repository.
Let’s commit a change to the README file.
- In your repository’s list of files, click README.md.

- Above the file’s content, click

.


Now that you have created a project, you can start committing changes.
README files are a great place to describe your project in more detail, or add some documentation such as how to install or use your project. The contents of your README file are automatically shown on the front page of your repository. Follow these steps to add a README file.
In the command line, navigate to the root directory of your new project. (This directory was created when you ran the gh repo create command.)
Create a README file with some information about the project.
Enter git status . You will see that you have an untracked README.md file.
Stage and commit the file.
Push the changes to your branch.
Congratulations! You have now created a repository, including a README file, and created your first commit on GitHub.com.
You can now clone a GitHub repository to create a local copy on your computer. From your local repository you can commit, and create a pull request to update the changes in the upstream repository. For more information, see «Cloning a repository» and «Set up Git.»
You can find interesting projects and repositories on GitHub and make changes to them by creating a fork of the repository. For more information see, «Fork a repository.»
Each repository in GitHub is owned by a person or an organization. You can interact with the people, repositories, and organizations by connecting and following them on GitHub. For more information see «Be social.»
GitHub has a great support community where you can ask for help and talk to people from around the world. Join the conversation on Github Support Community.
Help us make these docs great!
All GitHub docs are open source. See something that’s wrong or unclear? Submit a pull request.
Источник


