- How to Request Permissions in Android Application?
- Types of Permissions
- Steps for Requesting permissions at run time
- a full stack enthusiast interested in Javascript / Typescript / Kotlin / Python / React / React Native / (Android & iOS) native / Cloud
- Android permission handling done right with Kotlin
- 1. Official documentation
- 2. Google’s model
- 3. Problem
- 4. Design thinking
- 5. Our model
- 6. Code blocks
- 6.1 How to check the permission
- 6.3 Handle the three cases
- 6. What about using some DSL to make it better
- Check Multiple Android Kotlin Runtime Permissions Programmatically
- Download Source Code For Check Multiple Android Kotlin Runtime Permissions
- Understanding Runtime Permissions Architecture
- Step 1: Creating WelcomeActivity.kt class:
- Step 2: Creating MainActivity.kt class:
- Step 3: Description of MainActivity
- Defining permission codes
- Preparing ArrayList
- Hashmap Creation
- Update Package name
- Define required permissions in AndroidManifest.xml
- What are Normal Permissions?
- Java Version
- 2 thoughts on “Check Multiple Android Kotlin Runtime Permissions Programmatically”
- Request app permissions
- Basic principles
- Workflow for requesting permissions
- Determine whether your app was already granted the permission
- Explain why your app needs the permission
- Request permissions
- Allow the system to manage the permission request code
- Kotlin
- Kotlin
- Manage the permission request code yourself
- Kotlin
- Kotlin
- Handle permission denial
- One-time permissions
- Android auto-resets permissions of unused apps
- Request to become the default handler if necessary
- Grant all runtime permissions for testing purposes
- Additional resources
How to Request Permissions in Android Application?
Starting from Android 6.0 (API 23), users are not asked for permissions at the time of installation rather developers need to request the permissions at the run time. Only the permissions that are defined in the manifest file can be requested at run time.
Types of Permissions
1. Install-Time Permissions: If the Android 5.1.1 (API 22) or lower, the permission is requested at the installation time at the Google Play Store.
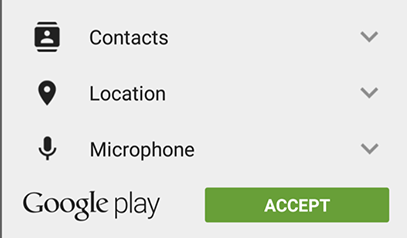
If the user Accepts the permissions, the app is installed. Else the app installation is canceled.
2. Run-Time Permissions: If the Android 6 (API 23) or higher, the permission is requested at the run time during the running of the app.

If the user Accepts the permissions, then that feature of the app can be used. Else to use the feature, the app requests permission again.
So, now the permissions are requested at runtime. In this article, we will discuss how to request permissions in an Android Application at run time.
Steps for Requesting permissions at run time
Step 1: Declare the permission in the Android Manifest file: In Android, permissions are declared in the AndroidManifest.xml file using the uses-permission tag.
Here we are declaring storage and camera permission.
Step 2: Modify activity_main.xml file to Add two buttons to request permission on button click: Permission will be checked and requested on button click. Open the activity_main.xml file and add two buttons to it.
Step 3: Check whether permission is already granted or not. If permission isn’t already granted, request the user for the permission: In order to use any service or feature, the permissions are required. Hence we have to ensure that the permissions are given for that. If not, then the permissions are requested.
Check for permissions: Beginning with Android 6.0 (API level 23), the user has the right to revoke permissions from any app at any time, even if the app targets a lower API level. So to use the service, the app needs to check for permissions every time.
Syntax:
Request Permissions: When PERMISSION_DENIED is returned from the checkSelfPermission() method in the above syntax, we need to prompt the user for that permission. Android provides several methods that can be used to request permission, such as requestPermissions().
Источник
a full stack enthusiast interested in Javascript / Typescript / Kotlin / Python / React / React Native / (Android & iOS) native / Cloud
Android permission handling done right with Kotlin
Permission handling should be simple, but not the case in Android. Or at least before you know a lot about it. This article aims to solve that problem. And we will use Anko here to make it better.
1. Official documentation
This is where you can find the official solution. It explains well but it depends on you how you shape your interactive model. Let’s see how google designs this model.
2. Google’s model
Below is the official code.
The code is easy to read:
- Check whether we got the permission or not.
- If yes, we go to the else : Permission has already been granted case.
- If no, two sub-cases here:
- show permission rationale, then ask permission again
- no need to show permission rationale
The key part here is the usage of shouldShowRequestPermissionRationale .
And when a user runs through the flow:
The user will get the ask-for-permission-dialog right away. If he grants it, then all fine. If he denies it, then the next time it will then trigger the shouldShowRequestPermissionRationale block.
3. Problem
The problem is what about as soon as the user sees the ask-for-permission-dialog, he just denies, close the app and uninstall? Because it seems it’s something like a system notification that we want to just use some feature without permission?
Because shouldShowRequestPermissionRationale won’t return true if this is the first time the user asks for permission.
And if you use this to show your real rationale, the code seems very clean, something like if shouldShowRequestPermissionRationale then showReason . Then you will be surprised to see that it won’t work for the first time.
Things will become more interesting when the user denies after the 2nd time. The 3rd time there will be a Never ask again checkbox. And how to handle that after the user tick that option?
And when this is a very important permission to this app, we want some better model to handle it.
4. Design thinking
Always asks for permission when the user just trigger the feature, try not to ask for many permissions at the start. Because when the user just needs it, in that context, it will make them feel more comfortable to grant you the permission. And actually, it will be quite easy, and Kotlin will make it easier, which we will see later.
5. Our model
In the app. First, we check the permission, and we execute the tasks if we got the permission. And here is how we handle the case when the permission is not granted.
- We always show a dialog to explain why we need the permission.
- Then we try to request the permission.
- Success case: We get the permission, cool, let’s go on.
- Failure case: We will display some further explanation and try to request again, or just stop because the user can press the button again to trigger the whole procedure again
- NeverAskAgain case: We need to route the user to application settings page and let them enable it there because this is the only way. And besides that, we will show an explanation to tell the user what will happen.
6. Code blocks
With the above ideas in mind, let’s see how to implement this.
6.1 How to check the permission
Something needs to know here, you don’t need to handle the API case where Google makes a change to the request model. import android.support.v4.content.ContextCompat.checkSelfPermission will handle it for you. If the above run under an older device ( else block, add this code
We will show the reason, and after the user press yes , we will ask for permission and dismiss the alert if user presses no button.
6.3 Handle the three cases
You will see that we haven’t used that shouldShowRequestPermissionRationale . When will we use it? Well, we will only use it to check the never ask again option has been ticked or not.
So after the user responds to your request. It will trigger onRequestPermissionsResult method, and this is where you can handle that.
And this is how you route the user to the application setting screen.
Then everything should behave as expected.
6. What about using some DSL to make it better
Although the above code works, can we make it any better? What about inside that onRequestPermissionsResult() , we can write something like this:
It behaves exactly like the previous one. But in a more declarative and readable way. Even better, you can now reuse it in any activity . Wait for my next blog, we will see how easily Kotlin will enable us to do something fancy like this. 🙂
Thanks for reading!
Follow me (albertgao) on twitter, if you want to hear more about my interesting ideas.
Источник
Check Multiple Android Kotlin Runtime Permissions Programmatically

Hi, Guys. Welcome to Android Kotlin Runtime Permissions example.
In this tutorial, We will learn how to programmatically request multiple Android Kotlin Runtime Permissions.
From android’s Marshmallow version, the developer needs to programmatically check and request multiple Android Kotlin Runtime Permissions to the user.
Using our code, you can ask for multiple or single runtime permissions android as per your requirements.
Following is the output:
Download Source Code For Check Multiple Android Kotlin Runtime Permissions
Understanding Runtime Permissions Architecture
As you have seen in the video, a dialog is created for asking every permission.
If the user denies, it will again ask when the user opens an Android app.
Once user allows, it will never ask for same permission in the future.
There is also one checkbox saying “Never ask again,” if the user clicks on that and then after deny, then Android will never ask for that permission.
For handling above situation, Android opens another dialog which allows the user to go to setting of our app and from there, he can turn on and off various permissions.
Following are required code snippets.
Step 1: Creating WelcomeActivity.kt class:
Create new Activity named WelcomeActivity.kt and add below code
Update activity_welcome.xml as below
Step 2: Creating MainActivity.kt class:
Step 3: Description of MainActivity
Defining permission codes
In checkAndRequestPermissions() method, create permission code for each permission like below.
Preparing ArrayList
Add each permission in ArrayList and ask user by below source code
Hashmap Creation
In onRequestPermissionResult() method, put all permission in one Hashmap.
Now check if all permissions are granted or not.
If granted, open WelcomeActivity or continue to the normal flow of your app.
If not granted, then ask again with your message.
Update Package name
In explain() method you need to update package name in below line
Define required permissions in AndroidManifest.xml
What are Normal Permissions?
Now, notice one thing. We have to define INTERNET permission in manifest file but have not ask for same in MainActivity.java class.
Android has classified some permissions as Normal Permissions, which are not very dangerous for user’s security and that’s why we don’t need to ask for those normal permissions but need to define them in the Manifest file.
You can find some more details and list of normal permissions here on an official document.
Java Version
If you have any question about implementing check request multiple android kotlin runtime permissions, feel free ask in the comment section.
Cheers and happy coding!
2 thoughts on “Check Multiple Android Kotlin Runtime Permissions Programmatically”
Give thanks! It works, but you also have to say about the WelcomeActivity ad in manifest.xml
I have created welcome activity just to demonstrate how to move further after getting runtime permissions.
There is no code lines in welcome activity.
Источник
Request app permissions
Every Android app runs in a limited-access sandbox. If your app needs to use resources or information outside of its own sandbox, you can declare a permission and set up a permission request that provides this access. These steps are part of the workflow for using permissions.
If you declare any dangerous permissions, and if your app is installed on a device that runs Android 6.0 (API level 23) or higher, you must request the dangerous permissions at runtime by following the steps in this guide.
If you don’t declare any dangerous permissions, or if your app is installed on a device that runs Android 5.1 (API level 22) or lower, the permissions are automatically granted, and you don’t need to complete any of the remaining steps on this page.
Basic principles
The basic principles for requesting permissions at runtime are as follows:
- Ask for permissions in context, when the user starts to interact with the feature that requires it.
- Don’t block the user. Always provide the option to cancel an educational UI flow related to permissions.
- If the user denies or revokes a permission that a feature needs, gracefully degrade your app so that the user can continue using your app, possibly by disabling the feature that requires the permission.
- Don’t assume any system behavior. For example, don’t assume that permissions appear in the same permission group. A permission group merely helps the system minimize the number of system dialogs that are presented to the user when an app requests closely-related permissions.
Workflow for requesting permissions
Before you declare and request runtime permissions in your app, evaluate whether your app needs to do so. You can fulfill many use cases in your app, such as taking photos, pausing media playback, and displaying relevant ads, without needing to declare any permissions.
If you conclude that your app needs to declare and request runtime permissions, complete these steps:
- In your app’s manifest file, declare the permissions that your app might need to request.
- Design your app’s UX so that specific actions in your app are associated with specific runtime permissions. Users should know which actions might require them to grant permission for your app to access private user data.
- Wait for the user to invoke the task or action in your app that requires access to specific private user data. At that time, your app can request the runtime permission that’s required for accessing that data.
Check whether the user has already granted the runtime permission that your app requires. If so, your app can access the private user data. If not, continue to the next step.
You must check whether you have that permission every time you perform an operation that requires that permission.
Check whether your app should show a rationale to the user, explaining why your app needs the user to grant a particular runtime permission. If the system determines that your app shouldn’t show a rationale, continue to the next step directly, without showing a UI element.
If the system determines that your app should show a rationale, however, present the rationale to the user in a UI element. This rationale should clearly explain what data your app is trying to access, and what benefits the app can provide to the user if they grant the runtime permission. After the user acknowledges the rationale, continue to the next step.
Request the runtime permission that your app requires in order to access the private user data. The system displays a runtime permission prompt, such as the one shown on the permissions overview page.
Check the user’s response, whether they chose to grant or deny the runtime permission.
If the user granted the permission to your app, you can access the private user data. If the user denied the permission instead, gracefully degrade your app experience so that it provides functionality to the user, even without the information that’s protected by that permission.
Figure 1 illustrates the workflow and set of decisions associated with this process:
 Figure 1. Diagram that shows the workflow for declaring and requesting runtime permissions on Android.
Determine whether your app was already granted the permission
To check if the user has already granted your app a particular permission, pass that permission into the ContextCompat.checkSelfPermission() method. This method returns either PERMISSION_GRANTED or PERMISSION_DENIED , depending on whether your app has the permission.
Explain why your app needs the permission
If the ContextCompat.checkSelfPermission() method returns PERMISSION_DENIED , call shouldShowRequestPermissionRationale() . If this method returns true , show an educational UI to the user. In this UI, describe why the feature, which the user wants to enable, needs a particular permission.
Additionally, if your app requests a permission related to location, microphone, or camera, consider explaining why your app needs access to this information.
Request permissions
After the user views an educational UI, or the return value of shouldShowRequestPermissionRationale() indicates that you don’t need to show an educational UI this time, request the permission. Users see a system permission dialog, where they can choose whether to grant a particular permission to your app.
Traditionally, you manage a request code yourself as part of the permission request and include this request code in your permission callback logic. Another option is to use the RequestPermission contract, included in an AndroidX library, where you allow the system to manage the permission request code for you. Because using the RequestPermission contract simplifies your logic, it’s recommended that you use it when possible.
Allow the system to manage the permission request code
To allow the system to manage the request code that’s associated with a permissions request, add dependencies on the following libraries in your module’s build.gradle file:
You can then use one of the following classes:
- To request a single permission, use RequestPermission .
- To request multiple permissions at the same time, use RequestMultiplePermissions .
The following steps show how to use the RequestPermission contract. The process is nearly the same for the RequestMultiplePermissions contract.
In your activity or fragment’s initialization logic, pass in an implementation of ActivityResultCallback into a call to registerForActivityResult() . The ActivityResultCallback defines how your app handles the user’s response to the permission request.
Keep a reference to the return value of registerForActivityResult() , which is of type ActivityResultLauncher .
To display the system permissions dialog when necessary, call the launch() method on the instance of ActivityResultLauncher that you saved in the previous step.
After launch() is called, the system permissions dialog appears. When the user makes a choice, the system asynchronously invokes your implementation of ActivityResultCallback , which you defined in the previous step.
Note: Your app cannot customize the dialog that appears when you call launch() . To provide more information or context to the user, change your app’s UI so that it’s easier for users to understand why a feature in your app needs a particular permission. For example, you might change the text in the button that enables the feature.
Also, the text in the system permission dialog references the permission group associated with the permission that you requested. This permission grouping is designed for system ease-of-use, and your app shouldn’t rely on permissions being within or outside of a specific permission group.
The following code snippet shows how to handle the permissions response:
Kotlin
And this code snippet demonstrates the recommended process of checking for a permission, and requesting a permission from the user when necessary:
Kotlin
Manage the permission request code yourself
As an alternative to allowing the system to manage the permission request code, you can manage the permission request code yourself. To do so, include the request code in a call to requestPermissions() .
Note: Your app cannot customize the dialog that appears when you call requestPermissions() . The text in the system permission dialog references a permission group, but this permission grouping is designed for system ease-of-use. Your app shouldn’t rely on permissions being within or outside of a specific permission group.
The following code snippet demonstrates how to request a permission using a request code:
Kotlin
After the user responds to the system permissions dialog, the system then invokes your app’s implementation of onRequestPermissionsResult() . The system passes in the user response to the permission dialog, as well as the request code that you defined, as shown in the following code snippet:
Kotlin
Handle permission denial
If the user denies a permission request, your app should help users understand the implications of denying the permission. In particular, your app should make users aware of the features that don’t work because of the missing permission. When you do so, keep the following best practices in mind:
Guide the user’s attention. Highlight a specific part of your app’s UI where there’s limited functionality because your app doesn’t have the necessary permission. Several examples of what you could do include the following:
- Show a message where the feature’s results or data would have appeared.
- Display a different button that contains an error icon and color.
Be specific. Don’t display a generic message; instead, mention which features are unavailable because your app doesn’t have the necessary permission.
Don’t block the user interface. In other words, don’t display a full-screen warning message that prevents users from continuing to use your app at all.
At the same time, your app should respect the user’s decision to deny a permission. Starting in Android 11 (API level 30), if the user taps Deny for a specific permission more than once during your app’s lifetime of installation on a device, the user doesn’t see the system permissions dialog if your app requests that permission again. The user’s action implies «don’t ask again.» On previous versions, users would see the system permissions dialog each time your app requested a permission, unless the user had previously selected a «don’t ask again» checkbox or option.
In certain situations, the permission might be denied automatically, without the user taking any action. (Similarly, a permission might be granted automatically as well.) It’s important to not assume anything about automatic behavior. Each time your app needs to access functionality that requires a permission, you should check that your app is still granted that permission.
To provide the best user experience when asking for app permissions, also see App permissions best practices.
One-time permissions
Starting in Android 11 (API level 30), whenever your app requests a permission related to location, microphone, or camera, the user-facing permissions dialog contains an option called Only this time, as shown in Figure 2. If the user selects this option in the dialog, your app is granted a temporary one-time permission.
Your app can then access the related data for a period of time that depends on your app’s behavior and the user’s actions:
- While your app’s activity is visible, your app can access the data.
- If the user sends your app to the background, your app can continue to access the data for a short period of time.
- If you launch a foreground service while the activity is visible, and the user then moves your app to the background, your app can continue to access the data until that foreground service stops.
- If the user revokes the one-time permission, such as in system settings, your app cannot access the data, regardless of whether you launched a foreground service. As with any permission, if the user revokes your app’s one-time permission, your app’s process terminates.
When the user next opens your app and a feature in your app requests access to location, microphone, or camera, the user is prompted for the permission again.
Android auto-resets permissions of unused apps
If your app targets Android 11 (API level 30) or higher and isn’t used for a few months, the system protects user data by automatically resetting the sensitive runtime permissions that the user had granted your app. Learn more in the guide about app hibernation.
Request to become the default handler if necessary
Some apps depend on access to sensitive user information related to call logs and SMS messages. If you want to request the permissions specific to call logs and SMS messages and publish your app to the Play Store, you must prompt the user to set your app as the default handler for a core system function before requesting these runtime permissions.
For more information on default handlers, including guidance on showing a default handler prompt to users, see the guide on permissions used only in default handlers.
Grant all runtime permissions for testing purposes
To grant all runtime permissions automatically when you install an app on an emulator or test device, use the -g option for the adb shell install command, as demonstrated in the following code snippet:
Additional resources
For additional information about permissions, read these articles:
To learn more about requesting permissions, download the following sample apps:
- Android RuntimePermissionsBasic Sample Java | Kotlin
Content and code samples on this page are subject to the licenses described in the Content License. Java is a registered trademark of Oracle and/or its affiliates.
Источник


