8 приложений для Android, которые нужно удалить. Они опасны
Кто бы что ни говорил, но Google Play – это помойка. Не даром её признали самым популярным источником вредоносного софта для Android. Просто пользователи в большинстве своём доверяют официальном магазину приложений Google и скачивают оттуда любое ПО без разбору. А какой ещё у них есть выбор? Ведь их всегда учили, что скачивать APK из интернета куда опаснее. В общем, это действительно так. Но остерегаться опасных приложений в Google Play нужно всегда. По крайней мере, постфактум.
Есть как минимум 8 приложений, которые нужно удалить
Google добавила в Google Play функцию разгона загрузки приложений
Исследователи кибербезопасности из антивирусной компании McAfee обнаружили в Google Play 8 вредоносных приложений с многомиллионными загрузками. Попадая на устройства своих жертв, они скачивают получают доступ к сообщениям, а потом совершают от их имени покупки в интернете, подтверждая транзакции кодами верификации, которые приходят в виде SMS.
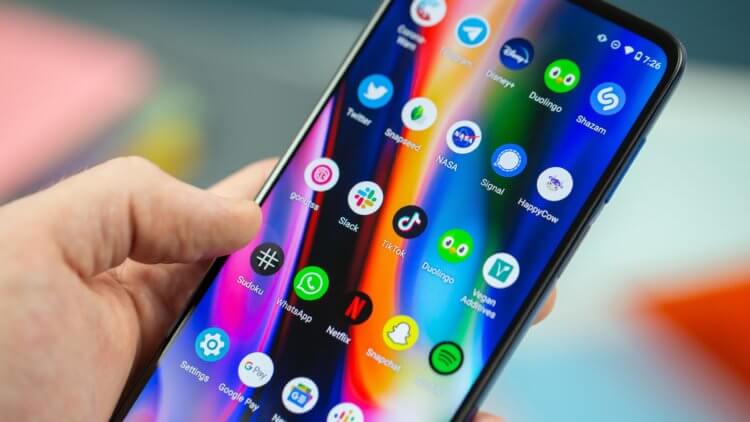
Вредоносные приложения для Android

Нашли вирус? Удалите его
В основном это приложения, которые потенциально высоко востребованы пользователями. Среди них есть скины для клавиатуры, фоторедакторы, приложения для создания рингтонов и др.:
- com.studio.keypaper2021
- com.pip.editor.camera
- org.my.famorites.up.keypaper
- com.super.color.hairdryer
- com.celab3.app.photo.editor
- com.hit.camera.pip
- com.daynight.keyboard.wallpaper
- com.super.star.ringtones
Это названия пакетов приложений, то есть что-то вроде их идентификаторов. Поскольку всё это вредоносные приложения, их создатели знают, что их будут искать и бороться с ними. Поэтому они вполне могут быть готовы к тому, чтобы менять пользовательские названия приложений, которые видим мы с вами. Но это мы не можем этого отследить. Поэтому куда надёжнее с этой точки зрения отслеживать именно идентификаторы и удалять вредоносный софт по ним.
Как найти вирус на Android
Но ведь, скажете вы, на смартфоны софт устанавливается с пользовательскими названиями. Да, это так. Поэтому вам понадобится небольшая утилита, которая позволит вам эффективно выявить весь шлаковый софт, который вы себе установили, определив название их пакетов.
- Скачайте приложение для чтения пакетов Package Name Viewer;
- Запустите его и дайте те привилегии, которые запросит приложение;
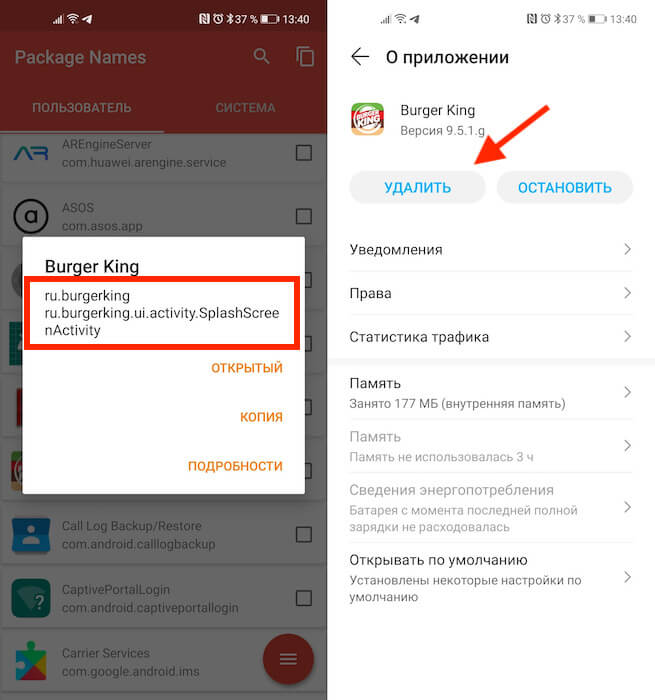
В красном квадрате приведен пример названия пакета
- Поочерёдно вбивайте в поиск названия пакетов, приведённые выше;
- При обнаружении приложений с такими именами, нажимайте на них и удаляйте.
Package Name Viewer удобен тем, что позволяет не просто найти нужное приложение по названию его пакета, но и при необходимости перейти в настройки для его удаления. Для этого достаточно просто нажать на иконку приложения, как вы попадёте в соответствующий раздел системы, где сможете остановить, отключить, удалить накопленные данные, отозвать привилегии или просто стереть нежелательную программу.
Как отменить подписку на Андроиде
Лучше всего приложение именно удалить. Это наиболее действенный способ защитить себя от его активности. Однако не исключено, что оно могло подписать вас на платные абонементы, поэтому для начала проверьте свою карту на предмет неизвестных списаний, а потом просмотрите список действующих подписок в Google Play:
- Запустите Google Play и нажмите на иконку своего профиля;
- В открывшемся окне выберите раздел «Платежи и подписки»;
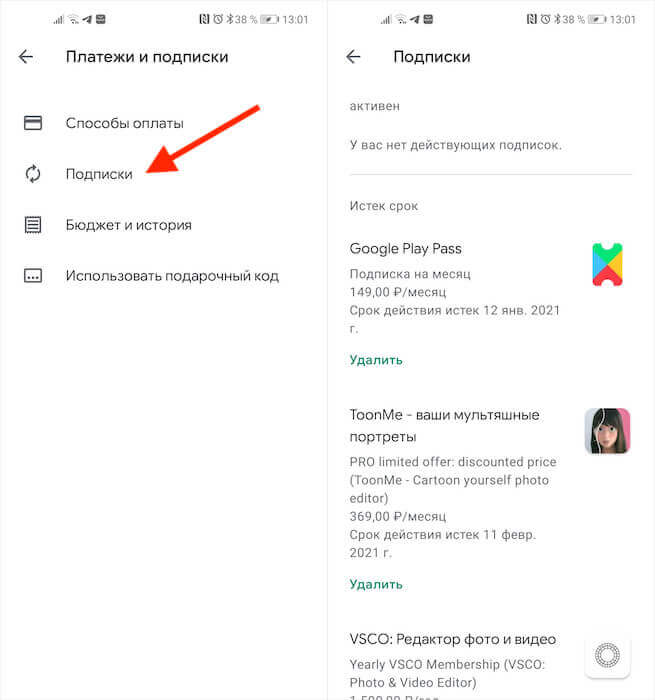
Если подписка оформлена через Google Play, отменить её ничего не стоит
- Здесь выберите «Подписки» и проверьте, нет ли среди них неизвестных;
- Если есть, просто нажмите напротив неё на кнопку «Отменить».
В принципе, если подписка была оформлена через Google Play и оплата уже прошла, вы можете потребовать у Google вернуть уплаченные деньги. О том, как это делается, мы описывали в отдельной статье. Но поскольку разработчики таких приложений обычно тщательно продумывают способы воровства денег, как правило, они не используют встроенный в Google Play инструмент проведения платежей, чтобы их в случае чего не могли отозвать.

Новости, статьи и анонсы публикаций
Свободное общение и обсуждение материалов
![]()
Мобильные устройства пока не планируют исчезать из нашей жизни. Мало того, они меняют наши пользовательские привычки на корню: смотришь какой-нибудь фильм из нулевых и понимаешь, что так с телефоном уже никто не обращается! Во время просмотра осознаешь всю тяжесть бытия: как же мы жили тогда? Ведь пользоваться телефонами было не так удобно! В общем, за последние 10-15 лет все наши привычки сильно изменились благодаря смартфонам и их функциям: что-то делать стало проще, от чего-то мы и вовсе отказались. Самое время обратить внимание на себя и понять, что же изменилось в нашем поведении из-за смартфонов: какие их функции сейчас стали бесполезны?

Так уж получилось, что смартфон стал нашим неотъемлемым спутником. При этом он достаточно компактный для того, чтобы его потерять. Учитывая стоимость современных средств связи, это всегда неприятно. Но даже если вы не можете найти свой телефон, это не значит, что пора расстраиваться и готовиться к покупке нового. На самом деле проблема решается довольно легко и есть как минимум несколько путей для этого. Думаете, что эта статья пригодится тем, кто уже потерял телефон? А вот и нет. Тем, у кого все нормально, она окажется даже более полезной, так как им будет проще принять меры и подготовится к тому, что может случиться с каждым.
Совсем недавно нам представили новые смартфоны Google Pixel. Не сказать, что до презентации ходила какая-то интрига. Большинство из характеристик были слиты самой компанией еще за несколько месяцев. Однако что точно заслуживает внимания — так это камера. Google уже давно дали понять, что двигаются по иному пути и делают большой упор на программные алгоритмы. Недавно появилась информация, что сторонние разработчики уже портировали приложение Google Camera из серии Pixel 6 для других смартфонов.
“пользователи в большинстве своём доверяют официальном магазину приложений Google и скачивают оттуда любое ПО без разбору”, зачем судить по себе? Никто так не делает и вообще откуда этот дикий список того, что надо удалить?
«Поставьте непонятное приложение, дайте ему все возможные разрешения, чтобы удалить другое непонятное приложение». Больше похоже на заказ от конкурентов
Источник
Android Firebase Authentication with Google SignIn
Mar 10, 2017 · 11 min read
Hi Android Developers, this is actually my first technical write-up in a series i believe to come. I’ll be taking you through a step by step process on how to implement Firebase Authentication using Google Login.
First what is Firebase?
According to wikipedia, Firebase is a mobile and web application platform with tools and infrastructure designed to help developers build high-quality apps. Firebase is made up of complementary features that developers can mix-and-match to fit their needs. Services provided by Firebase that can help developers build and launch applications faster include:
- Cloud Messaging
- Authentication
- Realtime Database
- Storage
- Hosting
- Crash Reporting to keep your apps stable and free from bugs.
- Test Lab to deliver high quality apps.
This tuto r ial is going to focus on the Authentication service provided by Firebase using Google SignIn and Firebase Realtime Database in Android Applications.
Authentication is the process of identifying an individual, usually based on a username and password before they can access certain resources in our case mobile application resources like data and other information (Authentication is simply the SignIn Process for Apps)
Firebase Realtime database is a NoSQL Cloud database that synced data across all clients for example, web, mobile and other clients and this happens in real time and even when the client is offline, the data remains available.
How to add Firebase Google Login For Authentication.
Follow the below steps to do this:
- Visit the Firebase Website firebase.google.com and create a firebase account to start with. Go to Firebase console and click the “Create New Project” Button.
- The Create a project window appears and you are required to enter your project name and your Country/Region, Click Create project to proceed.

3. In the next screen choose “Add Firebase to your Android App” and then add the package details and Debug signing certificate SHA-1 key. Click here for a tutorial on Getting Android Debug Keystore SHA1 Fingerprint:

After clicking ADD APP, in the next page, you will be asked to download the google-services.json file. Please, download it to your computer. We will add it to our android app later. After this, you will be taken to your project Dashboard.
4. In the project Dashboard, click the Authentication in the Menu on the left of the page, then click the SIGN-IN METHOD, you will be taken to a page where you can enable and disable different SignIn providers that Firebase Support, go ahead and Enable Google SignIn and then click save.

5. Create Android Firebase Login App in Android Studio.
Let’s create the Android Application that will connect to Firebase for user authentication using Firebase Google Login.
Steps to creating a project on Android Studio
- Launch Android Studio and Go to File → New → New Project and enter your Application Name.
- Enter company domain, this is used to uniquely identify your App’s package worldwide. Remember to use the same package name as used in the firebase console.
- Choose project location and minimum SDK and on the next screen choose Empty Activity, Then Click on Next.
- Choose an Activity Name. Make sure Generate Layout File check box is selected, Otherwise we have to generate it ourselves.Then click on Finish. We have used the Activity Name as MainActivity since this will be the default screen when the user opens the app for the first time.
Gradle will configure and build your project and resolve the dependencies, Once it is complete proceed for next steps.
Add Permissions and Dependencies
- After Gradle syncs the project, add the google-services.json file that you downloaded while creating a new project on the Firebase console to your project’s app folder as shown below. You can drag the file and put it inside the Android app module folder directly into android studio or you can simply copy the file and paste it inside the Android Studio Project App directory on your computer.

2. Since we need to connect to the Network while authenticating, you’ll need to add the Internet permission in your AndroidManifest.xml file which is more like a configuration file for your App.
3. open your project’s build.gradle file from the project’s home directory and add the following dependency. Please note that i’m not talking about the module or app’s build.gradle file, we’ll get to that in the next step
4. Next, open your app’s build.gradle from the and add the following at the end of the file.
5. Also add the following dependency in the dependency section.
After adding these dependencies, Android Studio would want to sync, make sure you are connected to the internet so Android Studio can download these used dependencies.
So let’s start coding the functionalities:
Open activity_main.xml file in the res/layout folder and add the following code. Since we are going to be displaying the username and email of the signed in user in a NavigationDrawer header view, we’ll just have only the Custom Google SignIn Button on this layout.
Now open your MainActivity.java in the App/Java folder, create a method called configureSignIn, outside the onCreate() method and put in the below codes. then call that method in the onCreate method of the class. Please, click here to view the project on github, check there for other resources required to build this application. For example the MainActivity.class extends another class called BaseActivity which will be written short.
we need to configure Google Sign-In in order to be able to get the user data. So, we create a GoogleSignInOptions object with the requestEmail option.
Add this code to the MainActivity Class:
Next, Add a signIn() method that will be called when the Sign In Button is clicked in the view, this will prompt the user to select a Google account before the authentication process begins. this method will handle sign-in by creating a sign-in intent with the getSignInIntent() method, and starting the intent with startActivityForResult().
Please note that if you don’t have other extended or all the resources for this project, you’ll be getting some errors by just running the piece of codes in this article, so it’s good to either open the project source code down while reading this tutorial or after reading, make sure you check out the project REPO ON GITHUB. Some instance variables are declared in the class for example mGoogleApiClient and others.
After the user selects an account and the process of authentication with Google begins, the result will be made available in the onActivityResult() as stated in the piece of code below. When the signIn button is clicked, the user will first be authenticated with Google and if that is successful, we’ll now authenticate the user with Firebase after saving user data to SharedPreference, so we can have access to them for display in the Header view of our Navigation Drawer Activity. So it’s a 2 stage authentication, the 1st stage is with Google and the Second with Firebase. So i guess this provides a double and secure authentication process.
Next, after authenticating with Google, it’s now time to authenticate with Firebase. Before we proceed, we should declare the instance of FirebaseAuth object and AuthStateListener which listens for changes in the signed in user state.
So declare these as instance variables:
Then, in the onCreate() method, we’ll need to initialize the FirebaseAuth instance and the AuthStateListener method so we can listen and track whether the user is signed in or out.
If the user is successfully authenticated by Firebase, we’ll now call the createUserInFirebaseHelper(); method that saves the user data to our own Firebase Database.
This approach of saving the user data to our own Firebase is a good practice after authentication so we can have our own copy of the users details persisted to Firebase database. So from onAuthStateChanged method, we’ll call a helper method that will now take the user details mainly username, photo URL and email and then save them to Firebase Database.
So before you look at the createUserInFirebaseHelper() method that saves data to Firebase, i want you to know that we might be going outside the scope of this tutorial which is simply Authentication with Google and Firebase. Now, we are dabbing into inserting data into Firebase database, which is a topic of it’s own. I’m just implementing this here as a good practice but there is more you need to know about Inserting and selecting from Firebase database. I hope to in my next article, write a step by step guide on inserting and selecting from Firebase.
You need to have the URL to your Firebase database, add a listener to the location and onDataChange, you insert the data by passing an object containing the information you want to save. Please don’t get confused here, i promise to do an article as stated above that will deal extensively on this.
Next, after successfully inserting into our Firebase database, we move to the second Activity where we’ll display user data. The below piece of code from the above method moves us to the second Activity:
Don’t forget the part that kicks of this whole process which is setting an onClicklisterner on the Google signIn Button, when this button is clicked, the signIn() method is called and the user is prompted to select an account:
Next, in the onCreate() method of the second Activity, we get the data stored from SharedPreference. SharedPreference stores data as key value pairs in the application Context and makes it available within that application but loses its data when the user logs out of the app, that’s why we are saving our own copy in our database.
The below code gets a handle to the views in the layout, get’s data from sharedPreferences and sets them to the Header view of the Navigation for display. Please take a look at the GITHUB REPO for the complete classes and other resources.
Next, the below code in the second activity, set’s up the NavigationDrawer and the data is displayed on the Header View of the NavigationDrawer:
Finally, we create the SignOut method to enable user logout of the app:
Now, run the app and click on Google Sign In Button to authenticate using Firebase Google Login. It should show a popup with available google account Click on your google account and the Firebase Google Login App should display your Display name, photo and Email Address on the Header View of the Navigation Drawer in the second activity.
Источник


