- Different Ways to Programmatically Restart an Android App on Button Click
- Step by Step Implementation
- Как программно «перезапустить» приложение Android?
- IntentCompat.makeRestartActivityTask
- Build and run your app
- Change the run/debug configuration
- Change the build variant
- Build your project
- Monitor the build process
- Apply Changes
- Requirements
- Use Apply Changes
- Enable Run fallback for Apply Changes
- Platform-dependent changes
- Limitations of Apply Changes
- Code changes that require app restart
- Libraries and plugins
- Code that directly references content in an installed APK
Different Ways to Programmatically Restart an Android App on Button Click
Sometimes we want to refresh an Activity, but there it is not possible to refresh. In that place, if we restart our app then it automatically gets refreshed. Also, we can use this to restart our app whenever it crashes. Most of the time when we open any app then it fetches all the data currently available. But if in the meantime if more data is updated to the database then we can use this feature to restart to again fetch all data every time it gets new data.
Now the point that comes here is how we can Programmatically Restart an Android App on Button Click . So in this article, we are going to discuss three different methods to Programmatically Restart an Android App on Button Click.
Attention reader! Don’t stop learning now. Get hold of all the important Java Foundation and Collections concepts with the Fundamentals of Java and Java Collections Course at a student-friendly price and become industry ready. To complete your preparation from learning a language to DS Algo and many more, please refer Complete Interview Preparation Course.
Step by Step Implementation
Step 1: Create a New Project
To create a new project in Android Studio please refer to How to Create/Start a New Project in Android Studio. Note that select Java as the programming language.
Источник
Как программно «перезапустить» приложение Android?
Во-первых, я знаю, что не нужно действительно убивать / перезапускать приложение на Android. В моем случае использования я хочу сбросить заводские настройки моего приложения в конкретном случае, когда сервер отправляет конкретную информацию клиенту.
Пользователь может быть авторизован на сервере только с ОДНЫМ экземпляром приложения (т.е. несколько устройств не допускаются). Если другой экземпляр получает этот «вход в систему», тогда все остальные экземпляры этого пользователя должны удалить свои данные (сброс к заводским настройкам), чтобы сохранить согласованность.
Можно принудительно получить блокировку, поскольку пользователь может удалить приложение и переустановить его, что приведет к другому идентификатору экземпляра, и пользователь больше не сможет снять блокировку. Поэтому можно принудительно получить блокировку.
Из-за этой принудительной возможности мы должны всегда проверять в конкретном случае, что он имеет блокировку. Это делается для (почти) каждого запроса к серверу. Сервер может отправить «неправильный идентификатор блокировки». Если это обнаружено, клиентское приложение должно удалить все.
Это был вариант использования.
У меня есть Activity A, который запускает Login Activity L или основной Activity B приложения в зависимости от значения sharedPrefs. После запуска L или B он закрывается, так что работает только L или B. Таким образом, в случае, если пользователь вошел в систему уже B работает сейчас.
B начинает звонить C. C startService для IntentService D. Это результаты в этом стеке:
Из метода onHandleIntent в D событие отправляется ResultReceiver R.
Теперь R обрабатывает это событие, предоставляя пользователю диалоговое окно, в котором он может выбрать заводскую настройку приложения (удалить базу данных, sharedPrefs и т. Д.).
После сброса к заводским настройкам я хочу перезапустить приложение (чтобы закрыть все действия) и только снова запустить A, который затем запускает логин Activity L и завершает себя:
OnClick-метод Диалога выглядит следующим образом:
И это MyApp класс:
Проблема в том, что если я использую FLAG_ACTIVITY_NEW_TASK Действия B и C, все еще выполняется. Если я нажимаю кнопку «Назад» при входе в систему, Activity я вижу C, но я хочу вернуться на домашний экран.
Если я не установил, FLAG_ACTIVITY_NEW_TASK я получаю ошибку:
Я не могу использовать Действия » Context , потому что ServiceIntent D также может вызываться из фоновой задачи, которая запускается AlarmManager .
Так, как я мог решить это, чтобы стек активности стал (A)> L?
Вы можете использовать его PendingIntent для запуска запуска в будущем, а затем для закрытия приложения.
Вы можете просто позвонить:
Который используется в библиотеке ProcessPhoenix
Как альтернатива:
Вот немного улучшенная версия ответа @Oleg Koshkin.
Если вы действительно хотите возобновить свою деятельность, включая уничтожение текущего процесса, попробуйте следующий код. Поместите его в HelperClass или там, где вам это нужно.
Это также повторно инициализирует классы jni и все статические экземпляры.
Джейк Уортон недавно опубликовал свою библиотеку ProcessPhoenix , которая делает это надежным способом. Вам в основном нужно только позвонить:
Библиотека автоматически завершит вызывающее действие, завершит процесс приложения и впоследствии перезапустит действие приложения по умолчанию.
Я немного изменил ответ Ilya_Gazman для использования новых API (IntentCompat устарел, начиная с API 26). Runtime.getRuntime (). Exit (0) кажется лучше, чем System.exit (0).
IntentCompat.makeRestartActivityTask
Новый способ сделать это, используя IntentCompat.makeRestartActivityTask
Создайте намерение, которое можно использовать для повторного запуска задачи приложения в ее базовом состоянии. Это похоже на makeMainActivity (ComponentName), но также устанавливает флаги Intent.FLAG_ACTIVITY_NEW_TASK и FLAG_ACTIVITY_CLEAR_TASK.
Есть действительно хороший трюк. Моя проблема заключалась в том, что в какой-то действительно старой C ++ jni библиотеке произошла утечка ресурсов. В какой-то момент он перестал функционировать. Пользователь попытался выйти из приложения и запустить его снова — безрезультатно, потому что завершение действия — это не то же самое, что завершение (или уничтожение) процесса. (Кстати, пользователь может перейти к списку запущенных приложений и остановить его оттуда — это будет работать, но пользователи просто не знают, как завершать приложения.)
Если вы хотите наблюдать за эффектом этой функции, добавьте static переменную к своей деятельности и увеличивайте ее, скажем, нажатием кнопки. Если вы выйдете из активности приложения, а затем снова вызовете приложение, эта статическая переменная сохранит свое значение. (Если приложение действительно было закрыто, переменной будет присвоено начальное значение.)
(И я должен прокомментировать, почему я не хотел вместо этого исправлять ошибку. Библиотека была написана десятилетия назад и с тех пор утечка ресурсов. Руководство считает, что это всегда работало . Стоимость предоставления исправления вместо обходного пути . Я думаю, вы поняли.)
Теперь, как я могу сбросить разделяемую библиотеку jni (она же динамическая, .so) в исходное состояние? Я решил перезапустить приложение как новый процесс.
Хитрость в том, что System.exit () закрывает текущее действие, а Android заново создает приложение с одним действием меньше.
Вызывающее действие просто выполняет код MagicAppRestart.doRestart(this); , вызывающее действие onPause() выполняется, а затем процесс создается заново. И не забудьте упомянуть об этой активности в AndroidManifest.xml
Преимущество этого метода в том, что нет задержек.
UPD: в Android 2.x он работал, но в Android 4 что-то изменилось.
Источник
Build and run your app
Android Studio sets up new projects to deploy to the Android Emulator or a connected device with just a few clicks. Once your app is installed, you can use Apply Changes to deploy certain code and resource changes without building a new APK.
To build and run your app, follow these steps:
- In the toolbar, select your app from the run configurations drop-down menu.
From the target device drop-down menu, select the device that you want to run your app on.
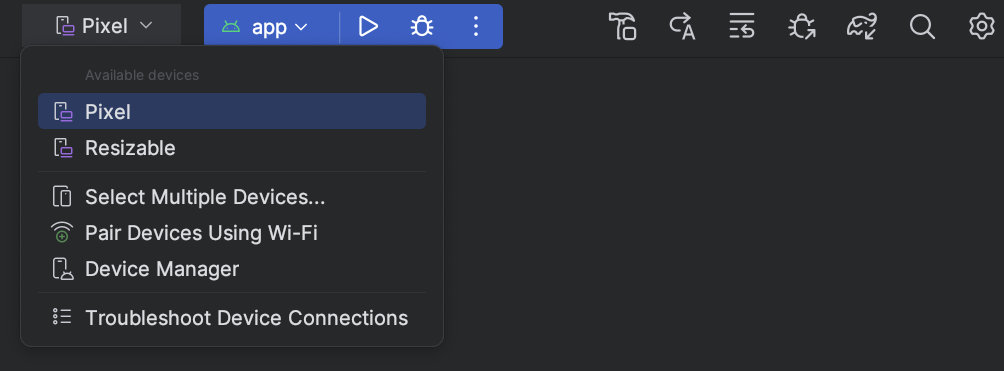
If you don’t have any devices configured, then you need to either connect a device via USB or create an AVD to use the Android Emulator.
Click Run .
Change the run/debug configuration
When you run your app for the first time, Android Studio uses a default run configuration. The run configuration specifies whether to deploy your app from an APK or an Android App Bundle, the module to run, package to deploy, activity to start, target device, emulator settings, logcat options, and more.
The default run/debug configuration builds an APK, launches the default project activity, and uses the Select Deployment Target dialog for target device selection. If the default settings don’t suit your project or module, you can customize the run/debug configuration, or even create a new one, at the project, default, and module levels. To edit a run/debug configuration, select Run > Edit Configurations. For more information, see Create and Edit Run/Debug Configurations.
Change the build variant
By default, Android Studio builds the debug version of your app, which is intended for use only during development, when you click Run.
To change the build variant Android Studio uses, select Build > Select Build Variant in the menu bar.
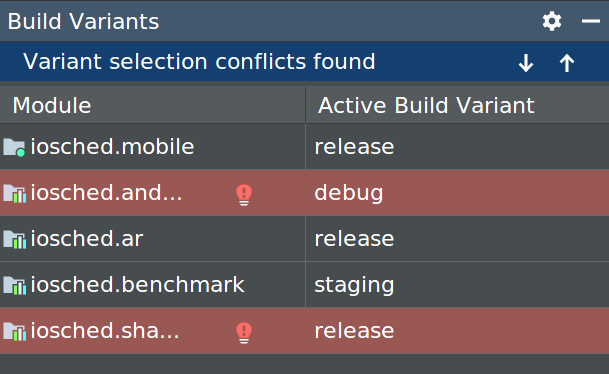
For projects without native/C++ code, the Build Variants panel has two columns: Module and Active Build Variant. The Active Build Variant value for the module determines which build variant the IDE deploys to your connected device and is visible in the editor.

Figure 1. The Build Variants panel has two columns for projects that do not have native/C++ code
To switch between variants, click the Active Build Variant cell for a module and choose the desired variant from the list field.
For projects with native/C++ code, the Build Variants panel has three columns: Module, Active Build Variant, and Active ABI. The Active Build Variant value for the module determines the build variant that the IDE deploys to your device and is visible in the editor. For native modules, the Active ABI value determines the ABI that the editor uses, but does not impact what is deployed.

Figure 2. The Build Variants panel adds the Active ABI column for projects with native/C++ code
To change the build variant or ABI, click the cell for the Active Build Variant or Active ABI column and choose the desired variant or ABI from the list. After you change the selection, the IDE syncs your project automatically. Changing either column for an app or library module will apply the change to all dependent rows.
By default, new projects are set up with two build variants: a debug and release variant. You need to build the release variant to prepare your app for public release.
To build other variations of your app, each with different features or device requirements, you can define additional build variants.
Conflicts in Android Studio’s Build Variants dialog
In Android Studio’s Build Variants dialog, you might see error messages indicating conflicts between build variants, such as the following:
This error does not indicate a build issue with Gradle – it is only indicating that the Android Studio IDE itself cannot resolve symbols between the variants of the selected modules.
For example, if you have a module M1 that depends on variant v1 of module M2 , but M2 has variant v2 selected in the IDE, you have unresolved symbols in the IDE. Let’s say that M1 depends on a class Foo which is only available in v1 . When v2 is selected, that class is not known by the IDE and it will fail to resolve it and show errors in the code of M1 .
These error messages appear because the IDE cannot load code for multiple variants simultaneously. In terms of your app’s build, however, the variant selected in this dialog will have no effect because Gradle builds your app with the source code specified in your Gradle build recipes, not based on what’s currently loaded in the IDE.
Build your project
The Run button builds and deploys your app to a device. However, to build your app to share or upload to Google Play, you’ll need to use one of the options in the Build menu to compile parts or all of your project. Before you select any of the build options listed in table 1, make sure you first select the build variant you want to use.
Table 1. Build options in the Build menu.
| Menu Item | Description |
|---|---|
| Make Module | Compiles all source files in the selected module that have been modified since the last build, and all modules the selected module depends on recursively. The compilation includes dependent source files and any associated build tasks. You can select the module to build by selecting either the module name or one of its files in the Project window. |
| Make Project | Makes all modules. |
| Clean Project | Deletes all intermediate/cached build files. |
| Rebuild Project | Runs Clean Project for the selected build variant and produces an APK. |
| Build Bundle(s) / APK(s) > Build APK(s) | |
| Build Bundle(s) / APK(s) > Build Bundle(s) | |
| Brings up a dialog with a wizard to set up a new signing configuration, and build either a signed app bundle or APK. You need to sign your app with a release key before you can upload it to the Play Console. For more information about app signing, see Sign your app. |
Note: The Run button builds an APK with testOnly=»true» , which means the APK can only be installed via adb (which Android Studio uses). If you want a debuggable APK that people can install without adb, select your debug variant and click Build Bundle(s) / APK(s) > Build APK(s).
For details about the tasks that Gradle executes for each command, open the Build window as described in the next section. For more information about Gradle and the build process, see Configure Your Build.
Monitor the build process
You can view details about the build process by clicking View > Tool Windows > Build (or by clicking Build in the tool window bar). The window displays the tasks that Gradle executes in order to build your app, as shown in figure 3.
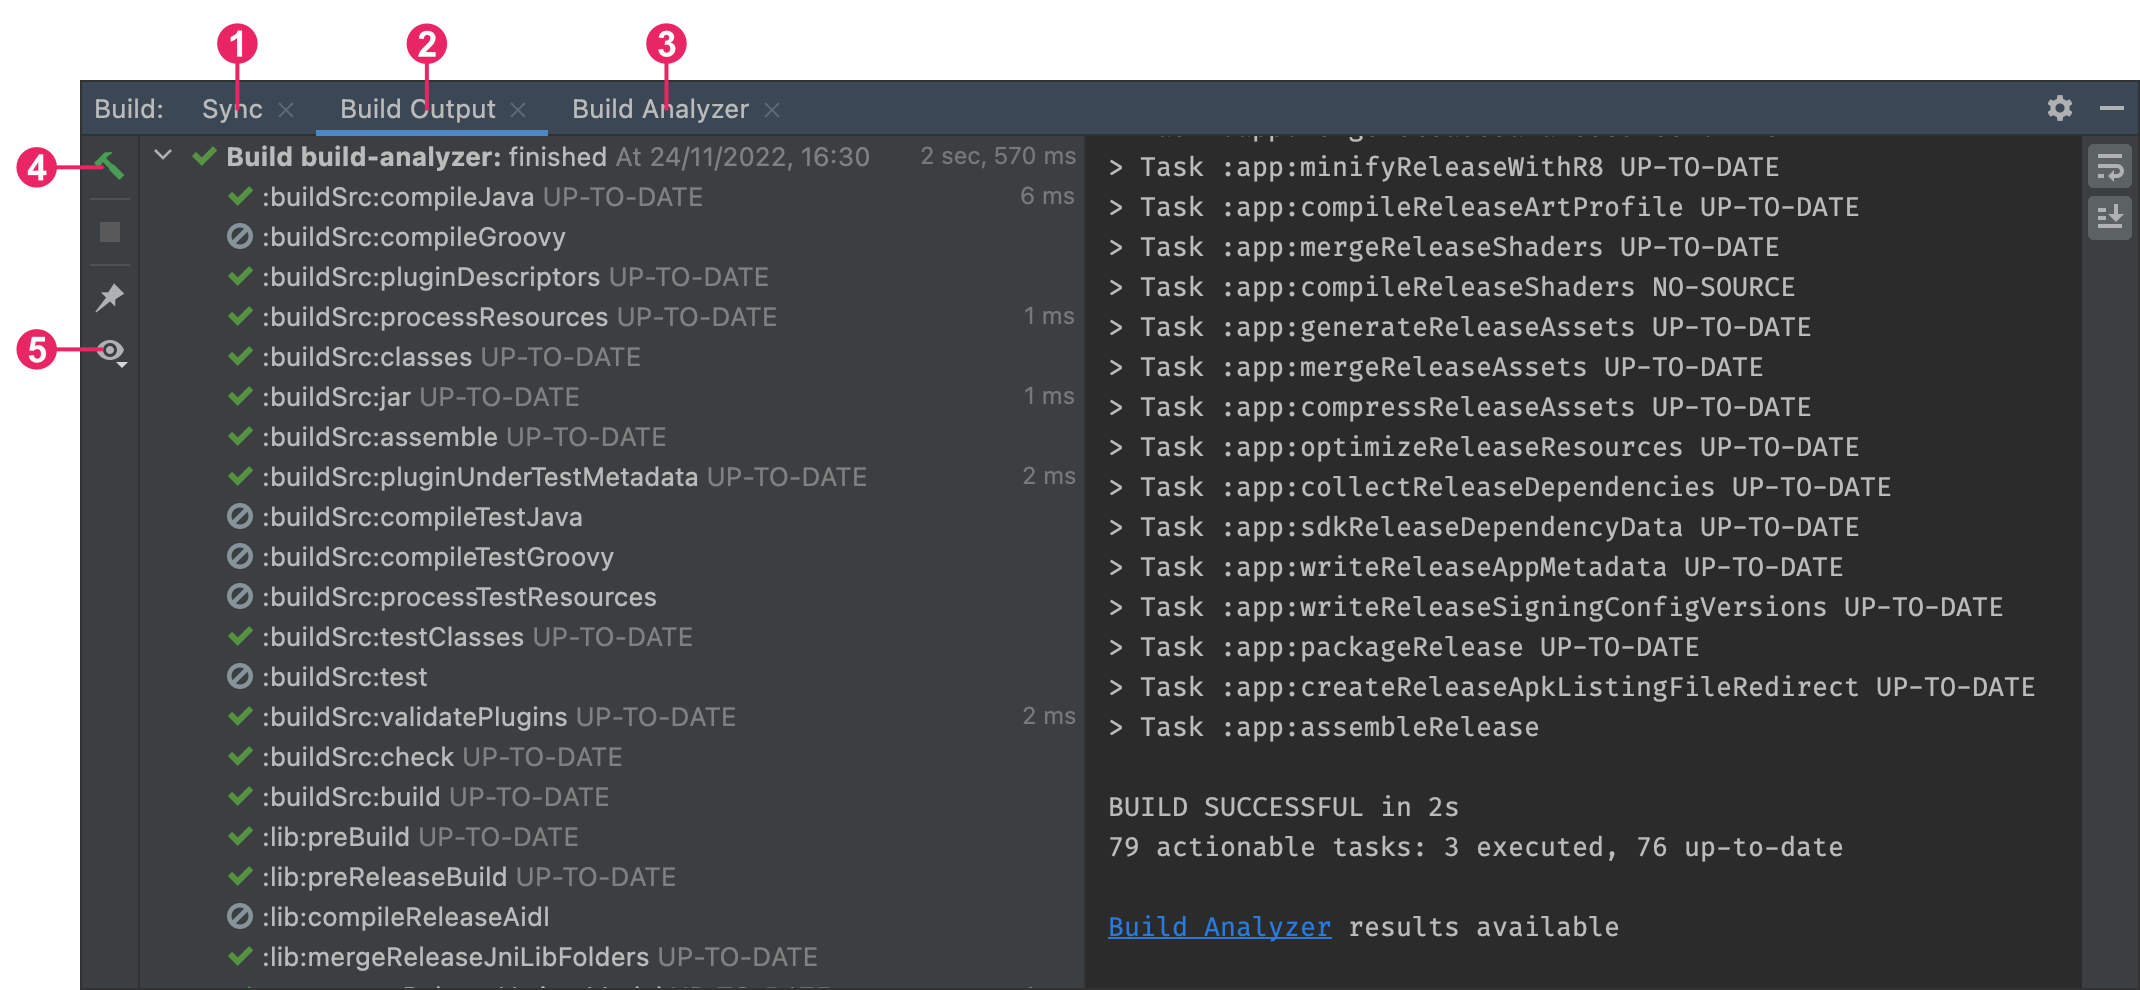
Figure 3. The Build output window in Android Studio
- Build tab: Displays the tasks Gradle executes as a tree, where each node represents either a build phase or a group of task dependencies. If you receive build-time or compile-time errors, inspect the tree and select an element to read the error output, as shown in figure 4.
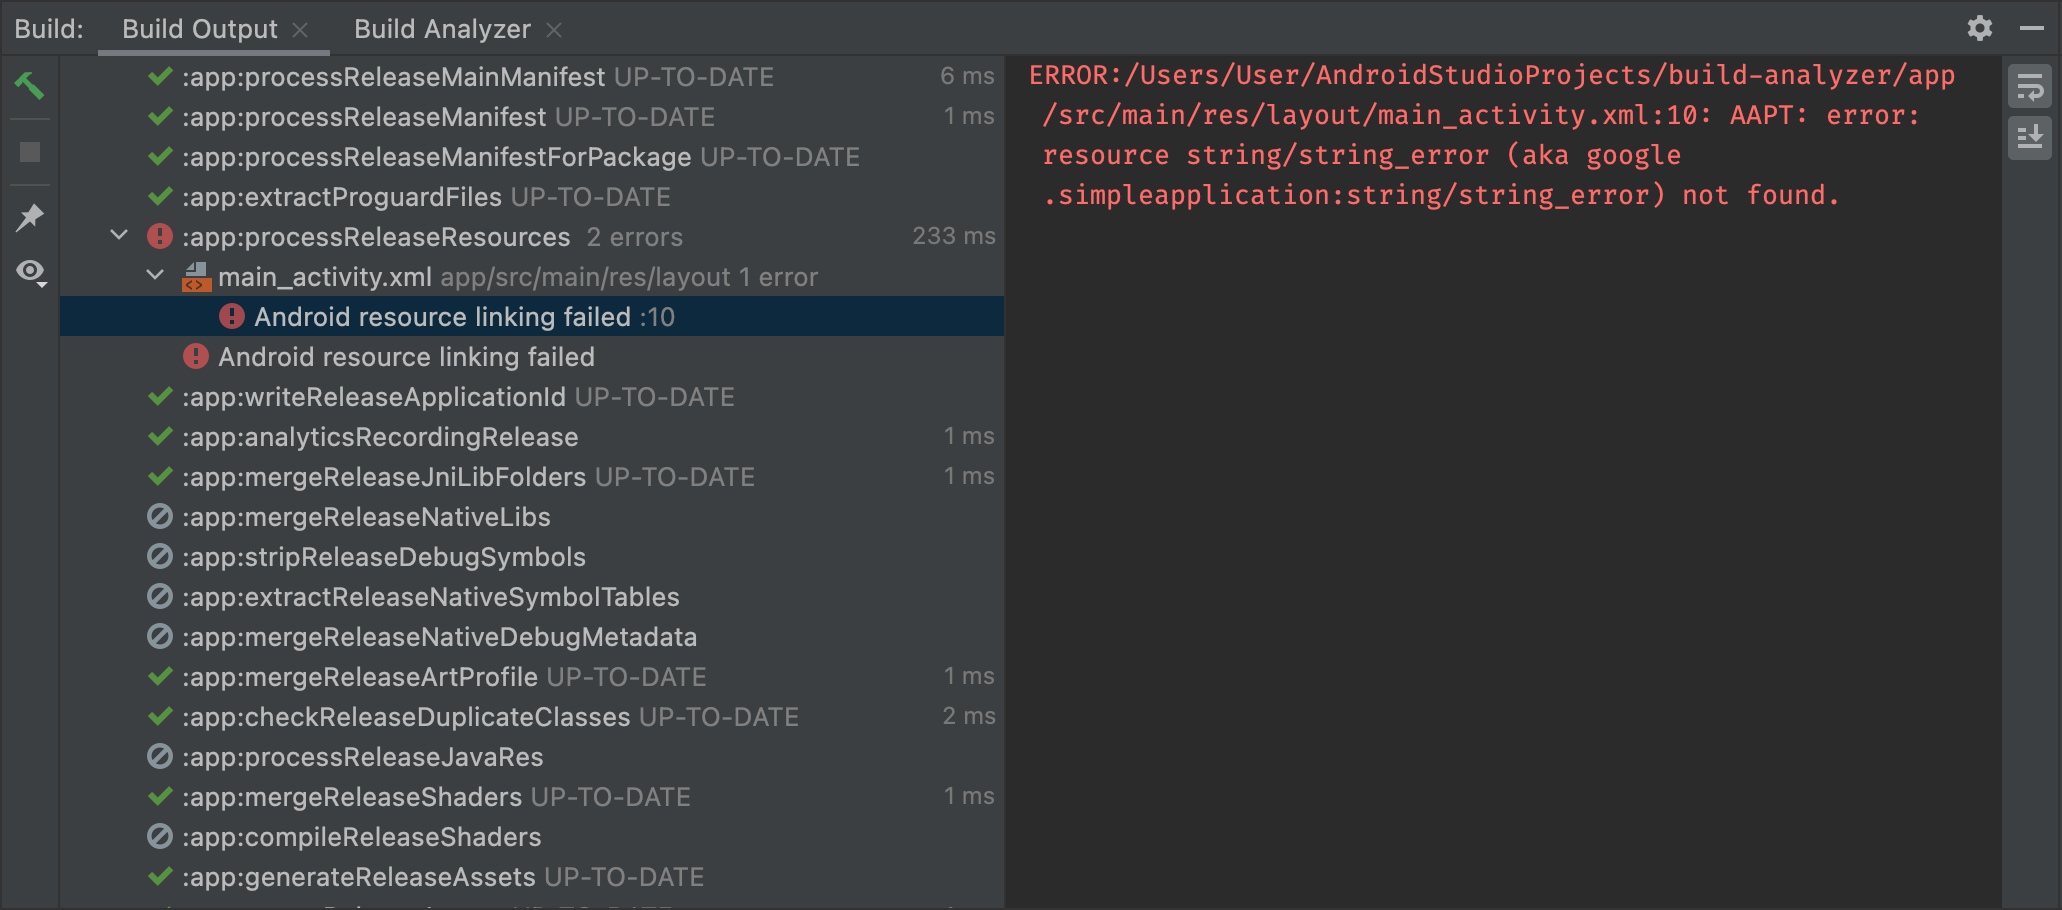
Figure 4. Inspect the Build output window for error messages
If your build variants use product flavors, Gradle also invokes tasks to build those product flavors. To view the list of all available build tasks, click View > Tool Windows > Gradle (or click Gradle in the tool window bar).
If an error occurs during the build process, Gradle may recommend some command-line options to help you resolve the issue, such as —stacktrace or —debug . To use command-line options with your build process:
- Open the Settings or Preferences dialog:
- On Windows or Linux, select File >Settings from the menu bar.
- On Mac OSX, select Android Studio >Preferences from the menu bar.
- Navigate to Build, Execution, Deployment >Compiler.
- In the text field next to Command-line Options, enter your command-line options.
- Click OK to save and exit.
Gradle applies these command-line options the next time you try building your app.
Apply Changes
In Android Studio 3.5 and higher, Apply Changes lets you push code and resource changes to your running app without restarting your app—and, in some cases, without restarting the current activity. This flexibility helps you control how much of your app is restarted when you want to deploy and test small, incremental changes while preserving your device’s current state. Apply Changes uses capabilities in the Android JVMTI implementation that are supported on devices running Android 8.0 (API level 26) or higher. To learn more about how Apply Changes works, see Android Studio Project Marble: Apply Changes.
Requirements
Apply Changes actions are only available when you meet the following conditions:
- You build the APK of your app using a debug build variant.
- You deploy your app to a target device or emulator that runs Android 8.0 (API level 26) or higher.
Use Apply Changes
Use the following options when you want to deploy your changes to a compatible device:
Apply Changes and Restart Activity
Attempts to apply both your resource and code changes by restarting your activity but without restarting your app. Generally, you can use this option when you’ve modified code in the body of a method or modified an existing resource.
You can also perform this action by pressing Ctrl+Alt+F10 (or Control+Shift+Command+R on macOS).
Apply Code Changes
Attempts to apply only your code changes without restarting anything. Generally, you can use this option when you’ve modified code in the body of a method but you have not modified any resources. If you’ve modified both code and resources, use Apply Changes and Restart Activity instead.
You can also perform this action by pressing Ctrl+F10 (or Control+Command+R on macOS).
Run
Deploys all changes and restarts the app. Use this option when the changes that you have made cannot be applied using either of the Apply Changes options. To learn more about the types of changes that require an app restart, see Limitations of Apply Changes.
Enable Run fallback for Apply Changes
After you’ve clicked either Apply Changes and Restart Activity or Apply Code Changes, Android Studio builds a new APK and determines whether the changes can be applied. If the changes can’t be applied and would cause Apply Changes to fail, Android Studio prompts you to Run your app again instead. However, if you don’t want to be prompted every time this occurs, you can configure Android Studio to automatically rerun your app when changes can’t be applied.
To enable this behavior, follow these steps:
Open the Settings or Preferences dialog:
- On Windows or Linux, select File > Settings from the menu bar.
- On macOS, select Android Studio > Preferences from the menu bar.
Navigate to Build, Execution, Deployment > Deployment.
Select the checkboxes to enable automatic Run fallback for either of the Apply Changes actions.
Click OK.
Platform-dependent changes
Some features of Apply Changes depend on specific versions of the Android platform. To apply these kinds of changes, your app must be deployed to a device running that version of Android (or higher).
| Type of change | Minimum platform version |
|---|---|
| Adding a method | Android 11 |
Limitations of Apply Changes
Apply Changes is designed to speed up the app deployment process. However, there are some limitations for when it can be used. If you encounter any issues while using Apply Changes, file a bug.
Code changes that require app restart
Some code and resource changes cannot be applied until the app is restarted, including the following:
- Adding or removing a field
- Removing a method
- Changing method signatures
- Changing modifiers of methods or classes
- Changing class inheritance
- Changing values in enums
- Adding or removing a resource
- Changing the app manifest
- Changing native libraries (SO files)
Libraries and plugins
Some libraries and plugins automatically make changes to your app’s manifest files or to resources that are referenced in the manifest. These automatic updates can interfere with Apply Changes in the following ways:
- If a library or plugin makes changes to your app’s manifest, you can’t use either Apply Code Changes or Apply Changes and Restart Activity and have to restart your app before you can see your changes.
- If a library or plugin makes changes to your app’s resource files, you can’t use Apply Code Changes , and you must use Apply Changes and Restart Activity to see your changes.
You can avoid these limitations by disabling all automatic updates for your debug build variants.
For example, Crashlytics updates app resources with a unique build ID during every build, which prevents you from using Apply Code Changes and requires you to restart your app’s activity to see your changes. You can disable this behavior so that you can use Apply Code Changes alongside Crashlytics with your debug builds.
Code that directly references content in an installed APK
If your code directly references content from your app’s APK that’s installed on the device, that code can cause crashes or misbehave after clicking Apply Code Changes . This behavior occurs because when you click Apply Code Changes, the underlying APK on the device is replaced during installation. In these cases, you can click Apply Changes and Restart Activity or Run , instead.
Content and code samples on this page are subject to the licenses described in the Content License. Java is a registered trademark of Oracle and/or its affiliates.
Источник


