- Русские Блоги
- Unity звонки Android Restart Application
- Интеллектуальная рекомендация
- Используйте шаблон состояния вместо if else
- Проектирование архитектуры: схема проектирования уровня балансировки нагрузки (5) — установка одного узла LVS
- Рыба образования, средняя школа закончила в учебном класс, как найти первую работу.
- Синглтон паттерн в питоне
- Java Counce Collection
- Вам также может понравиться
- динамический прокси-сервер jdk (Proxy, InvocationHandler), включая исходный код $ Proxy0
- Юля: Об изменениях в Array 1.0
- студия Android генерирует статическую библиотеку jni
- Nginx 502 раствор
- Java вызывает SMS-интерфейс WebService
- Restart app unity android
- About
- Different Ways to Programmatically Restart an Android App on Button Click
- Step by Step Implementation
- Integrating Unity into Android applications
- How it works
- IUnityPlayerLifecycleEvents
- Limitations
- Android environment setup
- 1. Install Android Build Support and the Android SDK & NDK tools
- 2. Enable USB debugging on your device
- ADB debugging for Chrome OS devices
- Connecting to your Chrome OS device
- Customizing the Android SDK & NDK Tools and OpenJDK installation
- Change the OpenJDK path
- Change the Android SDK Tools path
- Change the Android NDK path
- Updating the Android SDK Target API
Русские Блоги
Unity звонки Android Restart Application
Вызов в единстве
Интеллектуальная рекомендация

Используйте шаблон состояния вместо if else
Большинство разработчиков все еще используютif elseСтруктура процесса, виделиjdonизbanqСтатья написана Большим Братом, используяcommand,aopЗамена шаблонаif elseСтруктура процесса. Я не совсем понял эт.

Проектирование архитектуры: схема проектирования уровня балансировки нагрузки (5) — установка одного узла LVS
1 Обзор Предыдущая статья «Проектирование архитектуры: проектирование уровня балансировки нагрузки (4) — Принципы LVS» (http://blog.csdn.net/yinwenjie/article/details/46845997), мы предста.

Рыба образования, средняя школа закончила в учебном класс, как найти первую работу.
Self-брат Я девять ноль, теперь занимается разработкой веб-конца Java. Некоторое понимание и восприятие учебных курсов. Учебное заведение является ямой, дорога, что вы уже прошли, только вы знаете, дл.

Синглтон паттерн в питоне
Дизайн шаблона Шаблон дизайна — это краткое изложение предыдущей работы, которое, как правило, широко распространено людьми и является зрелым решением конкретной проблемы. Он предназначен для многораз.
Java Counce Collection
TRUEEWAP основан на реализации красных навигаций. Это отображение отсортировано в соответствии с его природооформленным порядком или отсортировано в соответствии с компаратором, предусмотренным при со.
Вам также может понравиться
динамический прокси-сервер jdk (Proxy, InvocationHandler), включая исходный код $ Proxy0
1. Связанные классы и методы: java.lang.reflect.Proxy, Прокси предоставляет статические методы для создания динамических прокси-классов и экземпляров. newProxyInstance() Возвращает экземпляр прокси-кл.
Юля: Об изменениях в Array 1.0
Версии до 1.0, например 0.2-0.6, Но теперь 1.0 это сообщит об ошибке. Это использование претерпело серьезные изменения! такие как: Это можно считать серьезным изменением.

студия Android генерирует статическую библиотеку jni
Android Сяобай, который только что вошел в общество, описывает, как использовать студию Android для создания статической библиотеки jni. 1. Подготовка: Сначала установите ndk, сначала сами Baidu, позж.
Nginx 502 раствор
Общие решения Nginx 502 Bad Gateway следующие: Nginx 502 Ошибка 1: Количество сайтов велико, а количество PHP-CGI мало. Для этой 502 ошибки просто увеличивайте количество процессов PHP-CGI. В частност.

Java вызывает SMS-интерфейс WebService
1. Описание интерфейса WebService Отправьте в виде http-сообщения, выше — информация о запросе, а ниже — возвращаемое значение. Представлен раздел возвращаемого значения документа интерфейса. 2. Код J.
Источник
Restart app unity android
A Watchdog Plugin for an Unity3D Android App
The idea is to have a plugin for the Unity3D app which will restart the application as soon as it becomes unresponsive. This is done for the Unity3D app running on Android, so the plugin is written in Java.
How to build an android java plugin for an C# Unity3D application we learned from this article:
The idea is simple: The plugin provides a tic method to the unity app which must be called on every update in the main event loop. This is the heartbeat of the applcation, as long as the tic method is called, the app is considered alive. Once the app stops looping and thereby stops sending the tics, the plugin will restart the application.
Two classes are involved in this:
- HeartbeatWatchdog.java : the java plugin code itseld and
- UnityHeartbeat.cs : the C# class to start and call the plugin class from C# Unity side.
This project combines both parts in the two subdirectories:
- android-heartbeat-watchdog: The android java code to handle the restart
- unity-android-heartbeat-watchdog-demonstrator: A Unity3D demo project which show how the android plugin is used.
TODO: explain Unity3D project setup with the plugin
About
a java library for Unity Android apps which observes a heartbeat of the Unity App to check for blocked UI
Источник
Different Ways to Programmatically Restart an Android App on Button Click
Sometimes we want to refresh an Activity, but there it is not possible to refresh. In that place, if we restart our app then it automatically gets refreshed. Also, we can use this to restart our app whenever it crashes. Most of the time when we open any app then it fetches all the data currently available. But if in the meantime if more data is updated to the database then we can use this feature to restart to again fetch all data every time it gets new data.
Now the point that comes here is how we can Programmatically Restart an Android App on Button Click . So in this article, we are going to discuss three different methods to Programmatically Restart an Android App on Button Click.
Attention reader! Don’t stop learning now. Get hold of all the important Java Foundation and Collections concepts with the Fundamentals of Java and Java Collections Course at a student-friendly price and become industry ready. To complete your preparation from learning a language to DS Algo and many more, please refer Complete Interview Preparation Course.
Step by Step Implementation
Step 1: Create a New Project
To create a new project in Android Studio please refer to How to Create/Start a New Project in Android Studio. Note that select Java as the programming language.
Источник
Integrating Unity into Android applications
This page describes how to integrate the Unity Runtime Library into Android applications using the Unity as a Library feature.
You can use this feature to include Unity-powered features, such as 3D/2D Real-Time Rendering The process of drawing graphics to the screen (or to a render texture). By default, the main camera in Unity renders its view to the screen. More info
See in Glossary , AR Augmented Reality (AR) uses computer graphics or video composited on top of a live video feed to augment the view and create interaction with real and virtual objects.
See in Glossary Experience, 3D model interaction, or 2D mini-games, into your application. The Unity Runtime Library exposes controls to manage when and how to load, activate, and unload content within the application.
Important: If you upgrade your project to Unity 2019.4 or above, the introduction of Unity as a Library might require you to adapt native and managed plug-ins A set of code created outside of Unity that creates functionality in Unity. There are two kinds of plug-ins you can use in Unity: Managed plug-ins (managed .NET assemblies created with tools like Visual Studio) and Native plug-ins (platform-specific native code libraries). More info
See in Glossary to work properly for Android. Plug-ins that make changes to Gradle An Android build system that automates several build processes. This automation means that many common build errors are less likely to occur. More info
See in Glossary manifests need to use the the Gradle changes outlined in Using Unity as a library in native iOS/Android apps.
How it works
You don’t need to do anything different when you build your Gradle project from Unity.
Every Android Gradle project that Unity generates has the following structure:
- A library part in the unityLibrary module that you can integrate into any other Gradle project. This contains the Unity runtime and Player data.
- A thin launcher part in the launcher module that contains the application name and its icons. This is a simple Android application that launches Unity. You can replace this module with your own application.
To integrate Unity into another Android Gradle project, you must include the unityLibrary module of the generated Android Gradle project in your Android Unity Project through the settings.gradle file.
This repository contains example Projects and plug-ins that demonstrate how to integrate Unity into an Android app, along with further documentation.
To control a Player, relay an Intent to launch Unity activity and extend it if needed. For more information, see Android developer documentation on Intents and Intent Filters. You can also use the UnityPlayer Java API.
IUnityPlayerLifecycleEvents
IUnityPlayerLifecycleEvents provides a way to interact with two important lifecycle events of the Unity Player:
- Unload — The application calls IUnityPlayerLifecycleEvents.onUnityPlayerUnloaded when Application.Unload or UnityPlayer.unload() unloads the Unity Player. This puts the Unity Player in a paused state where it unloads all Scenes A Scene contains the environments and menus of your game. Think of each unique Scene file as a unique level. In each Scene, you place your environments, obstacles, and decorations, essentially designing and building your game in pieces. More info
See in Glossary , but keeps everything else loaded in the memory. - Quit — The application calls IUnityPlayerLifecycleEvents.onUnityPlayerQuitted when the Unity Player quits. The process that was running Unity ends after this call.
You can pass an instance of IUnityPlayerLifecycleEvents to the UnityPlayer constructor, or to override methods in subclasses of UnityPlayer and UnityPlayerActivity .
Limitations
Unity doesn’t control the runtime lifecycle, so Unity as a Library might not work for all possible use cases. Known limitations include:
- Unity as a Library only supports full-screen rendering, and doesn’t support rendering on part of the screen.
- You can’t load or integrate more than one instance of the Unity runtime.
- You might need to adapt third-party plug-ins (both native and managed) to work with the Unity runtime.
- Unity as a Library for Android added in 2019.3. NewIn20193
Источник
Android environment setup
To build and run for Android, you must install the Unity Android Build Support platform module. You also need to install the Android Software Development Kit (SDK) and the Native Development Kit (NDK) to build and run any code on your Android device. By default, Unity installs a Java Development Kit based on OpenJDK.
Note: Unity supports Android 4.4 “KitKat” and above. See AndroidSdkVersions for details.
1. Install Android Build Support and the Android SDK & NDK tools
Use the Unity Hub to install Android Build Support and the required dependencies
See in Glossary : Android SDK & NDK tools, and OpenJDK.
 Add Android modules
You can install Android Build Support, the Android SDK & NDK tools and OpenJDK when you install the Unity Editor, or add them at a later time.
For information on adding the Android modules:
If you are using a 2018 version of Unity, see the Unity 2018.4 documentation for information on manually installing these dependencies.
2. Enable USB debugging on your device
To enable USB debugging, you must enable Developer options on your device. To do this, find the build number in your device’s Settings menu. The location of the build number varies between devices; for stock Android, it’s usually Settings > About phone > Build number. For specific information on your device and Android version, refer to your hardware manufacturer.
After you navigate to the build number using the instructions above, tap on the build number seven times. A pop-up notification saying “You are now X steps away from being a developer” appears, with “X” being a number that counts down with every additional tap. On the seventh tap, Developer options are unlocked.
Note: On Android versions prior to 4.2 (Jelly Bean), the Developer options are enabled by default.
Go to Settings > Developer options (or, if this does not work, on some devices the path is Settings > System > Developer options), and check the USB debugging checkbox. Android now enters debug mode when it is connected to a computer via USB.
Connect your device to your computer using a USB cable. If you are developing on a Windows computer, you might need to install a device-specific USB driver. See the manufacturer website for your device for additional information.
The setup process differs for Windows and macOS and is explained in detail on the Android developer website. For more information on connecting your Android device to the SDK, refer to the Run Your App section of the Android Developer documentation.
ADB debugging for Chrome OS devices
For information on how to set up your development environment for Chrome OS devices, and enable ADB An Android Debug Bridge (ADB). You can use an ADB to deploy an Android package (APK) manually after building. More info
See in Glossary debugging, see Google’s documentation on Chrome OS Developer Environments.
Connecting to your Chrome OS device
Before you can deploy to your device you need to manually connect with ADB via the device’s IP address.
To begin you need the IP address. Open up the Settings app and choose Network in the sidebar. Next click on the active network interface.
If the interface is wireless then next choose the SSID that you are connected to. In the details you will see your IP address. Make a note of it.
If you are using a wired connection your IP address will be shown on the first details page.
Now we are ready to connect. For the sake of this example let’s say that the device’s IP is 192.168.0.100. In a shell or terminal run the following command
adb connect 192.168.0.100
If the connection was successful you will see a message such as connected to 192.168.0.65:5555 . And adb devices should verify that the device is connected. List of devices attached 192.168.0.65:5555 device
From now on you may run ADB commands to target the device just as you would over a USB connection.
Note: If your device or host machine goes to sleep or loses network connectivity you may need to reconnect.
Customizing the Android SDK & NDK Tools and OpenJDK installation
Unity recommends that you use the Unity Hub to install Android SDK & NDK tools, to ensure that you receive the correct versions and configuration. Unity installs Android SDK & NDK Tools and OpenJDK respectively in the SDK, NDK and OpenJDK folders under /Unity/Hub/Editor/[EditorVersion]/Editor/Data/PlaybackEngines/AndroidPlayer/.
If you have multiple versions of Unity with the same required dependencies (be sure to check System requirements for the latest) and you want to avoid duplicating the installation of Android SDK & NDK Tools and OpenJDK, you can specify a shared location in the Unity Preferences window. To do this, go to Preferences > External tools and enter the directory paths in the SDK and NDK fields:
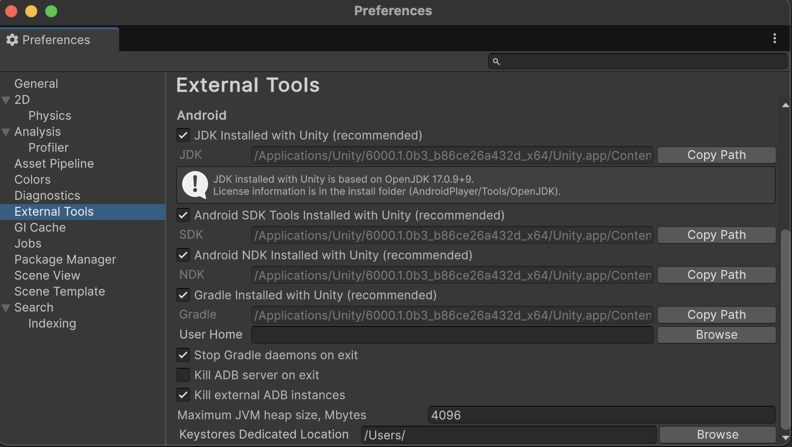 Preferences window showing external tools settings for Android
Warning: Unity does not officially support versions of the OpenJDK, SDK, or NDK other than the ones it supplies.
To change the OpenJDK, SDK Tools, or NDK that Unity uses to build Android apps:
- Open the Project.
- Open the Preferences window (Windows and Linux: Edit >Preferences; macOS: Unity >Preferences).
- In the left navigation column, select External Tools.
Change the OpenJDK path
- Uncheck JDK Installed with Unity (recommended).
- In the JDK field, enter the path to the JDK installation folder, or use the Browse button to locate it.
Change the Android SDK Tools path
- Uncheck Android SDK Tools Installed with Unity (recommended).
- In the SDK field, enter the path to the SDK installation folder, or use the Browse button to locate it.
Unity works with the most recent version of the Android SDK available at the time of the Unity version release.
Change the Android NDK path
- Uncheck Android NDK Installed with Unity (recommended).
- In the NDK field, enter the path to the NDK installation folder, or use the Browse button to locate it.
Each version of Unity requires a specific version of the Android NDK to be installed:
| Unity version | NDK version |
|---|---|
| 2018.4 LTS | r16b |
| 2019.4 LTS | r19 |
| 2020.3 LTS | r19 |
See the System requirements page for a complete list of requirements.
Updating the Android SDK Target API
Unity Hub installs the latest version of the Android SDK Target API required by Google Play.
If you need to use a more recent version, you can change the Target API from the Target API Level field in the Player Settings window (menu: Edit > Project Settings > Player, then select the Android platform). You can find the Target API Level option in the Other Settings > Identification section.
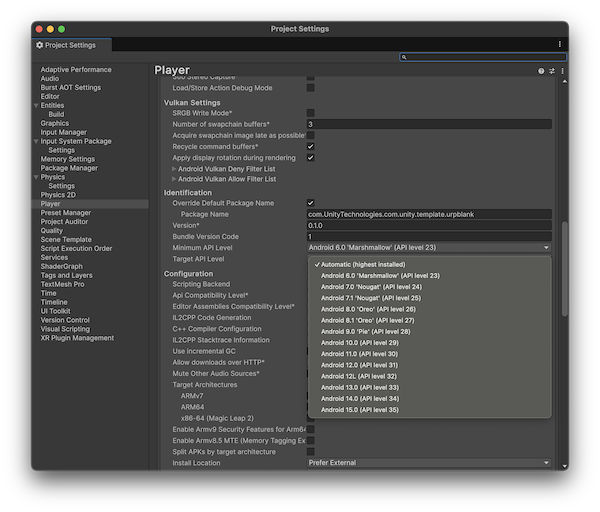 Selecting a target API for the Android SDK
After you select an option other than the default, Unity prompts you to update the Android SDK API. You can choose to either:
- Update the Android SDK
- Continue to use the highest installed version of the Android SDK
Note: If you select an older version of the Target API, the Unity Android SDK Updater will not be able to perform the update and will give you this message:
Android SDK does not include your Target SDK of (version). Please use the Android SDK Manager to install your target SDK version. Restart Unity after SDK installation for the changes to take effect.
In this case, to update the Android SDK Target API, you must use the Android sdkmanager from either Android Studio or the command line tool. Regardless of the method you chose, make sure to select the correct Android SDK folder for Unity in the Edit > Preferences > External Tools window.
On Windows, if the Unity Editor is installed in the default folder ( /Program Files/ ), you must run the sdkmanager with elevated privilege (Run as Administrator) to perform the update.
Источник


