- How to Roll a Joint for Beginners: An Extensive Guide on Rolling
- How to Prepare a Joint
- What Can I Roll a Joint With
- How to Roll a Joint for Beginners
- Step 1: Grind Your Cannabis
- Step 2: Fill the Joint with Cannabis
- Step 3: Pack the Joint and Distributed the Cannabis
- Step 4: Roll the Joint
- Step 5: Finishing Touches
- How to Roll a Filter for a Joint
- How to Roll a 2 Paper Joint
- How to Roll a Joint with a Joint roller
- How to Roll a Joint Dollar Bill
- How to Roll a Joint Hash
- Conclusion
- Roll A Joint
- Download Roll A Joint 3.0.0.5 APK
- The description of Roll A Joint
- How to Roll a Joint: 5 Steps (with Pictures)
- Step 1: Break down the bud
- 6 Best Weed Grinders in 2020 — Herb Grinder Buying Guide
- Step 2: Make a crutch A.K.A the filter
- Step 3: Fill the paper and pack the weed
- The Definitive Guide to Rolling Papers: Say No to Blunts
- Step 4: Roll it up
- Step 5: Wrap it up
- How to roll a cross joint
- How to roll a pinner
- How to roll a spliff
- How to roll an L joint
- How to roll a joint inside-out
- How to Roll an Inside Out Joint (Step-by-Step Guide with Pictures)
- How to roll a tulip joint
- Go crazy with it
How to Roll a Joint for Beginners: An Extensive Guide on Rolling
Learning how to roll a joint is an essential stoner skill.
Glass breaks, is expensive and is hard to travel with.
Joints, on the other hand, are, well, the opposite of all that.
Today, I’ll teach you not only how to roll a joint for beginners, but also various joint rolling techniques and tricks that will have you rolling perfect joints, every time!
How to Prepare a Joint
Before you learn who to roll, you need to think about how you need to get your cannabis ready to be rolled.
What do you need?
Just a paper and some weed! (How cool is that?)
Thrive Leads Shortcode could not be rendered, please check it in Thrive Leads Section!
There isn’t much that goes into the preparation of a joint, but I wanted to talk a little bit about how to prepare the cannabis for one.
Some smokers like to use grinders, and you really can’t go wrong with that.
If you grind up your bud to finely for a joint, however, it can lead to a joint that ends up being hard to hit and gets bogged down with resin.
When rolling up a joint, it’s always best to go with a somewhat rougher grind.
Check out this guide to look at grinders that work perfectly for joint rolling
Aside from that, make sure you have some good joint papers and maybe a rolling tray.
What Can I Roll a Joint With
Now, there comes a time in every smoker’s life that they get caught with nothing to smoke with and nothing to roll with.
When this happens, you can either go full on engineer and try to make a homemade bong or find something creative to roll a joint with.
But a word from the wise, don’t use anything other than real joint papers to roll up.
True, you can use a gum wrapper with the aluminum peeled off or corn husk or even printer paper.
Be patient, make a gas station run and enjoy cannabis the way it was meant to be enjoyed.
How to Roll a Joint for Beginners
If you came here to simply learn how to roll a joint, this section is all you’re going to need.
This will break down step by step how to roll a joint.
No tricks or fancy equipment, just the tried and true, old school way.
You can either watch this video or, if you prefer, you can read how to roll a joint step by step.
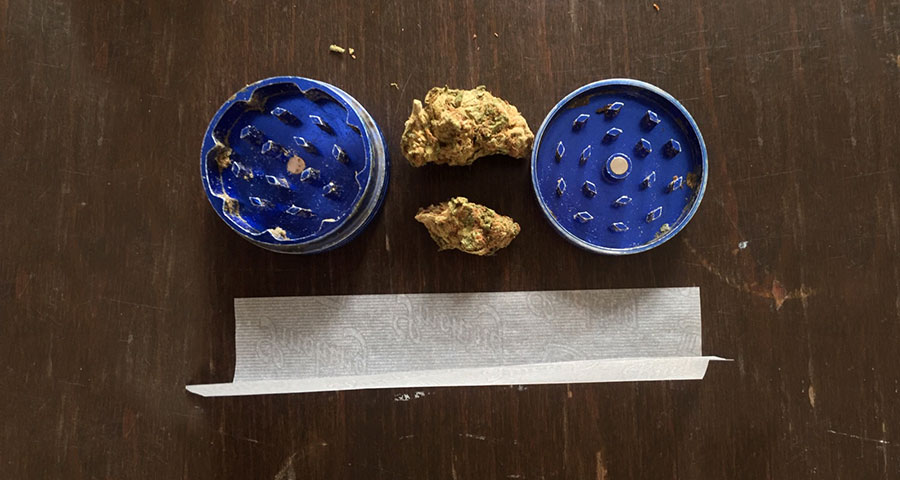
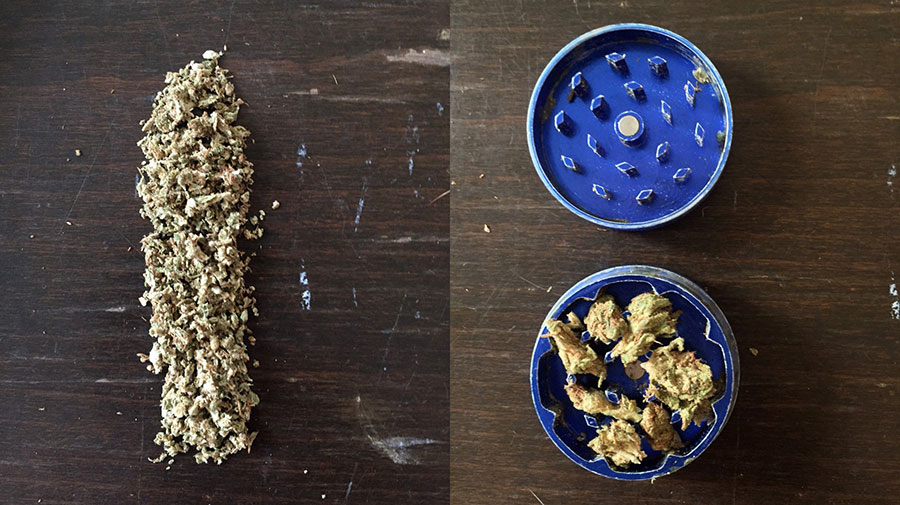
Step 1: Grind Your Cannabis
Before you can roll, you need to prep everything.
As mentioned earlier, you can use a grinder or a rough finger grind to prepare your cannabis.
You can also use scissors or any other homemade grinders.
I recommend you play around with different methods to see which you like the best because they do not all smoke the same.
Step 2: Fill the Joint with Cannabis

Now, take your paper and fill it with the shake you got from grinding your cannabis.
If you’re using a filter, place it at one end of the joint.
Usually, a good amount of cannabis for a joint is around a half gram (you can weigh it out with a scale if you want).
With one hand holding the paper, use your free hand to shape the joint by moving the cannabis around to where it’s evenly distributed across the paper.
A lot of beginners tend to roll joints with fat bellies.
Take the time to shape the joint properly.
Step 3: Pack the Joint and Distributed the Cannabis

So you’ve got the joint loaded and shaped, now is the time to roll it up.
Do so by pinching the paper between your fingertips and slowly roll it back and forth to pack the cannabis down.
Once you see it taking the shape of a joint, it’s time to go to the next step.
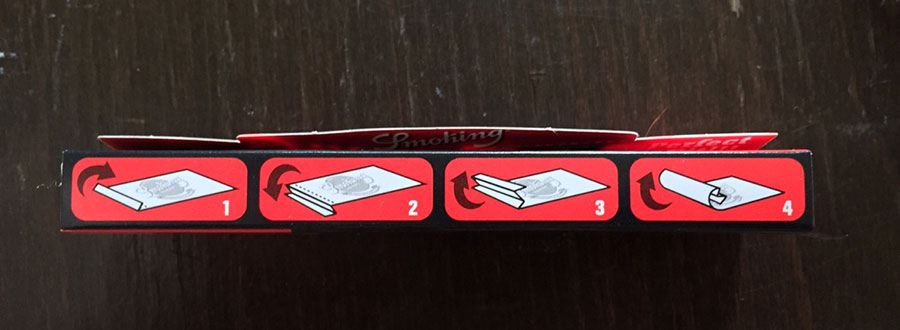
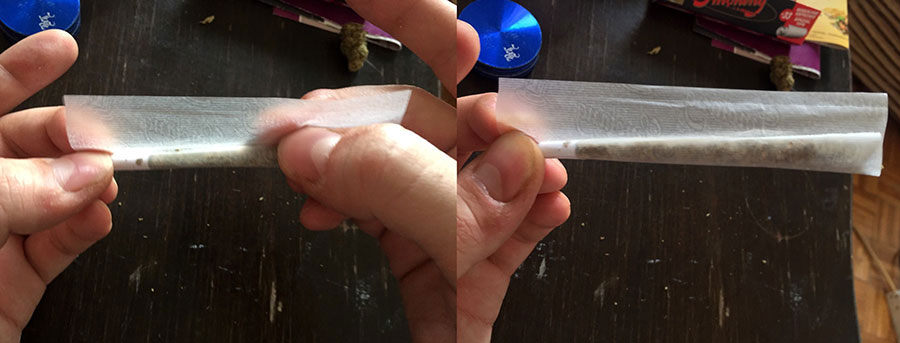
Step 4: Roll the Joint

Everything up to this point has been easy.
Now is the time that the great joint rollers separate themselves from the beginners.
Start by tucking the unglued side of your paper into the roll.
Lick the glued edge of the paper and roll one end down to hold it into place.
If you’re using a filter, roll this end into place first.
It makes it easier and helps guide the paper as it rolls around itself.
Slowly, work your way down the rest of the joint, tucking and sealing the joint as you go.
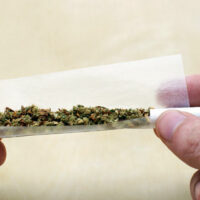
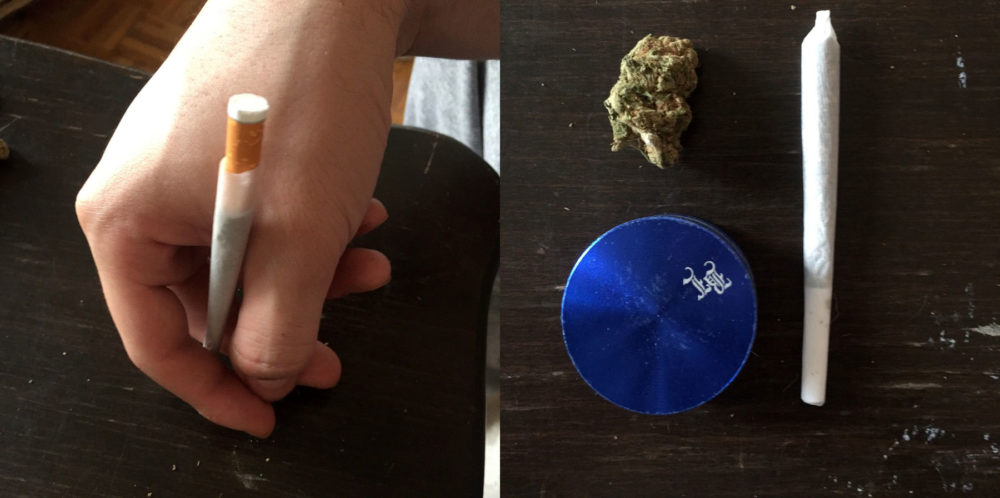
Step 5: Finishing Touches

Now that you have a rolled joint, you should pack it to ensure an even burn.
You can pack it by either using something like a pen to pack the cannabis down through the top of the joint, or you can pinch the top of the joint and lightly flick the joint back and forth till it packs down.
How to Roll a Filter for a Joint
Filters are also called crutches or tips.
The idea behind them is they allow you to smoke more of your bud instead of being left with an unsmokeable roach.
You also can smoke a joint a little bit better because it helps fight the resin clogging that usually happens at towards the end of the joint.
To make one, it’s best to use a thin cardboard like a business card.
Some papers even come with crutches built in, or you can just use an empty paper box.
RAW also makes some packs of just filter papers that, of course, work perfectly.
They’re pretty easy to make.
Just make a couple of accordion folds on one end of the cardboard (basically, fold the end into a W) and then roll it up thick enough to match the width of the joint you plan on rolling.
Again, it’s not required to use a filter for your joints, but they do prevent scooby snacks (swallowing cannabis), make the joint more stable and make it easier to smoke.
How to Roll a 2 Paper Joint
Now, rolling a two paper joint is exactly like rolling a single paper joint.
The only thing you need to learn is how to attach the two joint papers.
There are two different ways you can go about doing it.
The first way is the preferred method that is easier to roll, and that’s to take the second paper and attach it by shaping the two papers into an L shape.
You can see how it’s done in the video below.
The other way to roll a two paper joint is by attaching the papers slightly overlapping each other.
While this one sounds cooler since it will be a bigger joint, it tends to be pretty unstable and clog up from massive resin build up.
You’re better off rolling up a blunt.
How to Roll a Joint with a Joint roller
Using a joint roller is one of the easiest ways for beginners to learn how to roll joints.
The concept is pretty much the same as rolling one free hand, except the machine does the work of holding the paper in the right place for you.
- First, grind up your bud with a couple of twists.
- Take the joint roller and make sure it’s not locked into its tightest position, push the apron down and fill the chamber with your bud.
- Make sure that the bud is evenly distributed in the joint roller machine.
- If you’re using a filter, you can place it on either end of the joint roller.
- Now, you need to close the joint roller. You may have to push the bud into place with your finger to close it. Word of caution, though. Don’t put too much cannabis in the roller. If you have to cram the stuff in there forcefully, the joint will be too tight to smoke.
- Give the roller a couple of rolls without the paper to get the bud settled into place.
- Next, grab a paper, making sure the adhesive is facing you, place the joint paper in the opening of the roller.
- Once in place, roll down. It’s important to roll down, or the adhesive will be on the wrong side.
- The key here is to just lightly roll it up. Rolling machines can easily roll joints way too tight, ruining the entire experience.
- Roll it until just the adhesive is sticking out of the top and lick the glue before giving the roller a final roll finishing the joint.
How to Roll a Joint Dollar Bill
You’re not going to be smoking a dollar bill!
Instead, you’re using the dollar bill as a makeshift joint roller to roll perfect joints quickly and effortlessly every time.
Usually, when I’m asked to teach a beginner how to roll a joint, using a dollar bill is the first method I go to.
It’s like joint rolling with training wheels, and it helps you perfect the motions.
Here’s how to do it:
- First, you need a paper, some weed and a dollar bill.
- Fold the dollar in half and place some ground up bud in the middle of the dollar.
- Spread the cannabis out evenly.
- Now, fold the dollar bill back in half keeping the cannabis at the crease in the bill.
- Using your thumbs, work the bud towards the bottom of the crease by slowly rolling the dollar back and forth.
- Next, roll the dollar bill down to where the end of the dollar is just covering the weed.
- Holding the dollar in place with one hand, place the joint paper in the opening with the adhesive facing you (just like a joint roller) and lick the adhesive.
- Now, roll the dollar bill slowly back up. Make sure not to roll it too tight, or the joint will not be smokeable. Roll the dollar up until you can’t anymore, and the doobie will be done 🙂
How to Roll a Joint Hash
Rolling a joint with hash isn’t any different than rolling a normal joint.
You can use any of the joint rolling techniques mentioned above to do it.
The whole idea behind it is just putting hash in your joint.
There are right and wrong ways to put hash in your joints, though.
If your hash is very dry, like compacted kief hash is, use a knife to scrape off some of it into the cannabis you have prepped for your joint.
If the hash has a more play-dough consistency, then take a little bit of it and roll the hash until it’s a long and very skinny line of hash.
It needs to be roughly the same size of the joint.
Place the hash on top of the weed and roll it up.
From my experience, if you just tear off pieces of hash and throw them in the joint it smokes unevenly and causes the joint to run once you get to a chunk of hash.
These methods distribute the hash evenly creating a better smoke.
Conclusion
If you’ve managed to make it through this extensive rolling guide, I think it’s safe to say you can roll a joint now.
At the end of the day, it takes practice.
Perfection is only achieved through repetition, and it’s only natural to struggle at first.
Remember, we can’t all be Tony Greenhand.
Don’t worry, though, it’s a ride of passage, and once you master it, it will be a skill that never leaves you.
Anything you would like me to add to this guide on how to roll a joint for beginners?
Did it help you get over the hump and start rolling some masterpieces?
Источник
Roll A Joint
Download Roll A Joint 3.0.0.5 APK
4.5/5 — 4.827 votes
ID: com.fdp.rollajoint
Author:
Version:
Update on:
![]()
![]()
![]()
![]()
![]()
![]()
![]()
![]()
The description of Roll A Joint
Show your iPhone friends an app they’ll never get! Inhale on the phone mic to smoke! Great at parties!
IF YOU HAVE TROUBLE DOWNLOADING or any other issues please check our website (at the link below) for solutions, or EMAIL US. If you just leave a comment we have no way to contact you for details. We reply ASAP!
* 12 real strains of weed!
* Roach clip and filter tips!
* Fastest Roll mode! Compete with your friends for the best time!
* BLUNTS! Split it, unroll it, dump the tobacco, fill it with weed, roll it, and smoke it!
* 4/20 update! Blow out short breaths for smoke rings!
* Multi-touch
* grinders (1 free, 11 for in-app purchase)
* rolling papers (2 free, 10 for in-app purchase)
* lighters and matches (1 free, 10 for in-app purchase)
* The app comes with many items to start with (same as always). If you can’t get enough, now even more items can be purchased in-app. The extra items are very inexpensive.
Check out the gameplay video at link below!
* Drag a bud from the bag, break it up, line it up on the paper, roll it up and twist the ends!
* Then spark it up and smoke it! Inhale on the phone mic to smoke, then blow on the phone to exhale smoke onto the screen. Blow short breaths for smoke rings!
* Shake the phone to ash it, or tap the ash with your finger to knock it off
* The smoke always rises upward. Change the phone orientation to try it
Источник
How to Roll a Joint: 5 Steps (with Pictures)
Learning how to roll a joint is a rite of passage for the majority of cannabis users. Here’s how to do it in the next 5 minutes.
Joints, J’s, doobies, spliffs, Dutch cigs, reefers, whatever you call them — they’ve been around for quite some time.
Joints have been the staple mark of the weed industry since its initial days.
Back when cigarettes weren’t sold in packs and boxes, the art of rolling a perfect cone joint was truly appreciated and knowing a few joint rolling techniques is still a sought-after skill in the 420 community.
If not, here’s how to roll a joint the old school way.
How to roll a joint (step by step)
For rolling a joint you will need the following:
- Half a gram of cannabis
- Rolling papers – make sure you have more than one
- Aluminum 2-piece grinder (to finely grind the buds)
- A piece of hard cardboard for a filter
Step 1: Break down the bud
If you have the weed strain of your choice at hand, grab a herb grinder (if you have one) as it will make the process of breaking down weed a lot easier.
Don’t forget that strains that tend to be stickier are more prone to being harder to grind and you may have to break down those nugs by hand.

6 Best Weed Grinders in 2020 — Herb Grinder Buying Guide
If you don’t have a grinder at hand, don’t worry, you can also break the bud with your fingers or try other alternatives.
Step 2: Make a crutch A.K.A the filter
Most people prefer smoking joints with a crutch, otherwise known as a joint filter. They are usually made of thin cardboard sheets or thicker paper.
Some rolling papers usually come packed with as many filters as there are papers in the box so buying those types of paper can spare you the hustle of finding the perfect filter material right before going through this tutorial.
The easiest way to make a filter is to take a piece of thick paper and fold the first few millimetres of it 2-3 times and then roll it up in the same direction.
This will make it so that weed residue won’t go into your mouth through the filter hole in the middle of it.
Step 3: Fill the paper and pack the weed

Some people consider packing the joint properly to be the hardest part about rolling a joint. The way we at Greencamp do it is as follows:
- Put the filter on one side of the paper, with the sticky part of it being on the upper side and turned towards you.
- Take the weed that you previously ground and put it in the paper. You want to have a bit less of it by the filter and a bit more at the end in order to get that cone shape we are hoping for.
The Definitive Guide to Rolling Papers: Say No to Blunts
Step 4: Roll it up
As you are pressing and pushing the weed down with your fingers, start rolling it up slowly with your filter thumb.
The other thumb should be going upwards from the filter, tucking in the bottom side of the rolling paper.
Doing this simultaneously while rolling the filter upwards will start giving it the cone shape.
Lick the sticky part of the upper side of the paper and slowly keep rolling the joint.
Step 5: Wrap it up
Stick a cigarette filter (or something of similar shape and weight) into the top of the joint and tap the filter against a hard surface a few times in order to pack your joint better.
Wrap the top and light up your first joint.
Congratulations — you’ve learned how to roll a standard joint.
Let’s explore more variations.
How to roll a cross joint
Cross joints gained in popularity ever since Seth Rogen introduced them to the world on the big screen in his movie Pineapple Express.
Basically, what you will need to do is roll 2 joints, one thicker and longer and one shorter, approximately the same thickness as the crutch.
Once you’ve rolled the bigger joint, use a needle to punch through it near the top, approximately two-thirds way from the crutch.
Punch the hole through the joint on both sides, and slowly and gently expand the hole with the needle.
Once you’ve expanded the hole on both sides, try to slide the thinner joint through the hole on both ends.
Use some sticky tape from the rolling papers (cut the top of the paper with scissors) to secure the cross part so that it doesn’t fall out.
How to roll a pinner
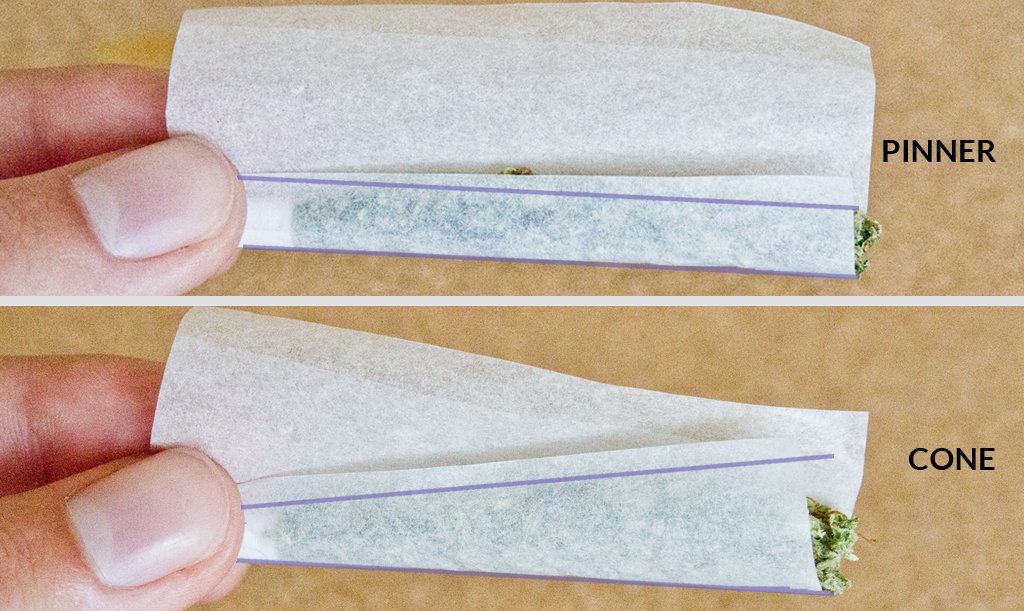
Pinners are great for people that don’t want to waste weed, especially when smoking alone. After all, they get their name after being so slim — like a pin.
Sure, there are better ways to smoke a small amount of weed, like using a vaporizer, but for some people, nothing gives a satisfying high like a joint or a blunt.
Pinners are quite easy to roll, but you have to know the basics of rolling a standard joint to make a pinner.
The technique is the same as rolling a joint, but you have to press down harder on it. The only major difference is that the top of the pinner is the same width as the crutch.
This is why you have to push down on the bud in the paper a lot harder, in order to pack it down and burn equally on all sides, otherwise, there’s gonna be a lot of canoeing.
How to roll a spliff
If you haven’t figured it by now, spliffs are just joints with tobacco in the mix. They aren’t a lot different when it comes to rolling.
The only minor difference which you’ll notice only when you’ve already rolled hundreds and thousands of joints is that tobacco and weed feel a bit different when you push down on the paper.
Tobacco is usually much drier, while weed tends to be a bit ‘spongy’ and it can push back a bit more than the tobacco.
How to roll an L joint

L joints get their name from the shape they are in before you roll them up. This is achieved by taping two pieces of paper together.
L joints are well suited for a large joint-smoking audience, as you can fit more weed than in a regular joint.
Take two papers from the box, and cut one in half, but somewhat diagonally. Take one of the halves and stick it vertically to the main paper at the and, so that you get the L shape we’re trying to achieve.
Make sure you are very careful when rolling up L joints because they are somewhat fragile due to their length.
How to roll a joint inside-out
Inside-out joints, also known as dutch joints, are very similar in size and shape to regular cone joints. However, there is one small difference in the way the joint is rolled.
Inside-out joints are rolled with the sticky part of the rolling paper on the “wrong” side.
So, keep the sticky part of the paper on the outside, fill it up with weed, and gently roll up the joint to the point that the sticky part is touching the rest of the paper.
Lick the rolling paper (the sticky part) on the outside of the joint, and stick the paper to it by constantly rolling it up.

How to Roll an Inside Out Joint (Step-by-Step Guide with Pictures)
Once you roll it up all the way to the top, give it a minute to dry and stick, and feel free to rip off the excess paper.
Inside-out joints are favored among people who don’t like the taste of paper, so this technique is perfect for when you want to get the full taste of the weed.
How to roll a tulip joint
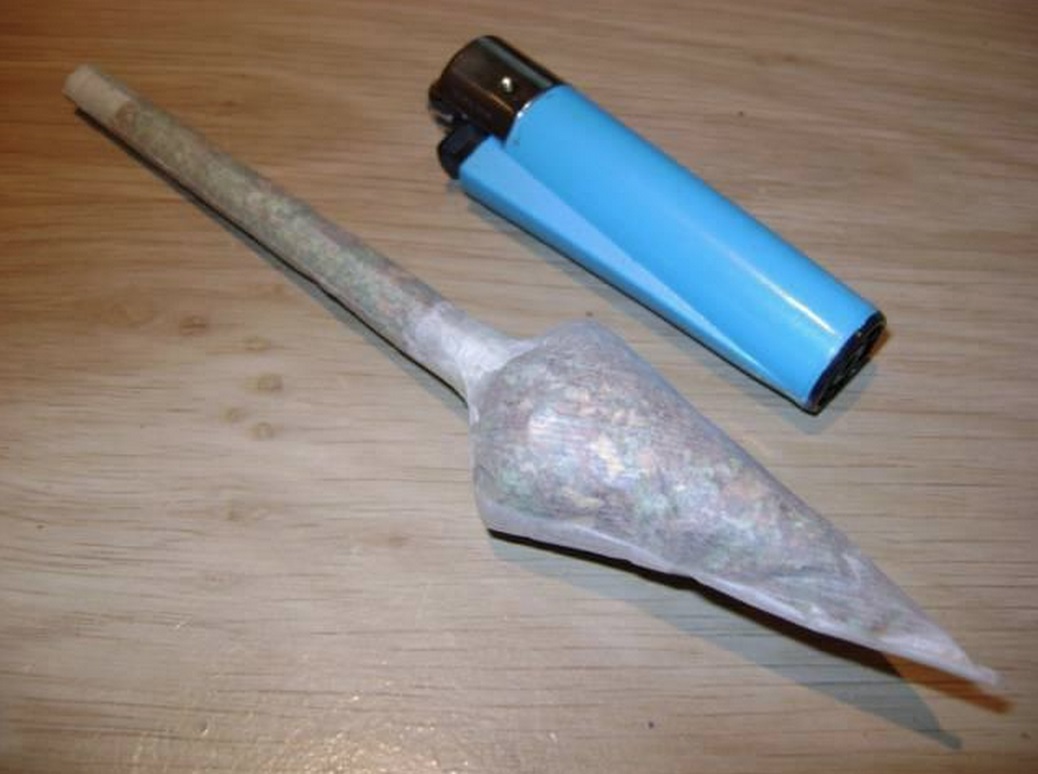
I rolled only a couple of tulip joints in my life because I believe them to be a waste of weed.
The tulip joint is popular among novel smokers that are in it for the high, but they are not so practical for everyday smokers.
This is another two-part joint, as you’ll need to roll a standard joint in a king size rolling paper and add a second one for the ‘tulip’.
I’ve even seen people using a sort of cardboard straw, instead of the joint for the elongated part. Make sure you don’t twist the top of this joint because the top will go in the tulip part.
Once you’ve got that handled, make a small rope from one or two papers by rubbing them together between your hands.
Take another three rolling papers, and stick them together so that you have an almost square paper surface with the sticky part on one of the four edges.
Fold that paper so that you make a cone, and stick it all together with that one sticky edge. You should now have a sealed triangle, that is actually a cone when you spread the edges.
Full the paper cone with weed, as much as you can fit in it. Now, take the joint you rolled previously and put the top of it in the open part of the tulip.
After you’ve connected these two parts, twist the edges of the tulip part around the joint, and use the tiny rolling-paper rope you made to secure the tulip to the joint.
Go crazy with it
Once you get the hang of how easy rolling actually is, you can start making your own designs and techniques.
Did you know that there are organizations that fund competitive joint-rolling? Yep, not only that but there are hundreds of people competing every day.
Источник


