- Резервирование пользовательских данных в Android
- How to Backup Android Device Completely (Root & No-root)
- How to Backup Android Phone Completely
- 1. Contacts
- 2. SMS & Messages
- 3. Photos & Videos
- 4. Applications and App Data
- » Non-rooted
- » Rooted Users
- 5. Full ROM/Firmware Backup (Nandroid)
- » Using TWRP
- » Using FlashFire App (Root users)
- 6. All Other Files on the Storage
Резервирование пользовательских данных в Android

Нижеизложенный материал не претендует на оригинальность или новизну решаемой проблемы, но может быть крайне полезен новичкам и тем, кто как и я, заботится о сохранности своих данных на устройствах под управлением Android. Далее в статье я ставлю перед собой задачи по обеспечению надежного резервирования данных при помощи облачных сервисов хранения данных и решаю их. Все еще интересно? Тогда добро пожаловать под хабркат.
Прежде чем начать скажу о том что я не отношусь к той категории сограждан которые маниакально заботятся о приватности своих данных. Это вовсе не значит что у меня сеанс работы в ОС без авторизации, кругом открытые шары, стандартные пароли на учетные записи или открытые беспроводные сети дома и на работе. Это лишь значит что я не шифрую свои файлы, пользуюсь публичной почтой и сервисами облачного хранения данных и сплю крепким и здоровым сном не думая о том что работники датацентра или владельцы сервисов могут, если захотят, смотреть мои данные. Лично я считаю что приватность, как таковая — давно умерла, но это тема выходит за рамки этого поста.
Зато я, надеюсь как и многих из вас, забочусь о безопасности данных со стороны резервирования. Уважаемый %username% спросит — Так при чем же тут Android? А Android тут при том что за последние несколько лет эта ОС плотно поселилась в моей повседневной жизни, полностью вытеснив от туда iOS и WM. В добавок к этому в последнее время, как грибов после дождя, развилось много сервисов предоставляющих, как бесплатно так и за дензнаки, энное количество гигабайт на “надежных” серверах где то там в глобальной сети. Я считаю что эти “надежные” сервисы — всяко надежнее моего домашнего ПК, флешек и дисков, и уж в разы удобнее в плане доступности. Грех не воспользоваться этим аттракционом неслыханной щедрости.
В последнее время у меня накопилось большое количество разного рода информации, потерять которую было бы крайне неприятно. Я говорю в первую очередь о фотографиях своего ребенка и жены, фотографий любимого котэ, каких то моих проектах по работе, и разного рода приятной мелочи на вроде прогресса в играх.
Я заставлял себя делать бекапы на своих устройствах. Составил даже что то вроде календарного плана. Делать это регулярно получилось с разным успехом, на это банально не хватало времени. В результате в голове зрела мысль о том как весь этот процесс автоматизировать.
И вот как то выдался выходной и я решил «прошерстить» Google Play на наличие приложений которые бы могли помочь мне сохранить свои данные, сесть и все настроить.
И так, для того, что бы я был спокоен, мне надо:
- Резервирование по расписанию с минимальным моим участием а лучше вообще без меня.
- Резервирование в облако (предпочтительно в несколько)
- Реплицирование резервных копий данных на hdd домашней рабочей станции и на hdd ноутбуков (вдруг «немцы нападут» и интернет выключат) и все тоже без моего участия
- Синхронизация из любого места где есть доступ к интернет.
Пожалуй, этого бы было достаточно на первое время. В результате в голове сложился план действий, представленный на картинке ниже.

В Android как бы есть выстроенный механизм резервирования, но он не работает. Точнее сказать — я не смог его «приготовить» так, что бы он выполнил требования, описанные выше. Контакты и все что связано а Gmail резервируются штатно как и положено, их не трогаем.
У меня (как у многих из вас) есть учетные записи в нескольких облачных сервисах, в которых при условии бесплатного использования доступно разное количество «халявных» гигабайт. Мне этих “халявных” гигабайт будет более чем достаточно, если вдруг не хватит — прикуплю еще.
Dropbox в основном используется для работы и обмена информации с друзьями.
- SkyDrive достался в нагрузку с учеткой от outlook.com и новой windows 8, не используется. Google Drive — родной для Android сервис, храню в нем разного рода документы по привычке после Google Docs, нравится.
- BOX, с халявными 50 гигабайтами до последнего времени вообще не использовался.
- Еще есть всякого рода Ubuntu One, Sugarsync и пара-тройка других менее популярных их аналогов которые я рассматривал чисто в ознакомительных целях.
По запросу «Data Sync» Google Play вывалил на «меня вагон и маленькую тележку» разного качества приложений, которые вместе с «раем на земле» обещали мне обеспечить и сохранность моих данных. Какие то делали это за деньги, а какие то совершенно безвозмездно. Какие давно не обновлялись, другие имели мягко говоря — спартанский интерфейс. В результате я купил пару полных версий приложений и занялся их полевыми испытаниями.
Мне бы не хотелось делать сравнительный обзор этих приложений. Скажу лишь что для своих нужд я приспособил приложение с говорящим названием «FolderSync» (есть платная и бесплатная версия). Ниже несколько скриншотов интерфейса, как говорится, один раз настроил и забыл.
Логика работы приложения строится на создании пары папок (Folderpairs), локальной и удаленной. Локальная папка это ЛЮБАЯ локальная папка на вашем устройстве, включая, если надо, вложенные папки. Удаленная папка, как следует из названия, это папка на одном из сервисов облачного хранения данных или вашем ftp, smb или webdav сервере. В настройках каждой folderpairs можно указать направление синхронизации, задать расписание, способ разрешения конфликтов, правила использования беспроводных сетей и кучу других параметров. На скриншотах ниже настройка той самой folderpair.
Я не о особо бережно забочусь о резервировании установленных приложений, всех их данных или прошивки (для себя не вижу смысла). Но эта задача также легко решается путем создания folderpair для папки, в которой хранят свои бекапы TitaniumBackup (который как бы и сам умеет закачивать в облако, только не в любое) или ROM Manager. К слову говоря, DataSync умеет бекапить и приложения, если у вас есть root.
Мне кажется, что настройка списков синхронизации удобнее сделана в DataSync Beta, правда она еще довольно сырая, но быстро развивается. В этой версии приложения можно задать несколько папок в рамках одного списка. Очень удобно (есть стабильные версии Data Sync, но мне они не подошли, Beta имеет более широкий функционал, будем за ней наблюдать).
После того как мы настроили должным образом нужные нам folderpair все что нам остается это оставить телефон или планшет на ночь заряжаться или, придя на работу, подключить его к компьютеру. Понятное дело, что надо не забыть включить wifi. Это может сделать вручную, а можно использовать такие утилиты, как Llama.
Программа синхронизации подключится через беспроводную сеть к интернет и проведет синхронизацию. Первый раз это займет время, которое напрямую зависит от объема данных и ширины канала доступа в интернет. Зато последующие синхронизации занимают считанные секунды. FolderSync помнит о датах изменения файлов их количестве в папке и контрольные суммы. В общем все по-взрослому. Синхронизацию любой folderpair можно запустить принудительно вручную в любое время.
В дальнейшем, ваши файлы синхронизируются согласно представленной выше схеме. Попадая в облако файл реплицируется на рабочий ПК, который как правило не выключается, с помощью шатного клиента для облачного сервиса. Затем они локально синхронизируются между папками, которые находятся на разных hdd при помощи стандартного и бесплатного SyncToy от Microsoft или rsync (как вам удобнее), или аналогичной утилиты. В течении дня, по мере подключения к интернет, резервируемые данные реплицируются на домашний компьютер и ноутбуки с помощью тех же родных клиентов облачных сервисов.
В сухом остатке имеем физически разнесенные и высокодоступные копии данных и крепкий, здоровый сон. Всего вам доброго.
Источник
How to Backup Android Device Completely (Root & No-root)
Are you thinking of flashing a custom ROM, or maybe just a mod? But before you head towards any of it, you might want to flip through this article that will show you how to backup Android devices and why you should do it.
A Backup is an accumulation of copied and archived data for restoring to the original state, in case of a data loss event.
While backing up is actually a matter of choice, but it is highly advised when it comes to performing actions like restoring stock ROMs, unlocking the bootloader, or even flashing custom ROMs. As time-consuming and boring it could be, preparing beforehand and backing up will save you from any regrets later. So let’s hit it and help you backup Android phones.
How to backup Android on rooted and non-rooted devices
Why should you backup Android regularly? – It is always wise to take a backup before you land yourself in trouble. And by trouble, I mean “data loss”. I bet many of us are reluctant when it comes to taking regular backup of our data. Taking regular backups will safeguard you from any accidental data loss. So if you face such a scenario, you will have the tools to restore back to the original state.
So here’s an all-around tutorial to help you backup Android devices completely, from apps to complete firmware, we have got you covered. For every different type of data, we will try to provide you the most effective options to get the job done.
How to Backup Android Phone Completely
1. Contacts
The first thing that you would never like to lose is your personal contacts and messages. Let us start from contacts. The best and most efficient way to backup Android contacts is to sync them with your Google account. This will also allow you to access contacts on your desktop and across all your synced devices.
 Backup Android Contacts using Google Cloud Sync
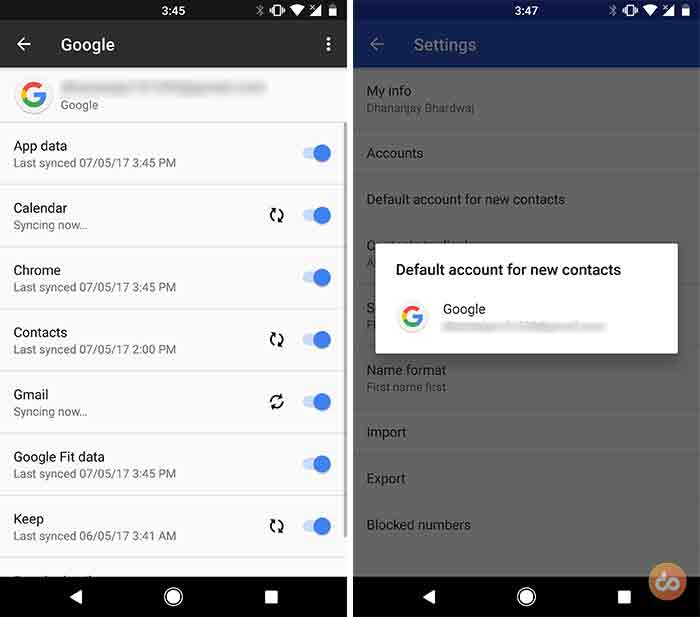
To get started you must have entered a Google account in Settings, that you would like to sync your contacts with. So, if you still haven’t done it, go to Settings > Accounts > Google and fill in your login details. Once you have done that, access the same menu again, and make sure that Contacts sync option is switched ON. All your existing contacts on your device will be pushed to Google for you to access them.
Now to make sure that your new contacts go to the same account, open the Contacts app and go to Settings. Tap on “Default account for new contacts” and select the default account.
2. SMS & Messages
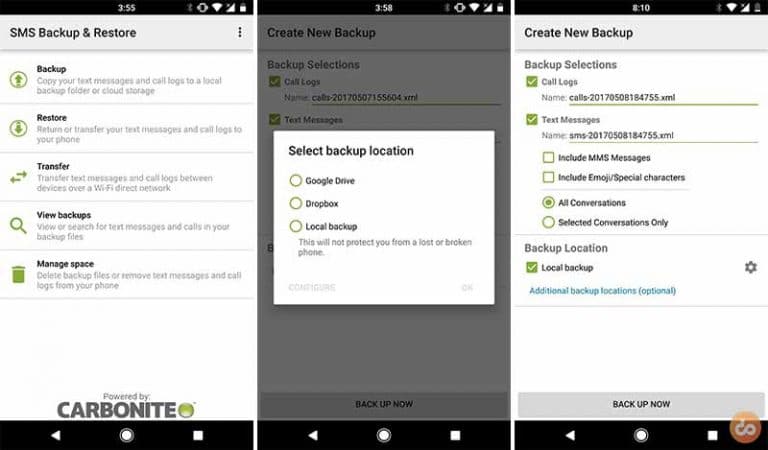
Currently, there is no way to backup Android SMS by syncing them with Google. So in order to backup SMS, you have to opt for a third-party application to get the job done. I have my faith in this app called “SMS Backup & Restore”, since the last few years. You can download any similar app of your choice, but I would always recommend to use this.
Once you have it installed, launch the app and tap on “Backup”. The best part about this app is that it allows you to backup your text messages to either your Google Drive, Dropbox account, or to your local storage. Backing up to the cloud will allow you to access and restore wirelessly, even on other devices. So, if you lose your data, you will always have it preserved online.
 Backup Android Messages using “SMS Backup & Restore” app
So select your preferred location. You can rename the backup files for your ease. The app also offers to backup only selected conversations, which is great. Once you have tweaked through all the available options, press the “BACK UP NOW” button to backup Android messages now.
TIP: The app also allows you to backup call logs. You can select the option while going though the backup procedure.
Now is the time for app messages, like those of WhatsApp, Telegram, etc. For those, you wouldn’t need any third-party app. Most of those offer in-app backup options and are best suitable for the situation. Read the article linked below, to know more about backing up WhatsApp messages to Google Drive.
3. Photos & Videos
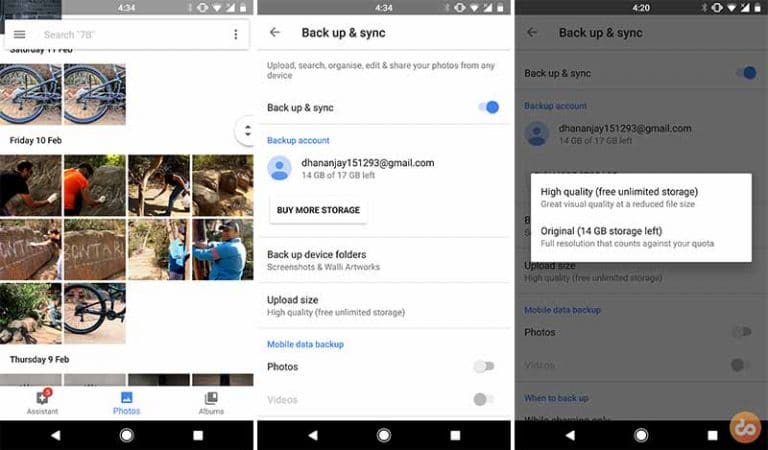
Google comes to rescue you again for this one. Google Photos enables you to backup Android photos and videos to the cloud.
However, you are only limited to back up against your allotted free storage quota, unless you choose “High Quality” as the Upload size. This will upload your media in the best possible quality for reduced file size. You still have the option to buy more storage from Google, if you’re willing to opt for original size backups.
 Backup Android Photos and Videos using Google Photos service
The other way is to backup Android photos and videos is by manually copying them over to your PC. This may require a bit of effort but is worthwhile if you’re not willing to buy extra storage for your account. All you need to do is connect your device to the PC in MTP mode and manually copy the content to the PC.
4. Applications and App Data
Backing up installed applications and their data could be easily carried over on rooted and non-rooted devices. Of course, the instructions for non-rooted users will work on any device. So, let’s begin on how to backup Android device’s apps and data.
» Non-rooted
The most competent method to backup applications on your non-rooted Android is through Helium. It is an app, developed by the famous – Koushik Dutta. The idea behind the app is to provide complete application backups without any implications, such as requiring root.
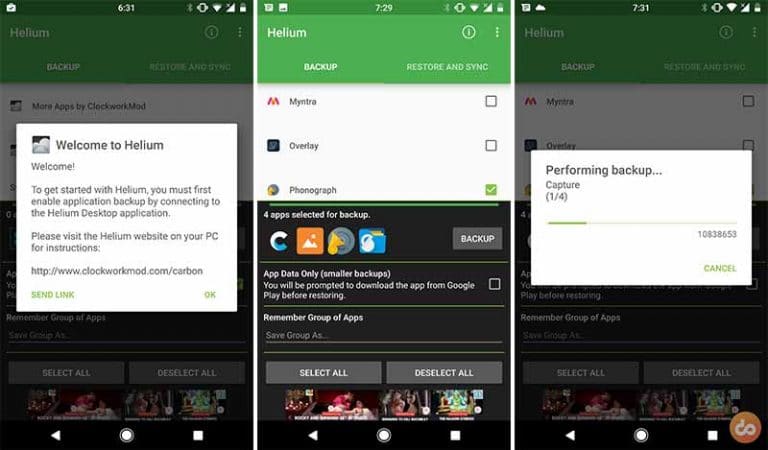 Backup Android apps on non-rooted devices using Helium
Now, there’s a drawback. Several applications like WhatsApp and Instagram do not allow application data backups. This is a factor controlled on the developer end and you can not bypass it.
- Download the Helium app from the Google Play Store.
- Enable USB debugging on your Android.
- Next, download the Helium Desktop Installer for your OS and install it – Link
- If you’re a Windows user, it is important that you install the drivers and reboot your PC before heading further.
- Now run Helium Desktop application on the PC.

- Launch the Helium app on your Android and follow the on-screen instructions.
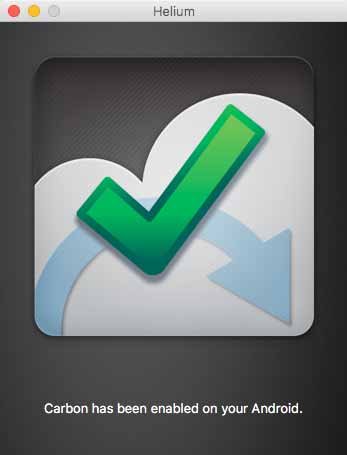
Note: Everytime you reboot your phone, it is required that you enable application data backup by connecting your device to the PC.
Once the process is done, you can head to the Helium app. Browse the applications in the “Backup” tab and select the ones that you want to backup. Finally, tap on BACKUP and choose the backup destination. You can either simply back up the application on the Internal storage, or add a cloud storage account (G Drive, Dropbox, and Box).
As soon as you select the destination, the process will begin. So sit back and give it the required time to backup Android apps on your non-rooted Android phone.
» Rooted Users
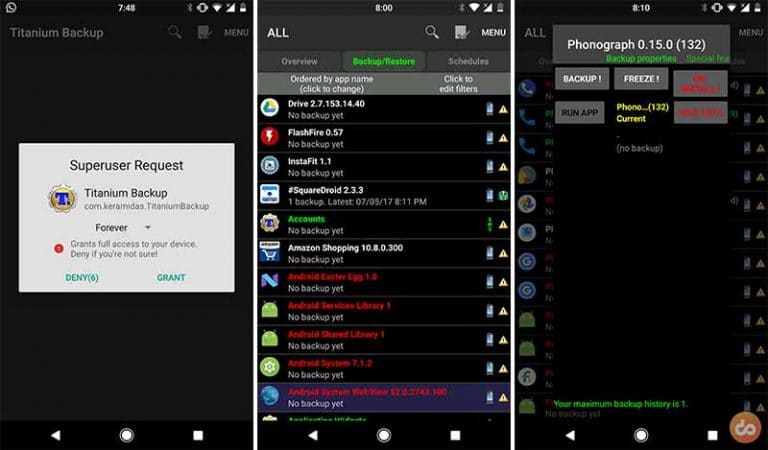
If you’re a rooted user, you have the privilege not only to backup Android installed apps but also the system apps. So if you have already rooted, just hop over and download Titanium Backup application from the Play Store.
- Run the Titanium Backup app and grant it root permissions when prompted.
- Tap on the “Backup/Restore” tab
- In there, you will be able to scroll through all the installed and system applications present on your device. Backup Android apps and data using Titanium Backup
- Select the app that you want to backup. Tap on the “BACKUP !” button.
- It will backup both the application and its complete data that is present at the moment.
 Backup Android apps and data using Titanium Backup
Titanium backups are stored in storage > TitaniumBackup. So if you want to restore it on another device, you can always transfer the folder manually.
5. Full ROM/Firmware Backup (Nandroid)
There’s more than one way to take backup Android ROMs completely. These full ROM backups are known as Nandroid backups and could help you restore back your complete firmware to the point where you left it.
While earlier we were only limited to using a custom recovery for this job, but now we have other ways to do it from within the OS. We will head on and demonstrate two different methods to backup Android ROMs.
» Using TWRP
Now if you’re headed to flash a custom ROM, we will presume that you already have TWRP installed. If not, you can search our website for the device-specific tutorial.
- The first step is to get into TWRP. The easiest way to it is by pressing the special buttons combination while your phone is powered down. But if you don’t know that, you can simply connect your device (You must have USB debugging enabled) to the PC and execute the following command in CMD window:
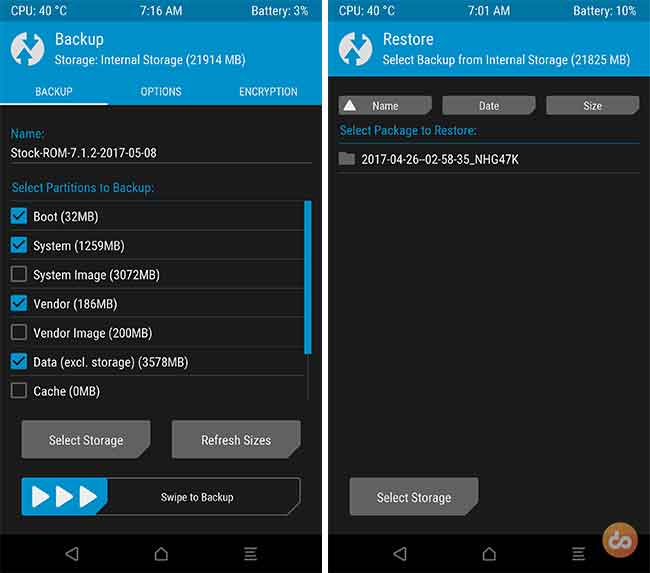
- Tap on the “Backup” tab in the main TWRP screen. Backup Android ROM setup using TWRP recovery
- Now in the backup screen, you will have the liberty to freely choose the partitions that you want to take a backup for. You can rewrite the backup name for your ease too. There are several other options like encrypting the backup and selecting the destination storage for it, which could be internal, a micro SD card, or even a USB OTG device.
- Generally, the only partitions you should check are – Boot, System, Vendor, Data, Cache, and EFS.
- Once you have selected those, you can swipe the button on the bottom of the screen to start the procedure.
 Backup Android ROM setup using TWRP recovery
TWRP backups are stored under Storage > TWRP > BACKUPS. You can manually move these backups to your PC to secure them for future purpose.
Bonus Tip: You can also backup Android ROMs over ADB. Here is the tutorial on how to do it.
» Using FlashFire App (Root users)
Backing up the ROM/Firmware from within the OS make things more efficient and easily accessible.
All you need to backup Android ROMs is an app called “Flashfire”. It is a multi-utility tool for rooted users. It allows a rooted Android user to perform multiple actions like wiping partitions, flashing ROMs and OTAs, and most stuff that only a recovery could do. Another big thing that Flashfire offers is taking Nandroid backup of your complete ROM setup.
- The first step, of course, is to download and install the FlashFire app on your device: Get Flashfire on Google Play Store
- Launch the app once it is installed. You will be prompted to grant root permissions, so make sure that you do that or else it won’t work. Backup Android ROM using Flashfire app
- In the “Actions” menu, you will need to tap on the “+” icon on the bottom right and select “Backup”.
- For the backup type, you will have to select “Normal”. It includes all the regular partitions like Vendor, Boot, System, Data, and also the internal storage (You can deselect it if you don’t need it).
- Finally, you can rename the backup file and hit the checkmark icon on the top-right to start the backup process and backup Android ROM from directly within the OS.
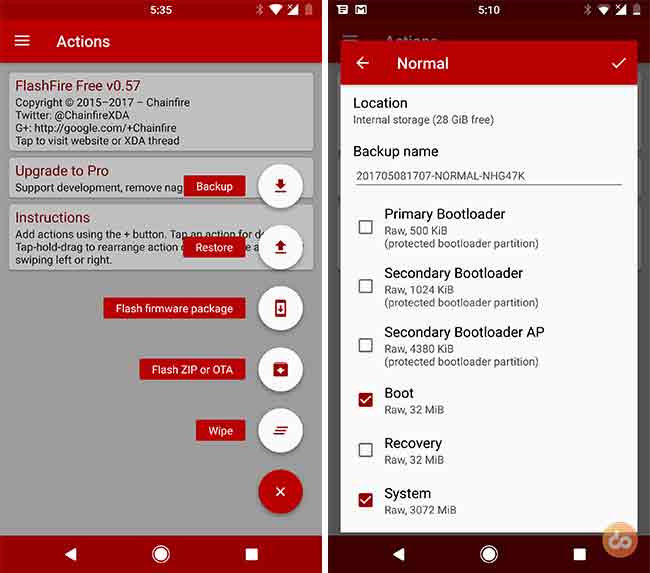 Backup Android ROM using Flashfire app
Your device might show a black screen during this process, so don’t worry and make yourself a coffee until the backup’s complete and your phone boots back.
6. All Other Files on the Storage
The last, yet not the least. One of the most important things is to backup Android device’s storage, which contains all your data and files. The best way to preserve the rest of the files on your storage is to manually back them up to your PC. You just need to connect your device in MTP mode and copy over all the files that you think are essential.
Yes, there are several tools out there that could help you backup Android device storage, but they will offer the same thing, just within the software’s UI. These toolkits can sometimes be unreliable. So, we recommend that you do not waste your time on those and carry out this process manually.
These were our tips to help you backup Android completely. If you think there’s a more easy and effective method to backup Android devices, kindly let us know through the comments. Don’t forget to share this article on your social media and with your friends to help them backup Android easily.
Источник


