- Root Android Phone with ADB Command, Magisk & TWRP
- Requirements
- Method 1: Root Android Phone via TWRP
- Steps to Follow
- Method 2: Root Android with ADB & Fastboot Commands
- What Does Root Mean: Root on Mac and Android
- Part 1. What Does Root Mean?
- Part 2. Getting Around Android Root on Mac
- Option 1. Set a Password for Root Account.
- Option 2. Set a Stronger Password for Root Account.
- Part 3. The Pros and Cons of Root on Android
- Part 4. Root Android Device to Recover Deleted Data
- Step 1. Connect your phone.
- Step 2. Select Files Type to Scan and Allow Root
- Step 3. Preview and Recover Deleted Files
Root Android Phone with ADB Command, Magisk & TWRP
In this guide, we will be discussing two different methods to root your Android device. Rooting is the process to attain administrative privileges over your device system files. Android community holds tons of mods and frameworks and related tricks that completely modify your phone and add new features to it. And rooting is the gateway to all these goodies. Earlier SuperSU was the lone choice for attaining root. But with the inception of Magisk, it has become everyone’s favorite tool.
The main reason for that is the fact that it carries out all the modifications systemless-ly. That is, it doesn’t modify the device’s system partition. As a result, Google’s Safety Net won’t be triggered and the apps dependent on it will continue to function as expected. Apart from that, Magisk also holds some other benefits like the Magisk Hide feature.
This allows you to hide root from apps that don’t work on the rooted devices (like banking apps, Pokemon Go among others). Owing to all these reasons, we will be listing two different methods to root your Android device via Magisk itself. So without any further wait, let us begin with the guide. With that said, here are the 6 most popular universal root tools for Android that you should definitely check out.
Requirements
- Make a complete backup of your Android device. Although rooting an Android device doesn’t wipe data, still, it is always recommended to be on a safer side.
- Your device should also be having an unlocked bootloader. If that’s not the case, please refer to our guide on how to unlock the bootloader of Android devices.
- Set up the Android SDK Platform Tool on your PC.
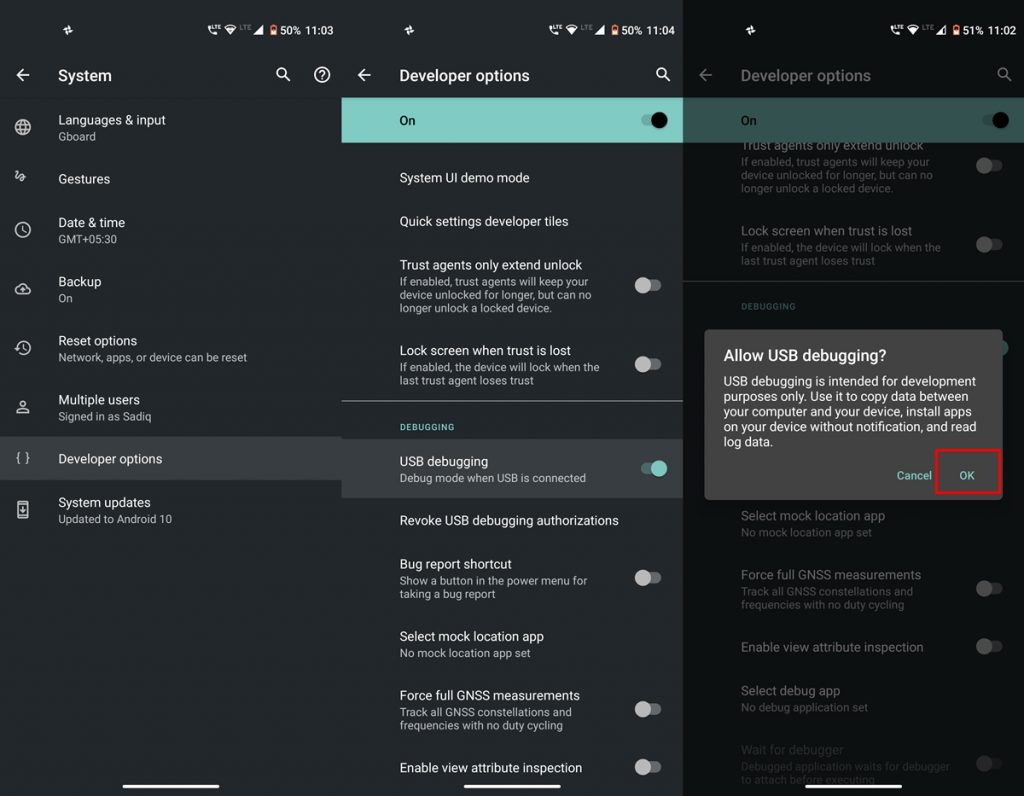
- Similarly, enable USB Debugging on your device from Developer Options. This will create a debug bridge between your device and platform tools to successfully execute ADB Commands.

- Download the latest Magisk Manager APK and Magisk ZIP. Transfer it to your device’s internal storage or SD Card.
With the requirements now clear, here are both the methods to root your Android devices.
Method 1: Root Android Phone via TWRP
First off, to root your Android device via recovery, you will need a working TWRP image for your device. Please don’t use any other device’s recovery. You will definitely end up in a bootloop. If there isn’t one for your device, then skip to Method 2. Also, make sure the recovery has been installed on your device. We have a detailed tutorial on installing TWRP on Android. Now with the instructions clear, let us proceed with the steps to root your Android device.
Steps to Follow

- Boot your device to TWRP Recovery. Either use the specific hardware key combinations for that or execute the below command. For the latter, head over to the platform-tools folder and type cmd in the address now, and hit Enter.
- Now enter the given command in the Command Prompt:
- Your device will now boot to TWRP Recovery. Go to Install, browse to the Magisk ZIP file and perform a right swipe to install it. This zip file is needed to root your Android device.
- Now go to Reboot and tap on System. Once your device boots up, install the Magisk Manager APK.
- That’s it. Open the app and you should now see the message that Magisk is up to date (see screenshot below).
With that, you have successfully rooted your Android device. Let’s now check out the steps to do so via fastboot commands. On that note, also have a look at 10 useful Windows command prompt tricks that you should be aware of.
Method 2: Root Android with ADB & Fastboot Commands
If there isn’t any working TWRP for your device or you don’t wish to install one for whatever reason, then this method might come in handy. For this to work, you will be needing the stock boot.img file of the same version which is currently installed on your device. You could extract the same from the stock firmware of your device. Just make sure that there is no version mismatch. Otherwise, bootloop is evident.
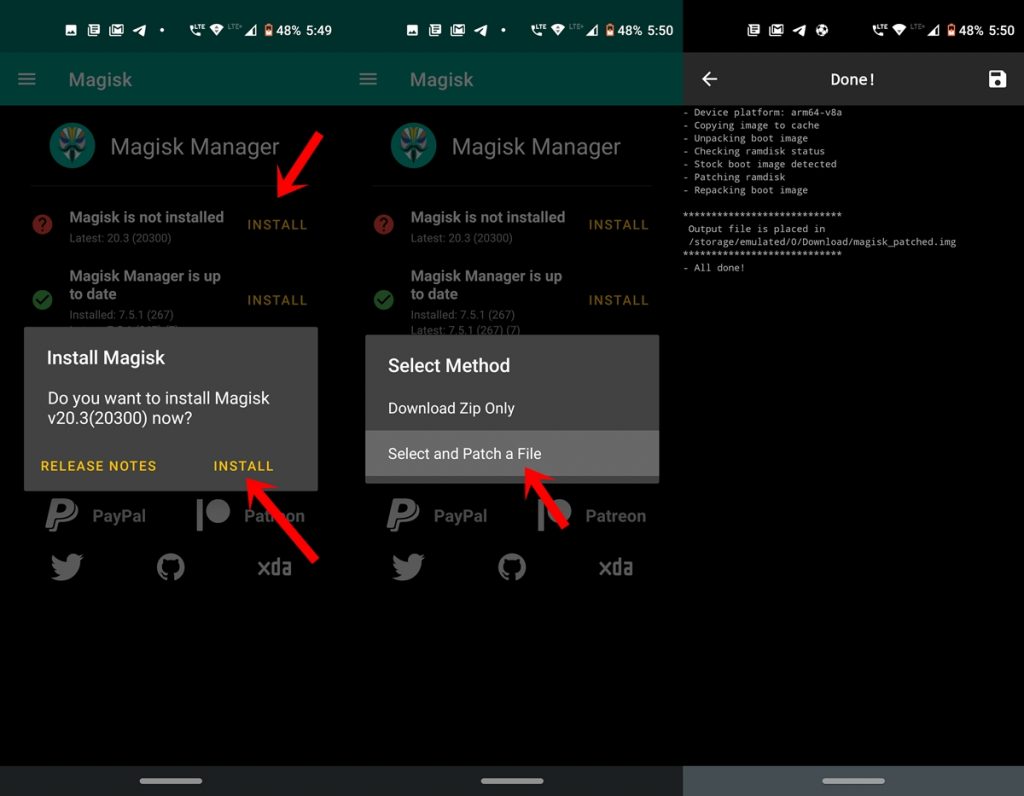
- Install Magisk Manager APK on your device. Open it and tap on Install next to “Magisk is not installed” keyword. Again tap on Install in the next pop-up.
- Now tap on Select and patch a file. Select the boot.img file and wait till Magisk patches it.
- Connect your device to PC via USB cable. Head over to the Downloads folder on the Internal Storage, copy the magisk_patched.img file and transfer it to the platform-tools folder on your PC. This file is needed to root your Android device.
- Now, enter cmd in the address bar of platform-tools and press Enter. This will launch the Windows Command Prompt window. Enter the below code to boot your device to fastboot or bootloader mode:
- Your device should now be boot into fastboot mode. Execute the following command to flash this patched boot image onto your device:
- It should be successfully installed on your device within a matter of seconds. You could now reboot your device via the Power key or the below command:
That’s it. You have now successfully rooted your device via TWRP Recovery. Now go ahead and dive deep into the mods community and give our device a completely new makeover. There are tons of Magisk Modules, Xposed framework, and Custom ROMs, all waiting for a place on your device. Go and give them a shot!
We have compiled quite a huge list of ADB, ADB Shell, and Fastboot commands with detailed explanations to all commands you may ever need to use.
Источник
What Does Root Mean: Root on Mac and Android
By Nathan E. Malpass, Last updated: December 23, 2019
“Can you explain to me what rooting is? They say it’s great to do on your Android phone, but how do you do that anyway?”
Part 1. What Does Root Mean?
If you have spent the time to research how to best use your Mac or Android device, then you would have chanced upon the term root or rooting. So what does root mean anyway?
Simply put, root grants users with administrative privileges on their device, which they would otherwise not have under default settings. Root on Mac and Android gives users full control over their device’s operating system. With that, you can access restricted files and folders, install apps, and customize your device like never before.
In Apple’s macOS High Sierra, root is a user account that allows superuser access to the system. While the new OS is already powerful as it is, activating the root user account will enable users to perform more advanced tasks. When you do some advanced setting to speed up your running slow mac, you need the root account.
By default, it is disabled but can be initiated upon logging in as root. However, this feature has exposed Mac users to the risk of a security breach. Widely known as the macOS High Sierra root bug, it allows hackers and unauthorized persons to log into your account even without a password. Part 2 of the article will discuss how users can address this issue.
As for Android users, rooting allows them to enhance their gadget’s performance. One way is by expanding its internal storage size. You can explore the other benefits in Part 3 of this post.
 What Does Mean Root on Mac
Part 2. Getting Around Android Root on Mac
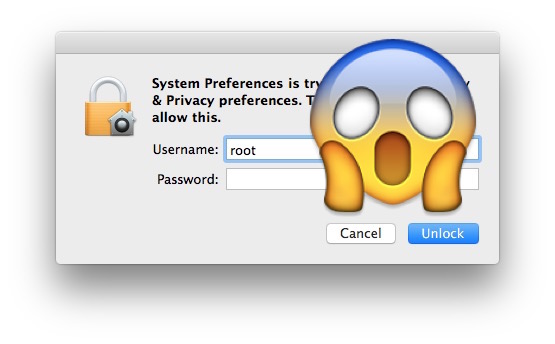
The newly discovered bug in macOS High Sierra presents serious security issues to users. Anyone with a physical access to the device will be able to have read and write privilege to your computer.
If anyone tries to log in as an administrator, typing in вЂroot’ as the username and leaving the password field empty can give him an instant access. He will simply have to click Unlock multiple times until he successfully gets in. By that time, he will be able to see all your files, install malware, and cause irreparable damage to your Mac. The same can be done on the login screen on a locked Mac.
To solve this problem, here are two easy-to-do fixes.
Option 1. Set a Password for Root Account.
You can enable root on Mac and set a password to protect your device and data. Here’s how.
- Click on the Apple icon () and head to System Preferences. Select Users & Groups or Accounts.
- Click the lock icon () and input your username and password for an administrator account on your computer.
- Select Login Options then Join or Edit.
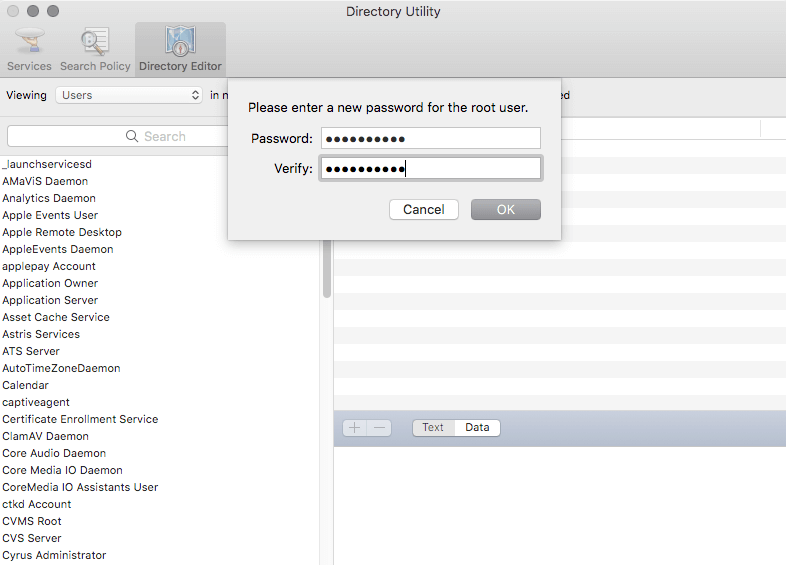
- Click Open Directory Utility. When a new window opens, click the lock icon () and enter an administrator username and password.
- From the menu bar, click Edit then choose Enable Root User. Set your password by entering it.
Option 2. Set a Stronger Password for Root Account.
If you already have a password set for your root user account, then you can create an even more unique password. That way, your Mac can be less susceptible to unauthorized access. As much as possible, make it a combination of characters, numbers, and symbols.
- Follow Steps 1 to 4 of Option 1 (Set a Password for Root Account).
- Select Edit and click Change Root Password.
- Enter your desired password.
 Set Password for Root Account
Part 3. The Pros and Cons of Root on Android
While rooting has caused a security problem for Mac users, it is a blessing for Android phone owners. Rooting an Android device offers plenty of great benefits. It unlocks your device’s full potential by making simple and significant modifications.
Here are some advantages of rooting:
- Freely install and uninstall apps
When you have made the necessary changes to your phone’s system, you can now install all apps that you want even if they are incompatible with your device. You can also get rid of pre-installed apps that you have no use for and take up too much space.
You will no longer have to be distracted by unsolicited ads when you’re using your app or playing a game.
- Customize your interface
You can change the built-in themes and skin of Android devices. By installing custom-built ROMs, you can modify the general appearance of the interface and add features.
You can also upgrade to the latest Android version even if your carrier has blocked it for your phone.
- Improve your phone’s overall performance
By uninstalling apps that you don’t need, you can improve RAM usage and speed up your smartphone. You can also install particular apps that enhance battery usage and allow a faster 3G network.
While it is useful, root on Android can cause security gaps especially if it was done incorrectly. Inexperienced users may have their phone bricked. This term simply refers to rendering one’s phone useless because of an improper modification. Here are some risks you have to watch out for:
- Compromised security
Now that the Android system has been modified, you are basically tampering with a layer of protection designed by the system’s creators, Google. In fact, the company does not support it, so much so that they have developed an API that can detect modified Android devices. Your device becomes vulnerable to viruses and malware too.
- Android update failure
New updates may fail to install because of software modifications. Some Android versions don’t work with rooted devices. You may have to stick with an old version or wait for new OS updates.
- Voided warranty
Rooting your phone automatically voids your device’s warranty. If your phone got damaged during or after the rooting process, you will have to pay the phone manufacturer for repairs.
The above risks may discourage you from rooting your device. However, it cannot be denied that the process opens up so many possibilities for your phone. The key here is to use an effective rooting tool and follow instructions closely.
Part 4. Root Android Device to Recover Deleted Data
If you want a safe and successful rooting, then FoneDog Toolkit is the best solution for you. Thousands of Android devices are supported by the software, so compatibility issues will not be a concern. Within a matter of minutes and a few clicks, you can make the best out of your Android phone! With FoneDog — Android Data Recovery, You can recover the deleted data with just 3 steps!
Before starting to root your phone, you should make a full backup of your device. Fully charge your device because there is knowing how long it would take to root it.
Step 1. Connect your phone.
With a USB cable, connect your Android phone to the computer. If a pop-up window asks you to authorize USB debugging, click OK to proceed. If no prompt appears, you will have to manually enable USB debugging. You may do it with the following steps:
Go to Settings on your device > About Phone > Tap Build Number multiple times until you are in developer mode > Return to Settings > Developer Options > USB debugging > Tap OK on your phone > Click OK on the software
After these steps, the software will then be able to detect your device.
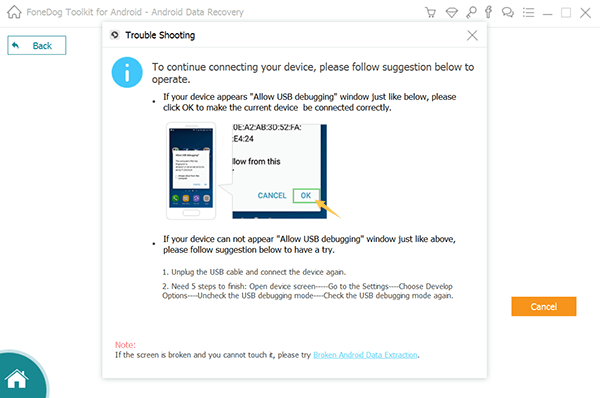
Connect Android and Allow USB Debugging — Step1
Step 2. Select Files Type to Scan and Allow Root
After your Android phone being detected by the program successfully, FoneDog — Android Data Recovery will display all the data types it supports to recover. By default, it has checked all the data types. You can just choose the type of files that you want to recover. And then click » Next « to begin scanning.
If there is a pop-up window on your device, Click «Allow» on the device.
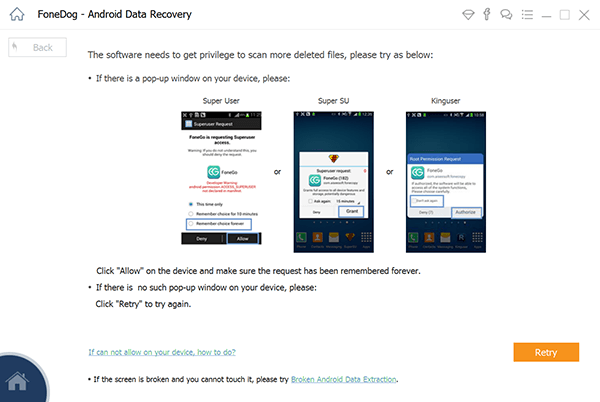
Choose File Type to Scan and Allow Root Android — Step2
Step 3. Preview and Recover Deleted Files
Select the deleted files you want to recover. Then click on the » Recover » Button to restore the deleted files to computer.
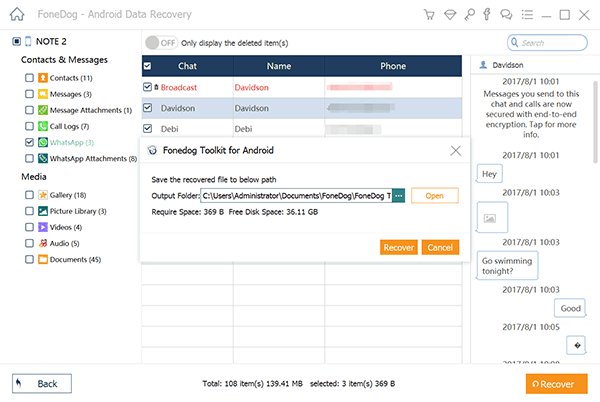
Recover Deleted Files on Android — Step3
Источник


