- /4te.me
- Предисловие
- Подготовка
- Разблокировка загрузчика
- Получение root
- How to root Android using Ubuntu
- The Big Picture
- Preparations
- Unlocking the Bootloader
- Using AutoRoot to install SuperSU
- Installing OTA updates
- Optional: Replacing the Recovery System
- restoring stock recovery
- Alternative superuser apps
- Как зайти под root в Ubuntu
- Как зайти под root в Ubuntu
- Оцените статью:
- Об авторе
- 3 комментария
/4te.me
Быстроman как получить root-права на Android смартфоне. Я буду использовать OnePlus 3 и Android 8.0, но инструкция должна подойти и к другим устройствам.
Предисловие
Все действия вы выполняете на свой страх и риск. При неправильной последовательности, можно потерять данные или превратить телефон в кирпич. Также, важно понимать, что рутованный девайс, кроме некоторых удобств, несет в себе риски безопасности. Будьте внимательны.
Подготовка
Для начала, надо на компьютер установить adb и fastboot. Это утилитки из Android SDK для работы с подключенным по USB телефоном.
Для Windows есть удобный установщик adb, fastboot — https://forum.xda-developers.com/showthread.php?t=2317790
Вот здесь официальные дистрибутивы под все платформы — https://developer.android.com/studio/#downloads
Далее качаем TWRP. Это что-то типа livecd для телефона. Образ некой системы, в которой загрузится телефон, и в ней мы установим приложение Magisk.
TWRP (я брал версию 3.1.0-0-twrp.img) — https://dl.twrp.me/twrp/
Если у вас OnePlus, вот TWRP для них — https://eu.dl.twrp.me/oneplus3/ (надо брать этот twrp если вылетает ошибка dtb not fount)
Magisk — это open source приложение, которое дает рут права на телефон, и позволяет скрывать наличие рута от других приложений, чтобы работал Android Pay. Также, обновления системы, которые прилетают “по воздуху”, не должны сломаться. Лучше использовать Magisk, а не SuperSU.
Теперь включим режим разработчика на телефоне. Для этого в настройках, в разделе “О телефоне”, надо несколько раз нажать на “Номер сборки”. После раза 10-го, появится сообщение “Теперь вы разработчик”, и в настройках появится новый пункт “Для разработчиков”.
Разблокировка загрузчика
Разблокировка загрузчика удаляет все данные с телефона и sd-карты
Также, разблокировка загрузчика, без установленного далее Magisk, может сломать Android Pay.
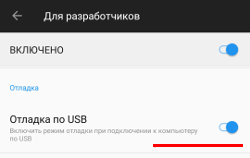
В настройках “Для разработчиков” включаем “Отладка по USB”, “Заводская разблокировка” и “Варианты перезагрузки” 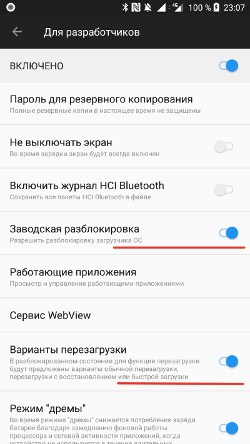
Загружаемся в fastboot mode. Для этого зажимаем кнопку выключения, выбираем “Перезагрузка” и далее “Загрузчик” 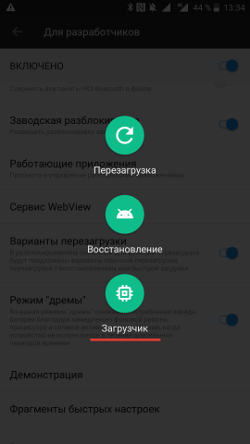 Второй способ — выключить телефон, зажать клавишу громкости вверх и клавишу включения. Через несколько секунд появится fastboot mode
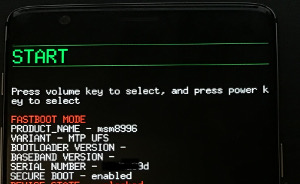
Подключаем телефон по USB-кабелю. И проверяем что устройство доступно в системе. Для этого выполняем:
ПОСЛЕ ЭТОЙ КОМАНДЫ ТЕЛЕФОН ПЕРЕЗАГРУЗИТСЯ И ВСЕ ДАННЫЕ БУДУТ УДАЛЕНЫ. Делайте бэкапы всех данных до этого шага.
Теперь загрузчик разблокирован.
Получение root
- Подключаем телефон к компьютеру в режиме передачи файлов MTP
- Заливаем на телефон zip-файл Magisk, скачанный выше из github
- Загружаемся в TWRP. Для этого перезагружаем телефон в fastboot mode (см. пункт 2 инструкции выше как разблокировать загрузчик) и на компьютере выполняем:
Все, теперь с помощью Magisk Manager можно выдавать root-овые права приложениям, которые их запрашивают, а также скрывать от других приложений, что этот девайс рутованный, чтобы не сломать Android pay.
Источник
How to root Android using Ubuntu
update 27.10.2018 – use TWRP instead of CWM (discontinued)
update 14.10.2017 – new instructions to set-up udev rules
update 26.02.2016 – instructions for Android 6 Marshmallow
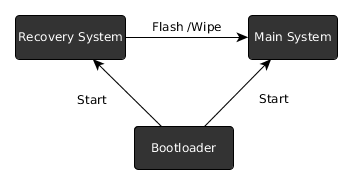
The Big Picture
Android consists of three parts relevant to rooting
- the bootloader
- recovery system
- main system
typically only the main system is running, that is the Linux Kernel, the launcher, the phone app etc.. If we talk about rooting, that means we want to add an additional app to the main system which has access to secured parts of the system and acts as a gatekeeper for other apps that also want to get access.
The problem is the secured parts of the system are locked down – otherwise they would not be secure. This means that we can not simply install that app (e.g. an apk) from within the main system.
Therefore we have to go one level down. This is where the recovery system is. Typically you do not see it, as it is only active when the main system can not run – either because a system update is installed or because you do a factory reset.
As the recovery system can do a full system update, it means that it has also access to the secured parts of the main system – exactly what we need.
The stock recovery system obviously does not allow altering the main system – otherwise everybody could get your private data if you lose your phone.
So we need to replace it as well. But before that we have to talk about the bootloader.
The bootloader is a tiny piece of software which decides whether to start the recovery or the main system (or another main system, like Ubuntu Phone).
In the default configuration in only starts systems that it knows and trusts. In this configuration the bootloader is called locked.
Although this prevents malicious software to change the phone and spy on us, it also prevents us from replacing the recovery system. By the way, this concept is also coming to the PC where it is called UEFI secure-boot.
Here is a graphical overview of the Android components:
So what we need to do in order to get root access is
- unlock the bootloader
- replace the recovery system
- install a superuser app
Note that unlocking the bootloader also allows attackers to circumvent any of the android security features (PIN etc). It becomes possible to access all the files on the device using a different recovery system. (unless userdata is encrypted)
Therefore android will wipe all userdata when the bootloader state is changed from locked to unlocked.
So if you lose your unlocked device or it gets stolen, you better hope the thief is not tech savvy.
Preparations
First you need to install the fastboot binary to be able to perform low-level communication with the device
The android-sdk-platform-tools-common package most importantly contains a whitelist (/lib/udev/rules.d/51-android.rules) with devices to which users can send commands over USB, so you do not have to run fastboot as root.
Now you have to reboot into fastboot mode. Usually there is a key combination you have to press on startup.
Remember this key combination as you will need some more times.
Samsung Devices however, like the Galaxy S3, do not support the fastboot mode – instead they have a download mode, which uses a proprietary Samsung protocol. To flash those you have to use the Heimdall tool. While this article does not cover the heimdall CLI calls, the general discussion still applies.
Unlocking the Bootloader
last warning: this will wipe all user data on the device
for google devices, like a Nexus 4 or Nexus 7 it is just do
if you have a Sony Xperia device, like a Xperia Z, you additionally have to request a unlock key and then do
where is the key you obtained.
Using AutoRoot to install SuperSU
There are several superuser apps to choose from for Android 4 and below. However the only superuser app working on Android 5/ Lollipop and above is SuperSU by Chainfire.
As there are devices like the Nexus 5X shipping with Android 6/ Marshmallow, I will describe this method first.
Chainfire created an “installer” called AutoRoot that includes the fastboot utility and will perform the unlocking step described above. However if you have read this far, you probably also want to understand the rest of the process.
First you have to download the appropriate package for your device. There you will find a recovery image which we have start with
the command above will not flash anything on your device, but just upload the image and immediately start it. The image contains a script to modify the main system (change startup to get around SELinux) and install the superuser app.
If everything goes well, you can now just reboot your phone and you are done.
You could lock your bootloader again now to make your device more secure. However the next Android update will remove root again and repeating the rooting procedure will wipe userdata – so you have to balance security update vs. the risk of your device being stolen. For the latter case you still have the option to enable encryption of userdata though.
Installing OTA updates
Android over the air (OTA) updates contain only the changes to the current system. In order to verify that the update succeeded Android computes a checksum of the patched system and reverts to the old state otherwise.
As SuperSU has changed the boot image to start itself, the updates obviously will fail. So to install an OTA update you will have to grab a factory image and restore the boot partition using the included boot.img
after this you will have to patch the boot partition again using the procedure described above.
Also note that if you use apps that change the system partition (like AdAway that changes the hosts file), you will have to revert those changes as well in order for the OTA update to succeed.
Optional: Replacing the Recovery System
If you want some advanced features, like backing up all your installed apks, you can permanently replace the recovery image on your device. However this will most likely prevent you from installing OTA updates.
There are two prominent alternative recovery systems with the ability to install apps
Clock Work Mod has been discontinued, so we will use TWRP. From the Website linked above download the recovery image which fits your phone.
where is the name of the file you downloaded. For instance for a Nexus 9 and TWRP 3.2.3 it would be
restoring stock recovery
If you have a Google Device, you can grab the factory images here. There you will find a image of the stock recovery. You can restore it by
Alternative superuser apps
If you run a device with Android older than 5/ Lollipop you have some alternatives to SuperSU:
I would recommend getting Superuser by CWM, as it is open source and also nag-free as there is no “pro” version of it. There is even a pull-request which might make it also work with Android 5 in the future.
To install the app we need to get this zip archive and copy it to the device. Then we need to reboot into fastboot mode and then select “Recovery Mode” to get to the recovery system. Once in Recovery mode select
install zip -> choose zip from /sdcard
then browse and select the “superuser.zip” you just copied.
Once installed select
Go Back -> reboot system now
Once the system has started you should have a “Superuser” App on your device. Congratulations, you are done.
Источник
Как зайти под root в Ubuntu
Политика дистрибутива Ubuntu нацелена на то, что все действия, требующих административных привилегий надо выполнять с помощью команды sudo. Использовать root пользователя как основного для новичков опасно, поскольку они ещё плохо ориентируются в системе и могут забыть, что они вошли как root и удалить что-то важное.
А поскольку восстановить файлы, удалённые с помощью команды rm почти нельзя, то лучше новичков туда не пускать. Но иногда возникает необходимость войти под пользователем root. В этой небольшой статье мы рассмотрим как это сделать.
Как зайти под root в Ubuntu
По причинам, описанным выше для пользователя root пароль в Ubuntu не задан по умолчанию, поэтому вы не можете просто так войти от его имени с помощью в виртуальных консолях доступных по Ctrl+Alt+FN или с помощью утилиты su. Поскольку пароля нет, ввести его верно вы не сможете.

Но это всё очень просто обходится. Для того чтобы войти под пользователем root в терминале достаточно дописать sudo перед командой su:

Также можно использовать опцию -i команды sudo чтобы открыть консоль от имени суперпользователя:

Однако, если вы хотите авторизоваться от имени этого пользователя в виртуальной консоли или по SSH, то вам надо сначала задать для него пароль. Для этого выполните:
sudo passwd root

Затем введите два раза пароль. После этого пользователь root становится почти полноценным пользователем системы. Вы не сможете только войти под ним в графический интерфейс потому что на это действует ограничение самой оболочки Gnome, это очень плохая практика — запускать целую оболочку от имени root.
Но если вам всё же очень хочется, надо немного настроить правила PAM для GDM. Для этого откройте файл /etc/pam.d/gdm-password и закомментируйте там строчку:
sudo vi /etc/pam.d/gdm-password
# auth required pam_succeed_if.so user != root quiet_success

После этого вы сможете авторизоваться от имени root в менеджере входа. Просто кликните по пункту Нет в списке, а затем введите логин root:

Перед вами откроется оболочка, запущенная от имени суперпользователя:

Это очень небезопасно, потому что любая программа может делать с вашим компьютером всё, что захочет и никто её не остановит. Фактически, первые версии Windows тоже работали в таком режиме и поэтому они были очень уязвимы к вирусам.
Нет похожих записей
Оцените статью:
Об авторе
Основатель и администратор сайта losst.ru, увлекаюсь открытым программным обеспечением и операционной системой Linux. В качестве основной ОС сейчас использую Ubuntu. Кроме Linux, интересуюсь всем, что связано с информационными технологиями и современной наукой.
3 комментария
Ну а что там с другими DE? Решение я знаю, но почему их нет в статье? Огласите весь список, пожалуйста!
Поставил два дня назад Ubuntu, просто посмотреть что за зверь такой Linux. Посмотрел. Теперь понял почему Windows рулит в мире, а Linux в глубокой попе ) Если после установки в Windows сразу можно работать (копировать, вставлять файлы, создавать папки редактировать и тд), то в Linux НИЧЕГО нельзя делать. То есть вообще ничего. Разве что браузер работает и можно что то посмотреть. А для того чтобы получить разрешение на работу в Linux, надо сначала выучить команды терминала ) Окститесь линуксоиды! Какой идиот сейчас будет заморачиваться с командами? Современная молодежь даже не знает что такое терминал. Почитал заклинания линуксоидов: какие страшные картинки рисуют, если юзер зашел под root. Чуть ли не конец света ) Как будто в Windows нет важных файлов, а все важнейшие для юзера файлы только в Linux ) Вы вообще про переустановку системы слышали? Если нет, сообщаю: Linux гораздо проще переустановить, чем Windows, не надо активировать систему. Так что заходим под root, спокойно что то ломаем и спокойно переустанавливаем. Никакой трагедии. По крайней мере такая дикая защита от ЮЗЕРА не нужна.
Источник


