- Root права на Samsung Galaxy S7 Edge [SM-G935F][инструкция]
- Инструкция по получению root прав на Samsung Galaxy S7 Edge SM-G935F с помощью CF-Auto-Root
- Cкачать:
- Root Galaxy S7 / S7 Edge on Android Oreo Stock Firmware
- Root Galaxy S7 and Galaxy S7 Edge with Magisk – Details:
- HOW TO: Root Galaxy S7 and Galaxy S7 Edge on Official Firmware
- How to root Snapdragon Galaxy S7 and S7 Edge on Android 8.0 Oreo Samsung Experience 9.0?
- Root Snapdragon Galaxy S7 (Edge) on Oreo – AT&T, T-Mobile, Verizon, Sprint
- How to Root Galaxy S7 (Edge)?
- Possible fix for heating and lag after rooting Galaxy S7
- Как получить root на Samsung Galaxy S7 и Galaxy S7 Edge
- Проверка загрузчика
- Активация режима root
Root права на Samsung Galaxy S7 Edge [SM-G935F][инструкция]
![]()
Инструкция по получению root прав на Samsung Galaxy S7 Edge SM-G935F с помощью CF-Auto-Root
рут для прошивок с версией Андроид 8.0 oreo — смотреть этот пост
инструкция ниже только для прошивок с версией Андроид 6.0.X
1. Нужно открыть опции для разработчика на смартфоне. Для этого заходите в Настройки -> Об устройстве -> Сведения о ПО -> там нажимаете 7 раз по Номер Сборки, в конце вы должну будете увидеть сообщение, о том, что опции для разработчика активированы.
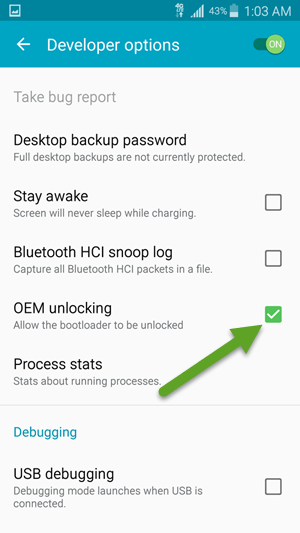
2. Включить отладку по USB и разрешить разблокировку предусмотренную производителем. Для этого нужно зайти в Настройки -> Параметры разработчика и активировать пункты Разблокировка, предусм. произ. OEM и Отладка USB.
3. Подключить смартфон к компьютеру и установить драйвера. | USB драйвера для Samsung 1.5.45.0 \ 1.5.51.0 | Перезагрузить компьютер.
4. Скачать архив (CF-Auto-Root-hero2lte-hero2ltexx-smg935f.zip) из вложения к посту, распаковать (подходит только! для прошивок с версией Android 6.0.1 и только для модели SM-G935F). Распаковать архив.
5. Запустить Odin3-v3.10.6.exe, откроется окно программы, где нужно отметить галочкой пункт AP, нажать на кнопку и выбрать файл CF-Auto-Root-hero2lte-hero2ltexx-smg935f.tar.md5
6. Перевести смартфон в режим Download Mode. Для этого нужно на выключенном устройстве зажать одновременно кнопки: Домой, Громкость вниз и Питание и держать их до появления меню, затем подтвердить вход в режим загрузчика однократным нажатием на кнопку Громкость вверх.
7. Подключить смартфон к ПК в таком состоянии. В программе ODIN должен будет загореться порт ID:COM жёлтым или голубым цветом.
8. Нажать на кнопку Start в Odin и ждать пока телефон сам не перезагрузится в систему, в самом конце вверху подсеченного порта вы должны будете увидить надпись PASS. на зелёном фоне, что будет обозначать что весь процесс прошёл без ошибок.
После загрузки в систему вы найдёте новое приложение SuperSU, которое будет управлять root-доступом.
Cкачать:
 CF-Auto-Root-hero2lte-hero2ltexx-smg935f.zip
Источник
Root Galaxy S7 / S7 Edge on Android Oreo Stock Firmware
Here are instructions on how to root Galaxy S7 / S7 Edge whilst running Android 8.0 Oreo official firmware. Despite the fact that we are expecting to see Android P being released to the public, Galaxy S7 and Galaxy S7 Edge users are just starting to receive Android 8.0 Oreo update. For enthusiasts, once this update is installed, older root status is wiped clean. Fortunately enough, we have a working guide that you can use to gain root. With TWRP custom recovery and Magisk root utility, we will take you through complete steps on how to root Galaxy S7 / S7 Edge running Android 8.0 Oreo.
Magisk root is a popular root solution that was updated to support Android Oreo. To utilize this package, we would also require a custom recovery and for that, TWRP is a great choice thanks to its reliability and ease of use. Also, it is a good idea that you maintain a complete backup of all your data before implementing any step given ahead. Once rooted, you will have access to root apps and further root mods which will overall extend the functionality of your smartphone

Disclaimer: All the custom ROMs and firmwares, official software updates, tools, mods or anything mentioned in the tutorial belong to their respective owners/developers. We (TeamAndroid.com) or the developers are not to be held responsible if you damage or brick your device. We don’t have you on gun point to try out this tutorial 😉
Root Galaxy S7 and Galaxy S7 Edge with Magisk – Details:
It is important to note that we will be making use of Magisk root utility for rooting Samsung Galaxy S7 and Galaxy S7 Edge. Magisk is a systemless root solution that gets flashed onto the device through TWRP custom recovery. This utility has been quite popular with all Android devices and we are happy to announce that it works well with the latest Samsung Galaxy flagship series.
In case you have already rooted your Samsung Galaxy S7 and are now looking for how to unroot your phone, we have a guide for that as well.
There are tons of useful articles and how-to guides on Team Android for the Samsung Galaxy S7 / S7 Edge, but we think you might be interested in the following posts:
- USB Drivers:Samsung Galaxy S7 USB Drivers and How to Connect with Computer.
- Custom ROMs: For a complete collection of Samsung Galaxy S7 / S7 Edge custom ROMs, click here!
All set and ready? Good. Now, let’s proceed with the tutorial below and root Galaxy S7 and Galaxy S7 Edge on Android 8.0 official firmware.
HOW TO: Root Galaxy S7 and Galaxy S7 Edge on Official Firmware
Here are all the steps you would need to root Galaxy S7 or Galaxy S7 Edge with Android 8.0 Oreo firmware through Magisk utility and TWRP custom recovery.
Just To Remember:
- This tutorial is only for Galaxy S7 / Galaxy S7 Edge devices running Android 8.0 Oreo.
- Your phone should be running latest Android 8.0 Oreo firmware.
- Enjoy rooting your Samsung Galaxy S7 and Galaxy S7 Edge and let us know about it in the comments!
Complete Step-By-Step Instructions:
NOTE: You need to have a custom recovery installed on your Galaxy S7 / S7 Edge device i.e. TWRP before proceeding below. Installation tutorials:
Step 1 – Download Magisk Root (Magisk-v16.1_1610_.zip) for Galaxy S7 / S7 Edge device to your computer.
Step 2 – Connect your Galaxy S7 / Galaxy S7 Edge device to your computer using the USB cable.
Step 3 – Now copy/paste the downloaded Magisk-v16.1(1610).zip files to your internal storage. Make sure the file is in the internal storage root (not in any folder).
Step 4 – Then turn OFF your phone and disconnect from the USB cable.
Step 5 – Now to get in the Recovery Mode (TWRP Recovery). Switch ON the phone while pressing and holding Volume Down + Power buttons together. Alternatively, read this: How to Access Recovery Mode on the Samsung Galaxy S7.

NOTE: Screenshots of the Team Win Recovery Project (TWRP Recovery) may change as new versions are released.
Step 6 – Once finished, tap on the ‘Install’ button from the list, choose the Magisk-v16.1(1610).zip file that you copied to your phone memory in Step 3.

Step 7 – Confirm installation on the next screen by swiping on the “Swipe to Confirm Flash” option. The installation procedure should start now as show below.


Step 8 – Once the installation is completed, you will be shown a similar screen like shown below.


Step 9 – Once you complete the second flash, you can now reboot to your system.
That’s it! You should now have a rooted Galaxy S7 / S7 Edge smartphone. You can install the Magisk Manager app to verify.
To make sure you have correctly installed the above root method and it’s working, verify with Root Checker as given in the link.
Have fun playing with it! If you have any issues, please fire them up in the comments below!
Источник
How to root Snapdragon Galaxy S7 and S7 Edge on Android 8.0 Oreo Samsung Experience 9.0?
@androidsage July 22, 2018 August 4, 2018
Table of Contents Hide
Update: Fix for Random reboot is to use the latest Eng Bootloader V6. The two year old Samsung Galaxy S7 and S7 Edge and all of their variants have already been updated to Android 8.0 Oreo by the end of last month. This first began when the Exynos variants of S7 G930F/FD (Global) and S7 Edge G935F/FD received the Oreo OTA update. Later, the US carriers rolled out similar update for AT&T, T-Mobile, Verizon, Sprint, etc. Now, here is a tutorial on how to root Snapdragon S7 and S7 Edge for latest Samsung Experience 9.0 based on Android 8.0 Oreo.
We already have the rooting tutorial for Exynos S7 and S7 Edge. This is possible because the Global variants have a readily Unlockable Bootloader. The Qualcomm Snapdragon processors, on the other hand, do not have this privilege. Thanks to developer, jrkruse, for deploying an Engineering Bootloader from Nougat that can be used on Oreo firmware as well. So the following procedure works on Android 7.0 Nougat as well as Android 8.0 Oreo firmware to gain root access for all US carrier models like SM-G930A/P/T/V and SM-G935A/P/T/V.
Root Snapdragon S7/S7 Edge supported devices:
- AT&T Galaxy S7 (Edge) SM-G930A or G935A (Oreo/Nougat)
- Sprint Galaxy S7 (Edge) SM-G930P or G935P (Oreo/Nougat)
- Verizon Galaxy S7 (Edge) SM-G930V or G935V (Oreo/Nougat)
- T-Mobile S7 (Edge) SM-G930T or G935T (Oreo/Nougat)
Warning: Although, the procedure has been tested working on some Snapdragon S7 devices, it doesn’t mean it will work for all the devices. If something goes wrong, we won’t be responsible. It is wise to backup and keep a full stock firmware file handy so your Samsung Galaxy device can be restored to stock via Odin. Reader’s discretion is advised.
Root Snapdragon Galaxy S7 (Edge) on Oreo – AT&T, T-Mobile, Verizon, Sprint
The root procedure has been tested working on Samsung Galaxy S7 (Edge) devices and is in beta state. So it may or may not work with all devices. Check out the supported devices list and also the warning . Moreover, this process does not cause any data loss.
Requirements:
- Verify the device for compatibility from above.
- Enable USB debugging and setup ADB and fastboot environment on PC.
- Download the ENG (AP) files for S7 and S7 Edge – Download S7_Oreo_Nougat_Adb_Advanced_Root V10 from here. (This is the ENGINEER boot kernel boot file that needs to be flashed).
- Make sure you have enabled USB Debugging on your S7 device.
- This file is optional and will Volte And Hotspot Fix. Download from here.
- Download and use latest modified Odin.
This Eng Boot Kernel zip will give you the option to install some CPU tweaks. You can change the settings included with the rooting Bootloader. You can also download the speedup swap app from Play Store to tweak further.
Warning: This tutorial will remove Knox and change the fstab.qcom file to disable DM-Verity on system and remove encryption. Installing the above zip requires a data wipe unless you have already installed it or you are coming from my non rooted ROMS.
How to Root Galaxy S7 (Edge)?
- Download and extract the S7_Oreo_Nougat_Adb_Advanced_Root.zip from above. It consists of all the necessary files including SuperSU, Odin, etc.
- Transfer and Extract the zip file to PC and enter it.
- Reboot your S7 device into Download Mode or Odin Mode. (Turn off the device completely and then press and hold Power button + Volume Down (or Up) + Home keys for a few seconds.)
- Enter the extracted S7_Oreo_Nougat_Adb_Advanced_Root folder and find the folder named Odin_Firmware. You will need to use the modified Odin to flash the Eng Boot Image for your
phone. - Launch the modified ODIN EXE on your PC. Run Odin software as administrator.
- Connect your device to your PC using a USB cable and make a successful connection.
- From Odin, click on AP button slot and add the AP_SM_G930_OREO_ENG_BOOT.tar file or whichever is best for your particular S7 or S7 Edge device.
- Verify everything and proceed with installation by selecting Start button.
- Let the installation begin and then reboot to system.
- Once done, connect Android to PC and again go to the folder S7_Oreo_Nougat_Adb_Advanced_Root.
- Simply run the root.bat file. Alternatively, you can open a Command Prompt (CMD) on your computer and enter the following:
Note: You can also run the root.bat file by double-clicking it, but make sure the zip is extracted. This will push the required files and root the S7 device.
- Follow the directions on terminal.
- It is recommended to choose the Systemless Root option.
- Once the phone is rooted, and root bat closes, leave the phone alone for a few minutes,
- Phone may reboot a couple of times
Note: If you choose system root, it is OK to update the binary when the SuperSU app asks. Choose normal. Just don’t flash any third-party superuser zips in recovery.
Once the procedure is complete, reboot the phone once and start granting root access to apps.
Possible fix for heating and lag after rooting Galaxy S7
Install Kernel Adiutor (ROOT) app from the Play store and grant root access. Open app and set both CPU governors to ONDEMAND and set apply on boot. Also, CONSERVATIVE kernel settings could give better battery life. Keep testing the options for your device.
Источник
Как получить root на Samsung Galaxy S7 и Galaxy S7 Edge

Сегодня мы поговорим о том, как получить права пользователя root на смартфонах Samsung Galaxy S7 и Galaxy S7 Edge.
Данная инструкция написана ТОЛЬКО для официальных прошивок на базе Anroid 6 Marshmallow. На данный момент Galaxy S7/S7 Edge начали обновляться до 7.0 Nougat, однако с этой версией ситуация может быть иной.
Отметим, что это первый из известных методов активации режима root для Galaxy S7 и Galaxy S7 Edge, и он требует определенного уровня квалификации. Со временем могут появиться другие способы, о которых мы обязательно расскажем.
Предупреждаем, что все операции со смартфоном по получению root вы проводите исключительно на свой страх и риск, мы не несем никакой ответственности за возможные последствия.
Активация режима root может приводить к возникновению проблем с безопасностью работы смартфона. Также на смартфоне с активированным режимом root могут не работать некоторые приложения, либо их функционал существенно ограничивается по соображениям безопасности (программы электронных платежей, мобильный банкинг и т.п.).
Данная инструкция по получению прав пользователя root работает с любыми вариантами Samsung Galaxy S7 и Galaxy S7 Edge вне зависимости от того, на каком чипсете они работают (Exynos 8890 и Snapdragon 820). Единственное требование — наличие разблокированного загрузчика (у некоторых американских вариантов Galaxy S7 и Galaxy S7 Edge он заблокирован).
Проверка загрузчика
Для проверки наличия возможности разблокировки загрузчика нужно зайти в режим разработчика. По умолчанию он отключен. Для его активации нужно зайти в настройки смартфона на вкладку «Опции», далее прокрутить вниз до раздела «Об устройстве», перейти в него. Найдите пункт «Номер сборки» и несколько раз нажмите на него. Обычно хватает 5 раз, причем смартфон сам подскажет, сколько нажатий осталось до активации режима разработчика.
Если вы сделали все верно, прямо над разделом «Об устройстве» должен появиться новый — «Параметры разработчика». Перейдите в него и найдите пункт «OEM Unlocking». Если такой пункт у вас есть и там можно поставить галочку, то у вас все хорошо — режим разработчика вам доступен. Переходите собственно к этапу активации режима root.
 Активация режима root
 Активация режима root
Вам потребуется собственно ваш смартфон Samsung Galaxy S7 и Galaxy S7 Edge, дата-кабель MicroUSB и компьютер под управлением ОС Windows 7 и современнее.
- Загрузите специальную утилиту CF-Auto-Root для Galaxy S7 и Galaxy S7 Edge. Скачать ее можно на сайте проекта.
- Загрузите программу для работы с прошивкой смартфонов Samsung ODIN. Сделать это можно на сайте программы. Отметим, что в большинстве случаев ODIN уже присутствует в архиве вместе с CF-Auto-Root, однако мы рекомендуем скачать самую последнюю версию.
- Скачайте и установите драйвер для подключения смартфонов Samsung в ОС семейства Windows. Также можно скачать и установить как альтернативное решение специальное ПО Kies последней версии для управления смартфонами Samsung Galaxy.
- Перезагрузите ваш компьютер.
- Распакуйте CF-Auto-Root.
- Распакуйте и запустите программу ODIN.
- Выключите ваш Galaxy S7/S7 Edge, после этого зажмите и удерживайте одновременно кнопки «Домой», «Громкость вниз» и «Питание», пока смартфон не перейдет сам в режим загрузки прошивки.
- Дождитесь, пока загорится экран и нажмите кнопку увеличения громкости.
- Теперь подключите смартфон к компьютеру с помощью кабеля USB.
- ODIN должен запустить идентификацию устройства, в процессе будут устанавливаться драйверы. Есть система спросит разрешение на запуск чего-то в этот момент — соглашайтесь.
- Если вы все сделали правильно, в левом верхнем углу экрана должен загореться синенький огонек.
- Теперь нажмите кнопку «АР» в ODIN, укажите файл CF-Auto-Root (обычно имеет название вида CF-Auto-Root-herolte-heroltexx-smg930f.tar.md5), который вы скачали для своей модели смартфона в самом начале процедуры.
- Нажмите кнопку «Start» в ODIN — процесс активации режима root запустится автоматически. В процессе смартфон может несколько раз перезагружаться.
Вся процедура занимает обычно 3-5 минут. Никакой дополнительной индикации процесса модификации прошивки нет, так что нужно просто подождать, пока ваш Galaxy S7/Galaxy S7 Edge не загрузится. Шанс превратить аппарат в «кирпич» минимален.
Вместе с активацией режима суперпользователя на смартфон будет установлено ПО SuperSU для управления режимом root (рекомендуется сразу обновить после установки).
Как мы уже написали выше, некоторые программы могут не работать либо работать с ограниченным количеством функций после активации режима root, либо выдавать предупреждения при запуске. Примеры:
- QIWI VISA Wallet (не работает бесконтактная оплата через NFC).
- Мобильный кошелек (выдается предупреждение при запуске об отказе об ответственности).
- «Сбербанк онлайн» (не доступны некоторые функции).
- «Мой проездной» от «Банк Москвы» (не работает вообще).
В ряде случаев снять подобные ограничения могут специальные программы, скрывающие наличие режима суперпользователя, например Hide my Root.
Источник


