- [UNLOCKED][ROOTED]Android 11 system-as-root and privacy policy updates permission problem
- Breadcrumb
- gh0stza
- How to Install OTA Updates on Rooted Android Devices using Magisk [Without Losing Root]
- What is an OTA Update?
- Why You Can’t Install OTA Updates on Rooted Android Devices Automatically?
- Magisk Root, A/B Partitions, and OTA Updates
- How to Install OTA Updates on Rooted Android Devices?
- Step 1: Disable Automatic System Updates in Settings
- Step 2: Restore Stock Boot Image When an OTA is Available
- Step 3: Install the OTA Update on your Rooted Android Device
- Step 4 [Optional]: Retain TWRP Recovery after OTA Installation
- Step 5: Preserve Magisk Root after OTA Installation
[UNLOCKED][ROOTED]Android 11 system-as-root and privacy policy updates permission problem
Breadcrumb

gh0stza
Member
This is my first post here.
Yesterday I rooted a Samsung A51 SM-A515F/N with android 11 [ A515FxxU4EUD7 ] stock rom with twrp recovery, unlocked bootloader, and magisk.
As far as I can tell zero functionality loss on OS. Got everything to work just right.
Pass SafetyNet Test .
systemized FGL Pro and GPS Joystick as priv-apps.
Both applications recognize system mode but they both crash when you start the location mocking.
I believe I found what is making them crash.
Need confirmation/Advise on how to proceed.
Assume full rooted SM-515F with fully working Magisk 23.0 and Terminal Systemizer module installed
a51:/ $ su
a51:/ # systemize
! Busybox not detected
Please install one (@osm0sis’ busybox recommended)
df: Unknown option ‘m’ (see «df —help»)
df: Unknown option ‘m’ (see «df —help»)
1 — Systemize Installed Apps (Listed)
2 — Systemize Installed Apps (Enter label)
3 — Systemize given APK
s — Set SELinux
0 — Exit
Enter APK Path
Example: /sdcard/launcher.apk
x — Back to Menu
> /sdcard/Download/com.ltp.pro.fakelocation.apk
Checking if file exists — OK
Checking if file is an APK — OK
Checking package name — com.ltp.pro.fakelocation
Where to install?
: 2
df: Unknown option ‘m’ (see «df —help»)
df: Unknown option ‘m’ (see «df —help»)
Checking APK size — 5M
Transfering com.ltp.pro.fakelocation.apk(com.ltp.pro.fakelocation) to ‘/system/priv-app’.
Granting Permissions
com.ltp.pro.fakelocation — Done
1|a51:/ # mount -o rw,remount /
a51:/ # rm /etc/permissions/privapp-permissions-platform.xml
a51:/ # cp /sdcard/Download/privapp-permissions-platform.xml /etc/permissions/
a51:/ # chown root:root /etc/permissions/privapp-permissions-platform.xml
a51:/ # chmod 644 /etc/permissions/privapp-permissions-platform.xml
a51:/ # mount -o ro,remount /
a51:/ # reboot
Snippet of /etc/permissions/privapp-permissions-platform.xml:
snippet from cmd dumpsys package com.ltp.pro.fakelocation:
Packages:
Package [com.ltp.pro.fakelocation] (1e331cd):
userId=10264
pkg=Package<876da82 com.ltp.pro.fakelocation>
codePath=/system/app/com.ltp.pro.fakelocation
resourcePath=/system/app/com.ltp.pro.fakelocation
legacyNativeLibraryDir=/system/app/com.ltp.pro.fakelocation/lib
primaryCpuAbi=null
secondaryCpuAbi=null
versionCode=67 minSdk=15 targetSdk=28
versionName=3.4.9.3
splits=[base]
apkSigningVersion=2
applicationInfo=ApplicationInfo<876da82 com.ltp.pro.fakelocation>
flags=[ SYSTEM HAS_CODE ALLOW_CLEAR_USER_DATA LARGE_HEAP ]
privateFlags=[ PRIVATE_FLAG_ACTIVITIES_RESIZE_MODE_RESIZEABLE_VIA_SDK_VERSION PRIVATE_FLAG_REQUEST_LEGACY_EXTERNAL_STORAGE PRIVATE_FLAG_ALLOW_NATIVE_HEAP_POINTER_TAGGING ]
forceQueryable=false
queriesPackages=[]
dataDir=/data/user/0/com.ltp.pro.fakelocation
supportsScreens=[small, medium, large, xlarge, resizeable, anyDensity]
usesLibraries:
android.test.base
android.hidl.manager-V1.0-java
android.hidl.base-V1.0-java
usesOptionalLibraries:
org.apache.http.legacy
usesLibraryFiles:
/system/framework/android.test.base.jar
/system/framework/android.hidl.manager-V1.0-java.jar
/system/framework/android.hidl.base-V1.0-java.jar
/system/framework/org.apache.http.legacy.jar
timeStamp=2021-05-30 19:29:31
firstInstallTime=2021-05-30 19:29:31
lastUpdateTime=2021-05-30 19:29:31
signatures=PackageSignatures<3bad593 version:2, signatures:[721026fa], past signatures:[]>
installPermissionsFixed=true
pkgFlags=[ SYSTEM HAS_CODE ALLOW_CLEAR_USER_DATA LARGE_HEAP ]
declared permissions:
com.ltp.pro.fakelocation.permission.MAPS_RECEIVE: prot=signature, INSTALLED
com.ltp.pro.fakelocation.permission.C2D_MESSAGE: prot=signature, INSTALLED
requested permissions:
android.permission.INTERNET
android.permission.ACCESS_NETWORK_STATE
android.permission.ACCESS_FINE_LOCATION
android.permission.ACCESS_COARSE_LOCATION
android.permission.SYSTEM_ALERT_WINDOW
com.google.android.providers.gsf.permission.READ_GSERVICES
android.permission.READ_EXTERNAL_STORAGE: restricted=true
android.permission.WRITE_EXTERNAL_STORAGE: restricted=true
android.permission.FOREGROUND_SERVICE
com.android.vending.BILLING
com.android.vending.CHECK_LICENSE
android.permission.WRITE_SETTINGS
android.permission.INSTALL_LOCATION_PROVIDER
android.permission.WRITE_SECURE_SETTINGS
android.permission.ACCESS_MOCK_LOCATION
android.permission.WAKE_LOCK
com.google.android.c2dm.permission.RECEIVE
com.ltp.pro.fakelocation.permission.C2D_MESSAGE
android.permission.ACCESS_BACKGROUND_LOCATION: restricted=true
android.permission.ACCESS_MEDIA_LOCATION
install permissions:
com.ltp.pro.fakelocation.permission.C2D_MESSAGE: granted=true
android.permission.WRITE_SETTINGS: granted=true
com.google.android.c2dm.permission.RECEIVE: granted=true
com.google.android.providers.gsf.permission.READ_GSERVICES: granted=true
android.permission.SYSTEM_ALERT_WINDOW: granted=true
android.permission.FOREGROUND_SERVICE: granted=true
android.permission.INTERNET: granted=true
com.android.vending.CHECK_LICENSE: granted=true
com.android.vending.BILLING: granted=true
android.permission.ACCESS_NETWORK_STATE: granted=true
android.permission.WAKE_LOCK: granted=true
User 0: ceDataInode=46342 installed=true hidden=false suspended=false distractionFlags=0 stopped=false notLaunched=false enabled=0 instant=false virtual=false
overlay paths:
/product/overlay/NavigationBarMode3Button/NavigationBarMode3ButtonOverlay.apk
gids=[3003]
runtime permissions:
android.permission.ACCESS_FINE_LOCATION: granted=true, flags=[ USER_SET]
android.permission.READ_EXTERNAL_STORAGE: granted=false, flags=[ APPLY_RESTRICTION]
android.permission.ACCESS_COARSE_LOCATION: granted=true, flags=[ USER_SET]
android.permission.WRITE_EXTERNAL_STORAGE: granted=false, flags=[ APPLY_RESTRICTION]
android.permission.ACCESS_BACKGROUND_LOCATION: granted=false, flags=[ REVOKE_WHEN_REQUESTED|APPLY_RESTRICTION]
android.permission.ACCESS_MEDIA_LOCATION: granted=true, flags=[ USER_SET|REVOKE_WHEN_REQUESTED]
Please direct your attention to the second last line: «android.permission.ACCESS_BACKGROUND_LOCATION: granted=false, flags=[ REVOKE_WHEN_REQUESTED|APPLY_RESTRICTION]»
This permission is restricted even though permission has been explicitly set with the xml file.
I believe this is due to: https://developer.android.com/training/location/permissions this update of the privacy policy on Android 11.
Now this thread says that the permission for ACCESS_FOREGROUND_LOCATION needs to be requested in the application.manifest file before ACCESS_BACKGROUND_LOCATION is called. This allows the user to select the always allow option that allows background threads to handle location permissions. This is where I believe the app crashes — the thread gets aborted and then crashes the app because it can’t get background location access.
I’m thinking the only solution is to get the devs of FGL/GPSJoystick to add these permissions to their minifest files. Am I correct or am I missing something big?
EDIT: interestingly — installing the app as userapp(not system app), gives the «Allow all the time» option under location (Settings->Apps->Permissions->Location). I think I’m missing something, aldo I might be a little sleep deprived, 36 hours straight with this A51
Please let me know if you need any more info from me
Источник
How to Install OTA Updates on Rooted Android Devices using Magisk [Without Losing Root]
An OTA update has arrived, but you cannot install it because your Android device is rooted? Well, that’s a known downside of rooting Android. In this guide, you will learn how to install OTA updates on rooted Android devices using Magisk. By using the method provided in this guide, you will also be able to retain root and TWRP after installing the OTA update. Before we get any further, let us take a quick look at what OTA updates are and how they work.
What is an OTA Update?
An OTA Update a.k.a an Over-the-Air Update is a wireless method of receiving and installing updates to an Android device’s software.
It is remotely pushed by the device manufacturer (Also known as the ‘OEM’) and is the easiest and most effective way to update an Android device’s software to the latest available version. Once an OTA update arrives, it is either automatically installed or prompts the user to manually download and install it.
So, how does one install an OTA update on a rooted Android device? You will know more about it in the next section. Read ahead.
Why You Can’t Install OTA Updates on Rooted Android Devices Automatically?
Rooting an Android device is great, it gives the user tremendous control over the device’s software and allows making any sort of modifications to it. However, it comes with its own drawbacks. The biggest one is losing the ability to take automatic OTA (over-the-air) updates. And users (Generally who are new to the scene) often tend to overlook this factor when they root their Android device.
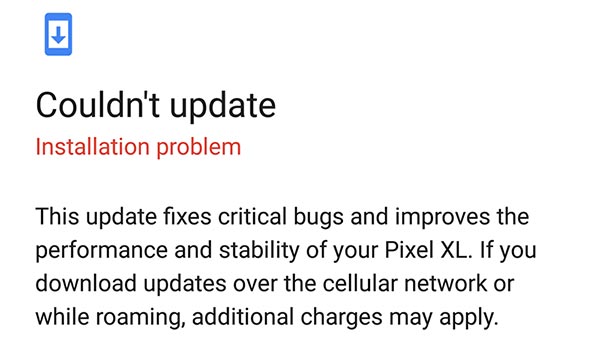
In Android 5.0 and above, Google introduced the concept of block-based OTAs. This new mechanism does certain pre-OTA block checks to verify the integrity of the device’s software. In layman terms, once the installation begins, the device partitions (like system, boot, vendor, dtbo, etc) are checked for modifications like Root, TWRP, etc. And if detected, the OTA update will fail to install.
Magisk Root, A/B Partitions, and OTA Updates
But thanks to Magisk, you can easily install OTA updates on rooted Android devices without losing root. For those who don’t know, Magisk is a Universal Systemless Interface that allows you to make modifications to your Android device’s software systemless-ly, that is, without altering the /system partition.
Not just that, it has also developed to be the most prominent modern-day rooting solution for Android using MagiskSU. Want to know more about how it came into existence? Then there’s no better way but to hear out the story directly from its creator – topjohnwu.
The developer devised two different methods to install Magisk and root Android devices:
- The first method follows the traditional process of installing a custom recovery (TWRP, OrangeFox, etc) and then using it to flash the Magisk installer zip (root package). But since you will install a custom recovery during this method, it makes it even harder to take OTA updates. So, to regain the ability to take automatic OTA updates or install them manually, you would require to first uninstall/remove root and other modifications applied to the software. And further, restore the stock Android recovery on your device.
- The second method was introduced when Google first released the Google Pixel devices in 2016. These devices came with dual A/B partition system to support seamless updates and removed the recovery partition from the devices completely. So, the first method failed rigorously. This new method involves patching the stock boot image using Magisk and then flashing the patched boot image via Fastboot.
The best part about rooting your Android device with Magisk is that it gives you the ability to install OTA updates easily. So, follow the instructions below on how to do it.
Note: If you’re upgrading from Android 10 to Android 11, make sure that you update to Magisk 21.0 or the latest Magisk Canary release. v20.4 and lower do not support Android 11.
How to Install OTA Updates on Rooted Android Devices?
Now, since most new OEM Android devices come with the A/B partition scheme, OTA updates are seamlessly installed to the inactive slot. When you root using Magisk, it is only installed to the currently active slot of your Android device. And thus, the inactive slot/partitions stay untouched.
When an OTA arrives, you can simply restore the stock boot image from within Magisk Manager, then install the OTA update to the inactive slot. And finally, right before you reboot your phone, you can install Magisk to the inactive slot to preserve root after the update.
Still, sounds a bit confusing? Don’t worry, the instructions below will take you through the complete process in detail. For your convenience, we have split the instructions into 5 different steps so that you can understand exactly what you’re doing.
Step 1: Disable Automatic System Updates in Settings
In Android 8.0 Oreo (and above), Google introduced a new automatic updates policy that downloads and installs OTA updates as soon as they are available.
Although this is great for an average Android user, but not for those who have rooted their devices. In order to update your rooted Android phone, you must first prevent the system from automatically installing updates without your acknowledgment.
Simply follow the steps below to disable Automatic System Updates in Android:
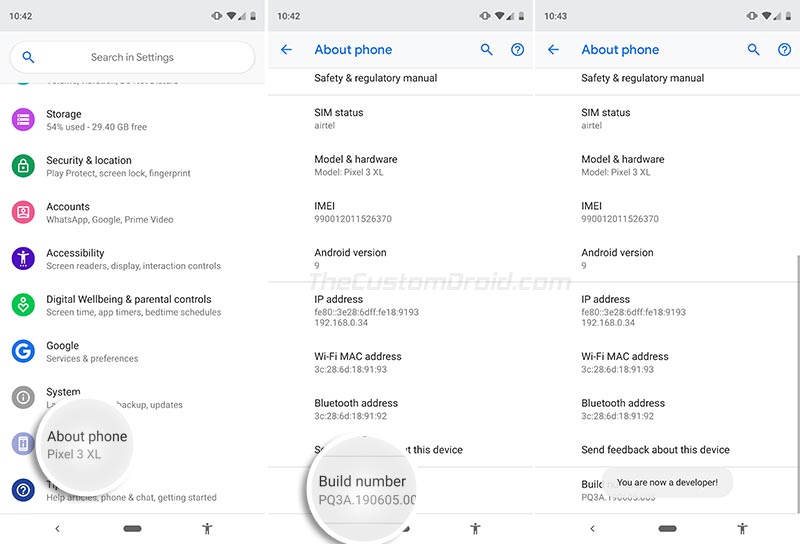
- Go to the Settings menu on your Android device.
- Navigate through the settings and select the About phone menu.
- Scroll down to the bottom and find the Build number section.
- Note: In the case of some OEM devices, the Build Number section could be nested further in the Settings menu. For example, in Samsung Galaxy devices, you will need to go to Settings → About phone → Software information.
- Now, continuously tap on the ‘Build number’ section for five (5) times to enable ‘Developer options‘ on your device.

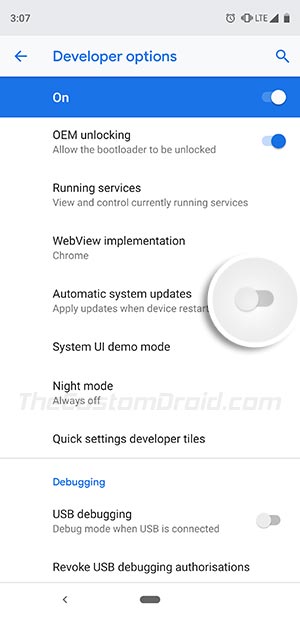
- Once enabled, go to Settings → System → Developer options.
- Scroll down and turn off the Automatic system updates toggle.
Step 2: Restore Stock Boot Image When an OTA is Available
Now your Android device is rooted and an OTA update notification has arrived. When an OTA update is available, you will need to restore the stock boot image (and dtbo, if applicable) and uninstall Magisk from the current slot.
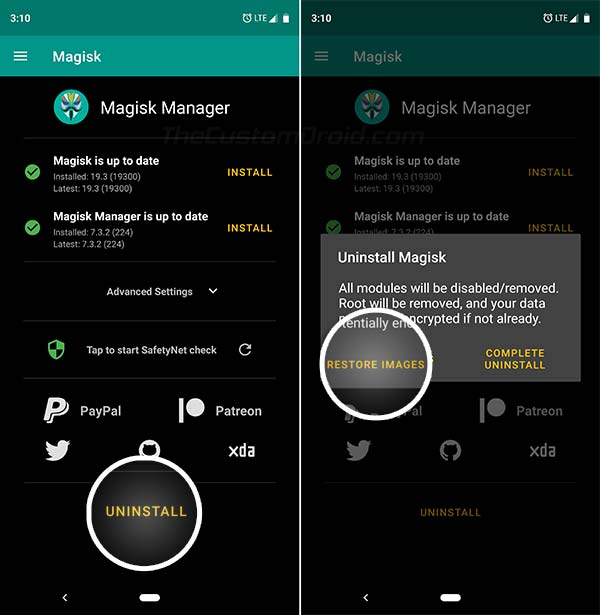
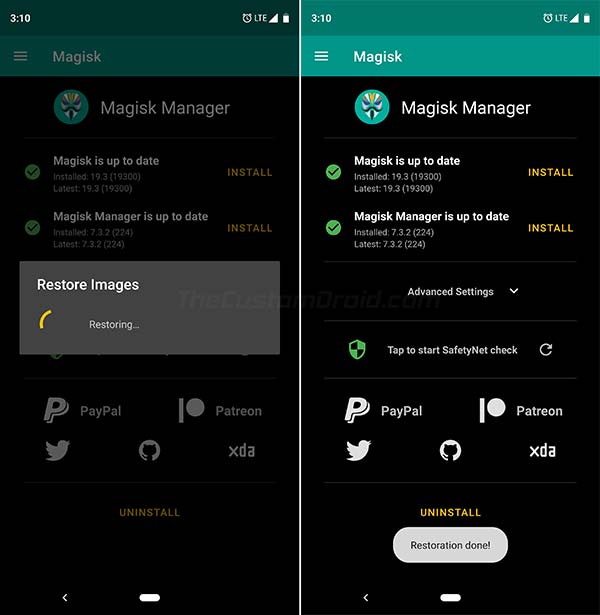
To do so, go to the app drawer and launch the ‘Magisk Manager‘ app. Then tap on the UNINSTALL button and select the RESTORE IMAGES option. You should now see the “Restoration done!” message on the screen.
Do not! Absolutely do not reboot your phone now, or else Magisk will be uninstalled completely.
Step 3: Install the OTA Update on your Rooted Android Device
Now, with the stock boot image restored, you can freely install the OTA update on your rooted Android device. Simply go to the device Settings → System → System update, and press the ‘Download and Install‘ button.
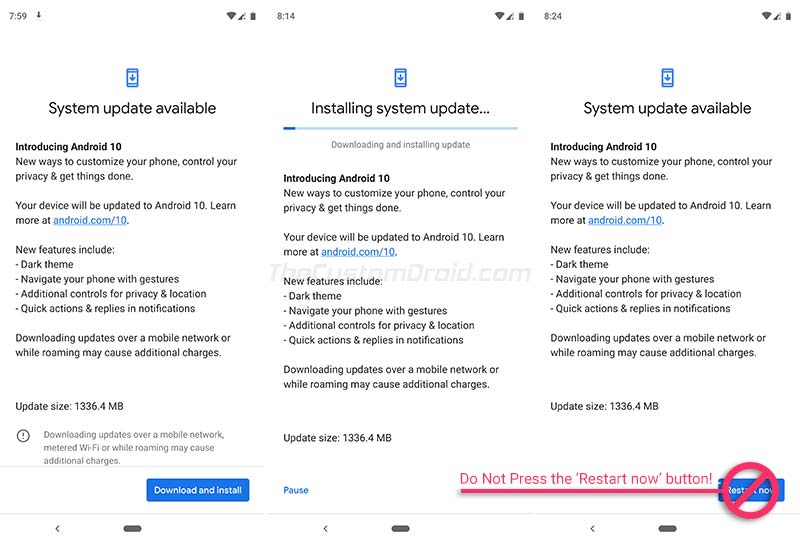
Once the installation finishes, you shall be prompted to reboot your phone. DO NOT REBOOT YOUR DEVICE YET! Simply move ahead to the next step.
Step 4 [Optional]: Retain TWRP Recovery after OTA Installation
This is an optional step and only to followed if you installed Magisk using TWRP recovery (Method 1). It will allow you to retain TWRP recovery after installing the OTA update.
For this, you will need to download and install “TWRP A/B Retention Script” (by XDA Recognized Developer osm0sis) from within Magisk Manager. To do so, follow the steps below:
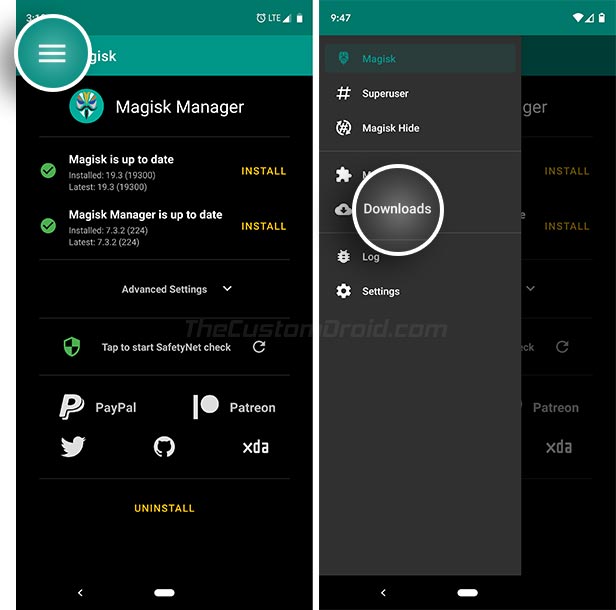
- Go to the app drawer and launch the Magisk Manager app.
- Tap on the menu icon (3-horizontal lines) on the top-left of the app’s window.
- Select ‘Downloads‘.
- Now search the modules repository for “TWRP A/B Retention Script“.
- Next, tap on the download icon and select the Install option.
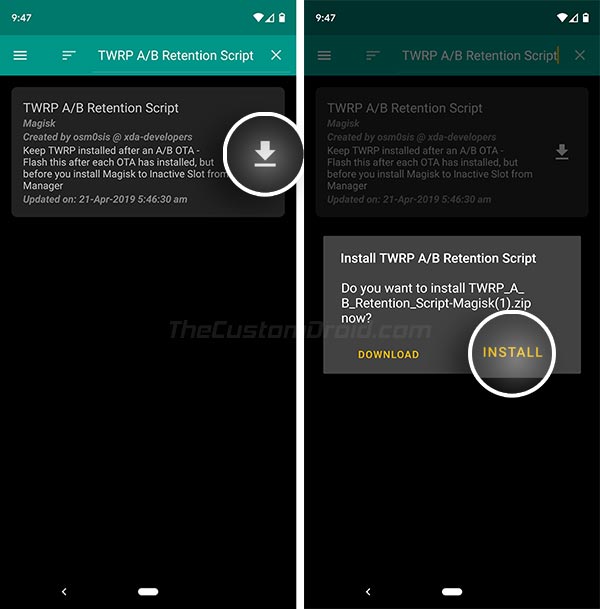
The script should now be installed on your phone. There’s nothing more you’d need to do for this now. The script will do its job and preserve TWRP after the OTA installation finishes.
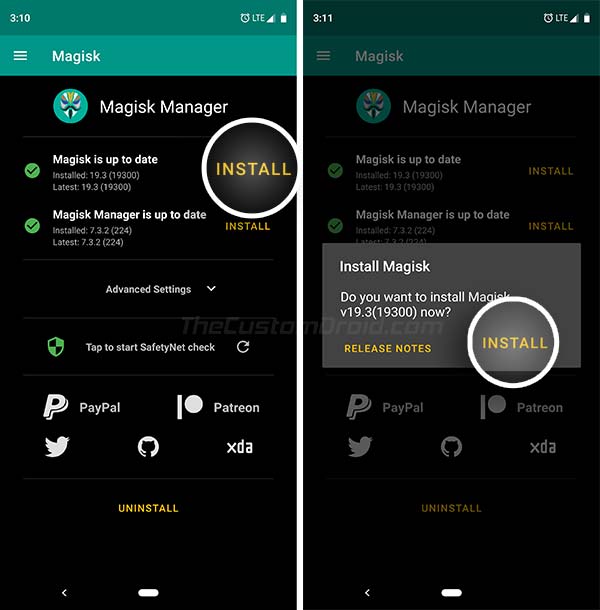
Step 5: Preserve Magisk Root after OTA Installation
The final step to install Magisk to the inactive slot. This will preserve root after the OTA installation is finished and the device is rebooted into the updated OS.
- Open Magisk Manager.
- Tap on the ‘INSTALL‘ button and select the ‘INSTALL‘ option.
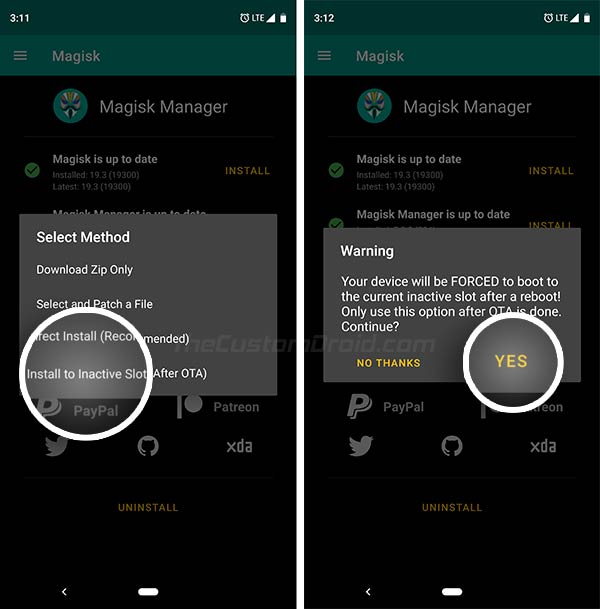
- Select ‘Install to Inactive Slot (After OTA)‘ when prompted to choose the installation method.
- Finally, tap on ‘YES‘ to confirm when the warning message appears on the screen.
- Magisk will now be installed on the inactive slot.
- Once the process finishes, tap on the ‘Reboot‘ button.
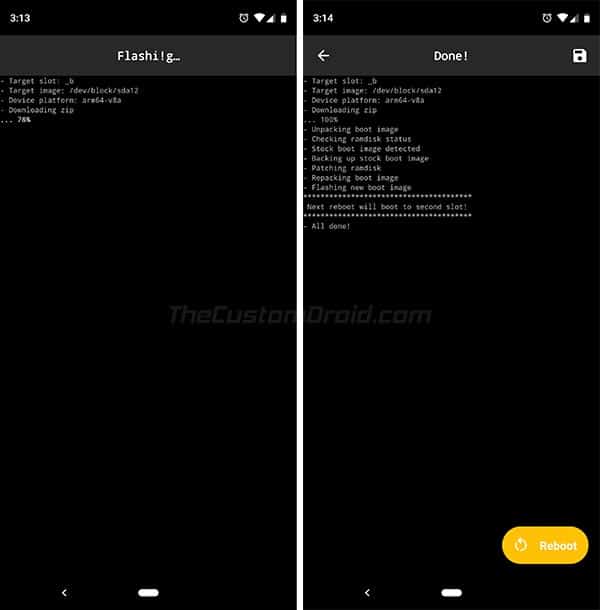
Magisk Manager will now force-switch your Android device to the inactive slot where the OTA update was installed. This will help prevent any post-OTA verifications that the system might have carried.
That’s it! You have just successfully installed an OTA update on your Android device rooted with Magisk. So when the next time an OTA update arrives, you can follow the same instructions to upgrade your device, and that too without losing root.
If you have any questions regarding the instructions/procedure listed here, feel free to let us know. We shall try to help you to the best of our knowledge. Make sure that you mention your device’s name (model number if applicable) and the software build number installed. This will allow us to help you quickly and more efficiently.
Источник


