- Rooted android no wifi
- Rooted android no wifi
- [ROOT][GUIDE] Permanently Disable WiFi
- Breadcrumb
- shmshd12
- shmshd12
- olearius
- shmshd12
- babyshark1983
- ashu55
- milkandbananas
- akash.ahuja
- RaoulV
- How to Fix No WiFi, Calls, Network after Root or Custom ROM
- The Reason for Missing Network and WiFi after Root or Installing Custom ROM
- How to Fix No WiFi, Calls, Network after Root or Custom ROM
- STEP 1: Download Stock Firmware for your device
- STEP 2: Extract the Stock Firmware
- STEP 3: Get the Stock Modem File
- STEP 4: Install Android SDK
- STEP 5: Boot to Fastboot Mode
- STEP 6: Check if the Device is A/B or A Partition
- STEP 7: Fix Network WiFi Calls Issue by Flashing Modem File
- For A/B Device
- For A-only Device
- About Chief Editor
- Sadique Hassan
Rooted android no wifi
Android 4 не работает WI-FI
HTC Sensation XE
ОС и прошивка: Android 4.0.3
Описание проблемы:
Добрый день друзья. Вчера наконец то дождался долгожданное обновление до Андрюшки 4. Эта радость была омрачена тем что после обновления перестал работать Wi-FI. Видов ситуаций несколько:
1. Включился, находит сеть но не цепляется к сети. Пишет «ВНЕ ДИАПАЗОНА»
2. Вообще не может включится и не находит сеть. При включении тупо висит, пока не отключишь. При попытке включить вновь «полный ВИСЯК», пока не перегрузишь тело.
WI-FI раздает модем цепляюсь в рамках одной комнаты, то есть расстояние до модема максимум 5 метров без преград. До обновления такой траблы не было, все работало на УРА.
HELP ME ДРУЗЬЯ. Что делать ума не приложу. Вариант с «HARD RESET» здесь вряд ли прокатит, может они что то добавили в настройку Андрюшки 4.
Мне на теле крайне необходим WI-FI очень надеюсь на вашу помощь. Заранее СПАСИБО.
Сообщение отредактировал dva974 — 18.01.16, 23:54
Друзья у меня до этого все работало. проблемы начались когда я обновился по воздуху. и еще один баг обнаружился. не хочет работать синхронизация
Сообщение отредактировал a.zinin.v — 28.03.12, 11:11
Ясно. Подскажите, пжл, как откатиться на предыдущую версию? Спасибо заранее!
Сообщение отредактировал Kumen_SE — 28.03.12, 19:52
Вылечил. Сегодня обновился до ICS? пропал wi-fi. Порылся в инете, в частности http://forum.xda-developers.com/showthread.php?t=1563336
Далее скачал через моб.интернет с google play программу wifix. Зашел, поставил галку «keep wi-fi», и «о, чудо» удалось запустить вафлю!
Может это и своеобразные костыли, но продержатся до выхода официальной заплатки поможет.
У меня получилось без root. Попробуйте, программа wifix на google play. Сегодня пробовал подключатся к вафле без запуска этой программы и у меня получилось.
Попробуйте и отпишитесь, интересно, может это особенность моего аппарата.
Жаль. ну держитесь товарищи, тогда может у меня проблемы никакой и не было, а имел место самопроходящий глюк.
Еще раз как все было: Обновился до ics, вафля домашняя не подключается никак (и соединение удалял и новую точку доступа создавал, и перезапускал телефон — никак, тело постоянно пишет «подключение. «), выключил wi-fi, затем скачал прогу, открыл, галку поставил (прога висит в панели уведомлений), включил wi-fi и он сразу же увидел домашнюю сеть.
Аппарат Sensation XE (Сингапур), Android 4.0.3.
Сообщение отредактировал privet12 — 30.03.12, 16:50
Источник
Rooted android no wifi

Для полного функционирования программы необходимы права root пользователя.
Без root прав предпочтительнее использовать NetShare
Краткое описание:
Андроид как wi-fi повторитель
Описание:
Устройство должно поддерживать Wi-fi direct.
Turn your android device to wi-fi hotspot to share data/wi-fi connection with your other devices.
-Root access required by this app BUT no other configuration required, one tap to create the hotspot and start sharing your internet.
-If you don’t have a root access please use my other app NetShare-no-root-tethering
RouterNet app doesn’t use the native wi-fi hotspot which is now blocked in android 6 and above, instead it creates it’s own wi-fi hotspot using Wi-fi Direct in a new and elegant way to make your device act as a wi-fi hotspot and wi-fi extender in the same time using wi-fi Direct.
TAGS
Wi-fi Hotspot.
Wi-fi Hotspot.
Wi-fi repeater.
Wi-fi extender.
Wi-fi booster.
shar vpn connection.
share wi-fi connection.
boost wi-fi connection.
extend wi-fi network.
android wi-fi repeater.
share data connection.
Включите андроида устройство к wi-fi точки доступа для обмена данными / wi-fi соединение с другими устройствами.
— доступ Root требуется это приложение, но никаких других конфигураций требуется, один кран, чтобы создать точку доступа и начать обмен Интернета.
-Если вы не имеете корневой доступ, пожалуйста, используйте мои другие приложения NetShare-не-корня привязывать
RouterNet приложение не использует родной wi-fi точки доступа, которая в настоящее время заблокированы в Android 6 и выше, вместо этого он создает свой собственный wi-fi точки доступа с помощью wi-fi Direct в новом и элегантный способ сделать ваш поступок устройства в качестве wi-fi точки доступа и wi-fi расширитель в то же время с помощью wi-fi Direct.
TAGS
Wi-fi Hotspot.
Андроид репитер.
Wi-fi ретранслятор.
Wi-fi расширитель.
Wi-fi усилитель.
Совместно использовать wi-fi.
усилить wi-fi.
расширить wi-fi.
андроид wi-fi ретранслятор
Требуется Android: 4.1 и выше
Русский интерфейс: Да (перевел вручную с помощью MT Manager)
(Подпись изменена. RouterNet с измененной подписью будет получать рут дольше, чем с оригинальной)
 RouterNetPro_1.2_RUS_fix2_sign.apk ( 532.51 КБ )
RouterNetPro_1.2_fix2_sign.apk ( 532.05 КБ )
Источник
[ROOT][GUIDE] Permanently Disable WiFi
Breadcrumb

shmshd12
Senior Member
When you buy a new phone for your child. You want it must be a cool phone, but you also don’t want your child uses WiFi function.
I have seen many people wondering here and there to Disable the WiFi permanently in their device. So i thought to make a thread regarding this.
I have seen many posts asking to remove or rename the WiFi Modules to Disable the WiFi but when i tried that unfortunately it failed to delete the Module.
So i moved on for another step and found easy steps to Disable WiFi permanently
Tested & worked in HTC M8 (4.4.2) & Nexus 5 (5.1)
This is a simple trick played in Build.prop which can disable the WiFi of your device for ever.
All you need is :
Rooted Device
ES File Explorer
RB Text Editor
First of all i recommend you to make a system backup with TWRP
1. Open ES File Explorer and get Root access
2. Go to system folder and open Build.prop using RB Text Editor (i recommend you to backup original file)
3. Remove the below mentioned lines in Build.prop
4. save it and reboot!!
You can notice that WiFi buttons are no longer in use
Warning!
Im not responsible for any damage caused. Always Make Backup
Disclaimers:
PM me before you post!
shmshd12
Senior Member
olearius
Member
shmshd12
Senior Member
babyshark1983
Senior Member
ashu55
Member
milkandbananas
New member
Yes you can disable data permanently.
akash.ahuja
New member
Hello .. sir . I had seen that file in that text editor .. i dont found that coding. Nw what i can do.. pls tell me.
RaoulV
New member
This did not work for my phone, as those program lines are not present in my build.prop folder, but I found a solution for my Samsung Galaxy S5 Neo (6.0.1) that I know many others are looking for, it will probably work for all the galaxy models or at least some of them. Here it is:
1. Root your phone using «oneclickroot.com», they will do everything for you, including installing TWRP and SuperSU. Be sure to pay attention to how to access TWRP (Team Win Recovery Project). for me it was by holding down the volume up, home, and power keys simultaneously and then releasing the power key on seeing red letters. It might vary phone to phone.
2. Make a system backup with TWRP after rooting by accessing TWRP and simply clicking «backup» and then swipe. In the event that you need to restore just access TWRP and click and swipe «restore».
3. Use a file managing app like «Root Browser» by JRummy from google play to go into these file folders: «system/etc/wifi»
4. In the Wifi folder delete the first four files:
bcmdhd_apsta.bin
bcmdhd_ibss.bin
bcmd_mfg.bin
bcmd_sta.bin
4. Now reboot your phone by simply turning it off and back on again.
5. All done, your phone’s wifi will no longer work.
6. If for whatever reason you don’t want to be able to get it back ever again, just go delete your system backup in TWRP and you won’t be able to get it back.
If you don’t see these files in your phone after rooting, don’t be discouraged. I figured it out with a little experimentation and I knew absolutely nothing about programming or androids. I still don’t. Just make a system backup with TWRP and experiment by deleting different files that have «Wifi» in their name. Only delete one at a time or a small group of files at a time, and restart the phone every time as programming changes will not take effect until you do. Every time you brick (disable) the phone, just use TWRP to restore your OS (Operating System) using your TWRP backup. It only takes about 2 minutes to restore every time. I bricked my phone about 4 times in the process of figuring this out. Very simple and easy.
Also, your carrier will usually be willing to apply a «data block» to your account if you call them. For $2/month Koodo will apply a data block that makes it impossible to access data.
Источник
How to Fix No WiFi, Calls, Network after Root or Custom ROM
In this guide, we will show you the steps to fix the no WiFi signal issues, inability to make calls, or no network issues after rooting your device or flashing a custom ROM. Android ecosystem beholds a plethora of tweaks and customizations, all thanks to its open-source ecosystem. There is just one gate that you need to unlock before stepping into the custom domain- unlocking the bootloader. Once you do so, there are literally no ends to the modifications that you could try out.
For example, you could replace the device’s stock recovery with a custom one such as TWRP. Likewise, you could also install customized Android OS ROMs (aka Custom ROMs). Along the same lines, there is also a possibility of gaining access to the system partition and attaining administrative level privileges. This could be done by rooting your device via Magisk, with or without TWRP. Once rooted, you could then flash Magisk Module, Substratum Themes, Xposed Framework, etc.
However, this is just one side of the story. On the flip side, these tweaks might bring in a few risks as well. If you don’t perform these tweaks correctly, then your device might go into a boot loop, soft brick, or even hard brick. Fortunately, most of these issues could easily be rectified via the device’s specific tool (MSM DownloadTool, Mi Flash Tool, etc). Then there is another pretty common issue- no WiFi, Calls, or Network after root or flashing Custom ROM, and this guide shall help you fix that as well. So without further ado, let’s get started.
Table of Contents
The Reason for Missing Network and WiFi after Root or Installing Custom ROM
Simply unlocking the device’s bootloader doesn’t usually lead to the loss of network signals. However, the task that you perform after that is a cause of concern. In this regard, flashing an incorrect or older build of a custom ROM is a pretty common culprit. Likewise, nowadays many users have reported this issue after rooting their device. But how? Well, the thing is there are two different methods to root your device.
The first one is rather simple- just flash the Magisk Installer ZIP via TWRP. However, it is the second method of patching the stock boot.img via Magisk and then flashing it via Fastboot that seems to be giving this issue. What really happens is users tend to extract the stock boot.img from the firmware whose software version is different from the one that is currently installed on their device.
As a result, when they patch and then flash this boot.img, it leads to a conflicting scenario and leads to a few issues. Apart from the root and installing a custom ROM, there could be quite a few other reasons as well. Fortunately, no matter what the reason is, the fix is one and the same. On that note, let’s check out the steps to fix the no WiFi, Calls, or Network issues after root or flashing custom ROM.
How to Fix No WiFi, Calls, Network after Root or Custom ROM
The issue is with the partition of your device that handles all kinds of this stuff, aka the tasks related to Network, Radio, WiFi, Calls among others. This partition is named Modem and is the same across all Android devices. What isn’t the same is the name of their modem file, while some like to call it modem.bin itself others have it named as NON-HLOS.bin (where BIN is the file format). I got my hands on a couple of devices and here the names of their modem files:
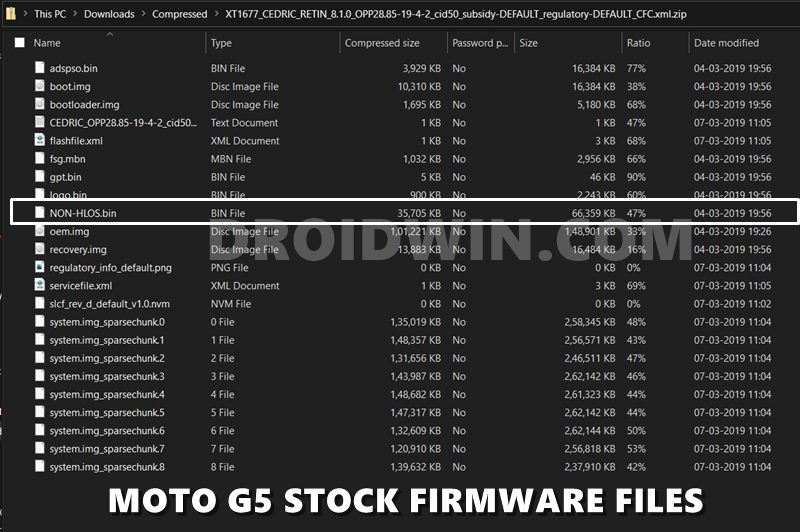
- Mi A3 [Android One]- NON-HLOS.bin
- OnePlus 6: modem.bin
- Redmi Note 8 [MIUI]: NON-HLOS.bin
- Motorola One Vision: modem.bin
As already mentioned before, the name of this file doesn’t matter, what really matters is that your device should have the modem partition. So keeping this in mind, let’s get on with the guide to fix the no WiFi, Calls, or Network issues after root or flashing custom ROM.
STEP 1: Download Stock Firmware for your device
First and foremost, you need to download the stock firmware for your Android device. Most of the OEMs upload the firmware for their devices on their official websites themselves, except for Samsung which requires tools like Frija. So head over to their site and grab the firmware file corresponding to your device and region. With that said, make sure that you are downloading the firmware that has the same version number as that your device is currently having. You could check the same from your device’s About Phone section.
STEP 2: Extract the Stock Firmware
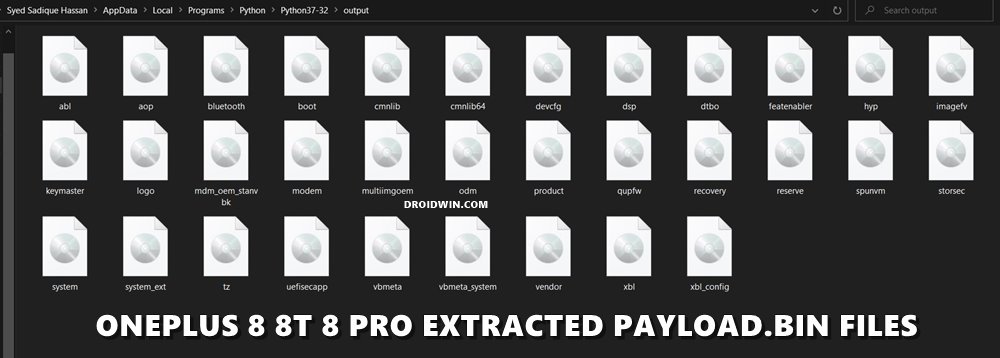
Once you have downloaded the firmware, extract it to a convenient location on your PC. If your firmware is in a ZIP format, then you could easily extract it via WinZIP/WinRAR, etc. However not every OEMs follow this tradition. For example, OnePlus have their partition files packed inside the payload.bin file whereas Oppo and Realme have it inside the OZIP. So if your device belongs to any one of these companies, then refer to the below guides.
STEP 3: Get the Stock Modem File
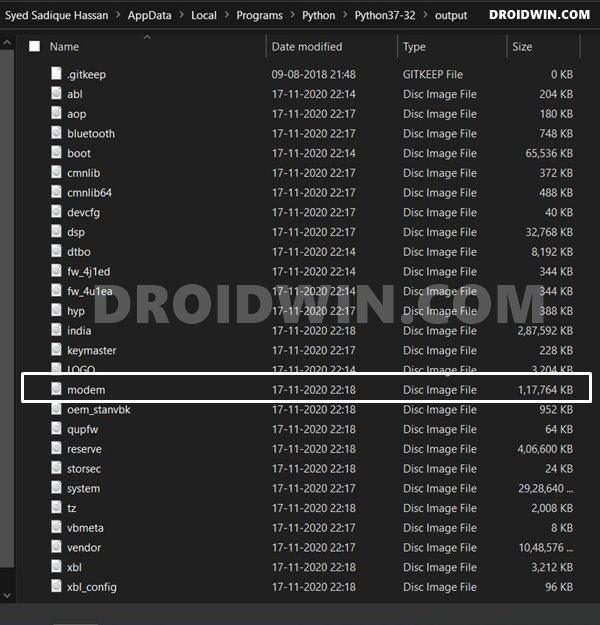
The next step in this guide to fix the no WiFi, Calls, or Network issues after root or flashing custom ROM requires you to get the stock modem file. Since you have extracted the stock firmware, look for the modem.bin or the NON-HLOS.bin file. Now copy this file and keep it ready.
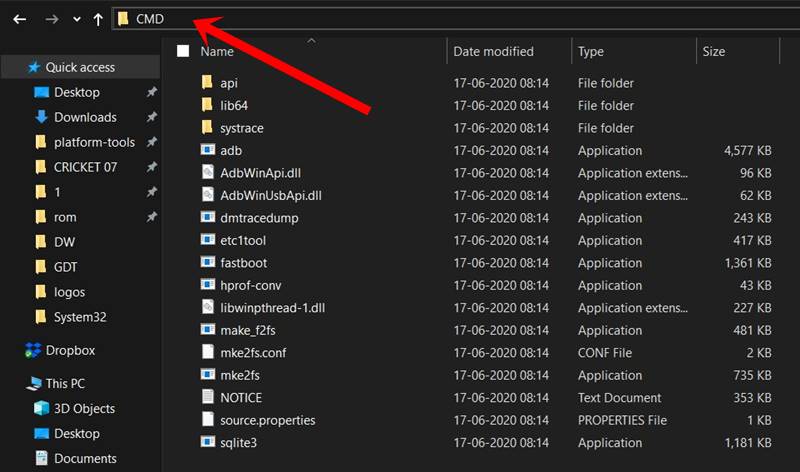
STEP 4: Install Android SDK
It’s time to install the Android SDK Platform Tools on your PC. This is the official tool provided by Google that has the required ADB and Fastboot binaries. So download this tool and extract it. You should then get the platform-tools folder, paste the modem file inside this folder. Once that is done, move to the next step to fix the no WiFi, Calls, or Network issues after root or flashing custom ROM.
STEP 5: Boot to Fastboot Mode
You will now have to boot your device to Fastboot Mode. This is because we now have to flash the modem file inside the modem partition, and flashing is only possible when your device is booted to Fastboot Mode. With that said, you may either use the device-specific hardware key combinations to boot to Fastboot or follow the below universal method:
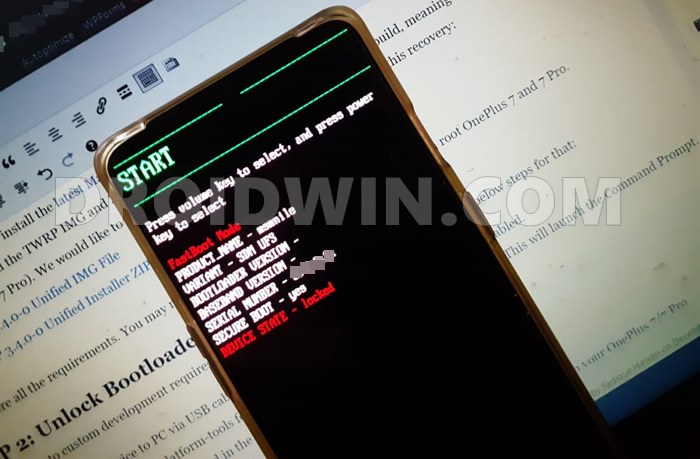 Fastboot Mode in OnePlus
- To begin with, enable USB Debugging on your device and connect it to the PC via USB cable.
- Then head over to the platform-tools folder, type in CMD in its address bar, and hit Enter. This will launch the Command Prompt.

- Finally, execute the below command in the CMD window to boot your device to Fastboot Mode:
- Your device is now in a position to have the files to be flashed to its partition. Follow along for the instructions for the same.
STEP 6: Check if the Device is A/B or A Partition
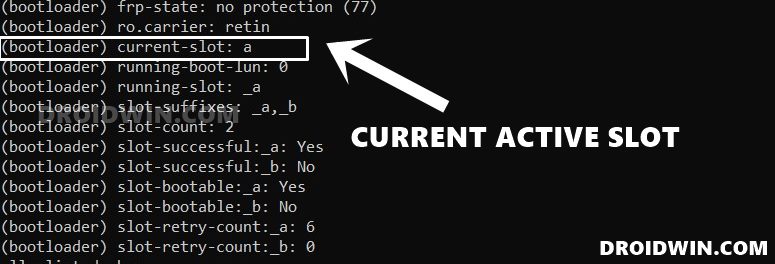
Your next and extremely important task is to check whether your device is A/B dual partition or an A-only single partition. For that, please refer to our guide on How to Check and Change Current Active Slot on Android [Direct Link to the Instructions: Does My Device Have A/B Partitions?]. Once you have verified the same, move over to the final set of instructions to fix the no WiFi, Calls, or Network issues after root or flashing custom ROM.
STEP 7: Fix Network WiFi Calls Issue by Flashing Modem File
Let’s start off with the steps to fix the network and call issue by flashing the stock modem file. Make sure that you have transferred the modem file (modem.bin or the NON-HLOS.bin file) to the platform-tools folder. Furthermore, you should also have the CMD window opened inside the platform-tools folder and the device should be connected to the PC in Fastboot Mode. If that’s all well and good, and you have checked the partition style of your device, proceed with the below instructions:
For A/B Device
- If your device has dual A/B Partition and the name of the modem file is modem.bin, then execute the below two commands in the CMD window. The first command will flash the modem file to Partition A whereas the second one will flash it to Partition B
- On the other hand, if your A/B partition device comes with the NON-HLOS.bin as the modem file, then execute the following two commands in the CMD window. As before, the first command flashes the file to Partition A whereas the second one flashes it to Partition B
- Once you have executed the above command, you may reboot your device to PC via the below command
- With this, you have fixed the no WiFi, Calls, or Network issues after root or flashing custom ROM on your A/B device.
For A-only Device
- If your device is A-only (single partition) and has the modem file named modem.bin, then use the below fastboot command to flash this file onto your device:
- However, if your single slot device (A-only) has NON-HLOS.bin as the modem file, then you should use the below command:
- Once the file has been flashed, use the below command to boot your device to the OS:
On that note, we conclude the guide on how to fix the no WiFi, Calls, or Network issues after root or flashing custom ROM. If you have any queries concerning the aforementioned steps, let us know in the comments section. We will get back to you with a solution at the earliest.
About Chief Editor
Sadique Hassan
A technical geek by birth, he always has a keen interest in the Android platform right since the birth of the HTC Dream. The open-source environment always seems to intrigue him with the plethora of options available at his fingertips. “MBA by profession, blogger by choice!”
Источник


