- Рут на Android из под линукс илина самом аппарате
- /4te.me
- Предисловие
- Подготовка
- Разблокировка загрузчика
- Получение root
- ChrootOnAndroid
- Debian install apps on Android
- Maintained
- Unmaintained
- Manual installation in a chroot
- Root your phone
- Install community Android variant
- Potentially useful tweaks
- Choose Android devices architecture
- Choose install device, tool and location
- Preparation
- Parameters
- Create install
- Transfer install to internal storage
- Advanced option using less temporary storage
- Convenience run-debian tool
- Finalise install
- Using the installation
- Running Debian binaries outside the chroot
- Available memory
- Group privileges on Android
- AF_INET privileges
- APT privilege dropping on Android
- exim4 and mailman chroot on Android
- Running GUI along side Android
- Integrate the Debian boot process
- handling /dev
- Important Android Environment Variables
- Booting into Debian instead of Android
Рут на Android из под линукс илина самом аппарате
В интернете в основном везде описывается способ получения рута программой под виндовс. Есть ли выход для тех у кого этой системы нет? Версия Android 4.0.3
Есть ли выход для тех у кого этой системы нет?

Рут получать можно и через adb и через Recovery телефона. Можешь взять zip отсюда и прошить через recovery или можешь подправить свои скрипты для windows для того чтобы они работали на онтопике(это очень легко).
unrevoked есть для linux (идет с вайн-либами).
Ты не указал свою модель телефона, поэтому предположим, что у тебя Galaxy Nexus. Да, рут можно получить и из под linux. Например, так.
Зависит от версии прошивки и ядра.
В большинстве случаев придётся прошивать рутованную прошивку.
я знаю есть популярные кастомные сборки андроида, не подскажешь названия?
я ведь все равно узнаю

Я получил root прогой SuperOneClick
Она на mono и должа работать под Linux, но у меня не запустилась и я запускал из шинды.
А на планшете у меня root изначально был.


Идешь на 4pda, находишь ветку своего аппарата, в шапке ссылка на FAQ, там находишь вопрос про рут, выполняешь. Я свой самсунг без десктопа вообще рутовал, закинул файлик на флешку, через рекавери его распаковал, и все.
нее, только хардкор! Ручками через adb скопировать 2 нужных файла, прописать права, кинуть линк — всё! 🙂
Источник
/4te.me
Быстроman как получить root-права на Android смартфоне. Я буду использовать OnePlus 3 и Android 8.0, но инструкция должна подойти и к другим устройствам.
Предисловие
Все действия вы выполняете на свой страх и риск. При неправильной последовательности, можно потерять данные или превратить телефон в кирпич. Также, важно понимать, что рутованный девайс, кроме некоторых удобств, несет в себе риски безопасности. Будьте внимательны.
Подготовка
Для начала, надо на компьютер установить adb и fastboot. Это утилитки из Android SDK для работы с подключенным по USB телефоном.
Для Windows есть удобный установщик adb, fastboot — https://forum.xda-developers.com/showthread.php?t=2317790
Вот здесь официальные дистрибутивы под все платформы — https://developer.android.com/studio/#downloads
Далее качаем TWRP. Это что-то типа livecd для телефона. Образ некой системы, в которой загрузится телефон, и в ней мы установим приложение Magisk.
TWRP (я брал версию 3.1.0-0-twrp.img) — https://dl.twrp.me/twrp/
Если у вас OnePlus, вот TWRP для них — https://eu.dl.twrp.me/oneplus3/ (надо брать этот twrp если вылетает ошибка dtb not fount)
Magisk — это open source приложение, которое дает рут права на телефон, и позволяет скрывать наличие рута от других приложений, чтобы работал Android Pay. Также, обновления системы, которые прилетают “по воздуху”, не должны сломаться. Лучше использовать Magisk, а не SuperSU.
Теперь включим режим разработчика на телефоне. Для этого в настройках, в разделе “О телефоне”, надо несколько раз нажать на “Номер сборки”. После раза 10-го, появится сообщение “Теперь вы разработчик”, и в настройках появится новый пункт “Для разработчиков”.
Разблокировка загрузчика
Разблокировка загрузчика удаляет все данные с телефона и sd-карты
Также, разблокировка загрузчика, без установленного далее Magisk, может сломать Android Pay.
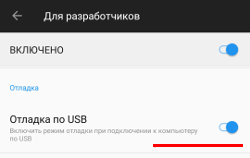
В настройках “Для разработчиков” включаем “Отладка по USB”, “Заводская разблокировка” и “Варианты перезагрузки” 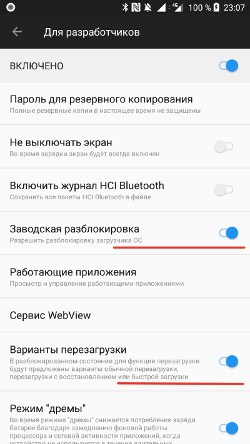
Загружаемся в fastboot mode. Для этого зажимаем кнопку выключения, выбираем “Перезагрузка” и далее “Загрузчик” 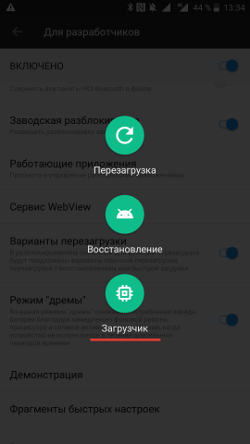 Второй способ — выключить телефон, зажать клавишу громкости вверх и клавишу включения. Через несколько секунд появится fastboot mode
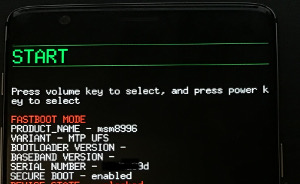
Подключаем телефон по USB-кабелю. И проверяем что устройство доступно в системе. Для этого выполняем:
ПОСЛЕ ЭТОЙ КОМАНДЫ ТЕЛЕФОН ПЕРЕЗАГРУЗИТСЯ И ВСЕ ДАННЫЕ БУДУТ УДАЛЕНЫ. Делайте бэкапы всех данных до этого шага.
Теперь загрузчик разблокирован.
Получение root
- Подключаем телефон к компьютеру в режиме передачи файлов MTP
- Заливаем на телефон zip-файл Magisk, скачанный выше из github
- Загружаемся в TWRP. Для этого перезагружаем телефон в fastboot mode (см. пункт 2 инструкции выше как разблокировать загрузчик) и на компьютере выполняем:
Все, теперь с помощью Magisk Manager можно выдавать root-овые права приложениям, которые их запрашивают, а также скрывать от других приложений, что этот девайс рутованный, чтобы не сломать Android pay.
Источник
- ChrootOnAndroid
Debian install apps on Android
There are a number of free and non-free apps and scripts for Android that allow you to run a Debian chroot on an Android device.
Maintained
Termux: Debian/Ubuntu environment without root access
MaruOS: uses Linux containers
AnLinux-App: downloads pre-built installs, uses proot
Unmaintained
Lil’ Debi: uses cdebootstrap to run the full install process on the Android device, then manage starting and stopping the chroot. It aims to provide a single Debian install in parallel with Android while touching the Android internals as little as possible. It provides a complete Debian install process and transparent boot integration. The app includes the debian-keyring.gpg so cdebootstrap fully verifies the packages it downloads from the beginning. It calls /etc/init.d/rc 2 on boot and /etc/init.d 0 on shutdown to provide boot integration.
DebianKit: installs Debian in same location as Android. This is possible since Android uses almost none of the standard UNIX paths, so Debian can just be copied directly onto the same file system. The one notable exception is that Android has a symlink to /system/etc at /etc, and there are a few files in /system/etc.
DebKit (different from DebianKit) (unmaintained)
GNURoot: lets you install a limited Debian environment without root access
Manual installation in a chroot
Root your phone
Side-loading z4root might be an option.
There maybe other options depending on your phone.
Install community Android variant
Vendor Android builds often have proprietary drivers/apps, anti-features, spyware or telemetry preinstalled. It is recommended to switch to a community maintained open source variant of Android.
Potentially useful tweaks
Set CPU to 710 MHz with the interactiveX governor. YMMV
Choose Android devices architecture
Almost all Android devices have ARM processors and can use one of the Debian ports to ARM.
Modern high-end devices have 64-bit ARMv8 processors and can use the Debian arm64 architecture.
Some lower-end or older devices have 32-bit ARMv7 processors and can use the armhf architecture.
Some very old devices have very old 32-bit ARM processors and can only use the armel architecture.
Some rare devices have 64-bit x86 processors and can use the Debian amd64 architecture.
To find out which Debian architecture to use, look up the device, chip and processor on Wikipedia to see which version of ARM it supports and chose the appropriate port from the list above.
Choose install device, tool and location
The Debian install can be created directly on the Android device or on a second device running Linux such as a laptop or desktop.
To create the installation on the Android device you will have to be using an install tool that supports running under Android. Probably only debootstrap supports this. You will need to copy the script over to the Android device and then run it there, probably via the adb shell.
You can use debootstrap, mmdebstrap or other system build tools to create a minimal Debian installation.
- Most tools will require root on the device where the install is created.
Most modern Android devices do not have a µSD card slot so the install will probably be placed on the internal storage.
- When installing to the internal storage of the Android device from a second device, you will need create the install in a directory on your Linux device and then transfer it over to the Android device.
- When using a µSD card, you will plug the µSD card into the workstation (possibly via an adapter), create the install on the µSD card, unplug the µSD card and plug the µSD card into your Android device.
Preparation
If creating the install on a second device, install the install creation tool that you chose above, using the Debian packages if the second device is running Debian.
If creating the install from a second device that doesn’t use an ARM processor and then transferring it to an Android device that uses an ARM processor, install the qemu-user-static package to enable emulation of ARM programs. If the device you are running on cannot run binaries for the processor of the Android device natively or emulated, then you will need to use the debootstrap tool, specify the --foreign option when creating the install, transfer the install to the Android device and finalise the install in a second stage on the Android device before using the install.
Most methods of creating a Debian install require root. Gain root using the right tool for the device where you will be creating the install. On Debian and Linux systems that is probably sudo -i. When using adb to connect to an Android device, use adb root and then adb shell to get a root shell.
Parameters
Set the parameters for the install based on the choices made above:
Set the appropriate Debian mirror. If you have a local mirror, replace the URL below with your local mirror.
Set the appropriate Debian release:
Set the appropriate Debian install variant. Use minbase for the most minimal option. For a slightly larger install, omit the variant option when creating the install.
Set the directory that will contain the Debian install and the location of the Debian install itself.
Create install
The tools to create Debian installs are usually run like this:
Read the documentation for the tool you are using to ensure this is correct.
If the device you are running on cannot run binaries for the processor of the Android device natively or emulated, then the --foreign option will be needed here and after the transfer is done, a second-stage step will be needed.
Transfer install to internal storage
Create an archive of the Debian install:
Transfer the Debian install over to the device:
Create the directory where the install will be stored:
Unpack the Debian install archive:
Advanced option using less temporary storage
If you don’t have enough space on either the Android device or the second device to archive, transfer and unpack the Debian archive, you can use this section to transfer without using additional storage.
Set the location for the scripts and Debian install:
Create a shell script called adb_shell.sh containing this:
Create a shell script called unpack using this command:
Transfer it to the device:
Transfer the chroot using tar:
Convenience run-debian tool
Create a script called run-debian for entering the Debian chroot, running a command and cleaning up afterwards:
Transfer it to the device:
Finalise install
If you used the debootstrap tool and the --foreign option above, you will need to finalise the install with a second stage. Most of the time this isn’t needed.
Using the installation
Use the run-debian tool to get a bash shell:
Then you can install needed Debian packages as you normally would with a minimal Debian install.
Using SSHDroid you can get a chroot from the Android user interface rather than via adb shell.
Running Debian binaries outside the chroot
If you need to run binaries from inside the chroot outside the chroot, you can use ld.so:
Available memory
Android pre-loads applications (in some case that the user has never started) when there is free memory. This reduces the memory available to applications in a chroot.
It looks like the *_MEM properties in /init.rc along with the /sys/module/lowmemorykiller/parameters/minfree could help.
Zygote starts SystemServer and SystemServer restarts zygote, so simply killing one of them won’t work. The Android-native way of getting rid of zygote and all that descends from it is to just use the ‘stop’ command (in a script or through a remote (root) shell), to restart the whole Android environment you’d use the ‘start’ command:
The display is now blank and ready for SDL. The input devices only partly work with SDL on the 8120 (write your own code to read /dev/input/event*) but graphics work well.
Group privileges on Android
Android uses predefined groups to control permissions. You will likely have to add these groups within your virtualized Linux environment to grant permission for your user to do useful things. For example, if you want to access the /sdcard storage area on your device, you will need to add yourself to group 1015 aid_sdcard_rw.
Refer to the official AOSP source for the complete list of users and groups. Here is the list for Marshmallow. The package android-permissions automatically sets up all groups used in an Android system (although you still have to manually add users to groups).
AF_INET privileges
On Android, you will need to add at least one group 3003 aid_inet for those processes which require access to creating sockets (other security guarded systems particular to Android may need addressing for other applications, search for 3003 aid_inet on the web for more detail).
APT privilege dropping on Android
The program apt-get (and all the other APT programs) drops privileges when doing network requests, thus fails because it does not have the inet group. One workaround is to add the user _apt to the group inet (3003) and also set it as the primary group for user _apt (because APT deliberately relinquish all groups except the primary one).
exim4 and mailman chroot on Android
As well as altering inet access, the Debian-exim user will have to be added to group 3003. Further, if you experience trouble in the exim mainlog for creating sockets during DNS, try dropping privileges by adding «deliver_drop_privilege=true» to the exim4.conf.template file. For mailman, the standard setup is required, as per the README.Debian file in /usr/share/doc. However the user list must also be added to the group 3003 to allow it to send mail.
Running GUI along side Android
You can also try running GUI apps and desktop environments along side Android. There are a number of X11 Server apps on the Google Play store that do a great job. One such X11 app is «XServer XSDL» which is free in the Google Play store.
An example of how to get this working. Start the chroot, start the X11 Server app, add «export DISPLAY=127.0.0.1:0» to your running chroot, then start your app or desktop environment, at this point you should see it open in the X11 Server app. YMMV though, not all Android devices have the ram or cpu to run this.
Integrate the Debian boot process
Debian gives you a huge array of server software to install and run on your Android device in a chroot. It is possible to start and stop everything using the rc scripts that all daemons in Debian install. If you don’t want the shutdown procedure to halt/power-off your phone, you need to remove some rc init scripts. This doesn’t always work, so when you run stop in Debian, it might poweroff your phone. We got it working on Blandroid by running these commands in the debian shell (via ssh is probably the easiest):
On ?CyanogenMod, we had to remove a lot more scripts to prevent it from shutting down, like sendsigs. But then /etc/init.d/rc 0 no longer shutdown all of the Debian services.
You probably want to remove all of the networking stuff from your Debian chroot and let Android handle it, otherwise you might have Debian and Android fighting over the network config. Also, you need to replace the Debian call to kill all processes, because it will also kill all Android processes. Instead projects like Lil’ Debi and Crouton (Debian chroot for ChromeOS) have a custom script to kill all processes running in the chroot.
The scripts to call to start and stop everything automatically:
start: /etc/init.d/rc 2
handling /dev
As of version Lil’ Debi v0.4.4, Android /dev/ is not bind-mounted in chroot. This means no /dev/block/, /dev/log/, /dev/graphics/ and such. Bind-mounting it there results in conflict between Android logger and syslog, so syslog users should not do that, unless they have workaround. Additionally, if /dev/ isn’t bind-mounted some Android executables, such as *am*, *dalvikvm*, *logcat* and many others won’t run from inside chroot.
Important Android Environment Variables
Android is a very limited environment, so there are some odd hacks in it. For example, Android does not support rpath for finding shared libraries. Android will only look in the hard-coded system path, i.e. /system/lib and /data/app-lib/com.myapp.packagename. You can make Android look for shared libraries in other paths using the env var LD_LIBRARY_PATH, and some Android apps with native executables rely on that hack.
Using **su -l** to login into the chroot may result in unsetting of some important Android variables, such as BOOTCLASSPATH and LD_LIBRARY_PATH.
Booting into Debian instead of Android
Download the zImage for your version of the Linux kernel that runs on your Android device to your laptop and run fastboot something like this:
Источник


