- /4te.me
- Предисловие
- Подготовка
- Разблокировка загрузчика
- Получение root
- How to root Android using Ubuntu
- The Big Picture
- Preparations
- Unlocking the Bootloader
- Using AutoRoot to install SuperSU
- Installing OTA updates
- Optional: Replacing the Recovery System
- restoring stock recovery
- Alternative superuser apps
- Записки программиста
- четверг, 16 февраля 2012 г.
- Android root из Linux
/4te.me
Быстроman как получить root-права на Android смартфоне. Я буду использовать OnePlus 3 и Android 8.0, но инструкция должна подойти и к другим устройствам.
Предисловие
Все действия вы выполняете на свой страх и риск. При неправильной последовательности, можно потерять данные или превратить телефон в кирпич. Также, важно понимать, что рутованный девайс, кроме некоторых удобств, несет в себе риски безопасности. Будьте внимательны.
Подготовка
Для начала, надо на компьютер установить adb и fastboot. Это утилитки из Android SDK для работы с подключенным по USB телефоном.
Для Windows есть удобный установщик adb, fastboot — https://forum.xda-developers.com/showthread.php?t=2317790
Вот здесь официальные дистрибутивы под все платформы — https://developer.android.com/studio/#downloads
Далее качаем TWRP. Это что-то типа livecd для телефона. Образ некой системы, в которой загрузится телефон, и в ней мы установим приложение Magisk.
TWRP (я брал версию 3.1.0-0-twrp.img) — https://dl.twrp.me/twrp/
Если у вас OnePlus, вот TWRP для них — https://eu.dl.twrp.me/oneplus3/ (надо брать этот twrp если вылетает ошибка dtb not fount)
Magisk — это open source приложение, которое дает рут права на телефон, и позволяет скрывать наличие рута от других приложений, чтобы работал Android Pay. Также, обновления системы, которые прилетают “по воздуху”, не должны сломаться. Лучше использовать Magisk, а не SuperSU.
Теперь включим режим разработчика на телефоне. Для этого в настройках, в разделе “О телефоне”, надо несколько раз нажать на “Номер сборки”. После раза 10-го, появится сообщение “Теперь вы разработчик”, и в настройках появится новый пункт “Для разработчиков”.
Разблокировка загрузчика
Разблокировка загрузчика удаляет все данные с телефона и sd-карты
Также, разблокировка загрузчика, без установленного далее Magisk, может сломать Android Pay.
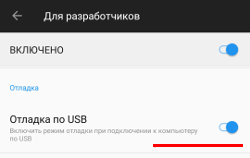
В настройках “Для разработчиков” включаем “Отладка по USB”, “Заводская разблокировка” и “Варианты перезагрузки” 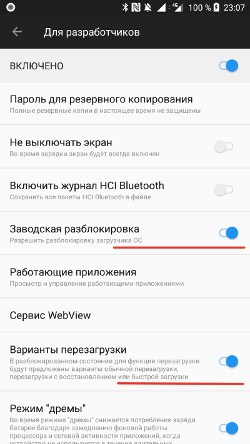
Загружаемся в fastboot mode. Для этого зажимаем кнопку выключения, выбираем “Перезагрузка” и далее “Загрузчик” 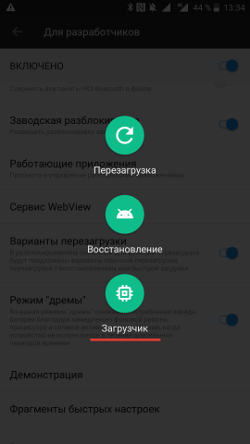 Второй способ — выключить телефон, зажать клавишу громкости вверх и клавишу включения. Через несколько секунд появится fastboot mode
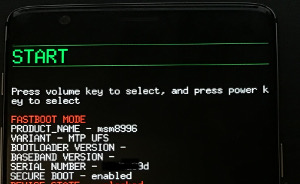
Подключаем телефон по USB-кабелю. И проверяем что устройство доступно в системе. Для этого выполняем:
ПОСЛЕ ЭТОЙ КОМАНДЫ ТЕЛЕФОН ПЕРЕЗАГРУЗИТСЯ И ВСЕ ДАННЫЕ БУДУТ УДАЛЕНЫ. Делайте бэкапы всех данных до этого шага.
Теперь загрузчик разблокирован.
Получение root
- Подключаем телефон к компьютеру в режиме передачи файлов MTP
- Заливаем на телефон zip-файл Magisk, скачанный выше из github
- Загружаемся в TWRP. Для этого перезагружаем телефон в fastboot mode (см. пункт 2 инструкции выше как разблокировать загрузчик) и на компьютере выполняем:
Все, теперь с помощью Magisk Manager можно выдавать root-овые права приложениям, которые их запрашивают, а также скрывать от других приложений, что этот девайс рутованный, чтобы не сломать Android pay.
Источник
How to root Android using Ubuntu
update 27.10.2018 – use TWRP instead of CWM (discontinued)
update 14.10.2017 – new instructions to set-up udev rules
update 26.02.2016 – instructions for Android 6 Marshmallow
The Big Picture
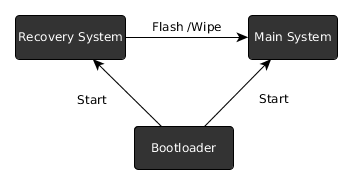
Android consists of three parts relevant to rooting
- the bootloader
- recovery system
- main system
typically only the main system is running, that is the Linux Kernel, the launcher, the phone app etc.. If we talk about rooting, that means we want to add an additional app to the main system which has access to secured parts of the system and acts as a gatekeeper for other apps that also want to get access.
The problem is the secured parts of the system are locked down – otherwise they would not be secure. This means that we can not simply install that app (e.g. an apk) from within the main system.
Therefore we have to go one level down. This is where the recovery system is. Typically you do not see it, as it is only active when the main system can not run – either because a system update is installed or because you do a factory reset.
As the recovery system can do a full system update, it means that it has also access to the secured parts of the main system – exactly what we need.
The stock recovery system obviously does not allow altering the main system – otherwise everybody could get your private data if you lose your phone.
So we need to replace it as well. But before that we have to talk about the bootloader.
The bootloader is a tiny piece of software which decides whether to start the recovery or the main system (or another main system, like Ubuntu Phone).
In the default configuration in only starts systems that it knows and trusts. In this configuration the bootloader is called locked.
Although this prevents malicious software to change the phone and spy on us, it also prevents us from replacing the recovery system. By the way, this concept is also coming to the PC where it is called UEFI secure-boot.
Here is a graphical overview of the Android components:
So what we need to do in order to get root access is
- unlock the bootloader
- replace the recovery system
- install a superuser app
Note that unlocking the bootloader also allows attackers to circumvent any of the android security features (PIN etc). It becomes possible to access all the files on the device using a different recovery system. (unless userdata is encrypted)
Therefore android will wipe all userdata when the bootloader state is changed from locked to unlocked.
So if you lose your unlocked device or it gets stolen, you better hope the thief is not tech savvy.
Preparations
First you need to install the fastboot binary to be able to perform low-level communication with the device
The android-sdk-platform-tools-common package most importantly contains a whitelist (/lib/udev/rules.d/51-android.rules) with devices to which users can send commands over USB, so you do not have to run fastboot as root.
Now you have to reboot into fastboot mode. Usually there is a key combination you have to press on startup.
Remember this key combination as you will need some more times.
Samsung Devices however, like the Galaxy S3, do not support the fastboot mode – instead they have a download mode, which uses a proprietary Samsung protocol. To flash those you have to use the Heimdall tool. While this article does not cover the heimdall CLI calls, the general discussion still applies.
Unlocking the Bootloader
last warning: this will wipe all user data on the device
for google devices, like a Nexus 4 or Nexus 7 it is just do
if you have a Sony Xperia device, like a Xperia Z, you additionally have to request a unlock key and then do
where is the key you obtained.
Using AutoRoot to install SuperSU
There are several superuser apps to choose from for Android 4 and below. However the only superuser app working on Android 5/ Lollipop and above is SuperSU by Chainfire.
As there are devices like the Nexus 5X shipping with Android 6/ Marshmallow, I will describe this method first.
Chainfire created an “installer” called AutoRoot that includes the fastboot utility and will perform the unlocking step described above. However if you have read this far, you probably also want to understand the rest of the process.
First you have to download the appropriate package for your device. There you will find a recovery image which we have start with
the command above will not flash anything on your device, but just upload the image and immediately start it. The image contains a script to modify the main system (change startup to get around SELinux) and install the superuser app.
If everything goes well, you can now just reboot your phone and you are done.
You could lock your bootloader again now to make your device more secure. However the next Android update will remove root again and repeating the rooting procedure will wipe userdata – so you have to balance security update vs. the risk of your device being stolen. For the latter case you still have the option to enable encryption of userdata though.
Installing OTA updates
Android over the air (OTA) updates contain only the changes to the current system. In order to verify that the update succeeded Android computes a checksum of the patched system and reverts to the old state otherwise.
As SuperSU has changed the boot image to start itself, the updates obviously will fail. So to install an OTA update you will have to grab a factory image and restore the boot partition using the included boot.img
after this you will have to patch the boot partition again using the procedure described above.
Also note that if you use apps that change the system partition (like AdAway that changes the hosts file), you will have to revert those changes as well in order for the OTA update to succeed.
Optional: Replacing the Recovery System
If you want some advanced features, like backing up all your installed apks, you can permanently replace the recovery image on your device. However this will most likely prevent you from installing OTA updates.
There are two prominent alternative recovery systems with the ability to install apps
Clock Work Mod has been discontinued, so we will use TWRP. From the Website linked above download the recovery image which fits your phone.
where is the name of the file you downloaded. For instance for a Nexus 9 and TWRP 3.2.3 it would be
restoring stock recovery
If you have a Google Device, you can grab the factory images here. There you will find a image of the stock recovery. You can restore it by
Alternative superuser apps
If you run a device with Android older than 5/ Lollipop you have some alternatives to SuperSU:
I would recommend getting Superuser by CWM, as it is open source and also nag-free as there is no “pro” version of it. There is even a pull-request which might make it also work with Android 5 in the future.
To install the app we need to get this zip archive and copy it to the device. Then we need to reboot into fastboot mode and then select “Recovery Mode” to get to the recovery system. Once in Recovery mode select
install zip -> choose zip from /sdcard
then browse and select the “superuser.zip” you just copied.
Once installed select
Go Back -> reboot system now
Once the system has started you should have a “Superuser” App on your device. Congratulations, you are done.
Источник
Записки программиста
четверг, 16 февраля 2012 г.
Android root из Linux
Это руководство для тех, кто хочет получить права root на своем Android телефоне.
[Предварительное рутование может и не потребоваться при переходе непосредственно на нестандартные прошивки, такие как: CM7 или MIUI через Odin/Heimdall, в любом случае вам потребуется ADB (пункты 1-4)]
Bus 001 Device 002: ID 04e8:681c Samsung Electronics Co., Ltd
Для нашего примера » идентификатор производителя Vendor ID > » заменяем «04e8». Не трогаете кавычки но заменяете и все, что в нутри.
- Сохраните файл по этому пути /etc/udev/rules.d/51-android.rules
- И ещё по этому пути /lib/udev/rules.d/51-android.rules
[Примечание: Вообще вам нужен первый из них, но он может отличаться в разных системах]
- В терминале, наберите ls /etc/udev/rules.d/51-android.rules дабы убедиться, что файл на месте, аналогично для второго пути.
- Перезапустите udev или перезагрузите компьютер чтобы изменения вступили в силу
[Примечание: в некоторых руководствах при настройке првил udev рекомендуется устанавливать права доступа 0666 которые открывают доступ к файлу всем. Здесь мы назначаем доступ одному пользователю, которому это нужно, так будет безопаснее. Приоритет правила установили 51, это не принципиально, можно назначить и другой.]
4.Проверяем что получилось
- В терминале наберите » lsusb «, как делали это ранее
- Одна из строк должна быть похожа на:
Bus 001 Device 002: ID 04e8:681c Samsung Electronics Co., Ltd
- В данный момент нас интересуют номера после Bus и Device, которые, возможно, изменились если вы перезагрузили компьютер.
- В терминале выполните » ls -l /dev/bus/usb/001/002 » ВНИМАНИЕ 001/002 это Bus/Device из примера выше, замените Bus/Device на цифры из вашего вывода команды » lsusb «.
- Если в результате команды имя пользователя и группа отличаются от «root root» можно продолжать дальше. Если это не так, перечитайте и повторите шаги 2 и 3.
- *Убедитесь что ваш телефон все еще в режиме Отладка по USB . Должен быть красный треугольник с восклицательным знаком в строке состояния вашего телефона (зависит от темы и версии Android).
- В терминале наберите » sudo adb devices » [*sudo понадобится только при первом запуске adb.]
Вы должны увидеть свой телефон в списке.
5. Загрузка Samsung Fascinate Root Package
Эти файлы необходимы, хотя драйвера не нужны для Linux.
6. Распаковка 4-х файлов в
/bin
Эту директорию мы создали в шаге 1, там уже должен быть файл adb. Вы можете распаковать куда-нибудь загруженный архив и поместить необходимые файлы в
/bin (это su, rage.bin, busybox, Superuser.apk).
/bin
В терминале наберите » cd
/bin «, а затем » ls «, должно быть 5 файлов.
8. Перенос файлов на телефон и запуск root:
Выполните каждую из следующих строк по отдельности в терминале, скопируйте и встаьте (жмите Enter после вставки каждой строки):
./adb push su /sdcard/su
./adb push rage.bin /data/local/tmp/rage.bin
./adb push busybox /sdcard/busybox
./adb shell
[Примечание: Эта комманда определит ограничение процесса, найдет номер процесса adb, а затем запускает процессы до исчерпания этого ограничения. Вы быстро вернетесь в строк сприглашением $, но ЭТО НЕ ВСЕ. ЖДИТЕ пока не выведется что-то похожее на «[+] Forked 3705 childs.» и вы вернетесь в свою домашнюю директорию.]
9. Зафиксируем права root
- В терминале вернитесь в директорию
/bin введите » ./adb shell «
На этот раз вы должны получить приглашение # вместо $. Это означает, что теперь вы удаленно зашли на телефон как root.
mount -t rfs -o remount,rw /dev/block/stl9 /system
cd /system/xbin
cat /sdcard/su > su
cat /sdcard/busybox > busybox
chmod 4755 su
chmod 4755 busybox
exit
./adb install Superuser.apk
/bin/adb shell »
Вы должны получить приглашение $
Выполните » su »
На телефоне должно появиться всплывающее сообщение где запрашивается подтверждение использования прав суперпользователя. После того, как вы разрешите, приглашение должно измениться на #
Это сообщение будет появляться всякий раз, когда вы устонавливаете и запускаете программу требующую привелегий пользователя root.
Теперь запустите приложение SuperUser, оно должно показать список программ имеющих привелегии root пользователя.
Источник


