Rpg maker mz android export
RPG Maker MV/MZ both have an export to mobile option, however it does NOT export directly to an APK file for installation or uploading to google play store. What it does is export everything needed for your game to run, however you will need to package it yourself in an android/iOS webapp container for it to actually be playable on your mobile device of choice. If you have decent understanding of how computers work, and can follow instructions, this project will help you get your RPG Maker MV, MZ, or even Visual Novel Maker games up and running on android. It takes some time to setup the android development environment, but after thats done, you can easily import your game files, compile, and load onto your android phone or tablet.
Hope this helps.


A direct to apk export option would be the key to this. I messed around with all sorts of tools to get MV games onto android and it was NOT easy. I don’t think I’d bother with MZ unless it had easier export options.
Agreed on this. MV Does have the export option, where it will export all the files to a format that can be used by another means to convert to APK, however the method included in the MV help files is outdated and will only create an APK that doesn’t meet the current Google Play regulations
With a lot of faffing and tweaking I have managed to make a Cordova build on my machine, but this is still a pain as it means creating an APK through command line (not the hardest job just a faff)
Then even after all this has been done, there is the final file size, most RPG Maker MV games I have made have been over 100MBytes in size, the maximum file size an APK can be on Google Play is 100MBytes (50MByte being preferred), This means I have to manually add/remove assets, change the compression ratios and what not to try to get it below that figure.
I have tried playing around with expansion files, but the problem with that is the core game doesn’t know where to look for these assets and doesn’t seem to allow us the ability to select where these can be found. Android APKs are installed in a «secure» area, and all the assets are normally installed on a SD card to save space on the device memory — I believe, so even using the 2x 1GByte expansion files are pointless..
So unless you are planning on getting people to side load APKs (good luck with that) your only option is either sharing the game via an .exe package (like we have done for years) or just upload to a webserver and run the risk that users who play the game browsers work properly by allowing save data to actually be saved (some browsers security settings won’t keep these files when the browser is closed) — and thats assuming you are giving it away for free.
So either including better documentation on how we can create APKs, or an actual «BUILD APK» option would be really helpful.
The Game Creators (a small UK business) has managed to do this with AppGameKit, you write the game, you can sign the APK from within the IDE, and then it compiles an APK ready to use.
— EDIT: I should mention that how it does this is it bundled your game code (as bytecode) and the media assets with a pre-built «Player App». So its similar to Java it creates a «Virtual Machine» that runs your program —
The only difference is, because this software is an actual «language» the user is responsible for writing in the code to check for expansion files and handle the download. but the point is, if there were a simple «Export to APK» option in MZ, I would be more tempted to buy it day one, otherwise its just a polished up MV.
Источник
Тема: [MV-MZ]Гайд по экспорту проекта на Android
Опции темы
Поиск по теме
Отображение

Спасибо большое, все действительно работает)


Обновил гайд, ну как обновил, со старым и так все в порядке было, апк собирается без проблем с новой версией мейкера, в точности как и два года назад. Проблемы выше были из-за проблем с кодировкой в командной строке у пользователей, это проблема установленной системы, а не гайда. Но где-то те же два года назад, кроссволк, который используется в гайде, помер и не обновляется. На построение самого апк это не влияет, но современные девайсы с андроид требуют новых версий, а их нет. Потому, на современных девайсах, после сборки присутствуют графические баги, например, то появляющееся, то пропадающее меню в игре. Так, что старый гайд актуален для девайсов с 6 андроидом и ниже точно, но не подходит для 8-9-10, про 7 не знаю не тестил.
В общем, добавил новый гайд, сохранив старый, используйте его.
Очередное обновление гайда, теперь он подходит и для MZ. Собрал новый проект болванку на основе инструкции от человека с офф форума мейкера, универсальную для обоих мейкеров, по крайней мере на данный момент.
По идее все должно работать и у вас, но тестил пока только я

Спасибо, что избавил от этого головняка.
Последний раз редактировалось KARAKURT; 25.08.2020 в 04:39 .


Новый гайд для MV-MZ мейкера по портированию проекта на андроид с помощью Android Studio.
На это раз причиной обновления гайда стал выход мейкера MZ. В принципе изменилось не так много, но старый метод на MZ давал черный экран с музыкой.
И вот не так давно для МВ вышел обновленный проект шаблон от одного китайца.
Оригинал «как собрать проект» вы найдете по ссылке.
Который, к счастью, вполне применим и для MZ.
Ну-с, приступим. Если у вас еще нету на ПК андроид студио, то самое время его скачать — ссылка на офф сайт
Так же вам потребует уже собранный мной проект болванка, для упрощения процесса, собранная по инструкции китайца — ссылка на проект
Скачиваем и устанавливаем андроид студио, ничего примечательно, просто следуйте подсказкам при установке, каких-то специфический действий не требуется.
На данный момент последняя версия 4.0.1, и потому гайд будет для этой версии.
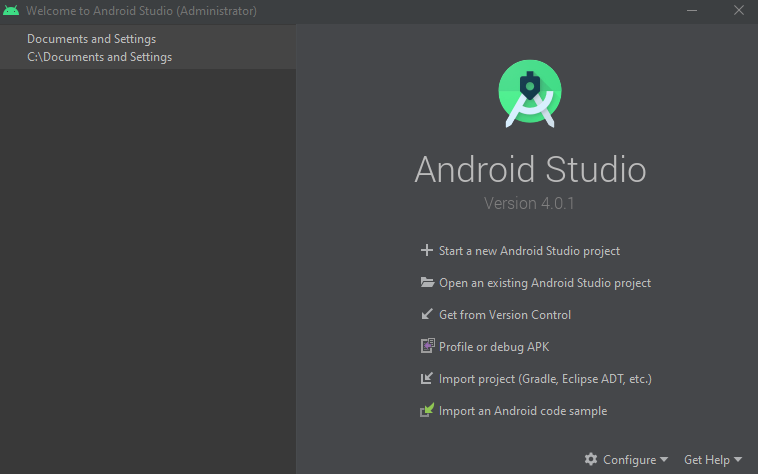
После установки — запускаем. При первом запуске, вас встретить такое окно:
Находим нужные компоненты:
1. Последний андроид, на текущий момент Android 10.0
2. Android SDK Build-Tools
3. Android SDK Platform-Tools
4. Опционально, можно закинуть еще Google USB Driver
(Вверху есть несколько закладок по которым можно перемещаться, в них находятся все нужные компоненты)
Ставим галочки и нажимаем ок или применить(Apply), происходит скачка и установка компонентов, ожидаем окончания.
Пока устанавливаются наши компоненты, можно свернуть программу и пойти экспортнуть наш проект для андроида, через стандартную кнопку в редакторе мейкера выбрав соответственную платформу. Для MV просто очистит проект от неподходящего формата звуков(.m4a — для андроида, .ogg — для пк). В MZ экспорт сведен в одну опцию — Web, оно эквивалентно экспорту под андроид в MV, только никакие звуки никуда не деваются, т.к. в MZ один формат для всех платформ.
Если конечно вы этого еще не сделали.
После установки всех компонентов, возвращаемся на наш стартовый экран(где мы искали SDK Manager) и выбираем открыть существующий проект(Open an existing Android Studio project)
Указываем путь к папке проекта скачанного ранее, предварительно разархивировав его куда вам удобно.
Ждем немного пока все подтянется.
Если в списке слева нет папки Assets, то создаем ее. Нажимаем правой кнопкой на App и в выпадающем списке выбираем New->Folder->Assets Folder, после просто жмем Finish.
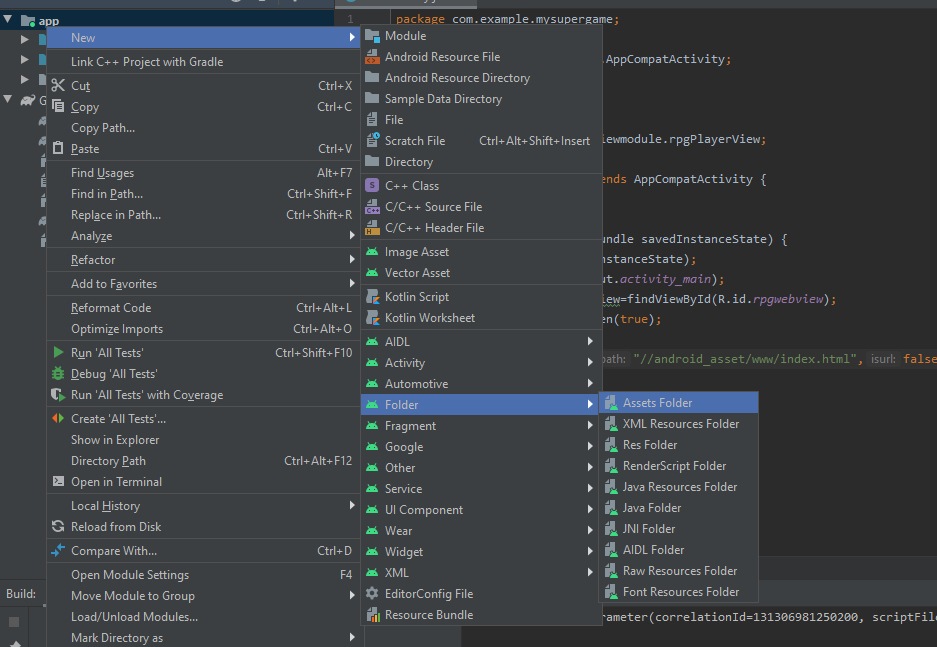
Папка должна появится в нашем проекте после этого.
В принципе, используя проект болванку, можно уже переходить к добавлению вашего проекта из рпг мейкер в андроид студио.
Для этого достаточно папку www, которую мы экспортировали ранее из мейкера, просто скопировать, а после вставить в папку Assets, нажав на нее правой кнопкой и выбрав Paste. Ждем пока ваш проект добавится в андроид студио.
Сделаем последние штрихи, перед созданием апк.
Находим в нашем проекте build.gradle (Module: app), нажимаем дважды.
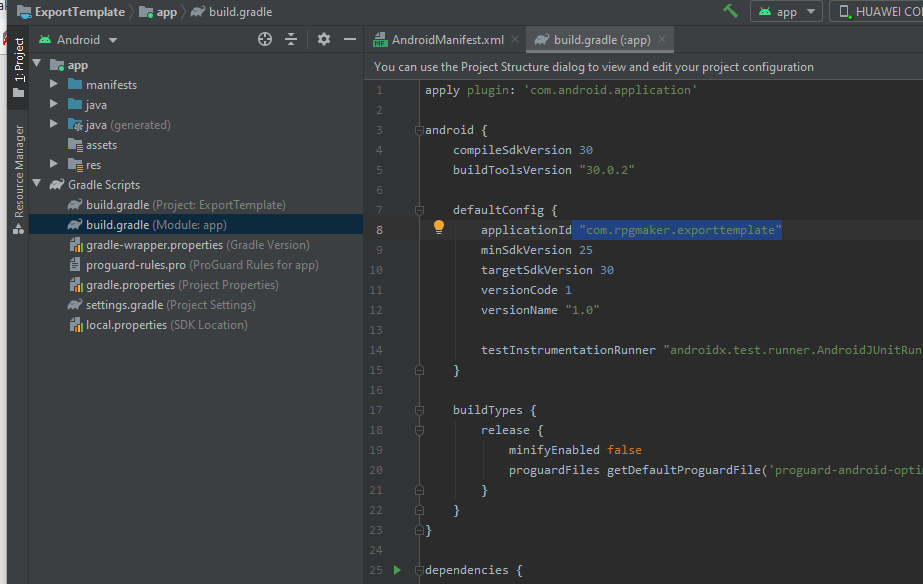
В нем на нужно будет найти applicationId, он должен быть уникальным для вашего проекта. Состоит он из перевернутого имени домена + имени вашего проекта в конце. Пишите только на английском. Если у вас нет доменого имени, можете использовать что-то другое. Записывайте его как в примере, с точками после каждого слова.
Название вашего проекта можно поменять в AndroidManifest.xml

После всего, можно и создать апк для андроида
Источник
Exporting to Android (MV Android Client)

xilefian
Veteran

The originating tutorial along with direct support can be found at:
hbgames.org/forums/viewtopic.php?f=48&p=939401
- Prerequisites
- Creating the Android app
- Testing (Optional)
- Create Debug APK
- Customisation
- Crosswalk vs WebView
What is the MV Android Client
The MV Android Client is a runtime client for the Android™ operating system intended to play games created with the RPG Maker MV game development tool-kit.
- Download Source
- View on GitHub
The tutorial uses the MV Android Client to compile an RPG Maker MV project for Android (deployed as an Android APK).
MV Android Client
This is a zip folder of the latest version of the MV Android Client.
Extract this zip folder to a memorable location (such as your computer Desktop folder).
The official IDE for Android application development is Android Studio by Google.
Android Studio can be downloaded for macOS, Microsoft Windows and Linux at the following URL:
developer.android.com/studio
The Android Studio install instructions for your platform can be found at the following URL: developer.android.com/studio/install.html
Android SDK Libraries
When opening Android Studio for the first time, you will be presented with a welcome window describing the version of Android Studio you have installed with some quick options for creating a project.

If this is not the first time you are opening Android Studio and you are presented with a previous project, you can reach the welcome window by closing your current project from the File menu and then selecting Close Project.
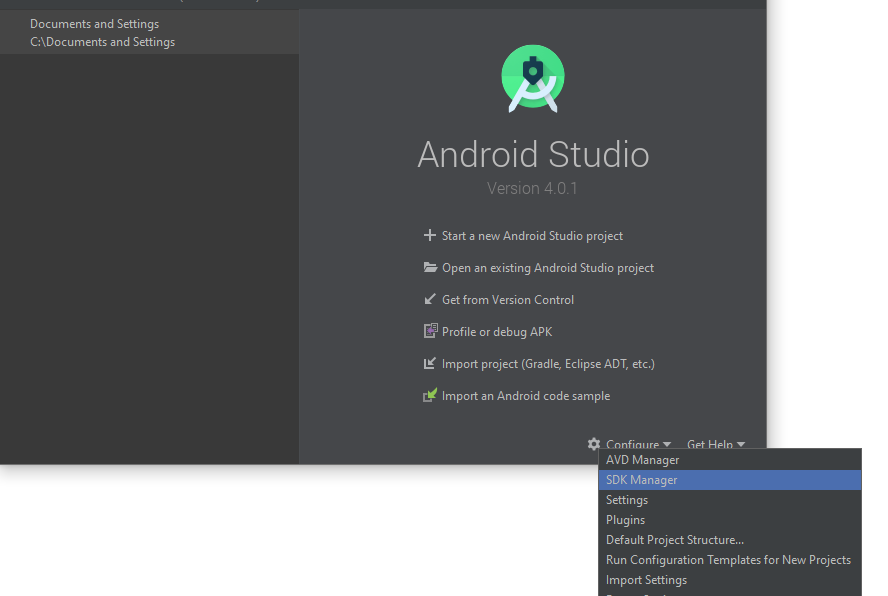
At the lower right of the welcome window is the Configure menu. Open this menu and select SDK Manager to start the Android SDK Manager. This is where you can download the required Android SDK libraries for a project.
You may also open the Android SDK Manager from within an opened project via the Tools menu, selecting the Android sub menu and then choosing the SDK Manager.
Required SDK Platforms
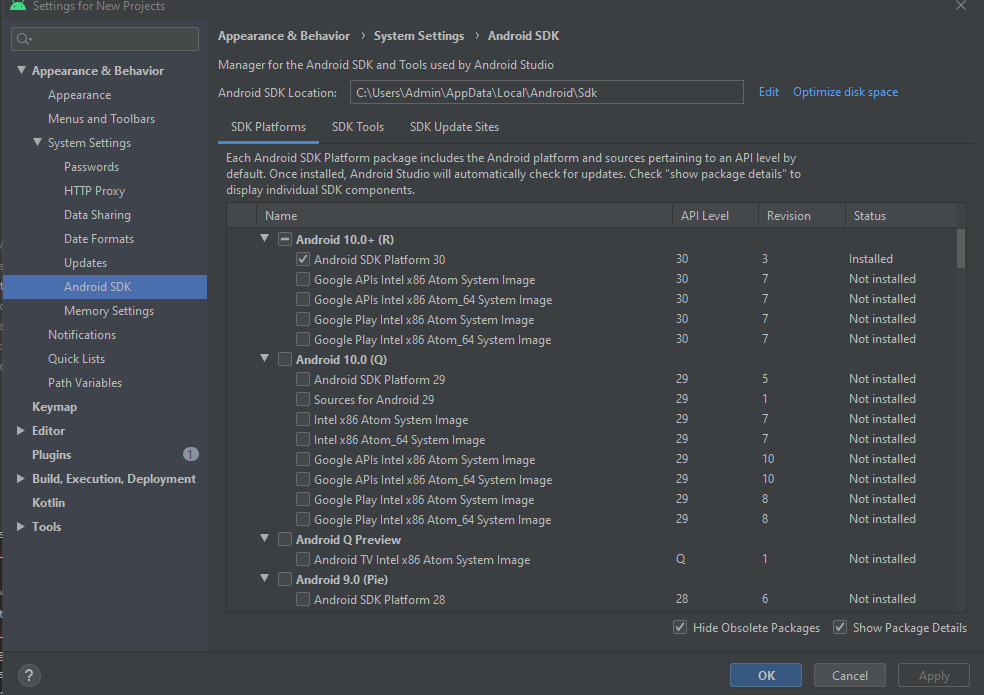
The Android SDK Manager has three tabs; SDK Platforms, SDK Tools and SDK Update Sites.
To download the required SDK Platforms, make sure the SDK Platforms tab is selected. This is where you can download the development libraries for the many versions of Android.
It is usually best to select the most recent version of Android for installation. As of the writing of this tutorial, the most recent version of Android is «Android 8.0 (Oreo)».
Check the box to the left of the version of Android you wish to install the SDK for and click Apply to begin downloading the required SDK Platforms.

Required SDK Tools
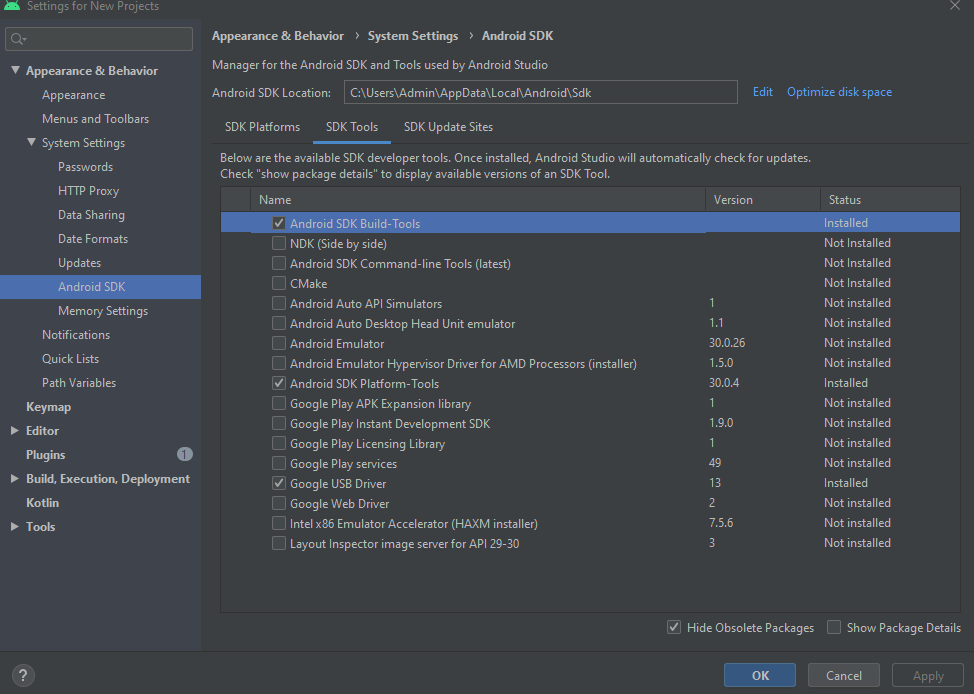
Once the SDK Platform is downloaded, select the SDK Tools tab to begin downloading the tools needed for developing Android apps.
From this list, check the boxes to the left of the following SDK Tools:
- Android SDK Build-Tools
- Android SDK Platform-Tools
- Android SDK Tools
(Note: Support Repository is no longer needed)

If you wish to test your app on a real device you may need to also check the Google USB Driver if you are on Windows.
Click Apply to begin downloading the required SDK Tools.
Deployed RPG Maker MV Project
To prepare your RPG Maker MV project for Android you must export it from the File menu, selecting the Deployment. option.

In the Deployment window that appears, make sure the Android / iOS Platform is selected. You may check the Exclude unused files option, however this may break some Plugins that depend on additional files.

Remember to select an Output Location for the deployment, you can do this by clicking the Choose. button. You will need to find this output location later so make sure it’s in an easy to find, memorable place (such as your computer Desktop folder).
Click OK to begin the deployment.
Creating the Android app
Open MV Android Client
From the Android Studio welcome screen, select Open an existing Android Studio project.
Find the folder where you extracted the MV Android Client source code downloaded at the beginning of the Prerequisites section.

Select this folder so it is highlighted and then click OK. It may take some time for Android Studio to build the project after opening it.
Wait for the project to settle in Android Studio. The project will automatically download additional libraries that it needs, so an internet connection is required for loading the project.

Once everything is settled, expand the Project tab at the upper far left and expand the Build Variants tab at the lower far left.
Expanding the app folder in the Project tab should have the manifests, java code and xml values.
The Build Variants section can be used to switch between Crosswalk and WebView as the default web-engine.

Crosswalk development ended in January 2017, so it is better to use WebView, however older devices may not be fully compatible with WebView features. See the end of this tutorial for a more in-depth explanation on Crosswalk vs WebView.
Import deployed RPG Maker MV project
Create Assets folder
If the Assets folder is not visible within the app folder of Android Studio then it must be created. The Assets folder is used to store the deployed RPG Maker MV project.
Right-click on the app folder to open the context menu. Open the New submenu, then open the Folder submenu lower down. From here, click the Assets Folder to begin creating the Assets folder.

Simply click OK on the window that appears.

Copy RPG Maker MV project files
Find the deployed RPG Maker MV project that you created during the Prerequisites. Inside here should be a www folder.

Select the www folder so it is highlight and copy this folder by right-clicking on it and selecting the copy option.
Back in Android Studio, you want to now right-click on the Assets folder and paste the www folder by selecting the paste option.

In the Copy window that appears, make sure Open copy in editor is un-checked to prevent the MV project files from opening in Android Studio and then click OK.

Depending on the size of your MV project, it may take a while to copy it into Android Studio.
The Android applicationId must be unique to your project.
Expand the Gradle Scripts and open the build.gradle (Module: app) file.

You should see something similar to the above image. Find the line inside defaultConfig that has applicationId.

Change the text inside the quotes to a new applicationId. Android applicationIds must contain no spaces and must be lower-case Latin characters with periods between each word.
Generally, they are domain names in reverse with the app name at the end. An example for a project call «Adventure» made at HBGames.org would be «org.hbgames.adventure».
If you do not have a website domain, you can use your first and last name. A project called «Owl Chronicles» by someone called «Harry Potter» would be «potter.harry.owlchronicles».
It must be unique to your project and your studio.
If you have an Android phone you may connect it to your computer to test your MV project directly.
A guide for setting up a phone for testing is available at this URL:
developer.android.com/studio/run/device.html
Alternatively, you may create an Android emulator instance. An emulator runs on your computer and does not require an Android phone.
A guide for setting up an emulator instance for testing is available at this URL:
developer.android.com/studio/run/emulator.html
Create Debug APK
From Android Studio, select Build and then click Build APK.

This will compile and build your app, which may take some time. When it is complete, at the lower right of Android Studio you will see a confirmation message with a handy link to your APK.

Clicking the link will open up the folder for you, where you can copy and share the APK.

This is a debug APK, so it is not ready for publishing to the Google Play Store. This tutorial will not cover publishing a release APK and support will not be given for issues related to APKs built for release. For information on creating a release APK see the URL:
developer.android.com/studio/publish
Most of the customisation can be done within the values.xml file.

To rename your app, open the values.xml file and find the app_name entry. By default, the app is called RPG Maker MV.
Unicode must be used for non-Latin characters (such as Chinese characters). Use a unicode converter to generate these for XML.
The website URL is configured in the values.xml file. Change the app_host to your website domain and app_scheme to HTTP or HTTPS. As an example, if my website is http://www.hbgames.org then my app_scheme will be «http» and my app_host will be «hbgames.org».
After that, my website will need to be associated with the app. See the section «Associate your app with your website» at the URL:
developer.android.com/studio/write/app-link-indexing.html
Open up the res/mipmap folders to view the app icons.

There are multiple icons here to handle the different versions of Android and the different sized icons for different devices.
You may delete all these icons to remove the default icon, however you must replace the icons with two icons, one named «app_icon» and another named «app_icon_round».
These can be PNG images, or you can create them with Android Studio by right-clicking on the mipmap folder, opening the New submenu and selecting Image Asset.
Remember to have two icons named «app_icon» and «app_icon_round»! Ideally, app_icon_round would be a circular icon.
Crosswalk vs WebView
Crosswalk is an Intel project that aimed to create a portable WebView alternative for Android that worked across multiple versions of Android. crosswalk-project.org
You may know of Crosswalk from Intel XDK, Cordova and PhoneGap. It is also featured as part of the «official» Android deployment guide for RPG Maker MV.
Modern Android has separated the WebView component from the operating system, so now old versions of Android can receive critical security updates for WebView without needing a complete operating system update. This has made Crosswalk redundant as Crosswalk’s main goal was to provide WebView updates for old versions of Android.
So why use Crosswalk? Unfortunately, WebView updates haven’t enabled some features for older devices. Namely, WebAudio and WebGL might not be available for old Android phones. Crosswalk may have these implemented for old devices, so with Crosswalk there is a possibility that compatibility can be improved.
This is not a win-win situation, however. WebView can work on even older version of Android than Crosswalk (Going as far back as Android 3.0 Honeycomb API 11). WebView may even be faster than Crosswalk for newer devices.
The critical difference is that Crosswalk is no-longer in development, so it will not receive security updates. If a bug appears in Crosswalk that allows people to hack devices and break phones through your app or game then you’re out of luck. With WebView, an update from Google will fix the issue rapidly.
WebView is also a core part of Android itself. Using Crosswalk can increase the size of the APK as all the Crosswalk libraries and files for all the potential versions of Android and phone devices need to be included as well.
The recommendation from security-conscious developers such as myself is that WebView should be used and Crosswalk avoided. Crosswalk should be used at your own risk.
If a serious security issue for Crosswalk does appear in the future, it will be removed from future versions of the MV Android Client.
Источник


