- Running Your Android Application on an Android Device
- Running Your Application with Clean Data and Cache Folders
- Troubleshooting
- Stuck at «Uninstalling» on the Run Dialog Box
- Android-x86
- Run Android on your PC
- Installation
- Introduction
- Step by Step
- Upgrade
- Auto Installation
- Auto Update
- Other boot options
- Advanced
- Create a bootable USB stick for Android-x86
- Multi-Boot
- Updated (2010)
- Issues
- VMware
- How to Create an Android USB Drive
- Run a version of Android on your computer with Android x86
- Download Android x86
- Download Etcher
- Write Android to the USB
- Boot into the USB
Running Your Android Application on an Android Device
After you prepare your development system for Android development, enable USB debugging in your Android device and configure your system to detect your Android device, you can run a FireMonkey mobile application on a connected Android device.
- Connect your Android device to your development system using your device’s USB cable. You should see your Android device listed under Portable Devices in the Device Manager (available from the Control Panel). For more information, see Configuring Your System to Detect Your Android Device.
- In RAD Studio, select either File > New >FireMonkey Mobile Application — Delphi or File > New >FireMonkey Mobile Application — C++Builder .
- In the Project Manager, activate (double-click) the Android target platform.
- Enable the Android SDK for your device:
- In the Project Manager, right-click the Android node and select Properties.
- In Platform Properties, click the down-arrow in the SDK (Software Development Kit) field and select either:
- Your installed Android SDK version, if it is displayed
- Add New
- In the Add a New SDK dialog box, click the down-arrow in the Select an SDK version field and select your installed Android SDK.
- Complete the fields in the Create a New Android SDK wizard. Most of the fields are completed automatically by the wizard.
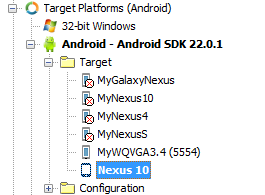
- Enable your Android device as the target platform: In the Android target platform in the Project Manager, open the Target node and double-click your Android device. When your Android device is correctly installed, the SDK version number appears after the Android target name; for example: Android — Android SDK 22.0.1Tips: If your device is not shown, try these steps:
- In the IDE, right-click the Target node and select Refresh.
- In the Control Panel, open the Device Manager:
- Verify that your Android device is listed, typically under Portable Devices.
- If your device is not listed, right-click any node and select Scan for hardware changes.
- If necessary, use the Android SDK Manager to uninstall and then reinstall the device driver for your Android device. Select Start | All Programs | Embarcadero RAD Studio XE6 | Android Tools .
The following image shows a populated Android Target node displaying the Nexus 10 device, one emulator that is running, and several emulators that are not running:

- If you selected the Application Store platform configuration on the Configuration node of the Project Manager, you must have a signing certificate configured for the Application Store platform configuration on the Provisioning page. The Debug platform configuration does not require a signing certificate.
- Run your application:
- Run with debugging ( Run >Run or F9 )
- Run without debugging ( Run >Run Without Debugging or Shift+Ctrl+F9 ).
RAD Studio builds your application for Android and runs your application on the selected Android device. If your Android device screen is locked, unlock it to access your application.
Running Your Application with Clean Data and Cache Folders
When you run an application on an Android device, RAD Studio installs your application on your device using the package name that you defined in the Version Info options page to uniquely identify your application. By default, the package name is «com.embarcadero.$(ModuleName)», where $(ModuleName) is the name of your project, such as «Project1».
If you run your application on a device that already contains a previously-installed application with the same package name as the application that you want to run, the Run command reinstalls your application, but only updates the application executable; your application’s data and cache folders are not updated.
To configure RAD Studio so that the Run Without Debugging and Run actions completely uninstall any previously-installed version of your application, including the data and cache folders, before installing the newer version:
- Select Run >Parameters .
- Enter «-cleaninstall» in the Parameters field:
- Click OK to save your changes.

Troubleshooting
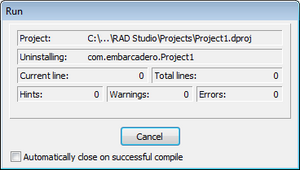
Stuck at «Uninstalling» on the Run Dialog Box
You might need to enable USB debugging specifically for your computer if you are running Android 4.2.2 or later and when you click Run or Run Without Debug, RAD Studio does not go beyond the following screen:
You might also need to enable the general USB debugging setting in your device. If this is the case, your device should show a dialog box asking you to allow USB debugging:
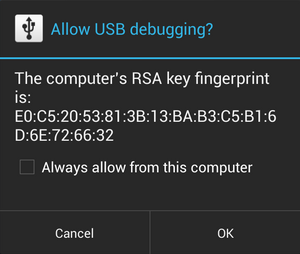
Click OK to allow USB debugging.
If you accidentally click Cancel, disconnect your device from your PC and then reconnect it to make the dialog box reappear on your device.
Источник
Android-x86
Run Android on your PC


Installation
Introduction
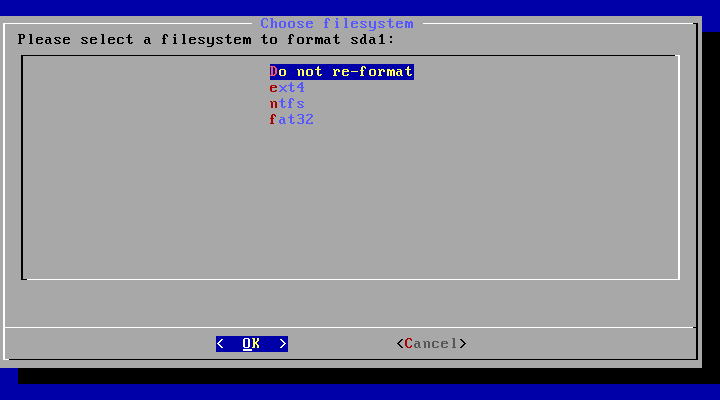
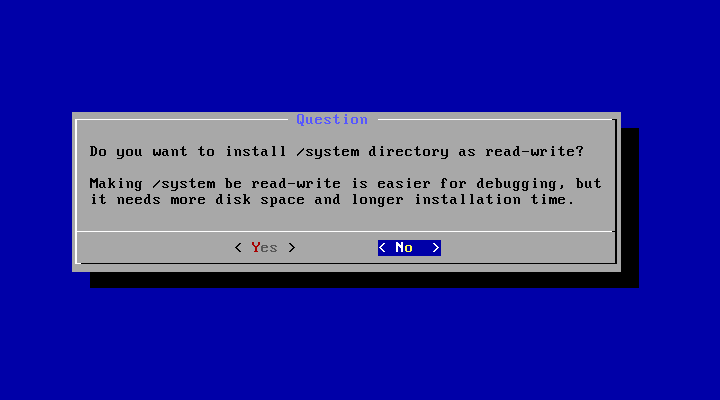
In particular, you can install Android-x86 to an NTFS filesystem to co-exist with Windows. See the Advanced Section for more details.
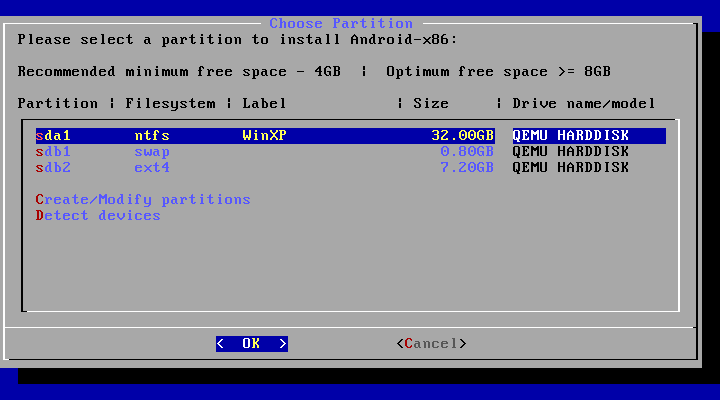
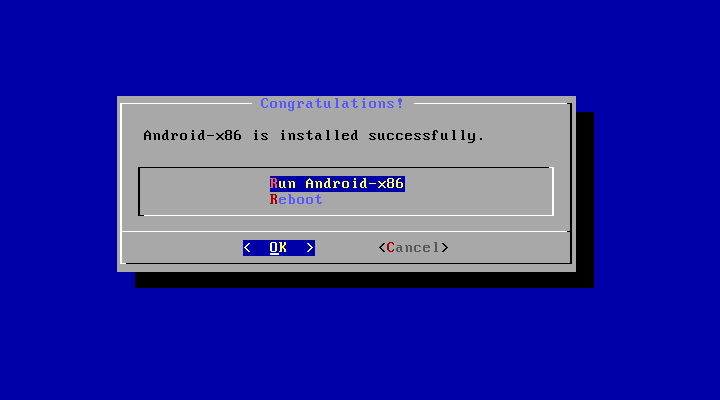
Step by Step
- Download an iso image from a mirror site. Usually you should just use the latest image.
- Burn the iso image to cdrom, or create a bootable USB disk (recommended). See the Advanced Section for details.
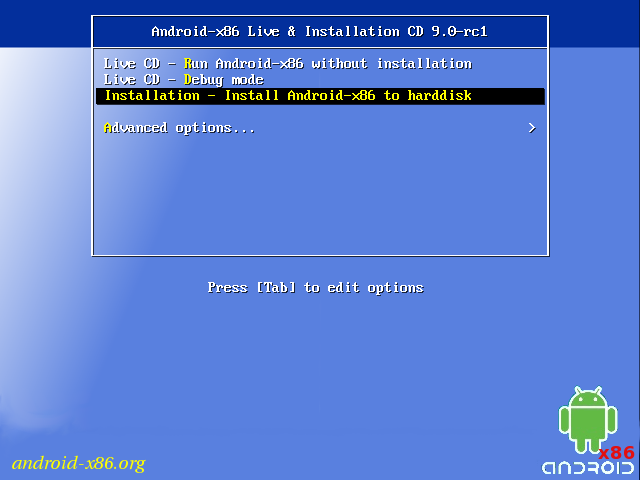
- Boot from the Android-x86 installation CD/USB, choose the ‘Install Android-x86 to harddisk’ item, as shown below:

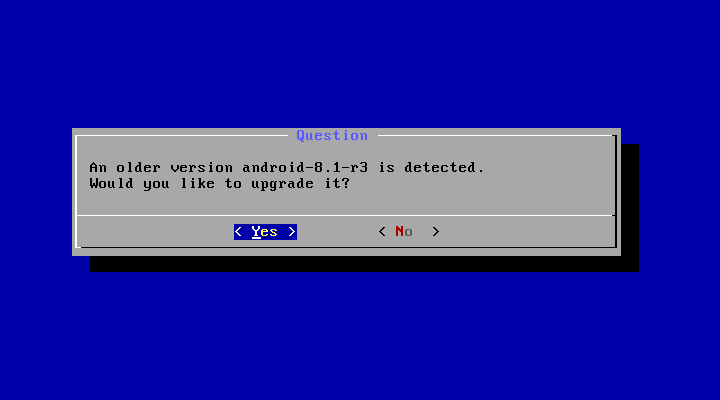
Upgrade
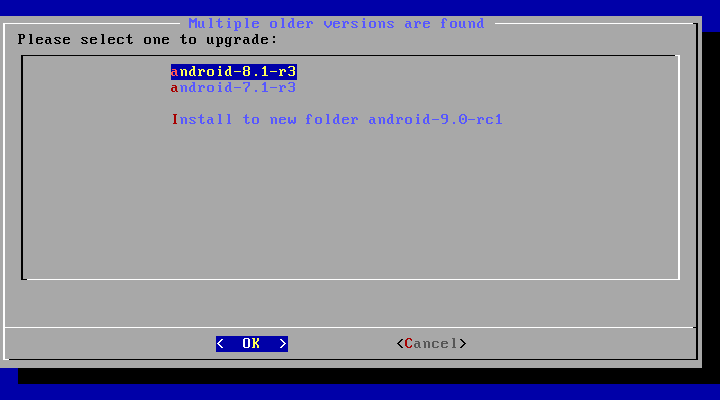
You may upgrade an older Android-x86 installation by the installer. Just select the partition containing the older installation. The installer will prompt if you’d like to upgrade it:
If there are multiple older versions in the same partition, the installer will ask which version to upgrade:
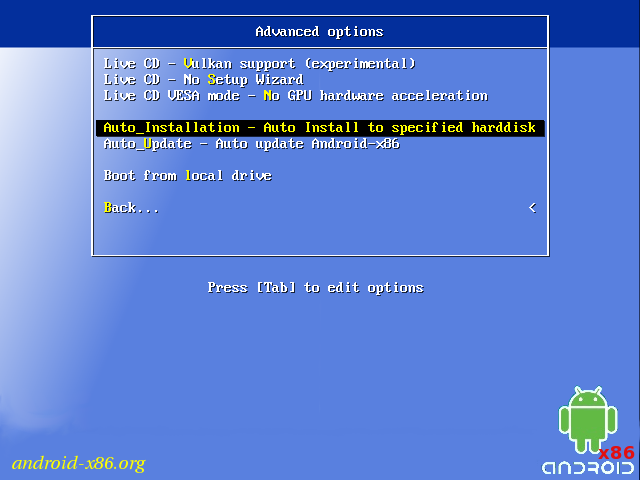
Auto Installation
If you want to use Android-x86 as the only OS in your device, you may choose «Auto Installation» under the «Advanced options».
The installer will prompt you to confirm:
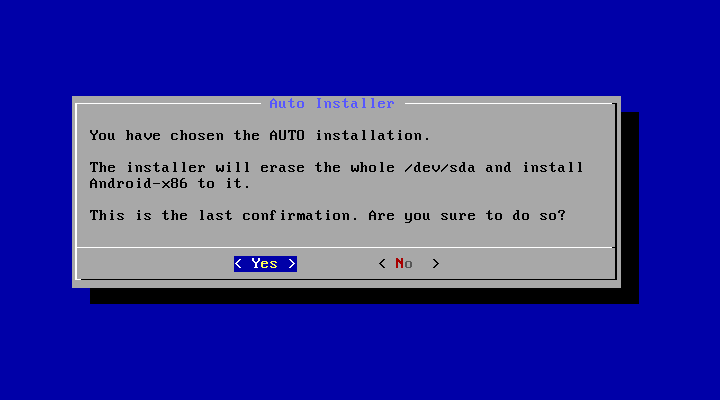
After you select ‘Yes’, the installer will erase the whole content of the hard disk, partition and install Android-x86 to it.
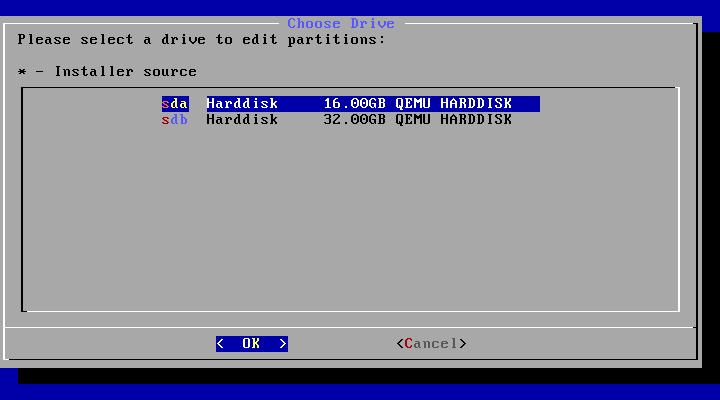
If you have multiple hard drives, the installer will let you choose which one to use. Be careful to choose the correct one.
Auto Update
By choosing «Auto Update» under the «Advanced options», the installer could update an older installation automatically.
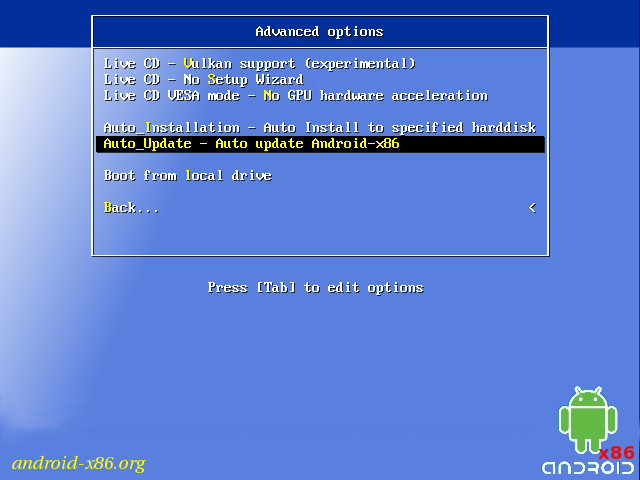
In this mode, the installer searches a partition named «Android-x86» or the first ext4 partition, and update the older installation in it automatically. If no such a partition is found, the auto update mode will be cancelled.
Other boot options
- Live CD — Run Android-x86 without installation
The item means to boot Android-x86 directly. This is useful to check if your hardware is compatible with Android-x86 quickly. All data is stored in RAM (tmpfs) and will lose after poweroff.
Live CD — Debug mode
See the debug howto for more details.
Live CD — Vulkan support (experimental)
Enable the experimental Vulkan support. Not all GPUs support it.
Live CD — No Setup Wizard
Skip the Setup Wizard. It’s useful if you want to test some apps quickly in live mode.
Live CD VESA mode — No GPU hardware acceleration
Disable GPU hardware acceleration. If you encounter black screen after booting, you may try this mode to see if it’s bootable.
Advanced
Create a bootable USB stick for Android-x86
There are several tools which could be used to create a bootable USB stick for Android-x86. The following tools are available for Windows users:
- Win32 Disk Imager — see demo video.
- UNetbootin — see demo video.
- Rufus — see demo video.
- Linux Live USB Creator (LiLi) — Obsolete software, but used to officially support Android-x86 until v4.4.
For Linux users, just use the standard dd command like:
Multi-Boot
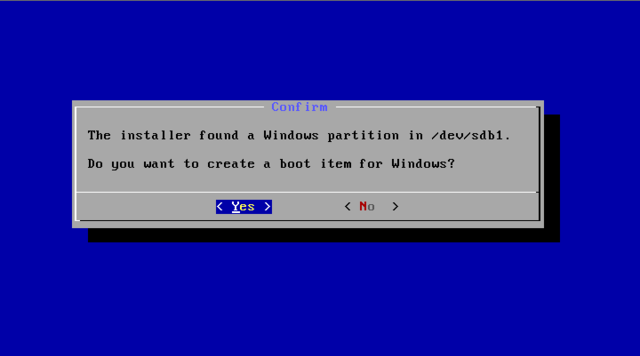
To boot other operating systems, you have to add items for them to /grub/menu.lst. For example, to boot Windows, add the following:
This assumes Windows is installed to the first partition of the first hard disk. Alternatively, you need to change rootnoverify to the appropriate value. See Grub Manual for details.
Updated (2010)
Issues
VMware
You have to change your virtual disk type to be IDE because the default type in VMware is SCSI, and Android-x86 kernel is not configured to support SCSI. You can follow these steps:
- Create a virtual machine.
- Edit virtual machine settings after the virtual machine created.
- Choose the hard disk and remove it.
- Add a hard disk to create a new virtual disk, then you can choose IDE as your virtual disk type.
- When finished, you can install android-x86 normally.
Источник
How to Create an Android USB Drive
Run a version of Android on your computer with Android x86
:max_bytes(150000):strip_icc()/GlamProfile-7bfa34647d8e4c8e82097cc1daf8f5ec.jpeg)
This article describes how to create and run a bootable Android USB drive that allows you to use Android on a desktop computer.
Download Android x86
The Android x86 project allows an older version of Android to run as an emulator on desktop-class hardware. The software from this site isn’t always in perfect sync with Google’s Android releases. Android x86 isn’t an official Google product and, therefore, requires time to port.
Visit the Android x86 download page to find a list of available downloads.
:max_bytes(150000):strip_icc()/download-android-x86-ccf280719c254f76af7a9f5e4d372a65.jpg)
Look for the latest Android ISO files. Depending on the computer you use the Android USB on, choose between the 64-bit and 32-bit files. Most of the time, you’ll want the 64-bit file.
The latest releases are located at the top of the page. Don’t worry about the CM release numbers.
Select the latest ISO. You’re taken to a different page to download it.
Save the ISO file. Don’t do anything else with it yet.
Download Etcher
There are several ways to write a disk image to a USB drive. The complexity of these varies, and it can be easy to write the image to the wrong place. We recommend the free, open source balenaEtcher. It works on Windows, Mac, and Linux, so you can make your Android USB on any computer.
In a web browser, go to the balenaEtcher home page.
Look for the green button to download Etcher. Make sure that the text in the button says that the download is for your operating system. If not, select the drop-down arrow to the right of the button.
:max_bytes(150000):strip_icc()/001-create-android-usb-drive-2202053-0699722e53534faba7a6cafb40824467.jpg)
The download should only take a few seconds to complete.
Depending on the operating system, the install will vary. Windows users will have an EXE to run and install. The Mac version comes in a DMG. Linux users will find an AppImage to run from the downloaded directory.
Write Android to the USB
You now have everything that you need to write the Android ISO image to a USB drive. You’ll use balenaEtcher to accomplish this, and your USB will work on nearly every computer when you’re done.
Insert the USB drive into your computer.
Look for where the USB is mounted. This step is critical. You must write to the correct drive; otherwise, you could overwrite data on another drive.
Open Etcher. On Windows and Mac, it is in the list of applications. On Linux, launch the AppImage that you downloaded.
:max_bytes(150000):strip_icc()/etcher-on-win10-218b490541f64634a5878738ba8ab436.jpg)
Etcher offers a simple interface that’s divided into three columns. Go to the first column and select the Android ISO file.
:max_bytes(150000):strip_icc()/etcher-image-select-0e9caa22b79a4d8383bb801d0c4ad6cb.jpg)
In the second column, select the USB drive.
:max_bytes(150000):strip_icc()/etcher-select-USB-07400b62bf204a4b9afd74330d9a5943.jpg)
When you’re certain that everything’s right, select Flash to write the ISO to the USB.
This process erases everything on the USB, so make backups before you flash.
The Etcher screen switches to show the progress in writing the USB drive.
:max_bytes(150000):strip_icc()/etcher-writing-7776b798575d4dbfaf8017fe99caf7d1.jpg)
When Etcher is done, the screen displays a message that the image was successfully written to the USB.
:max_bytes(150000):strip_icc()/etcher-flash-complete-024e2e6830bf4e51ae842baee12820e5.jpg)
Remove the USB drive and use it anywhere you choose.
Boot into the USB
In most cases, you’ll be able to boot into the USB fairly easily. If you know your computer’s boot-menu hotkey, press it while the computer boots, and select the USB to boot from.
Источник


