- Prerequisites
- The «android» command
- List Targets
- List Devices
- The Android Emulator
- Creating an Android Virtual Device
- Running your virtual device
- Creating a new Android application
- Project Directory Contents
- Adjust the created project
- Compiling an Android Project
- The APK file
- The Android Debug Bridge
- Select the appropriate device
- Installing an Android app
- Replacing or reinstalling an app
- Debugging with adb logcat
- Filtering logs
- Interrupting logcat
- Congratulations!
- How To Install Android SDK Tools On Windows
- Step 1 — Download SDK Tools
- Step 2 — Install Command Line Tools
- Step 3 — Install Platform Tools
- Step 4 — Configure Environment Variable
- Step 5 — Configure Commands
- Step 6 — Using the SDK Manager
- Step 7 — Using the Emulator and AVD Manager
- Summary
Prerequisites
To properly follow this material, you must have the following in place:
(1) You have installed the latest Java Development Kit (JDK) from Oracle. (java.com/download)
(2) You must have installed Android SDK. If you have not done so yet, you can download the Android SDK here: developer.android.com/sdk
(The Android SDK can be downloaded separately as a stand alone installer, or as part of the bigger Android Studio installer)
The Android SDK and the associated commands work roughly exactly the same way on Windows, Mac OS X and Linux. Therefore, the instructions given here should be applicable regardless of your operating system.
The «android» command
If you have the Android SDK in place, you can locate the «android» command inside the tools directory. To try it, open up your command line, and issue the following kind of command (obviously replacing the beginning with the complete path to the actual directory where you have installed the SDK files):
Then press ENTER. By default, the Android SDK Manager will be displayed:
The Android SDK Manager lets you download and install, uninstall, and update necessary packages (SDK tools and platforms) that you need to develop an Android app. Full information about this GUI tool can be found on the Android developer site:
Going back to the command line, to list some of the things that can be done with the android tool, try this:
You should see commands with corresponding descriptions like the following below:
List Targets
To display the list of available Android target(s) / SDK versions that are available on the current system, try this:
You should see available targets like the following:
(Followed by other targets, if available)
Take note of the «id» line in this list, as that is the value that you can use in other places to refer to the specific version of an Android SDK target.
List Devices
To display a list of available Android device(s) that are currently configured, try this:
You should see available device definitions like the following:
(Followed by other devices, if available)
The Android Emulator
The Android Emulator emulates a complete Android device in software on a desktop computer. Therefore, to do Android development, you will not necessarily need to have an actual physical device at your disposal. You can locate the Android emulator tool as part of the Android SDK here:
Creating an Android Virtual Device
To run an instance of the Android operating system inside the emulator, you will first need to create an Android Virtual Device. You can do this with the following kind of a command:
Type the entire command on one line. Then press ENTER in the end. You should see something like this:
Cool! You have successfully created your Android Virtual Device.
Running your virtual device
To execute your new Android Virtual Device in an emulator, you can simply do this:
You should see and Android Emulator starting up and something like below in the terminal window:
The emulator itself should have opened in a new window, running a complete copy of the Android operating system.
Creating a new Android application
To create the initial source code for a new Android application, try this:
Again, the entire command would be written on one line. In the end, press ENTER. You should see something like this in your terminal window:
Awesome! You have successfully created an Android project.
Project Directory Contents
After successfully creating a project, navigate to your project directory. You should have the following files and directories in place:
Adjust the created project
It appears that the project creation script is stuck in an older version of Gradle, which is no longer compatible with newer versions of the overall Android build system. To address the problem, we will need to edit the «gradle-wrapper.properties» file under the «wrapper» subdirectory of the «gradle» directory in the created project source. In that file, by default, you find a line like this:
This can be changed to this:
(essentially, we change gradle version from 1.12 to 2.2.1, as it should be).
Likewise, in the generated «build.gradle» file, you should change the line that says «runProguard false» to «minifyEnabled true» (apparently, the syntax for this was changed at a point during the Android build system development cycle, but the «android create project» script is yet to be updated accordingly).
Compiling an Android Project
Before you compile your project, you must be connected to the internet in order for the gradle wrapper script to download the appropriate gradle software components. Once ready, to compile your Android project, navigate to your project directory on your command line (change directory), and do this:
For Mac or Linux:
The «gradlew» script is a wrapper script that then downloads all the necessary components that are needed to run the complete Gradle build. Once any necessary downloading is completed, the wrapper continues to execute the actual build. In the end, you should find the final APK installer in the «build» -> «outputs» -> «apk» directory under your project directory:
The installer to use is the second one in the list above (*-debug.apk).
The APK file
The Android Application Package, most commonly known as APK, is the installer and distribution file format for Android apps. Once your Gradle build has successfully completed, you should have an APK file that was generated from your source code.
The Android Debug Bridge
Android Debug Bridge (adb) is a command line tool used to communicate with a connected android device or emulator. It is commonly used for installation and debugging of apps during development.
You can locate the Android Debug Bridge executable (adb or adb.exe) here:
For complete official information about Android Debug Bridge, refer to the link below:
Bear in mind that before you install and debug an app, you must have one of the following in place:
(1) Connected Android device
(2) Running Android Emulator
Select the appropriate device
If you have a device connected, or an emulator running, to check if it is connected, try this:
This command will list all physical Android gadgets (tablets, phones, etc.) that you have connected to your development computer (via USB or otherwise), as well as any Android emulator instances that you may have running. If ever you plug in several devices, and/or run several emulators simultaneously, observing this list becomes increasingly important in selecting which one of them you would wish to interact with.
You should see something like the following:
To select a specific Android instance (whether device or emulator) to use, you can use the -s parameter of adb to specify which device to use, followed by the device ID from the list above. For example:
Installing an Android app
If this is your first time to install the particular app on the device or emulator, you can simply do this:
Then press ENTER and the following kind of information should be displayed in your terminal window:
Congratulations. You have successfully installed your Android app. It should now appear in the application menu of the device or emulator.
Replacing or reinstalling an app
To replace a previously installed app, the -r parameter of adb can be used. Try this:
Take note that the -r parameter means to replace an existing application. So, doing this ..
.. would generate an error, as shown below, since you are trying to install the same version of the app without using the -r parameter.
Debugging with adb logcat
The logcat command of adb is used to display system messages of a running Android OS (whether device or emulator). This is extremely useful to find out what is happening to an application or a device. Any and all messages generated by the device are shown here, giving a wealth of information for any kind of troubleshooting requirements.
You should see logs in your terminal window something like the following:
The logcat command of adb is commonly used by app developers and testers to trace the cause of crashes in an Android app during development.
Filtering logs
To filter logs using the logcat command of adb. You can do this:
The asterisk (*) character means ALL logs and the hash (#) character is the filter, which can be one of the following:
For example, doing this .
. would result to something like the following:
When filtering logs, a priority is followed from top to bottom. If *:W is used, Warnings are displayed first followed by Errors then Fatal logs. Like in the sample above. Thus, filtering with Verbose (default) will display the logs starting from Verbose down to Fatal.
Furthermore, you can also filter logs with a keyword. Try this (this only works on a Unix-like environment, such as Mac OS X or Linux):
For example, doing this .
. would result to something like the following:
The pipe (|) character means that logs from the logcat command of adb will be an input for grep (a command used to search for strings). The -i parameter of grep means ignore case.
Interrupting logcat
You can at any time interrupt the logcat command by pressing Ctrl+C in your terminal window. You should then have returned to your command line.
Congratulations!
You have completed this tutorial. You have successfully created an Android application purely on the command line.
Источник
How To Install Android SDK Tools On Windows
It provides all the steps required to install Android Platform Tools and SDK Manager on Windows 10 without using Android Studio.
In this tutorial, we will discuss all the steps required to install Android Platform Tools and SDK Manager on Windows 10. This tutorial provides the steps for Windows 10, though the steps should be the same on other versions of Windows.
This post is useful for the developers using Android Platform Tools and SDK manager without installing Android Studio for the use cases including hybrid app development using Ionic. It also assumes that a valid JAVA_HOME environment variable exists pointing to the installation directory of Java.
You can follow How To Install Java 8 On Windows 10, How To Install Java 11 On Windows, How To Install Java 15 On Windows, or How To Install OpenJDK 15 On Windows to install Java on Windows. In case you are interested in developing Android applications using Android Studio, you can also follow How To Install Android Studio On Windows.
Step 1 — Download SDK Tools
Open the download tab of Android Studio and scroll down to the Command line tools only section. This section shows various options to download the SDK tools as shown in Fig 1.
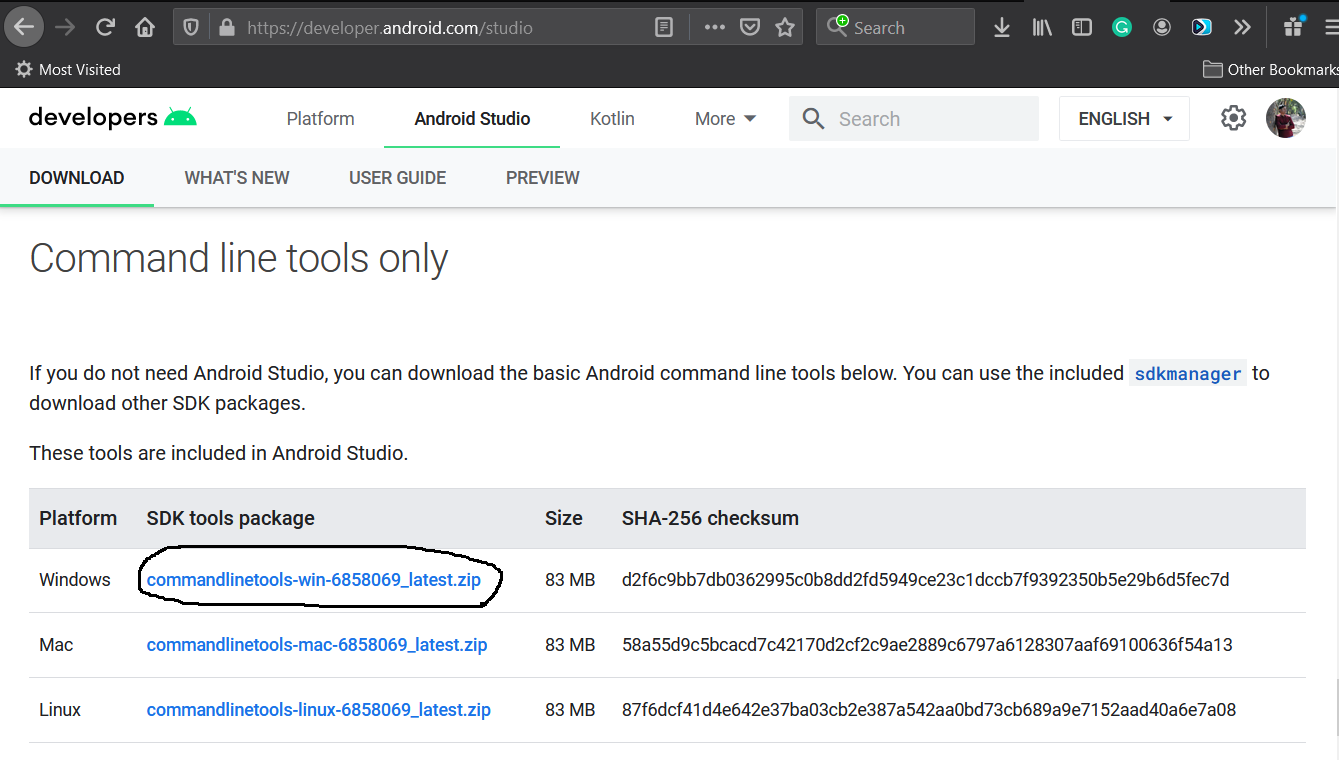
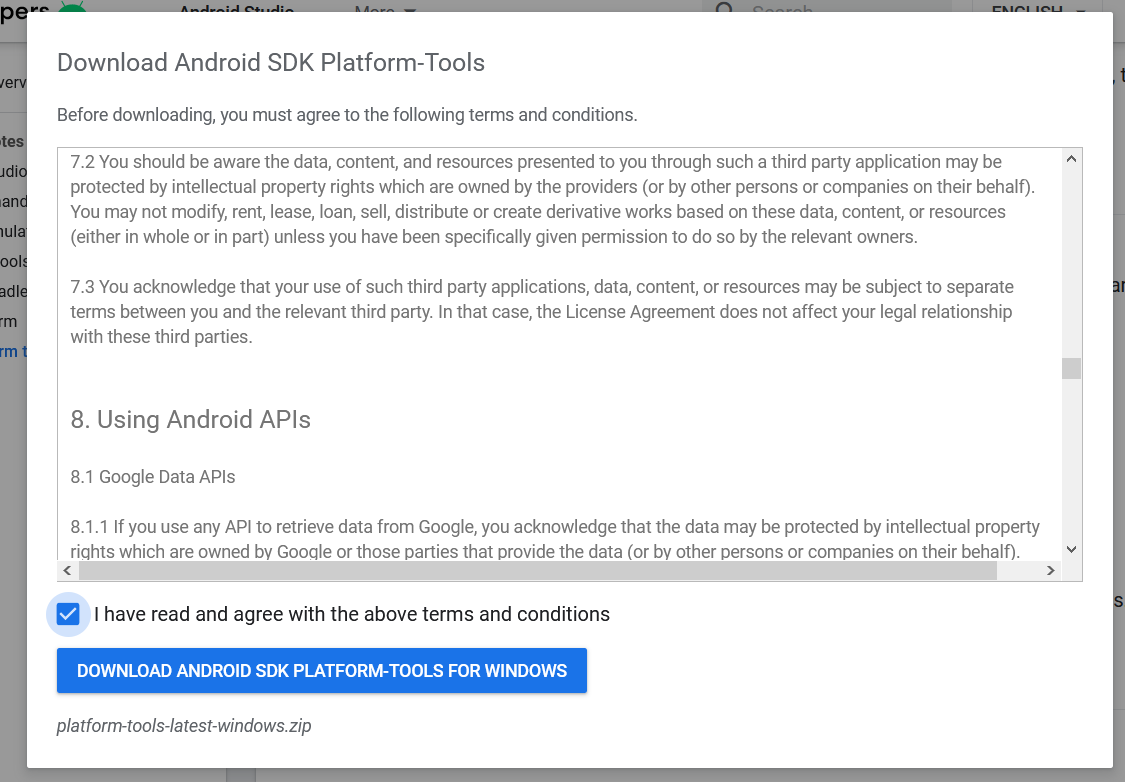
Click the first link having the download option for Windows as highlighted in Fig 1. It will ask to accept to terms and conditions as shown in Fig 2.
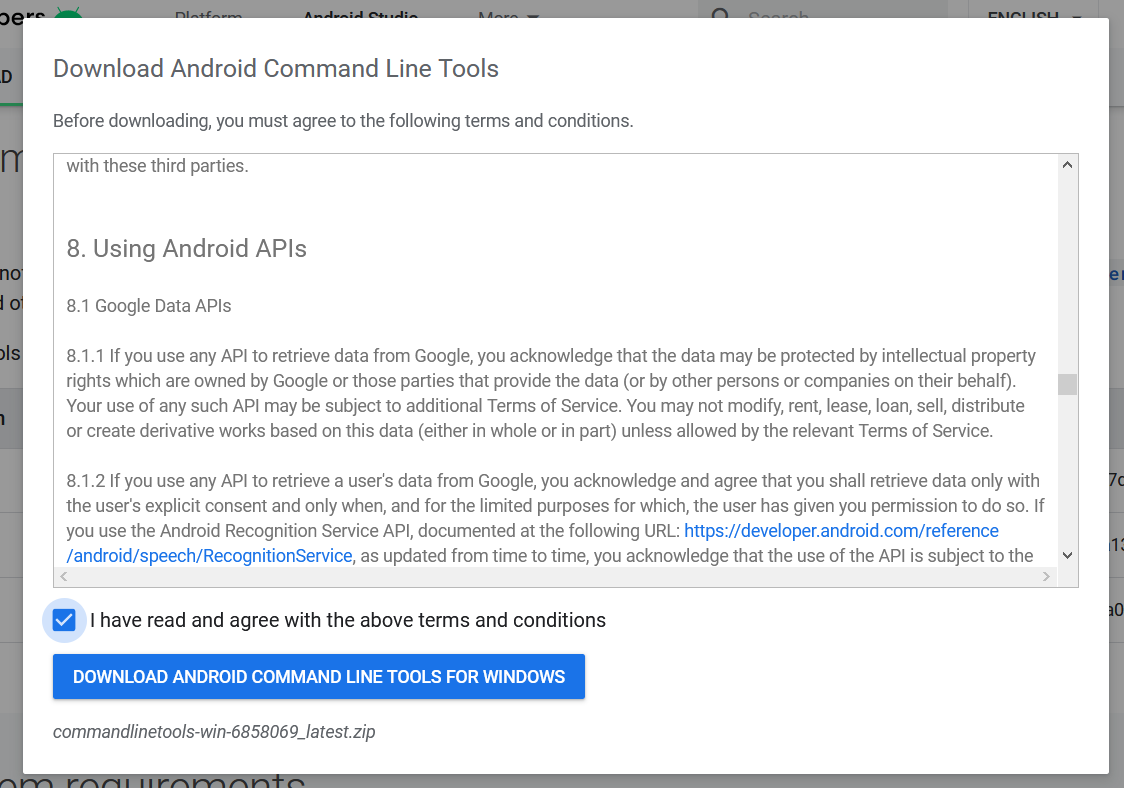
Go through the details, agree on the terms and conditions and click the Download Button to start the download.
Step 2 — Install Command Line Tools
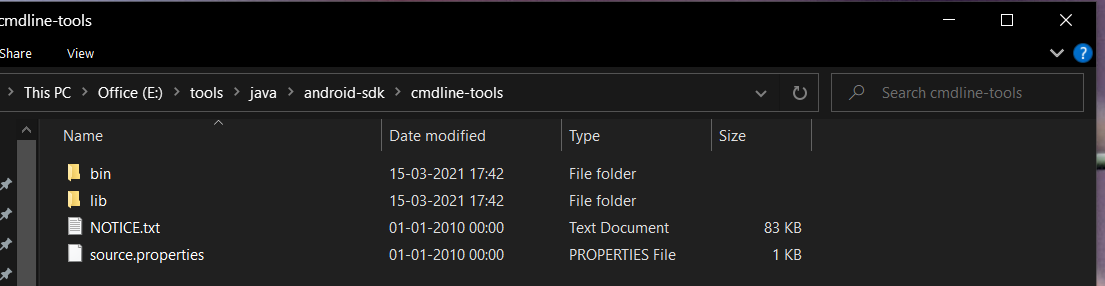
In this step, we will install the Android Command Line Tools on Windows 10. Create the directory android-sdk at your preferred location and extract the content of the downloaded SDK Tools zip to this directory. Make sure that the extracted content is available within the android-sdk directory created by us as shown in Fig 3.
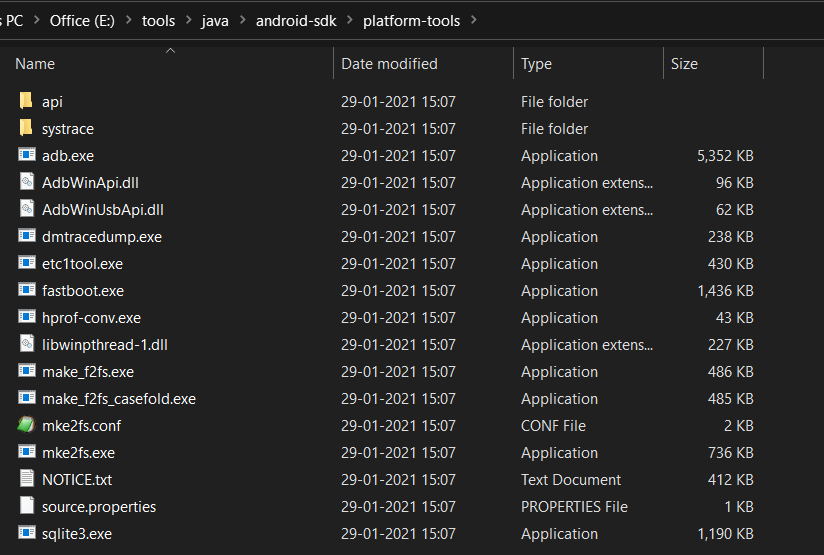
Step 3 — Install Platform Tools
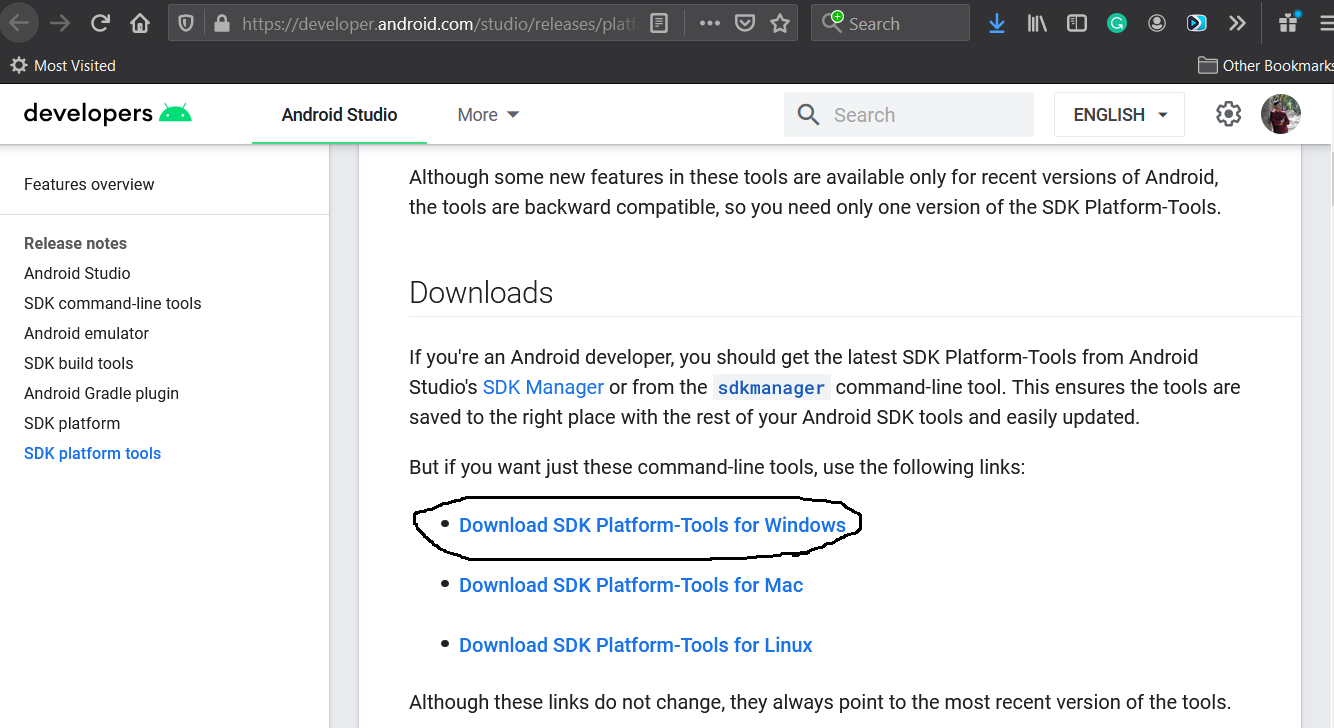
In this step, we will install the Android Platform Tools on Windows 10. Follow the same steps similar to Android SDK Tools to install Android Platform Tools using the download link as shown in Fig 4, Fig 5, and Fig 6.
Step 4 — Configure Environment Variable
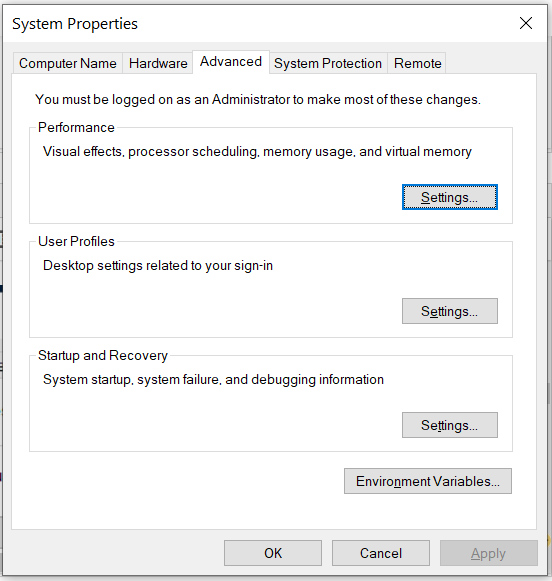
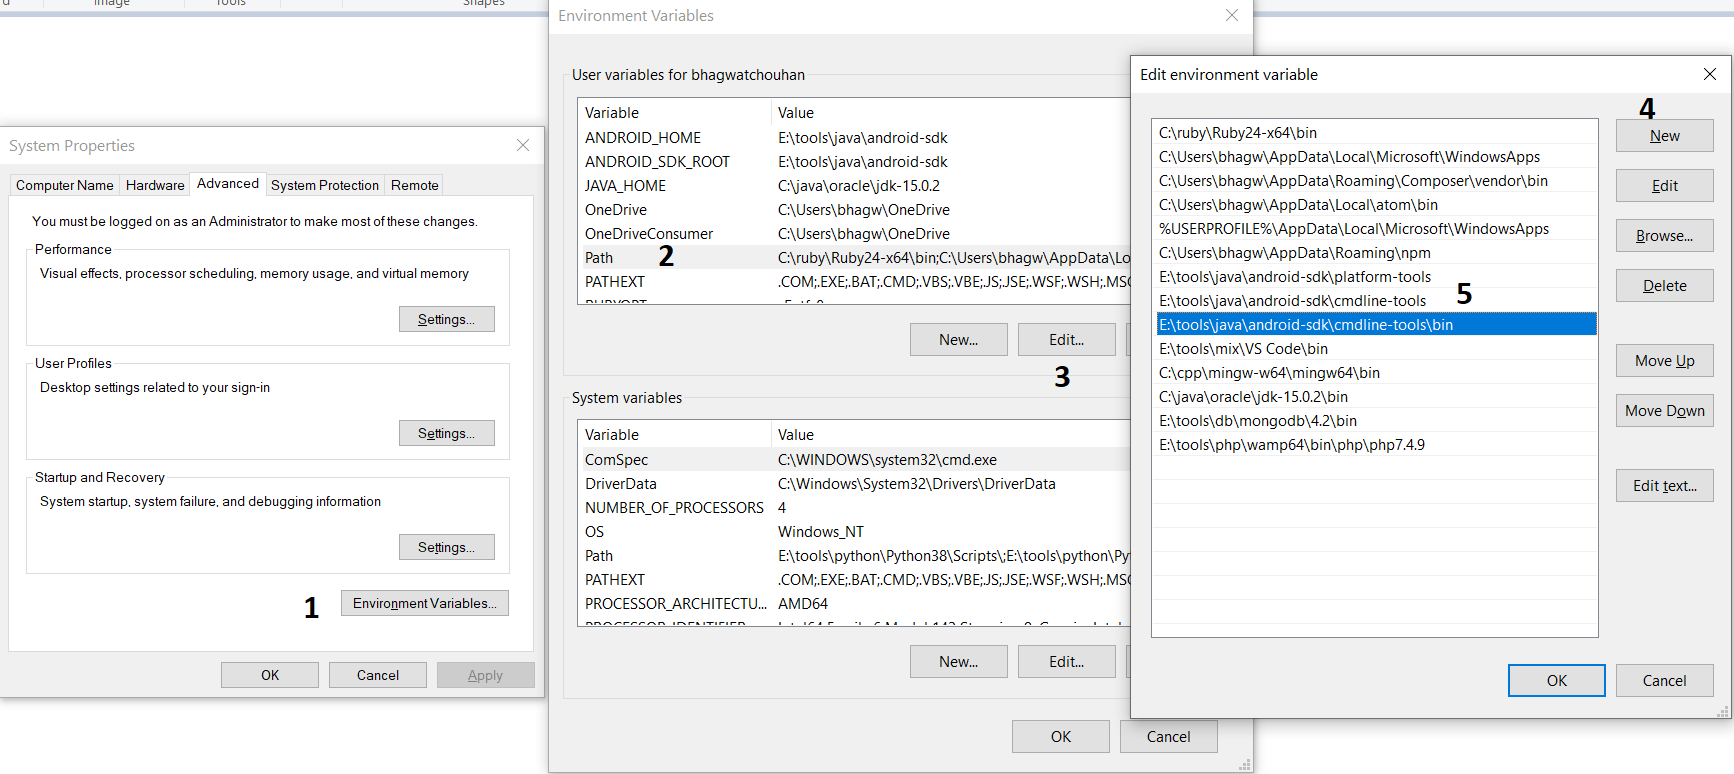
Right-click the My Computer or This PC on the desktop and click the Properties Option. Now click the Advanced system settings. It will show the System Properties dialog having Advanced Tab options as shown in Fig 7.
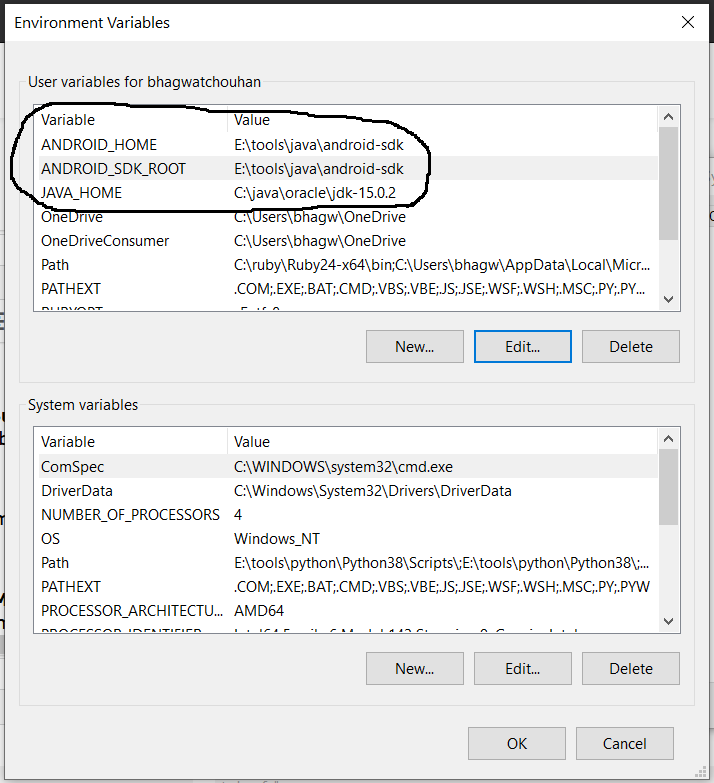
Click the Environment Variables Button and click the New Button in the first section. Set the Variable Name field to ANDROID_HOME and Variable Value to the android-sdk directory created by us in the previous step.
Similarly, also configure the environment variable ANDROID_SDK_ROOT to the android-sdk directory.
Also , make sure that the JAVA_HOME environment variable is set to the JDK installation directory. It must not end with the bin as we do with the system path variable.
Step 5 — Configure Commands
In previous steps, we have downloaded and extracted the Command Line Tools and Platform Tools to the android-sdk directory. Both the tools provide several command-line utilities which we need to run by going to the appropriate directory having the executable files.
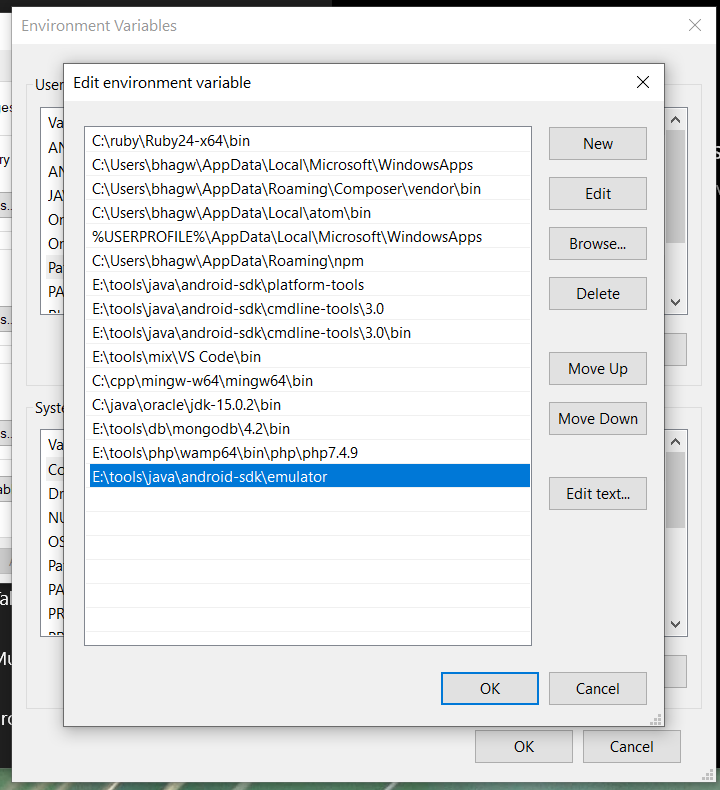
We can make these commands available at the system level without going to these directories by adding the path to tools, tools\bin, and platform-tools to the system path as shown in Fig 9. Make sure that these executables do not break other commands having the same name before adding these paths to the PATH environment variable.
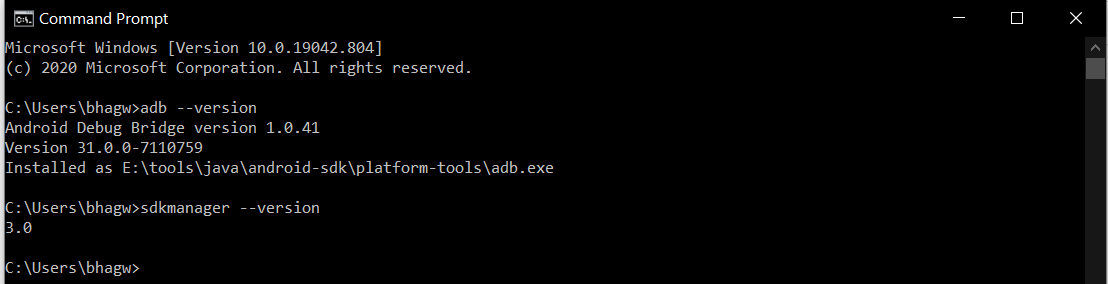
Now open the Command Prompt and check the ADB and SDK Manager versions as shown in Fig 10. You might be required to restart the system to apply the environment variables set by us.
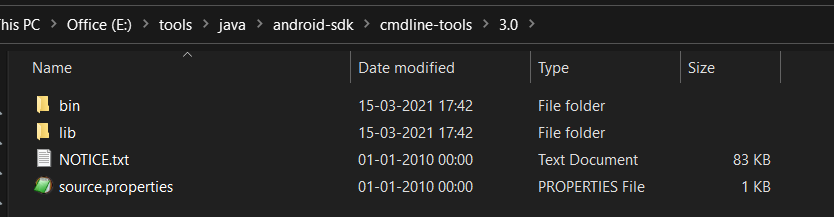
We can see that the ADB command works well and shows the version details, but the sdkmanager shows an error — «error: could not determine sdk root. error: either specify it explicitly with —sdk_root= or move this package into its expected location: \cmdline-tools\latest\» since it expects the Command Line Tools in a version-specific directory. Now open the source.properties file from the cmdline-tools directory to check the version. It will show the version details as shown below.
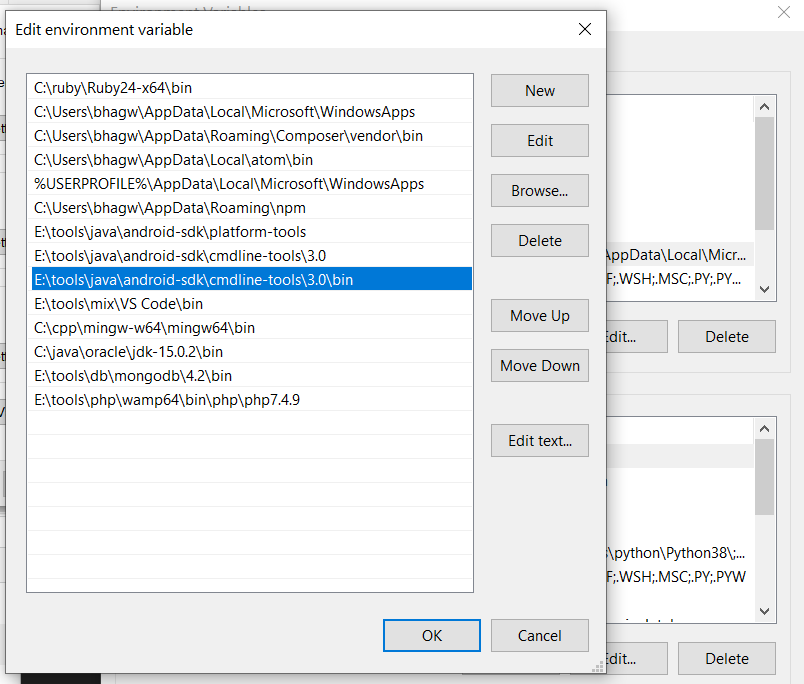
Now move all the files to the directory cmdline-tools/3.0 as shown in Fig 10.
Also, update the system path as shown in Fig 11.
Now close and open the Command Prompt. Also, check the ADB and SDK Manager versions as shown in Fig 12.
Step 6 — Using the SDK Manager
List — We can list the installed and available packages and images using the list command as shown below.
Install Platform — Use the below-mentioned command to install the Android 10 (API level 30) using the SDK manager.
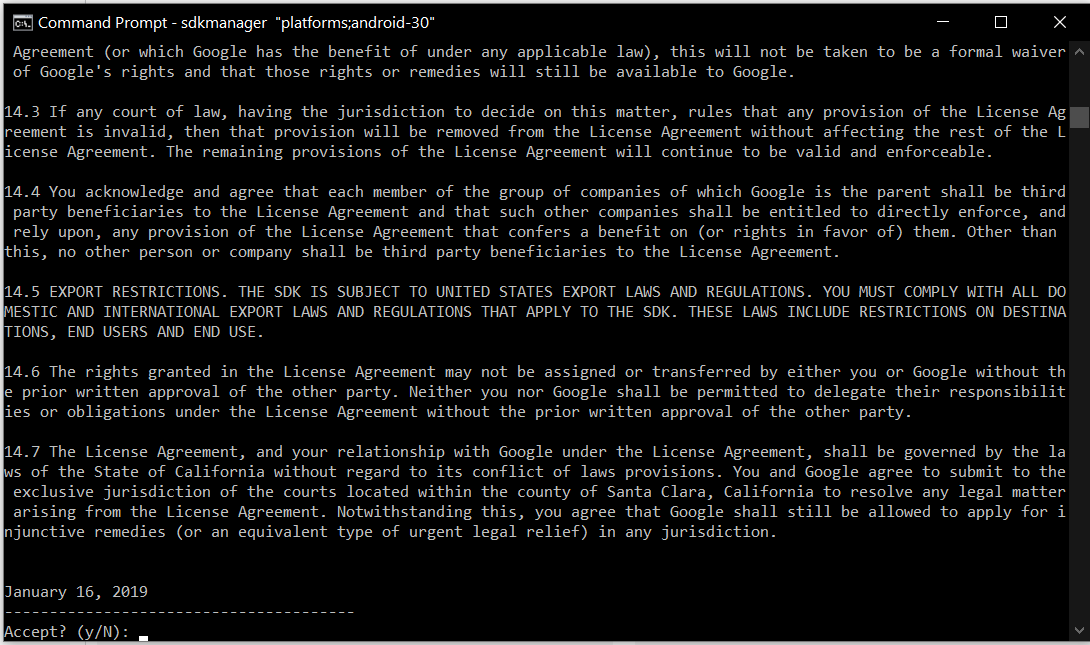
It will ask to accept the terms and conditions as shown in Fig 13. Enter y and hit Enter Key to accept the terms and conditions. This command creates the directory platforms within android-sdk and installs the package android-30 having all the required files to run the emulator for Android 10.
If we again check the installed packages, the list command shows the installed options as shown below.
Update SDK Manager — Update the SDK manager using the below-mentioned command.
Add System Image — We can add system images from available images shown by the list command using the SDK manager as shown below. We are adding the most recent default 64-bit system image.
Accept the License Agreement to complete the download.
There are several projects which need Google Play Services. We need system images specific to Google Play Services as shown below.
Accept the License Agreement to complete the download.
Install Emulator — We need to install the emulator before creating the AVD using SDK Manager.
Accept the License Agreement to complete the download.
Install Build Tools — Install the most recent build tool listed by the list command.
Step 7 — Using the Emulator and AVD Manager
Create Android Emulator — Create the emulator using the system image downloaded in the previous step as shown below. Replace with the actual name preferred by you.
The above commands ask a bunch of questions to configure the AVD if we choose the custom hardware profile option. We have excluded the details of these options from this tutorial since these configuration details depend on the actual needs. After completing all the configurations, it creates the AVD using the name provided by us while configuring it.
Similarly, we can also install the AVD of older versions as shown below.
List Android Emulators — Now go to the tools directory on the command line and check the installed platform as shown below.
Notes: Add Emulator to the system path as shown in Fig 14.
Close and re-open the Command Prompt to check the AVDs created by us in the previous steps.
It will list all the AVDs installed by us.
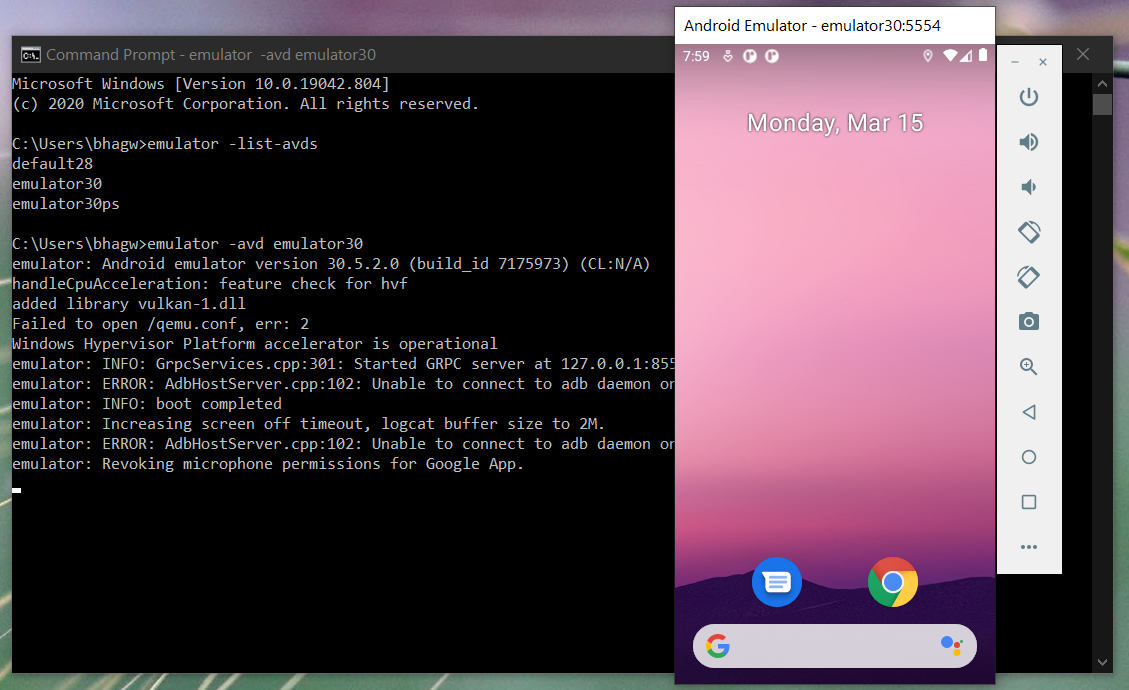
Run Emulator — We can run the emulator created by us as shown below.
The emulator will take some time to completely launch the AVD. The final results should look similar to Fig 15.
Delete Emulator — We can also delete an existing emulator as shown below.
Summary
This tutorial provided all the steps required to install Android Platform Tools and Android SDK Manager on Windows 10. It also provided the steps required to create and launch the AVDs using the Emulator.
Источник


