- Run any linux on android
- Guide: Installing and Running a GNU/Linux Environment on Any Android Device
- Setting Up GNU/Linux on Android
- Step-by-Step Guide
- Installing Linux Applications
- How to Install and Run a GNU/Linux OS on Your Android Device
- GNU/Linux Setup on Android
- How To Install GNU/Linux on Android Device
- Installing Linux Applications on Android
Run any linux on android
Краткое описание:
Установка Linux на Android в Termux без рут-прав
Andronix lets you install a Linux system on your Android Device without root. We found out that using Linux on Android is quite useful and lets you do many heavy tasks on your Android device.
This app lets you install various popular Linux distributions on your Android device by using Termux and PRoot functionality on the Android system. The application also provides you a graphics layer or Desktop environment (Xfce, MATE, LXDE, LXQT and KDE) on the top of the Linux shell which makes the user experience much better than working on a Linux command line.
* Manjaro is now available with xfce, lxqt, lxde and mate.
* Ubuntu KDE is now available which is great success.
* KDE Performance optimization — Better performance.
* Added multiple Window manager — Better look in KDE.
* Prinstalled softwares and themes — Makes a better aesthetic.
* AndroNix Premium — We have released AndroNix Premium with tons of features.
* Dark Mode — Use AndroNix at night comfortably.
* AndroNix Commands — A special addition to the family of AndroNix. It’s all you need to manage your commands throughout your life. Just copy and paste!
* AndroNix Web App — We have also released our web app to compliment AndroNix commands on Android, so you can now access Commands on any internet connected device.
* AndroNix Feed — We saw that since the last release you guys were really happy about the blogs we posted. So now we have a dedicated blog feed to make a better use of Linux and the power it offers.
* Offline Downloads — Internet can be unpredictable sometimes, but don’t worry we’re introducing offline support of Linux distros, though you’ll be still needing internet to download some files depending upon your device at the time of installing.
* Robust Documentation — We’ve been working on writing some documentations for weeks now. This will enable you to help yourself without waiting for us to reply.
* Priority Support — AndroNix Premium bring priority support with it at no extra cost. IF you’re an AndroNix Premium member just enjoy the blazing fast support, on the platform you like!
* Communities budding — We now support official AndroNix communities on Telegram and WhatsApp. We will soon expand to other platforms as well.
* UI overhaul — We’ve redisgned almost every element the our app and worked on user experience more than ever
* Automation Added — If you choose AndroNix Premium, we’ll handle everything for you. Just login and forget the rest.
* Profile Tab Added — Profile let’s you see your current status (Premium or not). If you’re a premium member, profile section has many things for you.
* Termux is now available offline — We now offer an offline copy of Termux within
AndroNix.
If you are new to Linux, we provide you easy and hassle-free instructions which makes your first impression of Linux a lot better. In case you still face some issues you can easily contact us on various platforms mentioned in the app. We ensure you that we will contact you as soon as possible.
— No root permissions required.
— Distros we support:
* Manjaro
* Ubuntu
* Kali Linux
* Debian
* Parrot OS
* Fedora
* Arch Linux
— Desktop environments we support:
* KDE
* LXDE
* LXQT
* MATE
* XFCE
— One click install/uninstall feature.
— Features multiboot linux system.
— Termux in required.
— Android version should be at least 5.1
— Device architecture supported: ARMv7, ARM64, x64.
Требуется Android: 5.1 и выше
Русский интерфейс: Нет
Источник
Guide: Installing and Running a GNU/Linux Environment on Any Android Device
As many of you mayВ well be aware, the Android operating system is powered by the Linux kernel underneath. Despite the fact that both Android and GNU/Linux are powered by the same kernel, the two operating systems are vastly different and run completely different types of programs.
Sometimes, however, the applications available on Android can feel a bit limited or underwhelming, especially when compared to their desktop counterparts. Fortunately, you can get a GNU/Linux environment up and running on any Android device, rooted or non-rooted. (The following instructions assume a non-rooted device.)
For those power users on Android tablets, or other Android devices that have largeВ screens (or can plug into a bigger screen), the ability to run desktop Linux software can go a long way towards increasing the potential that an Android device has for productivity.
Setting Up GNU/Linux on Android
To get a GNU/Linux environment set upВ on your Android device, you only need to install two applications from the Google Play store:В GNURoot Debian and XServer XSDL.В After you do that, you will only need to run a small handful of Linux commands to complete the installation.
GNURoot Debian provides a Debian Linux environment that runs within the confines of the Android application sandbox. It accomplishes this by leveraging a piece of software called proot, a userspace re-implementation of Linux’s chroot functionality, which is used to run a guest Linux environment inside of a host environment. Chroot normally requires root access to function, but by using proot you can achieve similar functionality without needing rootВ privileges.
GNURoot comes with a built-in terminal emulator for accessing its Debian Linux environment. This is sufficient for runningВ command-line software, however, running graphical software requires an X server to be available as well. The X Window System was designed to have separate client and server components in order to provide more flexibility (a faster, more powerful UNIX mainframe could act as the client to X server instances running on much less powerful and less sophisticated terminals).
In this case, we will use a separate application, XServer XSDL, that GNURoot applications will connect to as clients. XServer XSDL is a complete X server implementation for Android powered by SDL that has many configurable options such as display resolution, font size, different types of mouse pointer behavior, and more.
Step-by-Step Guide
1. Install GNURoot Debian and XServer XSDL from the Play Store.
2. Run GNURoot Debian. The Debian Linux environment will unpack and initialize itself, which will take a few minutes. Eventually, you will be presented with a “root” shell. Don’t get misled by this – this is actually a fake root account that is still running within the confines of the Android application sandbox.
3. Run apt-get update and apt-get upgrade to ensure you have the most up-to-date packages available on your system. Apt-get is Debian’s package management system that you will use to install software into your Debian Linux environment.
4. Once you are up-to-date, it’s time to install a graphical environment. I recommend installing LXDE as it is simple and light-weight. (Remember, you’re running Debian with all the overhead of the Android operating system in the background, so it’s best to conserve as many resources as you can.) You can either do apt-get install lxde to install the desktop environment along with a full set of tools, or apt-get install lxde-core to only install the desktop environment itself.
5. Now that we have LXDE installed, let’s install a few more things to complete our Linux setup.
• XTerm – this provides access to the terminal while in a graphical environment
• Synaptic Package Manager – a graphical front-end to apt-get
• Pulseaudio – provides drivers for playing back audio
Run apt-get install xterm synaptic pulseaudio to install these utilities.
6. Finally, let’s get the graphical environment up and running. Start XServer XSDL and have it download the additional fonts. Eventually you will get to a blue screen with some white text – this means that the X server is running and waiting for a client to connect. Switch back to GNURoot and run the following two commands:
Then, switch to XServer XSDL and watch the LXDE desktop come up onto your screen.
I recommend putting the above two commands into a shell script so that you can easily restart LXDE if you close the session or if you need to restart your device.
Installing Linux Applications
Congrats! You’ve successfully gotten Debian Linux up and running on your Android device, but what good is running Linux without apps? Fortunately, you’ve got a massive repository of Linux applications at your fingertips just waiting to be downloaded. We’ll use the Synaptic Package Manager, which we installed earlier, to access this repository.
Click the “start” button at the lower-left hand corner, click Run, and then type synaptic . The Synaptic Package Manager will load. From here, simply press the Search button at the top and then type the name of the application you’d like to install. Once you’ve found an application, right click it and select “Mark for Installation”. When you are finished marking packages, click the Apply button at the top to start the installation. Uninstalling packages follows the same procedure, except by right-clicking and selecting “Mark for Removal” instead.
Of course, since this isn’t a real Linux installation but rather a Linux environment running on top of, and within the constraints of, Android, there are a couple of limitations to be aware of. Some applications will refuse to run or will crash, usually due to the fact that some resources that are usually exposed on GNU/Linux systems are kept hidden by Android. Also, if a regular Android app can’t do something, then usually a Linux application running within Android can’t as well, so you won’t be able to perform tasks such as partitioning hard drives. Lastly, games requiring hardware acceleration will not work. Most standard everyday apps, however, will run just fine. Some examples include Firefox, LibreOffice, GIMP, Eclipse, and simple games like PySol.
I hope that you find this tutorial useful. While I personally performed these steps on my Google Pixel C, you can do this on most Android devices. Preferably on a tablet device with access to keyboard and mouse peripherals, of course. If you already run a GNU/Linux distribution on your Android device, let us know what you are using it for below!
Источник
How to Install and Run a GNU/Linux OS on Your Android Device
Installing a GNU/Linux environment on your android device can enhance and increase its productivity. Although the Android OS runs on the same Kernel as GNU/Linux, the two Operating systems run on different programs.
A common caveat of android apps is that they are sometimes more limited when compared to desktop apps for example, and one way to get around that is installing a GNU/Linux environment, which can be applicable on rooted or non-rooted devices. This guide assumes a non-rooted device is being used.
GNU/Linux Setup on Android
To Set up a GNU/Linux environment you will need to download GNURoot Debian and Xserver XSDL followed by applicable Linux commands to complete the process.
GNURoot allows you to create a Linux environment within a host OS. Normally you would need Linux’s “Chroot” functionality to do this however, GNURoot uses “proot” a software that allows you to achieve the same function without proot privileges.
The purpose of Xserver XSDL, is to provide an application that GNURoot connects to. An X server is needed to run software that is heavy on graphics.
Xserver XDSL provides options for customizing things like display resolution.
How To Install GNU/Linux on Android Device
1. Search and Install GNURoot Debian and Xserver XSDL from the Playstore.
2. After the download is completed run GNURoot Debian, however watch-out for a “root” shell, which is a fake root shell running in Andriod application sandbox, so ignore it.
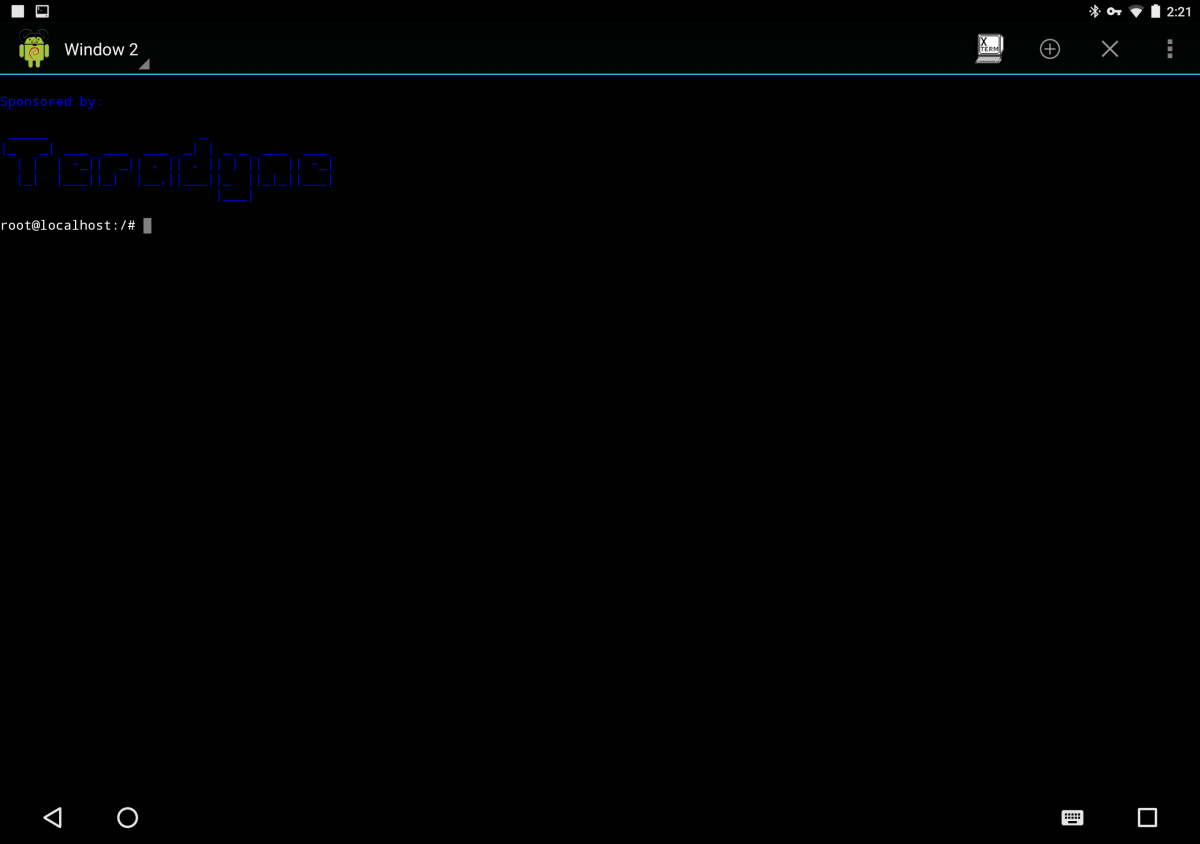
Linux Shell on Android
3. To ensure you have the most recent upgrades run “apt-get update and apt-get upgrade”. You will need Apt-get to install software in a Debian/Ubunu Linux environment.
4. The next step is to install a graphical environment. You can do this by running “apt-get install lxde” for the environment with all the tools, alternatively you can run “apt-get install lxde-core” for just the desktop environment.
5. What is left now is a way to provide access to the terminal when in a graphical environment, a software called XTerm is used for this.
Finally you will need Synaptic Package Manager as a front-end to apt-get drivers for audio play back with Pulseaudio.
6. As a final step start xServer XSDL and download all fonts then go back to GNURoot to run these commands:
After this, revert back to XServer XSDL and wait for the LXDE desktop.
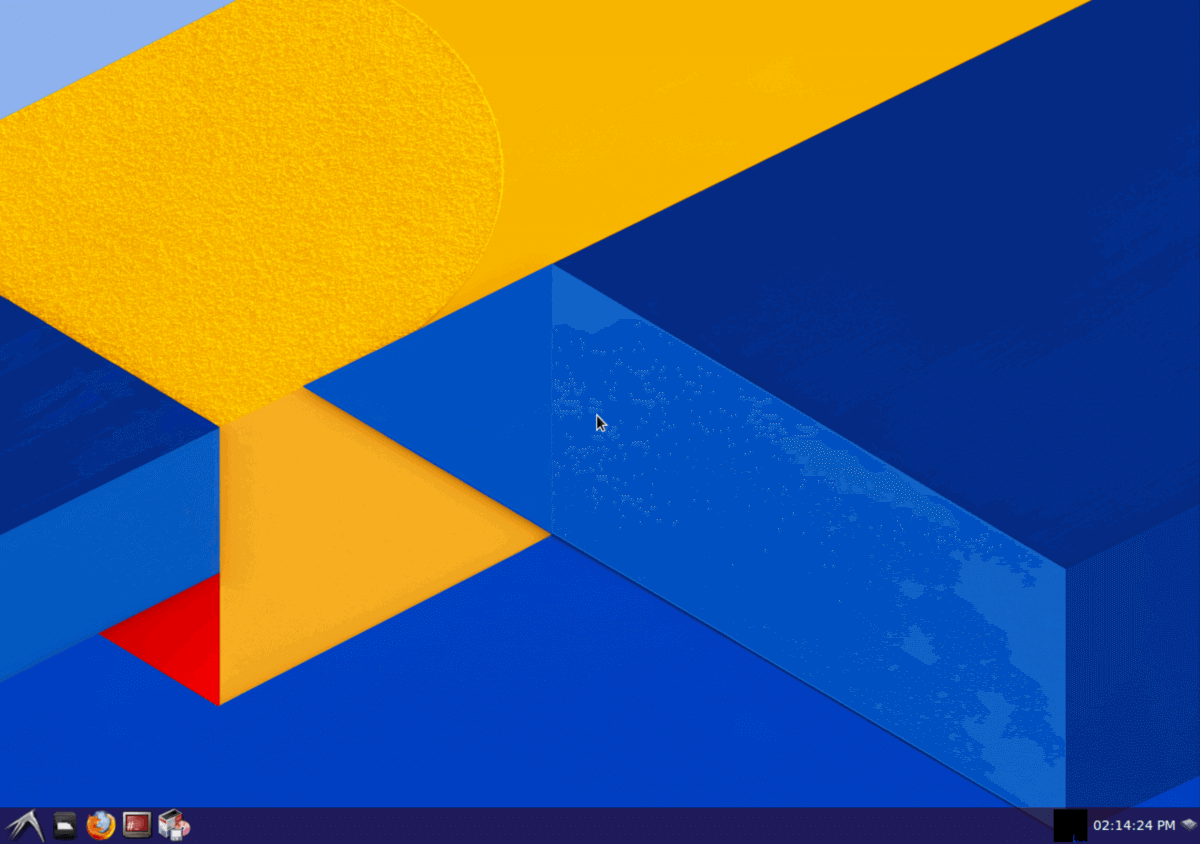
Running LXDE Desktop on Android
Installing Linux Applications on Android
Now that you have Debian Linux on your Android device you will need apps to enjoy it fully. To access the large repository of Linux apps use the Synaptic Package Manager previously installed.
Access Run from the start menu and type in “synaptic”. Press the search button when the Synaptic Package Manager opens and key in the name of the app you are looking for then mark it for installation.
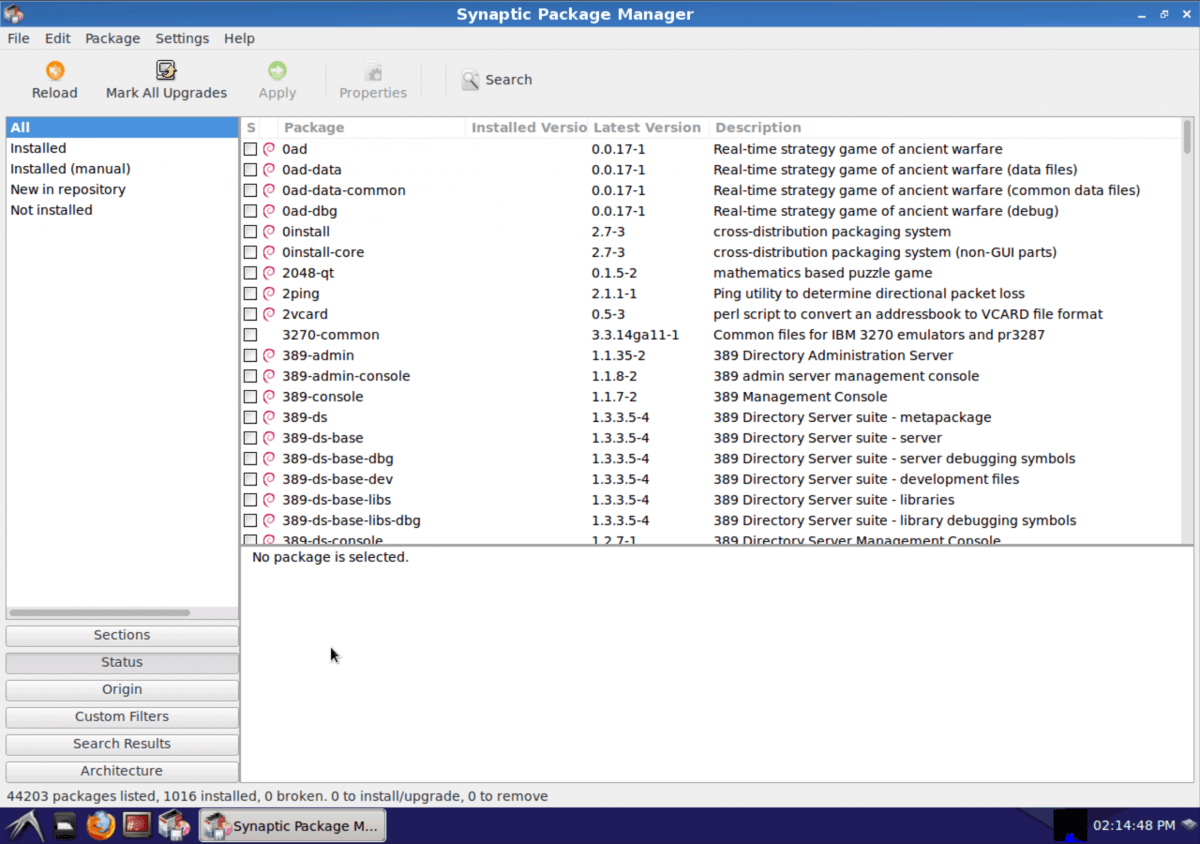
Synaptic Package Manager
With your apps installed, you are finally good to go! Remember however, that because this is a Linux environment running within Android, it will not run as seamlessly as you would expect from the whole Linux package, some apps may not run at all. Also, android apps do not necessarily work differently within a Linux environment so don’t expect more than the usually from your android apps either.
It is also important to remember that some games will not work especially those requiring hardware acceleration But all in all, most apps and simple games will work just fine!
We hope you find this guide easy to follow, let us know if you have any comments, tips or suggestions or simply to let us know you successfully installed Linux on your Android device with these guidelines!
Источник


