- Install and configure the NDK and CMake
- Install NDK and CMake automatically
- Install the NDK and CMake
- Configure a specific version of CMake
- Groovy
- Kotlin
- Install a specific version of the NDK
- Configure specific versions of the NDK in your project
- Groovy
- Kotlin
- Default NDK version per AGP version
- Configure CMake
- Create a CMake build script
- Groovy
- Kotlin
- Add NDK APIs
- Add other prebuilt libraries
- Include other CMake projects
- Call CMake from the command line
Install and configure the NDK and CMake
To compile and debug native code for your app, you need the following components:
- The Android Native Development Kit (NDK): a set of tools that allows you to use C and C++ code with Android.
- CMake: an external build tool that works alongside Gradle to build your native library. You do not need this component if you only plan to use ndk-build.
- LLDB: the debugger Android Studio uses to debug native code. By default, LLDB will be installed alongside Android Studio.
This page describes how to install these components automatically, or by using Android Studio or the sdkmanager tool to download and install them manually.
Install NDK and CMake automatically
Android Gradle Plugin 4.2.0+ can automatically install the required NDK and CMake the first time you build your project if their licenses have been accepted in advance. If you’ve already read and agree to the license terms, then you can pre-accept the licenses in scripts with the following command:
Install the NDK and CMake
When you install the NDK, Android Studio selects the latest available NDK. For most projects, installing this default version of the NDK is sufficient. If your project needs one or more specific versions of the NDK, though, you can download and configure specific versions. Doing so helps you ensure reproducible builds across projects that each depend on a specific version of the NDK. Android Studio installs all versions of the NDK in the android-sdk /ndk/ directory.
To install CMake and the default NDK in Android Studio, do the following:
With a project open, click Tools > SDK Manager.
Click the SDK Tools tab.
Select the NDK (Side by side) and CMake checkboxes.
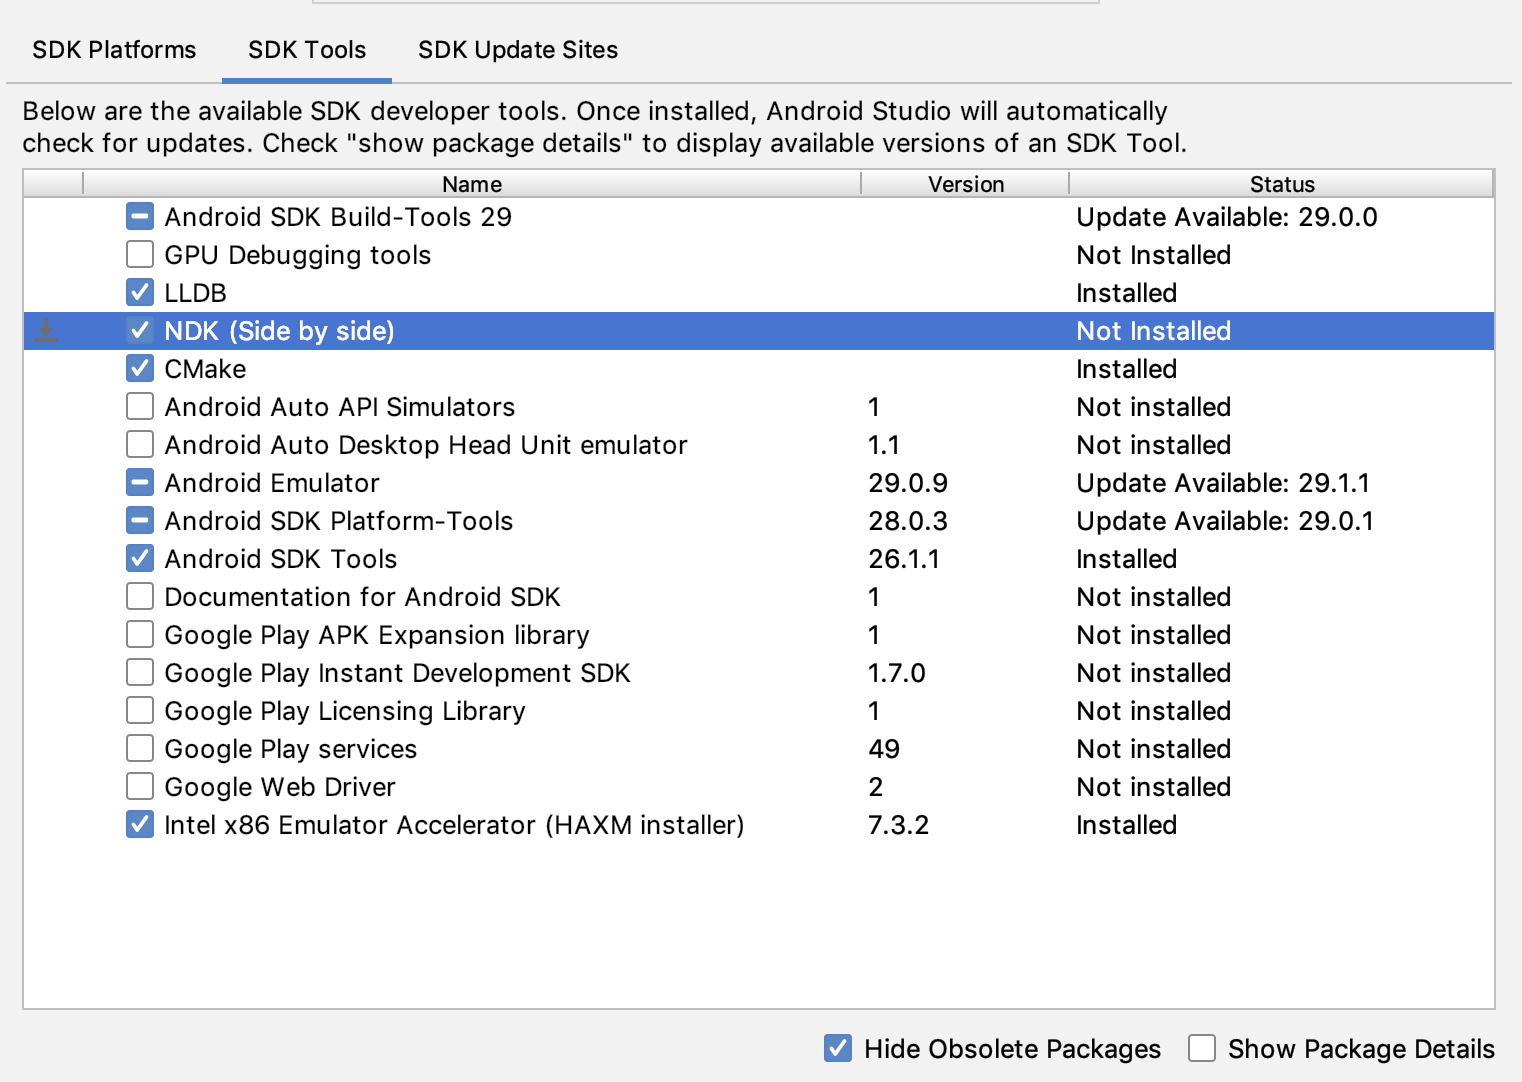 Figure 1: The SDK Tools window showing the NDK (Side by side) option
Click OK.
A dialog box tells you how much space the NDK package consumes on disk.
Click OK.
When the installation is complete, click Finish.
Your project automatically syncs the build file and performs a build. Resolve any errors that occur.
Configure a specific version of CMake
The SDK Manager includes the 3.6.0 forked version of CMake and version 3.10.2. Projects that don’t set a specific CMake version are built with CMake 3.10.2. To set the CMake version, add the following to your module’s build.gradle file:
Groovy
Kotlin
If you want to use a CMake version that is not included by the SDK Manager, follow these steps:
- Download and install CMake from the official CMake website.
- Specify the CMake version you want Gradle to use in your module’s build.gradle file.
Either add the path to the CMake installation to your PATH environment variable or include it in your project’s local.properties file, as shown. If Gradle is unable to find the version of CMake you specified in your build.gradle file, you get a build error.
If you don’t already have the Ninja build system installed on your workstation, go to the official Ninja website, and download and install the latest version of Ninja available for your OS. Make sure to also add the path to the Ninja installation to your PATH environment variable.
Install a specific version of the NDK
To install a specific version of the NDK, do the following:
With a project open, click Tools > SDK Manager.
Click the SDK Tools tab.
Select the Show Package Details checkbox.
Select the NDK (Side by side) checkbox and the checkboxes below it that correspond to the NDK versions you want to install. Android Studio installs all versions of the NDK in the android-sdk /ndk/ directory.
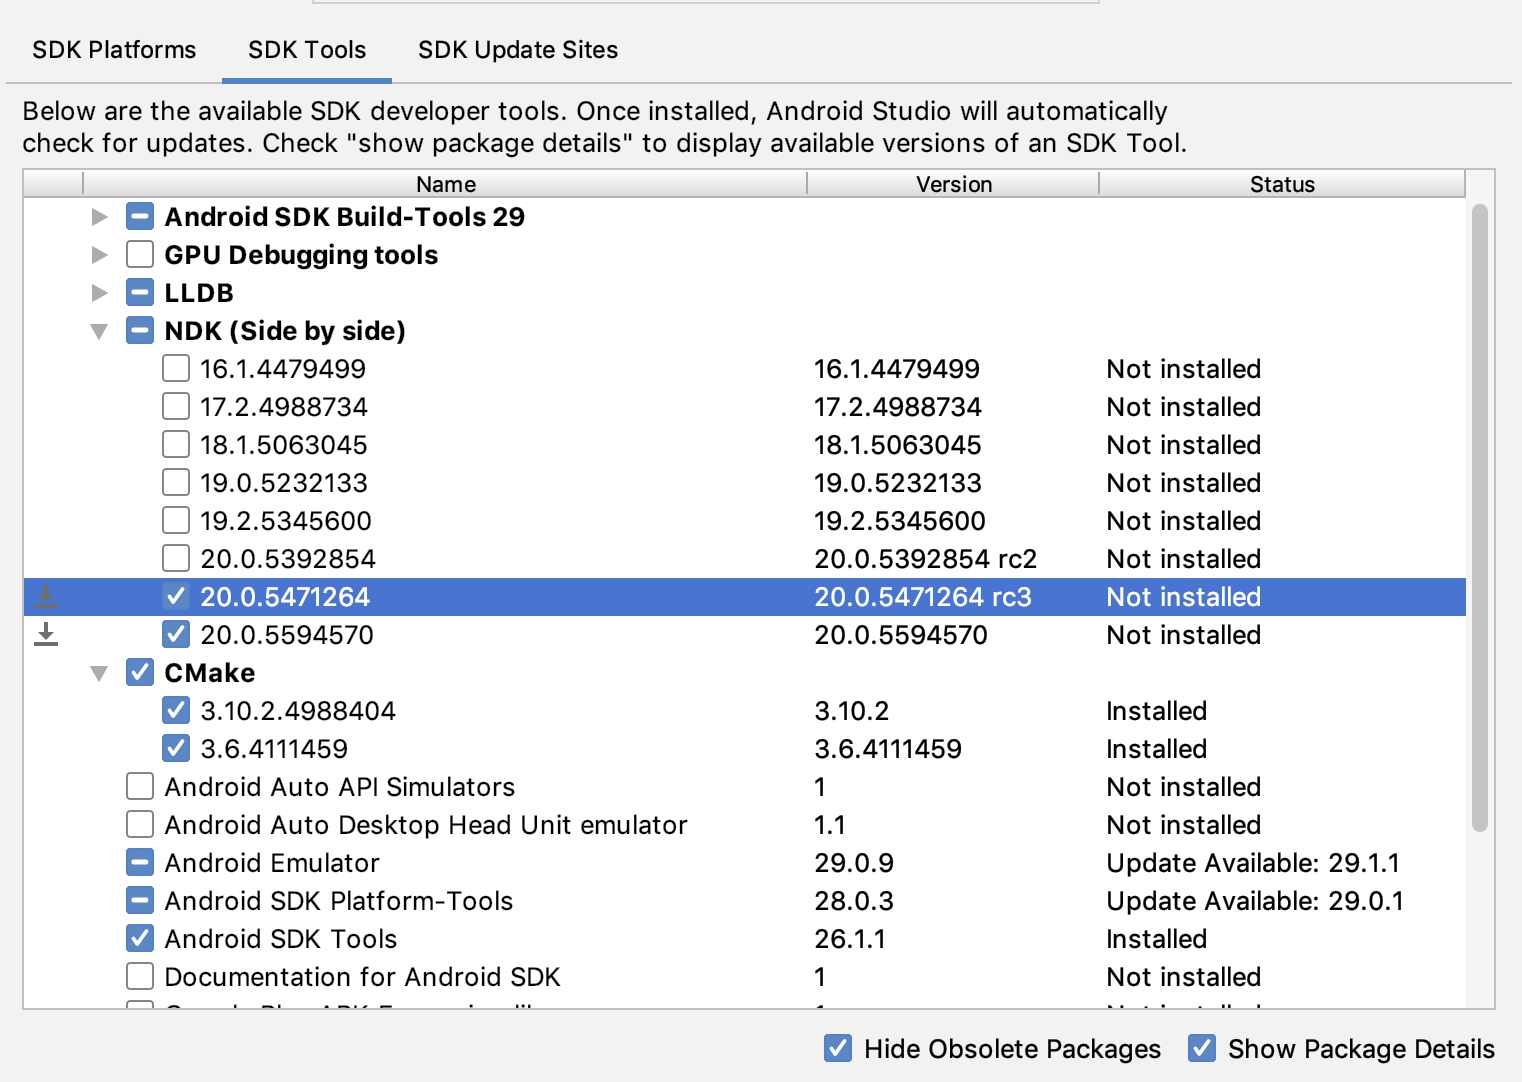 Figure 2: The SDK Tools window showing the NDK (Side by side) options
Click OK.
A dialog box tells you how much space the NDK package(s) consumes.
Click OK.
When the installation is complete, click Finish.
Your project automatically syncs the build file and performs a build. Resolve any errors that occur.
Configure each module with the version of the NDK you want it to use. When using Android Studio 3.6 or higher, if you do not specify the version, the Android Gradle plugin chooses a version that it is known to be compatible with.
Configure specific versions of the NDK in your project
You may need to configure the version of the NDK in your project if one of the following is true:
- Your project is inherited and you need to use specific versions of the NDK and the Android Gradle plugin (AGP). For more information, see Configure the NDK for the Android Gradle plugin.
You have multiple versions of the NDK installed and you want to use a specific one. In this case, specify the version using the android.ndkVersion property in the module’s build.gradle file, as shown in the following code sample.
Groovy
Kotlin
Default NDK version per AGP version
Before release, each AGP version is thoroughly tested with the latest stable NDK release at that time. For AGP version 3.6 and above, that NDK version will be used to build your projects if you do NOT specify an NDK version in the build.gradle file. The default NDK version is documented inside the AGP release notes. The current default NDK versions are listed in the following table:
| Android Studio/Gradle Plugin Version | |||||||
|---|---|---|---|---|---|---|---|
| 7.0 | 4.2 | 4.1 | 4.0 | 3.6 | 3.5 | 3.4 | |
| Default NDK version specified for the version of AGP | 21.4.7075529 | 21.4.7075529 | 21.1.6352462 | 21.0.6113669 | 20.0.5594570 | No default specified | |
Content and code samples on this page are subject to the licenses described in the Content License. Java is a registered trademark of Oracle and/or its affiliates.
Источник
Configure CMake
A CMake build script is a plain text file that you must name CMakeLists.txt and includes commands CMake uses to build your C/C++ libraries. If your native sources don’t already have a CMake build script, you need to create one yourself and include the appropriate CMake commands. To learn how to install CMake, see Install and configure the NDK and CMake.
This section covers some basic commands you should include in your build script in order to tell CMake which sources to use when creating your native library. To learn more, read the official documentation about CMake commands.
After you configure a new CMake build script, you need to configure Gradle to include your CMake project as a build dependency, so that Gradle builds and packages your native library with your app’s APK.
Note: If your project uses ndk-build, you don’t need to create a CMake build script. You can simply configure Gradle to include your existing native library project by providing a path to your Android.mk file.
Create a CMake build script
To create a plain text file that you can use as your CMake build script, proceed as follows:
- Open the Project pane from the left side of the IDE and select the Project view from the drop-down menu.
- Right-click on the root directory of your-module and select New > File.
Note: You can create the build script in any location you want. However, when configuring the build script, paths to your native source files and libraries are relative to the location of the build script.
You can now configure your build script by adding CMake commands. To instruct CMake to create a native library from native source code, add the cmake_minimum_required() and add_library() commands to your build script:
Tip: Similar to how you can tell CMake to create a native library from source files, you can use the add_executable() command to tell CMake to instead create an executable from those source files. However, building executables from your native sources is optional, and building native libraries to package into your APK satisfies most project requirements.
When you add a source file or library to your CMake build script using add_library() , Android Studio also shows associated header files in the Project view after you sync your project. However, in order for CMake to locate your header files during compile time, you need to add the include_directories() command to your CMake build script and specify the path to your headers:
The convention CMake uses to name the file of your library is as follows:
For example, if you specify «native-lib» as the name of your shared library in the build script, CMake creates a file named libnative-lib.so . However, when loading this library in your Java or Kotlin code, use the name you specified in the CMake build script:
Groovy
Kotlin
Note: If you rename or remove a library in your CMake build script, you need to clean your project before Gradle applies the changes or removes the older version of the library from your APK. To clean your project, select Build > Clean Project from the menu bar.
Android Studio automatically adds the source files and headers to the cpp group in the Project pane. By using multiple add_library() commands, you can define additional libraries for CMake to build from other source files.
Add NDK APIs
The Android NDK provides a set of native APIs and libraries that you may find useful. You can use any of these APIs by including the NDK libraries in your project’s CMakeLists.txt script file.
Prebuilt NDK libraries already exist on the Android platform, so you don’t need to build them or package them into your APK. Because the NDK libraries are already a part of CMake’s search path, you don’t even need to specify the location of the library in your local NDK installation—you only need to provide CMake with the name of the library you want to use and link it against your own native library.
Add the find_library() command to your CMake build script to locate an NDK library and store its path as a variable. You use this variable to refer to the NDK library in other parts of the build script. The following sample locates the Android-specific log support library and stores its path in log-lib :
In order for your native library to call functions in the log library, you need to link the libraries using the target_link_libraries() command in your CMake build script:
The NDK also includes some libraries as source code that you need to build and link to your native library. You can compile the source code into a native library by using the add_library() command in your CMake build script. To provide a path to your local NDK library, you can use the ANDROID_NDK path variable, which Android Studio automatically defines for you.
The following command tells CMake to build android_native_app_glue.c , which manages NativeActivity lifecycle events and touch input, into a static library and links it to native-lib :
Add other prebuilt libraries
Adding a prebuilt library is similar to specifying another native library for CMake to build. However, because the library is already built, you need to use the IMPORTED flag to tell CMake that you only want to import the library into your project:
You then need to specify the path to the library using the set_target_properties() command as shown below.
Some libraries provide separate packages for specific CPU architectures, or Application Binary Interfaces (ABI), and organize them into separate directories. This approach helps libraries take advantage of certain CPU architectures while allowing you to use only the versions of the library you want. To add multiple ABI versions of a library to your CMake build script, without having to write multiple commands for each version of the library, you can use the ANDROID_ABI path variable. This variable uses a list of the default ABIs that the NDK supports, or a filtered list of ABIs you manually configure Gradle to use. For example:
For CMake to locate your header files during compile time, you need to use the include_directories() command and include the path to your header files:
Note: If you want to package a prebuilt library that is not a build-time dependency—for example, when adding a prebuilt library that is a dependency of imported-lib , you do not need perform the following instructions to link the library.
To link the prebuilt library to your own native library, add it to the target_link_libraries() command in your CMake build script:
To package the prebuilt library into your APK, you need to manually configure Gradle with the sourceSets block to include the path to your .so file. After building your APK, you can verify which libraries Gradle packages into your APK by using the APK Analyzer.
Include other CMake projects
If you want to build multiple CMake projects and include their outputs in your Android project, you can use one CMakeLists.txt file as the top-level CMake build script (which is the one you link to Gradle) and add additional CMake projects as dependencies of that build script. The following top-level CMake build script uses the add_subdirectory() command to specify another CMakeLists.txt file as a build dependency and then links against its output just as it would with any other prebuilt library.
Call CMake from the command line
Use the following command to call CMake to generate a Ninja project outside of Android Studio:
This command will generate the Ninja project that can be executed to create Android executable libraries ( .so files). The CMAKE_TOOLCHAIN_FILE is required to use NDK’s CMake support. For CMake 3.21 or later, CMake’s built-in NDK support can be used instead, but a different group of variables must be used as described in CMake’s Cross Compiling for Android documentation.
Content and code samples on this page are subject to the licenses described in the Content License. Java is a registered trademark of Oracle and/or its affiliates.
Источник


