- How to run Windows OS on Android Phone in 2 Minutes (Without Root)
- Requirements
- How to Run WINDOWS ON ANDROID
- Use apps from your Android device on your PC
- How do I interact with apps?
- How do I know I’m using the multiple apps experience?
- How do I pin Android apps into Windows?
- How do I remove pinned Android apps from my Windows taskbar or Start menu?
- Are the apps from my Android device now installed on my PC?
- Can I access Android apps without linking my device?
- Can I open multiple apps at the same time?
- How to Run Windows Apps on Android
- How to Run Windows Apps on Android with Wine 5.0
- Wine + 6 Other Apps To Run Windows Programs On Other Platforms
- Prerequisites
- Download & Install Wine
- Try out Wine on Android
- Download apps & tools
- Troubleshooting issues
- 10 Apps to Connect Computer to Android Devices
- That’s all about using Wine on Android
How to run Windows OS on Android Phone in 2 Minutes (Without Root)

Running Windows on an Android smartphone has been on top of my tech bucket list. I’ve tried several methods and emulators to get somehow it working but unfortunately, none of it works, or the ones that do work are filled with bugs making it unusable. After thoroughly researching and trying various methods, we are bringing you a step by step guide which will help you in running Windows OS on your Android smartphone.
You’ll be able to run Windows 7,8 or even Windows 10 using this method on your smartphone, provided your smartphone has some good specs to run it. We won’t be fully installing Windows OS on your devices rather than that we’ll be emulating the full Windows experience on your phone. The app which we’ll be using to get this thing done is Limbo PC Emulator, now there are tons of emulator apps available on Play Store, but the reason why we are selecting Limbo PC Emulator is due to its simplicity over other emulators.
Now before we proceed with the process, Here are some of the Requirements.
Requirements
- Android device running Android v4.4 or above. At least 2GB of RAM and octa-core processor is recommended.
- Limbo PC emulator installed on the device ( Download link is given below)
- ISO/IMG Image file of Windows OS to be emulated
How to Run WINDOWS ON ANDROID
Step 1. Download Limbo from Sourceforge and install it on your Android device
Step 2. Download image file of the Windows version that you want to run and place it in a suitable directory in your device.
Step 3. Open Limbo app
Step 4. Click on Load Machine option and click New
Step 5. Create New Machine by entering any name.
Step 6. Select these Settings.
| Architecture | x86 |
| Machine Type | PC |
| CPU Model | Default |
| Core | 1 |
| RAM | 512MB (for running Windows 8 or above requires more ram) |

Step 6. Select the Storage option – Tick harddisk A and choose the path of the Windows XP image file.

Step 7. Go to User Interface settings on Limbo App and select Interface as SDL.
Step 8. Select Orientation as Landscape.
Step 9. Run the program by clicking the play button. Now, wait for 10-15mins to complete the loading of Windows XP.

Voilla. you now have a running Windows OS on your smartphone.
Do let us know if you face any trouble following this guide in the comment section down below.
Источник
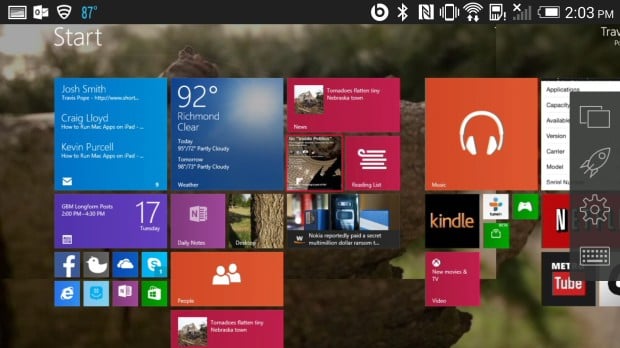
Use apps from your Android device on your PC
With Your Phone apps, you can instantly access the Android apps installed on your mobile device right on your PC. Using a Wi-Fi connection, Apps allows you to browse, play, order, chat, and more – all while using your PC’s larger screen and keyboard. You can add your Android apps as favorites on your PC, pin them to your Start menu and taskbar, and open them in separate windows to use side-by-side with apps on your PC – helping you stay productive.
Note: For the best experience, we recommend making sure your Android device and PC are on the same Wi-Fi network and band. Some Wi-Fi networks offer different connection bands, like a 5 GHz or 2.4 GHz band. Make sure both your devices are connected to the same one. Learn more about how to do that in our Wi-Fi troubleshooting help.
How do I interact with apps?
You can use your PC’s mouse, trackpad, keyboard, pen or touch-enabled screen to open, type, scroll, and interact with apps. A few tips for using your mouse and keyboard:
Single click will behave the same as any single touch/tap interaction
Right click anywhere on your phone screen to navigate to the previous page
Click and hold will behave the same as a tap/hold interaction
Click and hold and drag to select content
Mouse scroll to move between pages vertically or horizontally
Some games and apps might not work with a mouse or keyboard. You’ll need to use a touch-enabled PC to interact with them.
If you’re encountering issues using Apps, our troubleshooting tips may help.
How do I know I’m using the multiple apps experience?
The requirements for using multiple apps are:
A PC running the Windows 10 May 2020 Update or later. For best performance, we recommend having at least 8GB of RAM.
An Android device running Android 11.0.
On your Android device, you need Link to Windows version 2.1.05.6 or higher, or Your Phone Companion version 1.20104.15.0 or higher.
Your Phone versions 1.20104.20.0 or higher.
How do I pin Android apps into Windows?
You can pin your Android apps to the Windows Start menu, taskbar, or add it to Your Phone app favorites.
To pin an app on your PC:
Open the Your Phone app
Right click on the app icon you want to pin or add to your favorites
How do I remove pinned Android apps from my Windows taskbar or Start menu?
If you’ve pinned an app to your taskbar, just right-click the app icon and select Unpin from taskbar.
If you’ve added an app to your Windows start menu, you’ll need to uninstall the app from your apps list. Go to Windows Settings > Apps & features, search for your app in the list. Select it, then select Uninstall.
Are the apps from my Android device now installed on my PC?
No, apps you open will be running from your Android device. The Your Phone app is mirroring apps from your Android device to your PC, meaning you’ll see the same thing on your PC that’s being displayed on your Android device.
Can I access Android apps without linking my device?
No, you need to connect your Android device to your PC via the Your Phone app in order to use this experience. Learn more about how to set up Apps here.
Can I open multiple apps at the same time?
If you have Android 11 on your Android device and one of select Samsung devices, yes. For most other Android devices, you can only open one Android app at a time.
Источник
How to Run Windows Apps on Android
Here’s how to run Windows apps on Android so that you have the best of both worlds at your fingertips: an Android device that’s powerful and mobile enough to be useful anywhere and the flexibility to get work done with the powerful apps that only Windows can offer.
First, you’ll need your Android device powered on. You’ll also need access to the Google Play Store. The Google Play Store is the marketplace where Android devices download apps from.
Pick up your Android device and unlock it by putting in your passcode or entering your lock pattern.

Once inside, find the app drawer and navigate to the Play Store. On the HTC One M7 this is done by tapping the button in the middle of the bottom shortcut bar. This is going to be particular to whatever version of Android your device is running and the maker of that device. Either way, you should be able to reach the Play Store from your device’s list of installed applications. Access to the Google Play Store is almost universal.
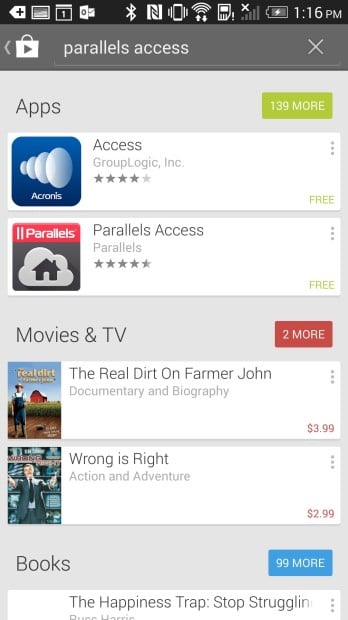
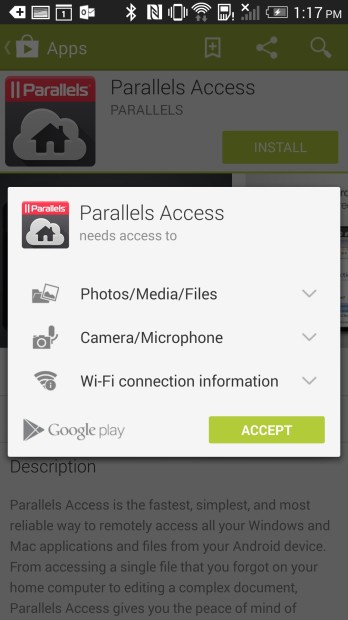
Inside the Google Play Store you’ll be greeted by a showcase of apps. You’ll want to tap the search icon in the top right corner of your screen. It looks like a magnifying glass. Search for Parallels Access.
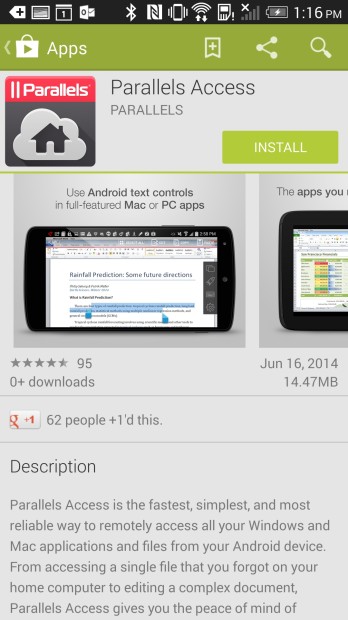
Select Parallels Access from the list of apps.
Tap Install.
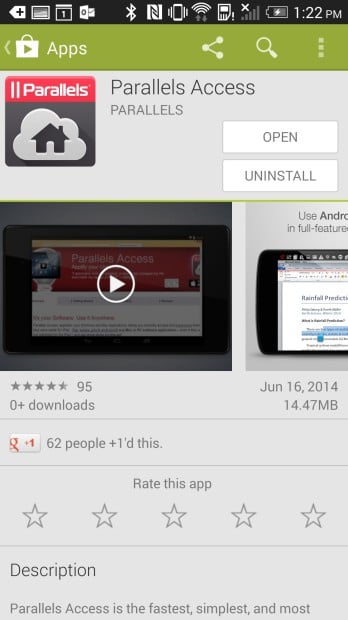
Tap Accept to give Parallels Access permission to do things on your device. Then wait for it to finish downloading and installing on your device. This can take a long time if you have a slower internet connection.
Tap Open.
Now tap Register.
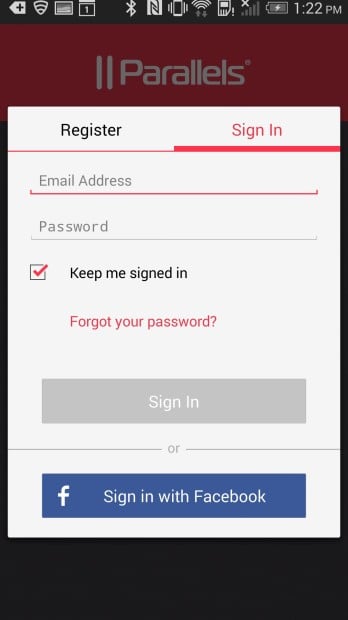
Now put in a username, email address and password that you’re comfortable with. You can also login with your Facebook Account as well, though if your Facebook Account is ever compromised you could give someone access to your data.
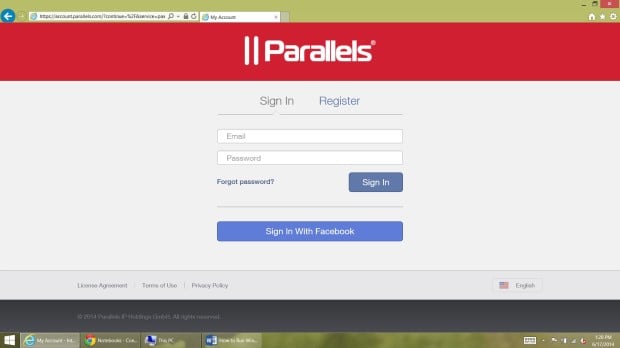
Parallels Access will have sent a registration email to the address you provided so that you can set up Parallels on your Windows device. Go to your computer and open the email. The email will have the subject Welcome to Parallels Access.
Click on the button in the email labeled Download Parallels Access Agent.
Type in the username and password that you just used to setup your Android device.
Once inside click or tap on the Downloads link in the navigation bar.
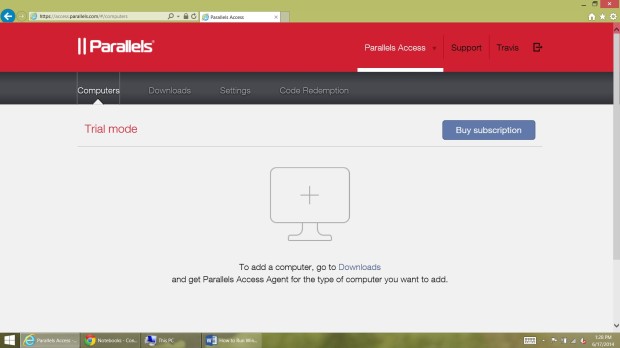
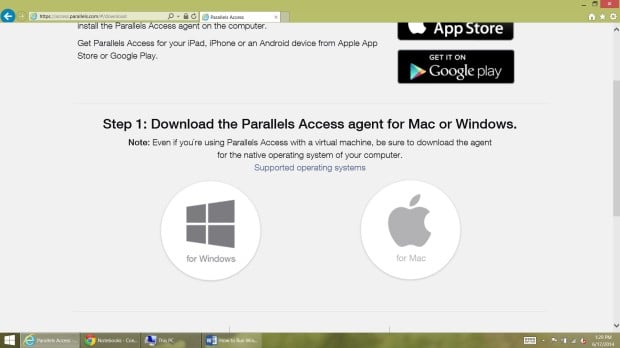
Click or tap on the Windows icon to download the access client to your Windows device. Tap or Click Run to begin installing the app. Your device will need to download the app before it begins installing. Again, depending on your internet connection this could take a bit.
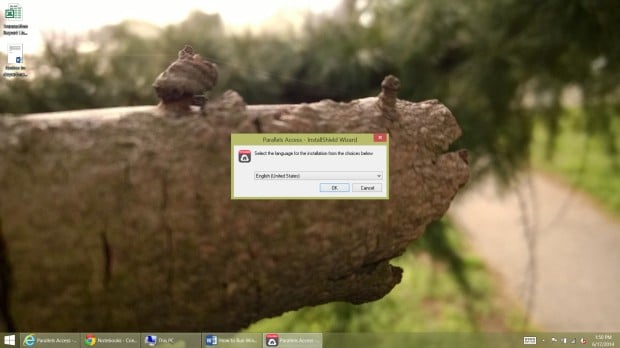
Tap or click on Ok.
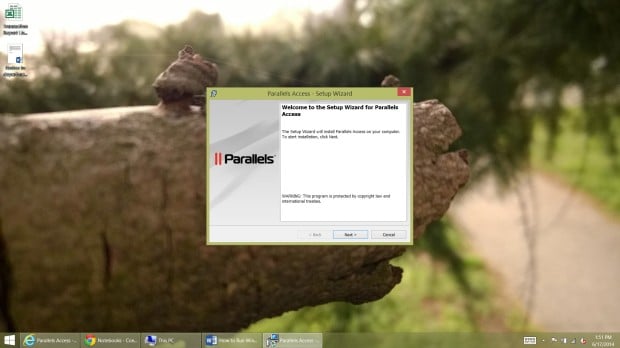
Tap or click on Next.
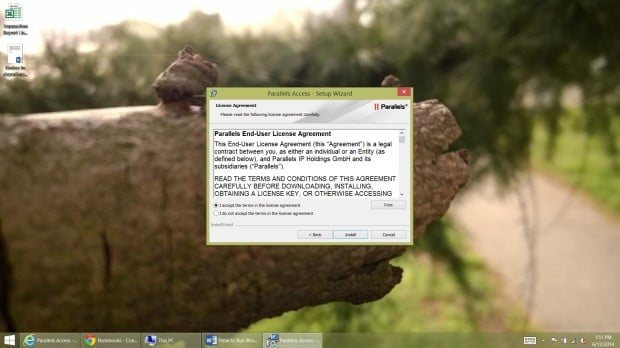
Click on the Agree then click Install.
Tap or click on Finish.
Parallels Access can overwrite your computer sleep settings so that it’s accessible whenever you need to access it from your Android device. Click on Allow Access to give Parallels permission to do so. Parallels Access will still work without enabling this setting, you’ll just need to make sure your device is always wake when you need to access it.
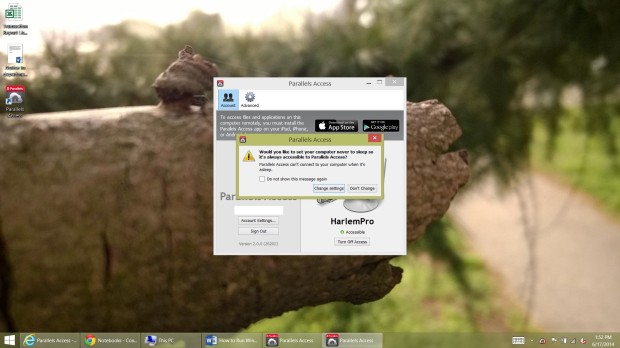
Click or tap on Yes to enable background updating for Parallels Access.
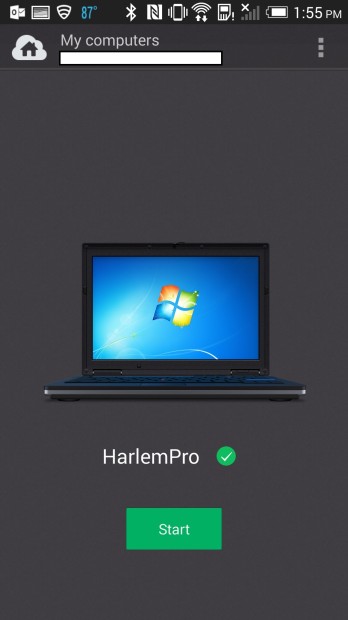
Now back to your Android device. Once you’ve logged in successfully you’ll notice that the name of your PC is now displayed on your device.
Tap on the name of your PC to connect to your device. Before it’ll let you connect, Parallels Access will show a very long video guiding you through the setup process. Don’t try to skip it. Take the time to learn about the features that Parallels Access has.
Zoom is a simple as pinching and zooming like you would on a picture. Double clicking on anything is as simple as tapping on that item twice. Tapping on the windows the two overlaid squares allows you to open apps you already have open. You can launch more apps by tapping on the App Launcher rocket ship.
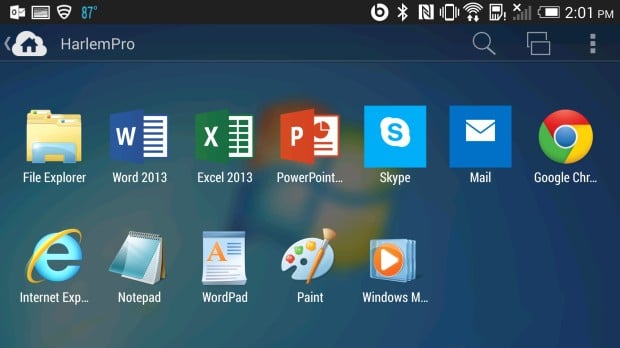
Press the back button and open the menu to add more apps to your quick launch menu.
To be clear, accessing your Windows device directly through your Android device requires both devices to have an internet connection or be connected to a wired or wireless network. For the best performance, you’ll want to be on the same network as your Windows PC, but that’s not actually required. By setting this up you’ve agreed to a 14 day free trial on all of your devices. When that free trial is up you’ll need to purchase either the 1-year $19.99 subscription or the two-year $29.99 subscription.
Источник
How to Run Windows Apps on Android with Wine 5.0
Wine is one of my must-have tools for working on Linux. If you do not know Wine, it is a compatibility layer between Windows and Linux, that bridges the gap between the two and allows Windows applications to work on Linux; almost magically.
While Wine has been available since a long time, but the 3.0 release brought an important update — support for Android. That means, now you can easily run Windows apps on Android. And through this post, I will tell you just how to do that.
Let’s take a look.
Wine + 6 Other Apps To Run Windows Programs On Other Platforms
Make no mistake, Windows is still the most used (and popular) operating systems for desktops and laptops. So. Read more
Prerequisites
Wine for Android is a simple app, and you only require an Android device with a working Internet connection to download and run it.
You can also download the required app (Wine’s APK) and Windows apps (.exe’s) on your computer and transfer them to your mobile device in case your smartphone does not have a working network connection.
Download & Install Wine
Please follow the below instructions to get started with this tutorial:
- Open “https://dl.winehq.org/wine-builds/android/” in your mobile.
- Download the latest available release per your device platform. For instance, I downloaded “wine-3.2-arm.apk” on my phone, but you may need its “x86” version if your device has an Intel CPU in place of an ARM CPU (as mine).

- Open the downloaded APK, and install Wine app on your device.

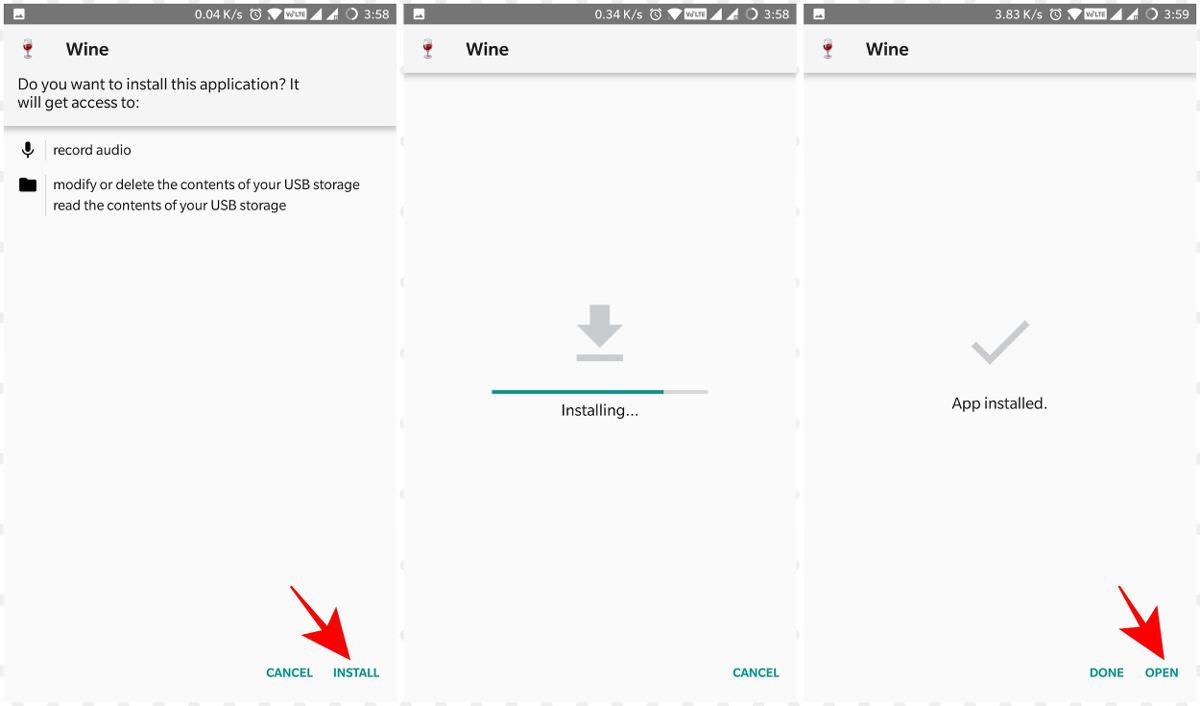
Try out Wine on Android
After you have downloaded and installed Wine on your device, it is time to experiment with it. Just follow the below steps to continue with this guide:
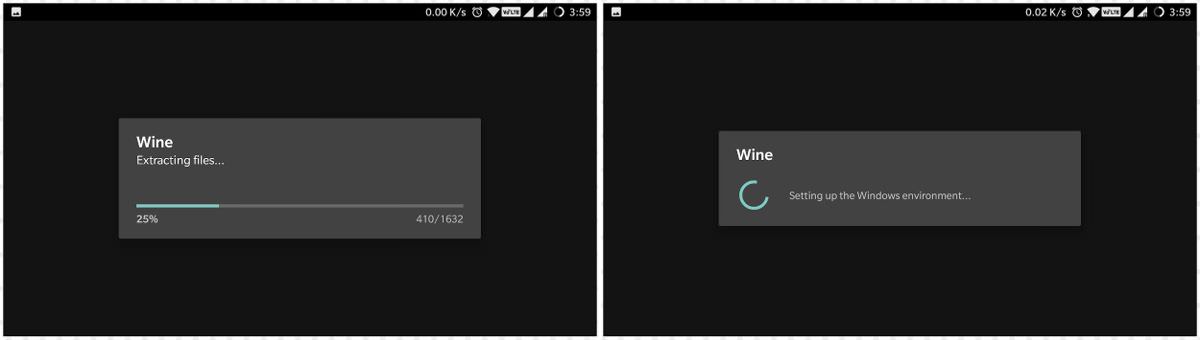
- Open the Wine app on your Android device. If you are starting it for the first time, it will take some time to extract its files and set up the Windows environment, but from the second time onwards, it will be much faster.
- Once Wine is loaded, you will see a classic desktop of Windows, which instantly reminds me of Windows 98. You may click the Start button, and to your surprise, you will see just two options there, suggesting there is a lot more to do.
Download apps & tools
As most of us own a device powered by an ARM CPU, we can only run WinRT apps using Wine on Android. The list of supported WinRT apps is small, as you must have guessed by now; and you can access the complete app list on this thread on XDA Developers.
However, if you are fortunate enough to hold a device with an Intel CPU like ASUS ZenFone 2, you have a lot more choices to pick from the supported apps.
That is because you can run Win32 apps, i.e., x86 aka 32-bit apps using Wine for Android.
If you need to install a Windows app inside Wine, the process is as simple as below steps:
- On Wine’s desktop, click on the Start button.
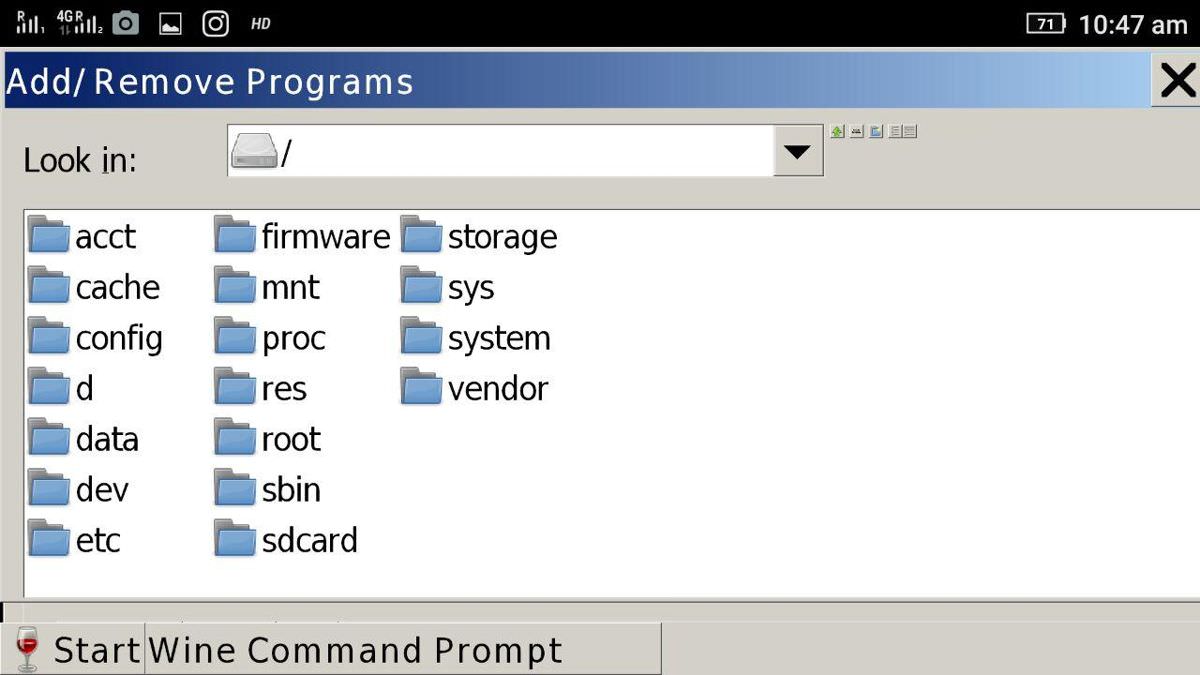
- Choose Control Panel and go to “Add/Remove Programs” from the options.
- A new window will open. Click the Install button in it.
- A file dialog will open. Here you can browse and select the app (.exe) you wish to install.
- You will see the program’s installer. Follow the on-screen instructions provided by the installer and install the app as you install any other program in Windows.

Alternatively, you can use Wine Command Prompt to install or run a program inside Wine. Just type the full path of the executable in the command prompt, and Wine will show the program’s installer.
Afterward, simply follow the on-screen instructions and at the end of the process, the program will be installed. And you will see its entry under Start menu.

For example, if you are trying to install Notepad++ (with “npp.exe” as its file) and its installer is present in your device’s Downloads directory, which is located at “/sdcard/Downloads”. Then you must type “/sdcard/Downloads/npp.exe” inside the command prompt window.
Troubleshooting issues
Following are some of the most common Wine issues and some instructions on how to troubleshoot them.
1. Wine won’t install on my Android device.
If you can’t install it, maybe the downloaded APK file is corrupt. In this case, just download it fresh and try installing it again. While installing Wine, if you are getting a message saying “not allowed to install unknown apps“, then you need to change a setting.
You can do it by heading over to Settings > Security and then toggling on “Unknown sources”.
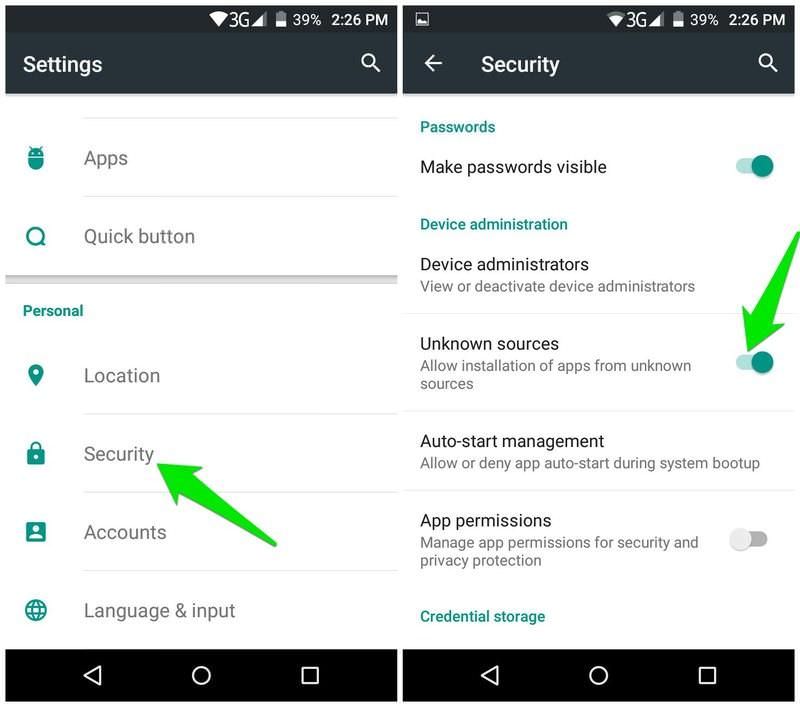
If you are not using Google’s flavor of Android, then this setting may reside at a different place — just search for it in Settings or google the procedure for your device. After you have changed this option, you can try installing this app — it shall work.
2. Wine won’t start/run on my Android device.
If you are able to install Wine but not able to start or run the same, then there is some issue with your device — probably a compatibility problem.
Also, please note that Wine 3.x (up to 3.2 at the time of writing) does not support Android 8 (Oreo) platform. That said, Wine 3.x on Android 8 will always get stuck on the “Setting up the Windows environment…” screen.
Moreover, during my tests using Android Emulator, I found that Wine 3.2 is not working on emulated devices — for both ARM and x86 versions. Though the devices are assigned enough resources yet I could not reach the classic desktop on Wine using an emulator. That being said, please know that Wine 3.2 may not work on AVD (Android Virtual Device).
3. Soft aka on-screen keyboard is not showing up.
Wine 3.2 is not yet complete in terms of features and this bug is one of the proofs of its imperfection. That being said, you will need a physical keyboard (like Bluetooth keyboard) to work with Wine. It is because soft keyboard won’t show up on the screen in case you wish to type something, and the only workaround is to plug in a hard keyboard.
4. I cannot choose a directory or a file in the file dialog.
Windows default setting needs you to double-click an item (say a file or folder) to open it, as you must have done in Windows. Since we are talking about touch-enabled devices, we need to double tap to emulate a double-click. And I found it does not work very well, at least for now.
That’s why, it is good to use a physical keyboard and use its navigation keys to navigate through windows, options, directories, etc. or choose a file or folder.
10 Apps to Connect Computer to Android Devices
When you’re a vivid smartphone user, you may need to connect your device to your PC or Mac. Read more
That’s all about using Wine on Android
Hope you are successful at installing and running Windows apps on Android using Wine. If you get into problems, you can ask for a solution on WineHQ Forums, and you can also write a comment below to ask me directly.
Источник


