- Howto Install and Run the Android Emulator
- Step 1 — Download the Android SDK
- Step 2 — Optional Add to System Path
- Step 3 — Install Android Platforms
- Step 4 — Create a Virtual Device
- Step 5 — Run the emulator
- Like this? Follow me ↯
- If you like reading about android, emulator, mobile, or google then you might also like:
- Comments
- Running Your Android Application on an Android Emulator
- To Start Your Android Emulator
- To Run Your Application on Your Android Emulator
- How to Run an Android Emulator
- How to Install an Android Emulator?
- How to Run an Android Emulator on Windows?
- How to Run an Android Emulator on Mac?
- How to Run an Android Emulator on iPhone?
- How to Run an Android Emulator in Visual Studio Code?
- How to Run an Android Emulator From Command Line?
- How to Run an Android Emulator on AMD Processor?
- Additional FAQs
- What Are the Best Ways to Run an Android Emulator on a PC?
- How Does an Android Emulator Work?
- Can My PC Run an Emulator?
- Running an Android Emulator
Howto Install and Run the Android Emulator

I am in the process of building some mobile apps for one of my clients, and while I’m pretty familiar with running the iPhone simulator and building iPhone apps, I’m pretty new to the Android development tools at this point. So I thought I would give a quick and easy guide for folks to follow, that might be interested in getting started with Android Development and running the Android Emulator.
I should mention that there is also an Eclipse Plugin for Android Development as well that you can use instead. Also, I’m using a Mac, but I think the steps should be pretty close if you are running Windows or Linux.
Step 1 — Download the Android SDK
Download the Android SDK, and unzip it somewhere. I placed the android-sdk-mac_86 folder in my /Applications/ folder, but you can put it wherever you want.
Step 2 — Optional Add to System Path
Since we are using the command line you might find it useful to add the android-sdk-platform/tools folder to your system path so you can run the android commands from any folder.
Step 3 — Install Android Platforms
At this point, I tried running the emulator command, but the SDK doesn’t contain any Android Platforms, the Android platform is essentially Android OS, you need to install at least one version (eg 1.6, 2.1, 2.2, etc) to run the emulator.
To install platforms run the android command located in the tools folder of the SDK (use Terminal.app on a Mac, or the Command Prompt on Windows, Linux folks you know what to do :). This will pop up a window. Select Available Packages, pick some platform versions and install.
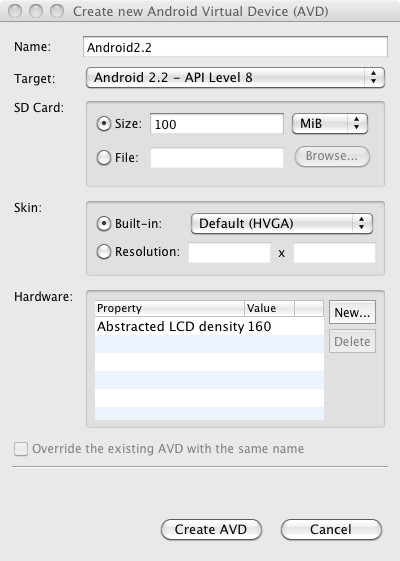
Step 4 — Create a Virtual Device
Still in the android tool, click on Virtual Devices on the left, and then click New. Here’s an example of the settings for the new device:
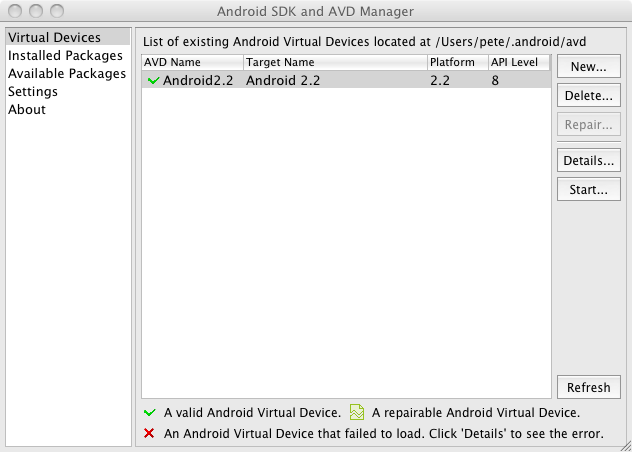
Once you create the avd file, it should show up in the listing of Android Virtual Devices:
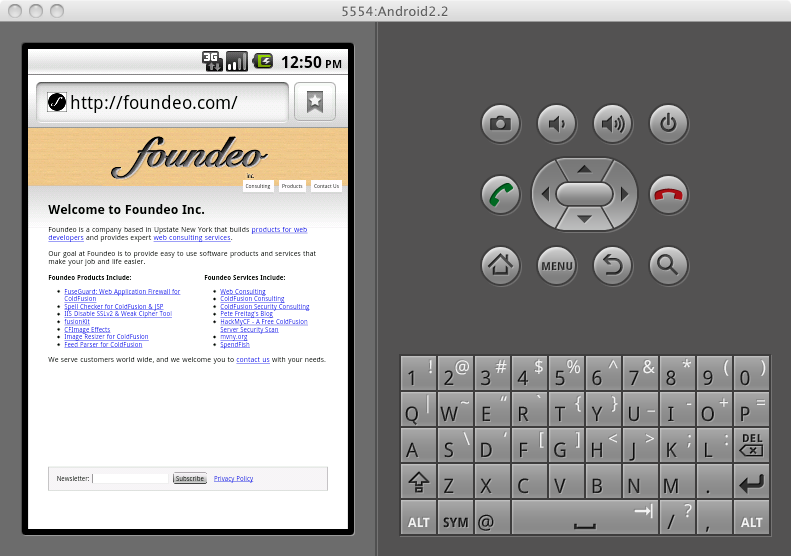
Step 5 — Run the emulator
Now select the virtual device you just created and click Start on the right, and the emulator should start running:
Like this? Follow me ↯
Howto Install and Run the Android Emulator was first published on August 20, 2010.
If you like reading about android, emulator, mobile, or google then you might also like:
Comments
When I first installed Android SDK on Windows it refused to work and no meaningful error message was displayed. Resorting to tools like SysInternals ProcMon I was able to figure out Android SDK depended on Java. I had Java JRE, but its path was not set on the PATH environment variable.
So if you happen to see similar behaviour when you first install Android SDK, check Java JRE/JDK is installed and the directory it was installed in is included on the PATH environment variable.
Step 1 — Download the Android SKD
Download the Android SDK,
PROOFREAD!
I am getting the following message:-
Starting emulator for AVD ’40And4′
Failed to create Context 0x3005
emulator: WARNING: Could not initialize OpenglES emulation, using software renderer.
could not get wglGetExtensionsStringARB
could not get wglGetExtensionsStringARB
could not get wglGetExtensionsStringARB
could not get wglGetExtensionsStringARB
could not get wglGetExtensionsStringARB
could not get wglGetExtensionsStringARB
could not get wglGetExtensionsStringARB
could not get wglGetExtensionsStringARB
emulator: emulator window was out of view and was recentered
Источник
Running Your Android Application on an Android Emulator
After you create one or more Android emulators, you can run your RAD Studio mobile applications on your Android emulators. Before you run your application on your Android emulator, start your Android emulator as described below in To Start Your Android Emulator, so as to reduce startup time when you run your Android application from the IDE.
 Caution: Android emulators are extremely slow and do not support the same feature set as real devices.
We do not recommend that you attempt to use an Android emulator:
- If you have an Android device, use your Android device instead.
- You can also use Mobile Preview to do initial debugging of an Android app.
To Start Your Android Emulator

- Start the Android Virtual Device Manager: Select Start | All Programs | Embarcadero RAD Studio XE6 | Android SDKs | Android AVD Manager .
- In the Android Virtual Device Manager, select your Android emulator in the list and click Start.
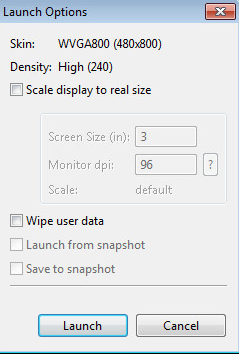
- On the Launch options dialog box, click Launch:

To Run Your Application on Your Android Emulator
- Open your Android application in RAD Studio.
- In the Project Manager, enable the emulator as the target platform. If necessary, expand the Target Platforms node and double-click the Android target platform. (The active target platform is displayed using a bold font.)
- Expand the Android node in the Project Manager.
- Expand the child Target node.
- Double-click the target Android emulator to activate it. (The active emulator is displayed using a bold font.) Note: If the emulator is not shown, right-click the Target node and select Refresh. If the emulator still is not displayed, see Using the Target Node.
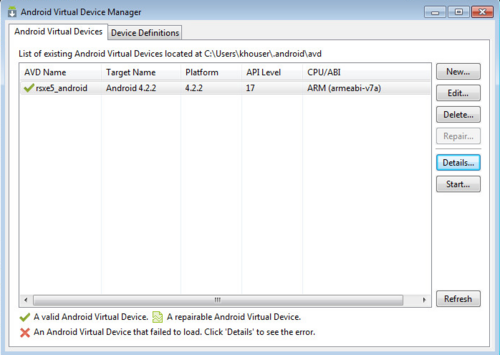
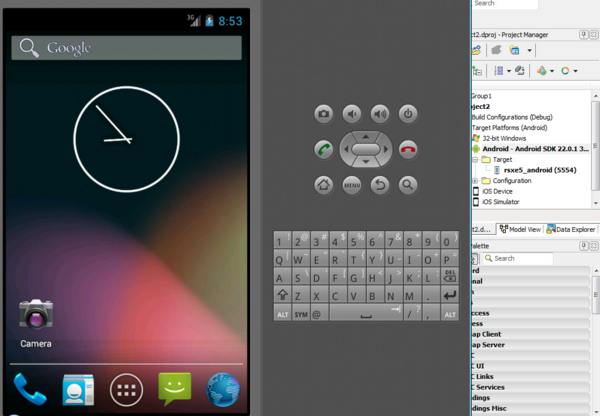
In the following image you can see an emulator named rsxe6_android running, and the target platform setting activated in the Project Manager:
- In the device selector in the FireMonkey Mobile Form Designer, select the device that matches the emulator you are using. For example, if your emulator uses the WQVGA400 device, select 3.3″ WQVGA Android Phone (240dp x 400 dp).
- Run your application:
- Run with debugging ( Run >Run or F9)
- Run without debugging ( Run >Run Without Debugging or SHIFT+CTRL+F9)
- Compile and deploy messages should appear in the IDE.
- If the emulator is not running, the IDE displays: «The selected emulator is not running. Do you want start it?» Click Yes. A «Launching emulator» message is displayed.
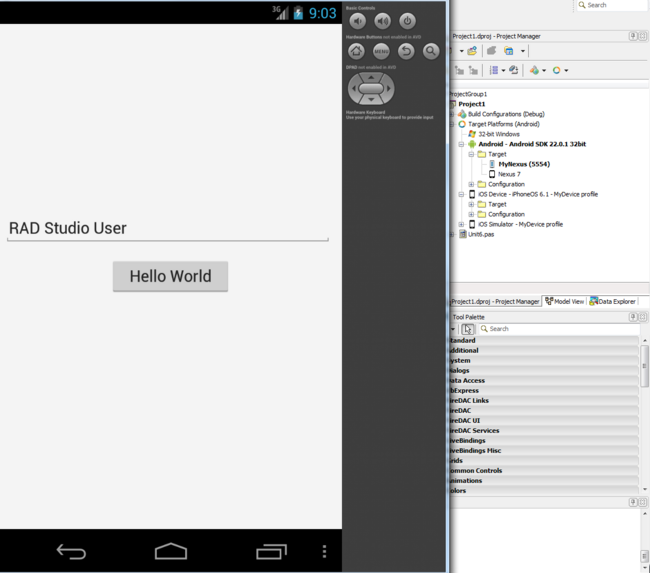
- Open your emulator screen and watch for the app to appear. In the following image you can see a custom Nexus 4 emulator running a simple Hello World! application:
RAD Studio builds your application for Android and runs your application on the selected Android emulator. If the active Android emulator is not running, RAD Studio shows a dialog box that gives you the choice to start your Android emulator. If your Android emulator screen is locked, unlock it to access your application.
Android emulators run much slower than real devices due to the ARM platform emulation on top of a non-ARM system; if performance prevents you from using an Android emulator side by side with RAD Studio, see Running and Debugging Your Android Application Remotely. For obvious reasons, emulators also lack some of the physical features that real devices provide, although you can emulate some features], such as geo location.
Источник
How to Run an Android Emulator
Whether you are an app developer or simply want to run android apps on your computer, you’ll need to run an android emulator. The best program to use is Google’s Android Studio, an app development program that has a built-in emulator.

In this article, you’ll learn how to download, install, and run Android Studio on various platforms. We’ll also cover common problems, explain how an Android emulator works, and provide you with best practices for running the program.
How to Install an Android Emulator?
First, you’ll need to download the installation for Android Studio:
- Go to the official download page for Android Studio.
- Click on “DOWNLOAD OPTIONS.”
- Choose which file to download. Note: This depends on the type of device you are using.
- Locate the downloaded file on your computer and run the installation.
- Follow the on-screen instructions.


How to Run an Android Emulator on Windows?
Once the installation is finished, Android Studio should start automatically. However, if you’ve unchecked “Start Android Studio” in the final step of the installation process, click on the desktop shortcut for Android Studio. If there is no shortcut on your desktop either, run the “studio64.exe” from the folder where Android Studio has been installed.
When you launch Android Studio, you’ll have to go through the setup wizard:
- Click “Next.”
- Check “Standard” if you are using Android Studio for the first time and click “Next.”
- Choose the theme for your interface and click “Next.”
- Click “Finish.”


Android Studio will now download additional components that will enable you to run the emulator. Click “Finish” when the download is over and Android Studio will launch.
- Click on “Start a new Android Studio project.”
- Choose the type of activity that best describes what you want to do using the emulator and click “Next.” Note: If you’re unsure what you want to do, simply select “No Activity.”
- Type in the name of your project, choose the path where you want to save it, choose program language and device, and then proceed.


Now you’ll see the Android Studio interface. The next step is to launch the emulator:
- Click on the AVD Manager button in the top-right corner of the screen.
- You will see the emulator of the latest Android version. Click “Run.”


Done! You’ve run the Android emulator on your Windows device. However, if there is no emulator in AVD Manager, you’ll have to create a new one:
- At the bottom of the AVD Manager dialog box, click “Create Virtual Device.”
- Select the hardware profile for your emulator and click “Next.”
- Click on the “x86 system” tab and choose a system image. Note: System images in this section run the fastest in the emulator.
- Check your AVD configuration and click “Finish.”


You have created an Android Virtual Device. Finally, run the emulator:
- Select your AVD in the toolbar.
- Click the “Run” button next to the toolbar to start the emulator.


Success! You’ve run the android emulator on your PC.
How to Run an Android Emulator on Mac?
For Mac users, the process of installation is the same. You first have to download the installation for Android Studio (see the beginning of this article). When the download is finished, do the following:
- Run the installation.
- In the dialog box, click and drag the Android Studio icon into the “Applications” folder.
- Go to “Launchpad” and start Android Studio.
- Click “Open.”
- Choose “Do not import settings” and click “OK.”
- Click “Send usage statistics to Google.” Note: This is optional.
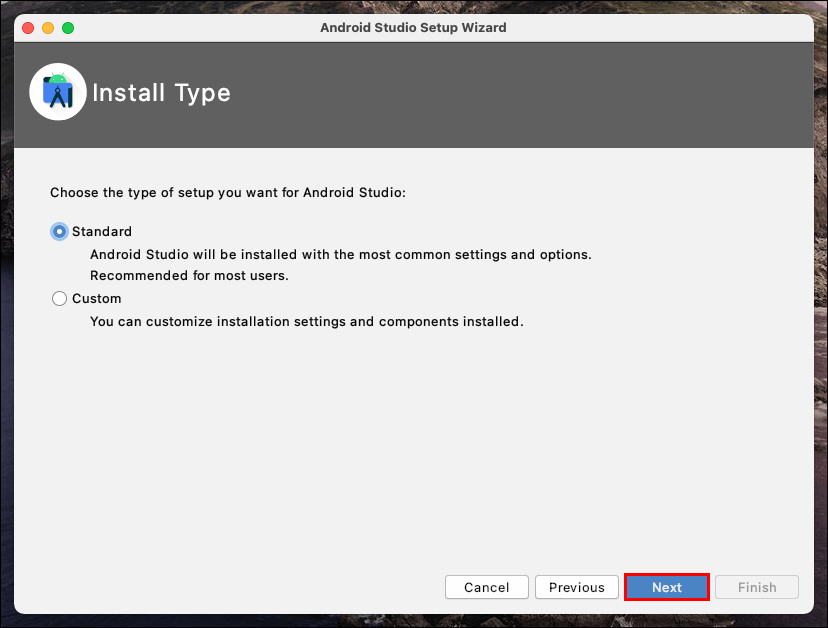
- The Android Studio Setup Wizard is now opened. Click “Next.”
- Check “Standard” if you are using Android Studio for the first time and click “Next.”
- Choose the theme for your interface and click “Next.”
- In the “Verify Settings” dialog box, click “Finish.”


Wait for the additional components to download.
Note: You may be prompted to provide your credentials (username and password) to proceed with the download. This is because your Mac needs your confirmation for downloading these additional components. Type in your username and password and click “OK.”
If the “System Extension Blocked” dialog box appears:
- Select “Open Security Preferences.”
- Click “Allow.”
- When the download is over, click “Finish.”
Android Studio will automatically launch after this. Now, it’s time to create a new project:
- Select “Start a new Android Studio project.”
- Click on “Basic Activity.”
- Type in the name of your project, choose the path where you want to save it, choose program language and device, and then proceed.


You will now see the Android Studio interface. Next, you need to start the emulator:
- Click on “Tools” and put your cursor on “Android.”
- In the extended menu, click “AVD Manager.”

Note: If you see the notification that says “HAXM is not installed,” click on “Install Haxm.” You’ll need this component to run the emulator.
In AVD Manager, you should see the emulator of the latest Android version. Click the “Run” button to start the emulator.
If there is no emulator in AVD Manager, you’ll have to create a new one:
- In the AVD Manager, click “Create Virtual Device.”
- Choose your hardware profile.
- Select the system image. Note: System images in “x86” section run the fastest in the emulator.
- Check your AVD configuration and click “Finish.”


Now run the emulator:
- Select your AVD in the toolbar.
- Click the “Run” button next to the toolbar to start the emulator.

Great! You’ve launched your custom emulator.

How to Run an Android Emulator on iPhone?
Unfortunately, Android Studio is not available for iPhone. To have the Android experience on your iPhone, you’ll need to download an emulator from another developer.
This also means that you’ll have to jailbreak your iPhone. We don’t recommend this as it will prevent iOS from keeping your device safe from potentially malicious software.
How to Run an Android Emulator in Visual Studio Code?
Provided that you already have an Android emulator installed, you can run it from Visual Studio Code.
For Windows and Linux users, press Ctrl + Shift + P and type “emulator.”
For Mac users, press Cmd + Shift + P and type “emulator.”
How to Run an Android Emulator From Command Line?
To run the emulator from the command line, you need to have at least one AVD created. Then, run the emulator from the command line in the following way.
- Open Windows Explorer.
- Go to Local Disk (C:).
- Open the folder “Users” and then go to “User.” Note: The name of this folder may vary according to the language of your OS and your PC account configurations.
- Open the folder “AppData.”
- Go to “Local.”
- Open the “Android” folder.
- Go to “sdk.”
- Double-click on the folder bar at the top and highlight the entire folder path.
- Type in “cmd” and press Enter.
- Enter the following command emulator -avd and press enter


The emulator should run now.
Note: Instead of , enter the actual name of the emulator you want to run.
How to Run an Android Emulator on AMD Processor?
If you own a PC with an AMD processor, you’ll have to enable the Windows Hypervisor Platform.
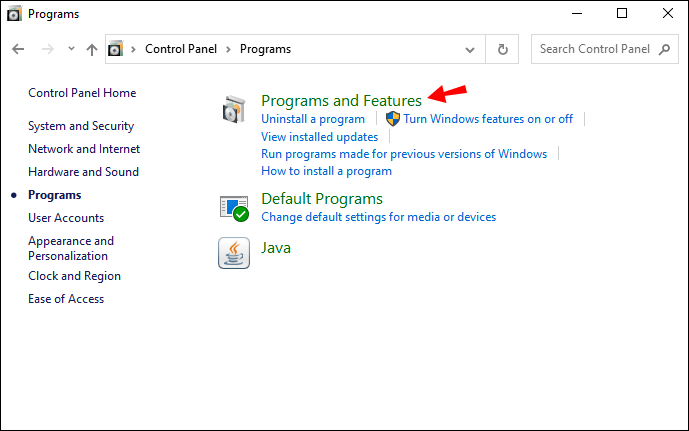
- In the Windows Search bar, type in “Control Panel” and open the program.
- Click on “Programs.”
- Open “Programs and features.”
- Click on “Turn Windows features on and off.”
- Check “Virtual Machine Platform” and “Windows Hypervisor Platform.”


Additional FAQs
What Are the Best Ways to Run an Android Emulator on a PC?
Android Studio is the best option to run an Android emulator. It lets you create a custom Android emulator. You can customize software and hardware options to the tiniest degree. Plus, it’s developed by Google, which adds to its credibility.
Alternatively, there are simpler alternatives for Android emulators. This is especially useful to mobile gamers who simply want to play Android games on PC. But don’t expect to have a full-featured program like Android Studio.
How Does an Android Emulator Work?
An Android emulator is a program that lets you use the Android system on your computer. They enable you to run and test apps or play Android games. Remember that they only emulate the Android system. You don’t actually operate within Android when running an emulator.
Can My PC Run an Emulator?
Before you download Android Studio, first check the system requirements to see if your device can support this program. There are other emulators besides Android studio. Check the requirements of each one before downloading to have the most optimal experience.
Running an Android Emulator
There are many Android emulators out there, but it is best that you use Android Studio. Apart from the emulator itself, it offers many other features, like app development and custom emulator creation.
Also, if you use Android Studio only, you avoid the risk of potentially harmful software interfering with your computer. Unfortunately, you can’t run Android Studio on an iPhone. Any alternative for Android emulators for iPhone isn’t safe.
Lastly, we’ve covered solutions for running Android Studio with an AMD processor and initiating an Android emulator in Visual Studio Code.
What Android emulator do you use? Have you had any troubles running it? How did you resolve these issues? Let us know in the comments section.
Источник


