- Samsung android build from source
- Samsung android build from source
- Creating the App
- Adding Platform
- Checking the Install pre-requisites for building
- Building the App
- Testing the App
- Publishing your APK
- Getting Started
- 1. System Requirements
- 2. Downloading Samsung SDKs
- Downloading SDKs from Samsung Developers:
- 3. Getting started with Android Studio
- Creating an Android Studio project
- Adding a Samsung library to Android Studio
- Running the App
- Running a sample app
- [GUIDE] HOW TO BUILD ANDROID FROM SOURCE [2020 Edition]
- Breadcrumb
- vsoma
Samsung android build from source
Инструкции по сборке Android из исходников

 Мануалы в помощь новичку и обсуждение для гуру!
Описание | Старая шапка | Собираем ядро для MTK | Первая помощь | Редактирование системных ресурсов Android | Средство обработки прошивок
Что такое ADB и с чем его едят, читаем тут. Отследить новую версию ADB можно в репо от Google.
ADB для Winodws — Скачать sha1:52b4816990d2d18a34645bbf20a31b38a7859d4c
ADB для Linux — Скачать sha1:31078104e5927d823c28550c01275c437a87def7
ADB для MacOSx — Скачать sha1:1403fa0d1bb57ec31170d7905e8505e3b0ed05ee
Что такое маркет и с чем его едят, читайте в этой теме.
Android 4.1.*: microgapps скачать
Android 4.2.*: microgapps Скачать
Android 4.3.*: microgapps Скачать
Android 4.4 : ART microgapps Скачать
Android 4.4.1: ART microgapps Скачать
Android 4.4.2: ART microgapps Скачать
Android 5.0.2: ART microgapps Скачать
Android 5.0.2: ART microgapps Скачать By Mansi
Android 5.1.0: ART minigapps Скачать faq
microgapps — пакет Google Apps с самым основным, только Google Play и framework. Остальное можно установить из Google Play.
minigapps — Пакет Google Apps с самым основным набором ПО от Google.
ART — совместимы с ART режимом, появился в версиях Android 4.4 KitKat.
FlymeOS 5/6 от rocker123
Скачать Огромная коллекция на XDA 4.x-6.x
Скачать OmniRom + Prebuilts 4.x-6.x От ctavropoholb
Скачать Qualcomm MSM8974 и MSM8939 От acdev
Скачать MIUI PatchRom miui5-7 От ctavropoholb
Скачать CyanogenMod 10.1 — 13 4.х.х-6.х.х От ctavropoholb
Скачать CyanogenMod 12.1 android-5.1.1_r18 От SteelBreaker
Скачать Prebuilts AOSP 5.0.x От assusdan
Скачать MIUI PatchRom KitKat v6 От vgdn1942
Скачать AOSP mirror repo От wladimir_tm
Скачать AOSP, AOKP, CM, MIUI 4.4.4 От vaibhavpandeyvpz
Скачать CyanogenMod 11 4.4.4 От Никита Pro Android
Скачать CyanogenMod 10 4.1 От Scorpio92666
Скачать CyanogenMod 7.2.0 2.3.x От pryanya96
Скачать AOSPA ParanoidAndroid 4.4.4 От mrAlmid
Скачать Ubuntu phablet 4.4.2_r1 От Каточимото
Скачать repo snapshots cm-10.2 — android5.1 От wladimir_tm
После чего, качаем исходники командой repo sync
Источник
Samsung android build from source
tutorials web, mobile
Creating your First APK with the Cordova CLI — Part II
Diego Lizarazo Rivera
Sr. Developer Evangelist
In Part 1 of this intro to Apache Cordova series, we were able to see how front-end developers could use standard web technologies to create cross-platform mobile applications, and the prerequisites to install Cordova in your dev environment.
In this second part we are focused on creating your first application with Cordova, and how to publish your app in the Samsung Galaxy Store.
Creating the App
After installing Cordova, you should go to the file directory where you maintain your source code. There, you can create a Cordova project. This would be a simple Hello World project, but would give you an idea of the file structure of a Cordova project, and the different parts that you can modify to obtain the functionality you are looking for.
In your terminal or command interface type:

- CordovaProject is the directory name where the app is created.
- com.example.hello is the default reverse domain value (package name). You should use your own domain name if possible.
- CordovaApp is the title of your app.
This creates the required directory structure for your Cordova app. By default, the Cordova create script generates a skeletal web-based application whose home page is the project’s www/index.html file.
Adding Platform
Since Cordova works for multiple platforms, we have to add Android to the build settings. You need to open your project directory in the command prompt. In our example, it is the Cordova Project. You should only choose platforms that you need. To be able to use the specified platform, you need to have installed the specific platform SDK.
All subsequent commands need to be run within the project’s directory, or any subdirectories:
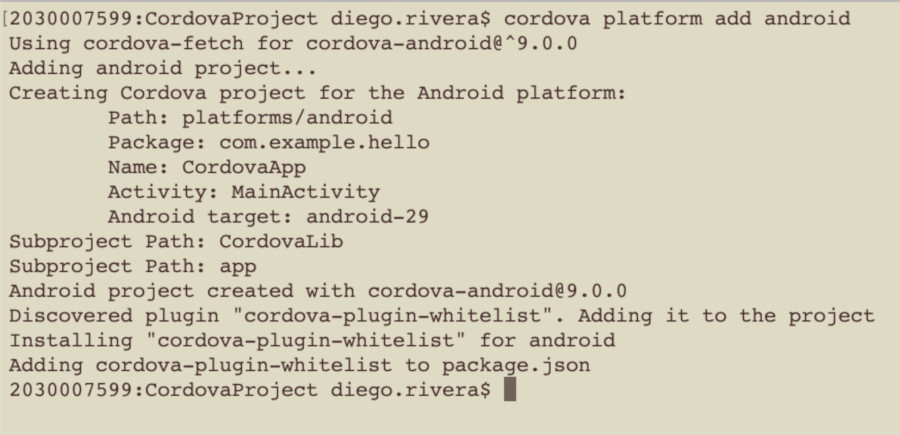
Add the Android platform, since this is the target of app, and ensure they get saved to config.xml and package.json:
You can also remove a platform from your project by using:
To make certain you have added all the platforms you are targeting you can type:
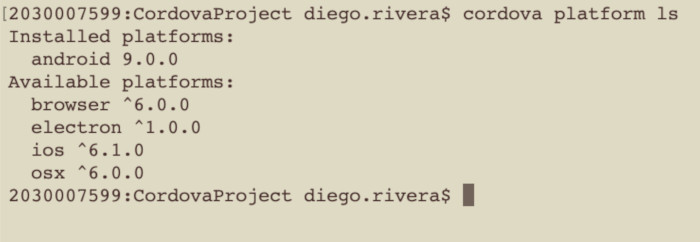
This should list all the added platforms for your current project.
Checking the Install pre-requisites for building
To build and run apps, you need to install SDKs for each platform you wish to target. Alternatively, if you are using browser for development you can use browser platform which does not require any platform SDKs.
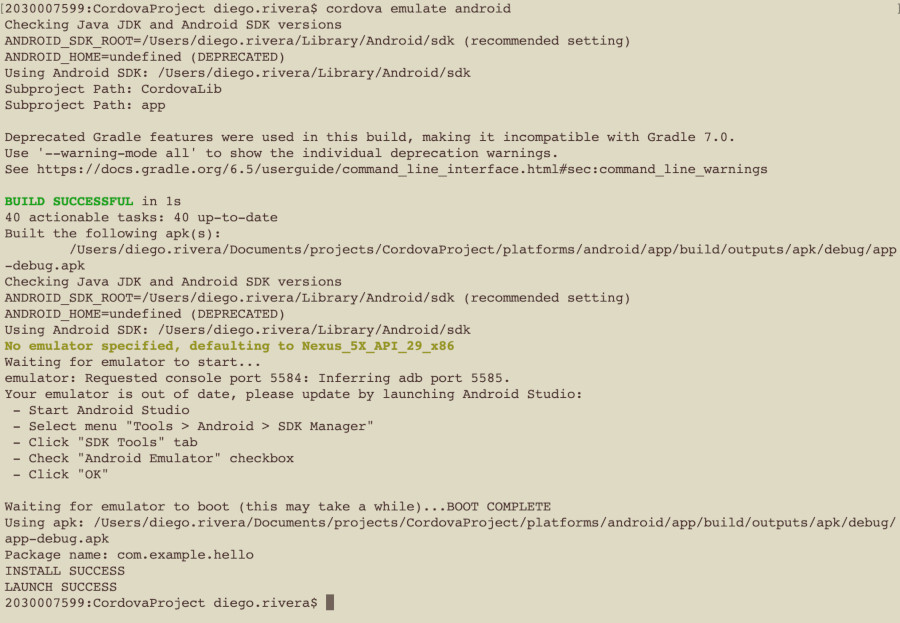
To check if you satisfy requirements for building the platform that you just added:
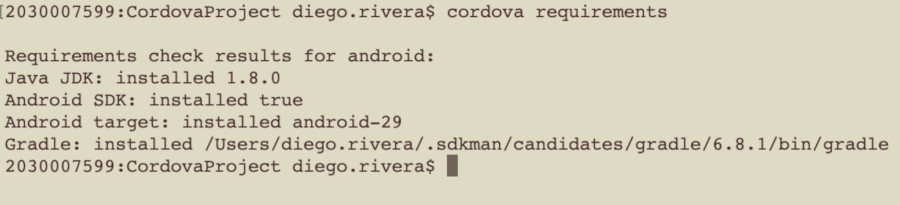
This command should show you a result similar to this one:
Building the App
This step builds the app for a specified platform so we can run it on mobile device or emulator.
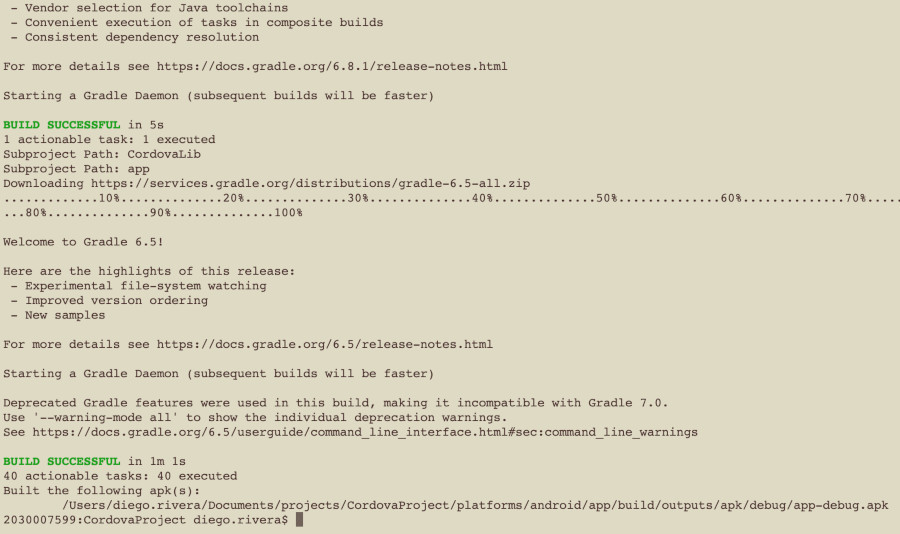
If you have added more than one platform to your project, you can limit the scope of each build to specific platforms. For our example we should add ‘android’:
Build for android platform in release mode and use the specified build configuration:
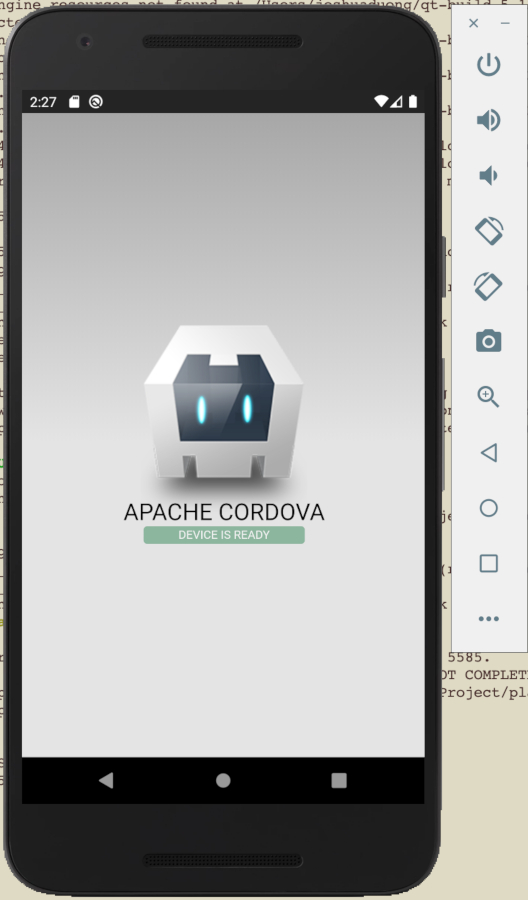
Testing the App
Now we can run our app. If you are using the default emulator you should use:
If you want to use the external emulator or real device you should use
Publishing your APK
To check in detail how to take your binary files and publish them in the Samsung Galaxy Store, check this in-depth video:
We love to chat with mobile game developers and help you as you develop, publish, and market your own games. Galaxy Store is a great place to publish your game and get discovered. If you are a mobile app developer and want to request a quick chat with us, just fill out this form.
Источник
Getting Started
This guide teaches developers how to set up their workstations in order to use Samsung Mobile SDKs in their apps. It covers basic topics such as how to download and install the SDK.
This section covers:
- System Requirements.
- Downloading Samsung Mobile SDKs.
- Getting started with Android Studio.
1. System Requirements
To develop apps for Samsung mobile devices, you must first set up your Android development environment. If your development environment is already configured, you can skip this section.
- Verify that your development system meets the requirements specified by the Android System Requirements.
- Set up your Java environment:
To develop Android apps in Java, you need the following:
- Java Development Kit (JDK) — this provides the tools required to build a Java app.
- Java Runtime Environment (JRE) — this lets you run Java apps on your computer.
To set up these components: 1. Go to Java SE Downloads. 2. Click Java Download to display the download page for the latest version of JDK, which includes JRE. 3. Click the download package for your operating system: Windows, Mac OS X, or Linux. 4. Install the JDK package. For details about the installation, see the Java Platform Installation.
- Download Android Studio:
- Go to Android Studio.
- If the browser has detected your operating system, click Download Android Studio. Otherwise, click Download Options and select a different platform: Windows, Mac OS X, or Linux.
- Unzip and install the bundle. It includes essential components and the Studio IDE.
- Launch Android Studio.
- If you get a notice of Platform and Plugin Updates, click update to exit Studio and launch the SDK Manager. Then install the suggested packages.
2. Downloading Samsung SDKs
Downloading SDKs from Samsung Developers:
- Go to Mobile page
- Select the SDK you want to download
- Go to the Resources page for the SDK
- Click the download button
- Read the license agreement, select I agree to this SDK License Agreement and click Download
- Unzip the downloaded SDK to a folder of your choice. The SDKs typically provide the following folders
- Docs: Programming guides and API references
- Libs: Java and C libraries to use in your app
- Samples: Sample apps showing example source code
- Tools: Additional tools that may be needed to use the SDK
- Extras: Additional support resources
3. Getting started with Android Studio
This section describes how to create your first project in Android Studio and run an app.
Creating an Android Studio project
- Launch Android Studio.
- Create a new project by clicking File > New Project
- Fill out the fields:
- Application name: your app name
- Company domain: the qualifier for your app package name.
- Package name: this is the combination of the company domain and application name, which must be unique across all packages in the Android environment. Android generates this from the application name and company domain values.
- Project Location: the directory where your app is stored. You can use the default or specify another location, if desired.
- Click Next
- Select the type of device you want to target, for example, Phone and Tablet
- Select the Minimum SDK level you need to support the SDKs you’re using. In this example, select API 21. Click Next
- Use the default Empty Activity type and click Next. For more about activities, see Android Activities.
- Use the default Activity Name and Layout Name and click Finish For more about creating a project in Android Studio, see Creating Projects.
Adding a Samsung library to Android Studio
To use a Samsung SDK in your app, you add the library files that are bundled with the SDK to your Android Studio project.
- Open your project in Android Studio.
- Use a file browser to navigate to the folder containing the Samsung SDK
- Open the add-on SDK folder, then open:
- Docs > API Reference > index.html: to see what libraries and API methods are provided by the SDK
- Libs folder: to copy the libraries you want to use in your app
- In your Android Studio project, top-left drop-down menu, change the Android view to Project
- Right-click your app’s libs directory and select Paste
- In the Copy dialog, click OK to paste the copied files into your project
- The libraries now appear in your project under the libs folder
- Right-click the libraries and select Add As Library.
- Select the module to add the library to. If your app contains several modules, ensure that you add the library to the appropriate module. Click OK. Your project now includes the SDK you downloaded.
Running the App
Android Studio provides two ways to compile and test your app: — On an Android Virtual Device (AVD) — On a physical Samsung device To run your app:
- Plug your Samsung mobile device into your computer using a USB cable
- If you are using a Windows computer, go to Samsung Android USB Driver for Windows, then download and install the USB driver onto your computer
- Enable developer options on your device by going to Settings > About device > Software info and tapping Build number seven times. (Devices with Android 4.1 or older already have developer options displayed by default.)
- Turn on USB debugging by tapping Settings > Developer options > USB debugging
If My Knox is installed, USB debugging is grayed out; try using another device.
- In Android Studio, with your project open, click Run > Run ‘app’ (or press Shift + F10)
- Select the device you want run the app on, under either Connected Devices or Available Emulators
Running a sample app
The sample apps are in the Samples folder of the SDK you downloaded. To run a sample app:
- Open Android Studio
- In the top navigation menu, select File > Open
- Navigate to the sample app directory in the SDK you downloaded
- Click OK to import the file to your project
Источник
[GUIDE] HOW TO BUILD ANDROID FROM SOURCE [2020 Edition]
Breadcrumb
vsoma
Senior Member
[NOOB-FRIENDLY] HOW TO BUILD ANDROID FROM SOURCE CODE [2020 EDITION]
Introduction
Hi, my name is Varun, during the times I was building I faced some trouble building, and I thought it would be helpful if I put together a guide that covers every aspect of building. Many roms fundamentally differ so this is a generic guide, but when it comes to modifying device specific files you are going to have to refer to your rom developer or your device tree maintainer.
I see a lot of lead devs referring to older guides on xda, and felt like there should be a good reference thats more recent.
I have heavily depended upon Nathan Chance’s Guide which can be found HERE. I feel like this may be a little intimidating for new builders hence this thread. I will slowly upload screenshots here as I find time. But for now this is what I have. You can find my guide HERE. If there are any changes to be made in this thread then it also needs to be changed on gh, so please do comment or make a pr and fix what is requested.
Table of Contents
1) Getting started
2) Prerequisites
3) Understanding the DOC
4) Preparing Linux environment
5) Getting the source
6) Getting device specific files
7) Building
Understanding This Doc
PREPARING LINUX ENVIRONMENT FOR BUILDING
• Now the you have finished setting up, a special environment is required for building.
• Preparing the environment is as easy as double clicking .exe in Windows or .dmg in MacOS
thanks to developer Akhil N.
• We need to clone his scripts (installer) from his GitHub
NOTE:
A script is a file which contains multiple commands that run sequentially when executed
• This should copy the scripts to directory /home/username/scripts
• Cd into the directory called setup
• Find the file that corresponds to our Linux build. Since we are using Ubuntu it will be android_build_env.sh
For other Distros refer to the readme that has also been cloned
• Setup GitHub using on screen instructions
• Congratulations you set up your computer for building
• Go back the previous dir that you were originally on (/home/username)
GETTING THE SOURCE
• This is probably one of the worst steps, you have to wait a while
• GCloud users will be able to download source in 15 minutes
• Other users may have to wait longer (depends on internet connection speed)
• Make a directory for your ROM
NOTE:
this will make folder in directory home/username/romname
• Cd in and initiate repository, this basically tells your computer where to download source files from.
The repository initiation command can be found on the GitHub page under “manifest” then scroll down to
repo initialisation and copy command
• It should look like
NOTE:
1) Linux users can paste into terminal using Ctrl + Shift + V
2) Linux users can copy from terminal using Ctrl + Shift + C
3) GCloud users can paste into window using Ctrl + V
4) GCloud users can copy from window simply by highlighting
5) GCloud users using ssh from terminal can just follow terminal commands
• Once repo is initialised, you can begin download using
GETTING DEVICE SPECIFIC FILES
• As most of you know the kernel acts as the translator between the OS and your actual hardware
• The files mentioned above are android version specific and will only work with that android
version
• The developer for your device aka dt maintainer will have these files on their GitHub and its
usually linked at the end of the op of other rom threads in the source code section
• You have to make sure that the rom version you downloaded matches up
• If the device tree is for an older version then wait until your dev. releases the latest trees, if no
developer is working on your device then it is possible to modify the tree to work with newer
version of android but it may take some effort.
• In case your tree doesnt match with the rom version that you have downloaded, the easiest and best option is
to scrap everything and download the source version that your tree is designed for
• To scrap everything, use
• To modify the init command to download an older version you need to pick out the branch you
need (the branch is basically the version the newer version is added to a new branch)
• Change the init command after -b to include desired branch. For example
repo init -b ten to repo init -b seven
• To get the device specific files, we need to fork them to your GitHub.
Find the stuff (kernel vendor device tree hardware) and fork them
NOTE:
Forking basically copies them to your GitHub
• At this point we need to know if we need to modify the device tree as some ROMs don’t require
you to modify it (CrDroid)(LOS)
• Some roms require only partial modifications, this is rom specific so I wont be going too much into detail
• If modification is required follow these steps , otherwise skip to the end of this section
• After forking we need to modify the files we will do this from the browser for ease of
understanding
•There are three files that need modification and they are located your device tree
• Some tree developers may split your device tree into two parts if there is more than one phone
running the same SOC, so keep an eye out for that. (devices that have the same soc are like the op3/op3t and the op7/op7p)
• The files that we need to modify are under your «device codename» device tree, not «device SOC-common» device tree.
• For example; we need to go to «device_samsung_crownlte» tree not «device_samsung_universal9810-common»
• In here the three files that need modification are
1) Android Products.mk
2) lineage.dependencies
3) lineage_»device codename».mk (example:lineage_crownlte.mk)
• First open AndriodProducts.mk Here replace wherever you see lineage with name of ROM in lowercase only.
• Second, open lineage dependencies.mk and rename file to «romname».dependencies (ecample: aim.dependencies)
• Third, open lineage_»codename».mk and rename to «romname»_»codename».mk and replace
lineage with «romname in the code. (Remember,use lowercase)
NOTE:
If you are building an older version of android make sure you branch out the right branch for your trees
People who do not need to modify can join us here
• Now that all your files are in your GitHub, we need to download them
• There are two easy ways
1) Fast and easy Room Service
2) Slow and boring manual cloning
• Room Service
1) cd into .repo from romsource
Источник


