- 4 Ways to Transfer Photos from Android to Android
- Part 1: How to transfer photos from Android to Android using MobileTrans?
- MobileTrans — Phone Transfer
- Part 2: How to transfer photos from Android to Android using Bluetooth?
- Part 3: How to transfer photos from Android to Android using Android Beam
- Part 4: How to transfer photos from Android to Android using dr.fone — Phone Manager (Android)?
- dr.fone — Phone Manager (Android)
- How to Transfer and Save Photos from an Android Phone
- Google Drive
- Google Photos
- MicroSD cards
- Dropbox
- Mylio
- Email and share
- External storage
4 Ways to Transfer Photos from Android to Android


“Is there an easy solution to help me? I change to a new android phone and need to transfer all photos from old to new phone.”
You want to share the pictures taken during trips with your friends or family members or you just got a brand new Android device and want to move all your loved photos from the old Android to the new Android device?
If you want to transfer photos from Android to Android, but you don’t know much about Android photo transfer then this is just the article for you. Keep on reading this to know everything related to how to transfer pictures from Android to Android.
Part 1: How to transfer photos from Android to Android using MobileTrans?
MobileTrans is a very handy data transfer software that can meet most of your Android needs. With MobileTrans — Phone Transfer, you will be able to transfer photos from Android to Android easily and efficiently.
Besides, you can easily do the data transfer between Android and iOS devices in one click when you need to upgrade to a new device.
Let’s check how to transfer photos from Android to Android with MobileTrans — Phone Transfer.
MobileTrans — Phone Transfer
1-Click Phone to Phone Transfer
- • Easy, fast and safe.
- • Transfer photos, text messages, contacts, notes, and many other file types.
- • Move data between devices with different operating systems, i.e iOS to Android.
- • Supports iOS devices that run the latest iOS 14

- • Supports over 8000+ Android devices. Works for all models of iPhone, iPad, and iPod.

- Download and install MobileTrans on your computer. Select the «Phone Transfer» module.
![]()
Then connect both your Android phones to the computer. Select Photos from the supported file type list and click on the «Start» button.
![]()
There you go! You have successfully transferred photos from one Android to another Android Device.
![]()
Here is the video tutorial for you:
Part 2: How to transfer photos from Android to Android using Bluetooth?
Another simple way for Android photo transfer is via Bluetooth, and probably this is the only way that works on almost every device presently in usage in this world. You just have to follow the two simple steps to know how to transfer pictures from Android to Android.
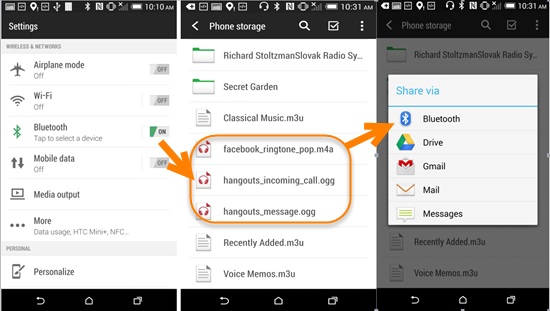
- Turn on the Bluetooth on both android devices and pair Bluetooth with those two devices. Select Bluetooth option that will be available in the settings then turn it вЂon’ on both android devices for file sharing. After that, establish a connection between the two phones to pair them successfully and exchange files.
- Now, share photos between those two android devices.
- When the two smartphones have been successfully paired and connected, open the “File Manager” option on the phone desktop, then select the music that you want to transfer and press it for 2 seconds to share to the destination phone via Bluetooth.
Part 3: How to transfer photos from Android to Android using Android Beam
Android Beam is a software that allows you to send content between devices just by pressing them back-to-back. Android Beam is very ideal for sharing content – web pages, maps, videos, photos, and more – with other people’s Android phones and tablets. Many latest Android phones have integrated NFC hardware under their panel and support Android Beam on them.
Here are the tips on how to transfer photos from Android to Android using Android Beam.
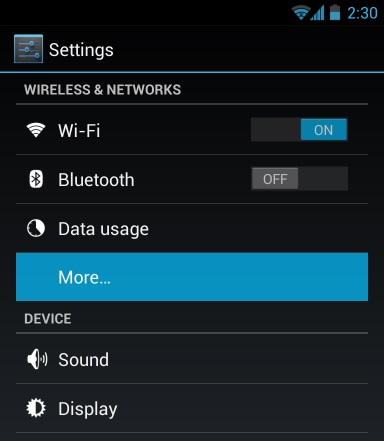
Step 1: Check for NFC Support
- Before you try to transfer photos between two Android devices using Android Beam, you will need to ensure that both your Android devices support NFC. Some Android smartphones support NFC, however, some don’t come with NFC support, so it is necessary to check before you launch this process.
- To check for NFC support, open your device’s Settings screen and tap on “More…” that will be located under Wireless & networks.

Step 2: Open the Content that You Want to Share
Once your device confirms that you have NFC support and you can use Android Beam, you need to navigate to the content that you want to share. For example, here’s how you would share various types of content using this toolkit:
- Web Page: Open it in Chrome (it is always advisable to use chrome for this purpose).
- YouTube Video: Open it in the default YouTube app, pre-download the app on both devices).
- Map Directions or a Location: Open the Google Maps app and pull up the directions or the location that you want to share.
- Contact Information: Open the contact card in the People app on the sender device.
- An App: Open its download page on Google Play Store.
- Photos: Open a photo in the gallery. You can also send multiple photos by opening the default gallery app, you just have to long-press a photo’s thumbnail, and then tap all the other photos you want to send to select them. With the photos selected, you can finally start the beaming process.
Step 3: Beam the Content
- Now, before you can send your content between two devices with Android Beam, they must both be powered on and completely unlocked. If either device screen is off, or if either device is at its lock screen (or is password-encrypted), Android Beam won’t work, and you can’t transfer photos.
- With both devices on and unlocked, press them back-to-back to transfer your music from one Android to Another.
Part 4: How to transfer photos from Android to Android using dr.fone — Phone Manager (Android)?
dr.fone — Phone Manager (Android)
Transfer Photos from Android to Android flexibly and easily.
- • Transfer files between Android and computer, including contacts, photos, music, SMS, and more.
- • Manage, export/import your music, photos, videos, contacts, SMS, Apps, etc.
- • Transfer iTunes to Android (vice versa). • Manage your Android device on the computer.
- • Fully compatible with Android 10.
- Download and install dr.fone — Phone Manager on your computer. Select the «Phone Manager» from all the models.

Connect both your Android phones to the computer. dr.fone will recognize them and display them like below. Select the Android phone which you would like to transfer photos from.
![]()
Go to the Photos tab on the top. It will display all the photos on your source Android phone. Select the photos you would like to transfer and click Export > Export to Device to transfer the selected photos to the target Android phone.
![]()
So, in this article, we discussed how to transfer photos from Android to Android. I would recommend everyone to use the Wondershare toolkit for this process as it is the safest, secure, and easy to use toolkit for Android photo transfer process. They are the best toolkit makers all over the globe. Lastly, I hope that you enjoyed reading this article on how to transfer pictures from Android to Android.
Источник
How to Transfer and Save Photos from an Android Phone
If you are one of those who accumulates hundreds of photos on your cell phone and usually run out of storage capacity, an excellent solution is to back them up in the cloud in services such as Google Photos, OneDrive or Dropbox. However, it is also possible to transfer and save photos from an Android phone to a computer or an external hard drive. And here we explain how to do it.

Most users do not usually edit or delete their photos, turning their phones into real “digital cemeteries”. If you want to archive your moments for later viewing, you’ll need to know how to back up your photos. There are several ways to do it, even when you do not have a cable on hand and we will explain them here.
Are you an iOS user? Then check out our guide on transferring photos from an iPhone.
One of the best features of Android is its virtually unrestricted access to the file system. The fact that you only need to connect your phone to your computer using the included USB cable makes it easy to download each and every image. You can drag them to any desktop application or to your file system.
We believe this is the easiest method and the only downside is that you need a computer and your charging cable at hand. 
If you use Windows, the automatic USB connection prompts will show you options to manage the device as soon as it connects. If you have a Mac, there are a few options, like the Android file transfer program .
Google Drive
The Google Drive backup service is the easiest method to back up all your photos and then delete them from your Android phone. The app comes standard on almost all Android devices and works in the background, uploading files to Google Drive for easy access to other devices. 
Synchronized photos are also kept private, which means you don’t have to worry that some embarrassing photos end up in the wrong hands, although they are easily accessible from your Google drive.
Also, enabling Google Drive backup options is easy. In the app, press the Menu button or icon, and then open the Settings Menu.
Here, you can adjust automatic backup to be on or off, as well as change settings.
To access and download your synchronized photos, you will have to open your Google Drive. The photos are stored in a private folder called “Google Photos”. Open this folder, browse and download your photos directly to your desktop.
If you don’t want to enable sync, you can also upload the files you choose from the phone to your drive. Open your phone’s photo gallery, open an image, and then tap the “Share” button.
From there, you can select the multiple sharing option. Tap the Google Drive icon and the files will load. Once loaded, you can access the images through Google Drive.
Please note, however, that any files uploaded to Google Drive will take up your allocated storage space. Therefore, you may want to periodically clean your drive or opt for a more robust storage plan.
Google Photos
Google Photos works similarly to Google Drive. In fact, the user interface and experience is almost identical because they both share Google’s language and style. Of course, this application is strictly aimed at storing photos and videos, while Google Drive handles all kinds of files.
But Google Photos offers a series of useful tools that will allow you to edit and share your creations or automatically group photos and videos into collections.

The service also lets you stream content to a Chromecast, keep photos private unless specified, and perform smart searches using machine learning. The “wizard” can even create fun projects with your images, such as slide shows, some collage, and animations.
Also, best of all, you can access your photos from almost any device, not just those running Android. And if your biggest concern is backing up your images, Google Photos may be a good solution for you.
Also, the service is free, storage is unlimited and, unlike Google Drive, it does not affect the allocated amount of storage.
Google has also recently improved performance, which means Photos is now twice as fast. However, the service only supports JPEG photos up to 16 megapixels in size and Full HD (1080p) videos.
So if you have a phone that shoots RAW or 4K, you will have to allow Google Photos to display these files or save it to your Google Drive account. But, at the moment, few users have smartphones that exceed those specifications.
Google Photos is also easy to set up and use. Once you connect it to your Google ID, the app will automatically load any new content.
However, make sure before setting up Google Photos to sync only when your phone is on a Wi-Fi network, by accessing the Settings menu in the upper right corner of the app.
Otherwise, it could greatly affect your cellular data plan.
MicroSD cards
Unlike the iPhone, many Android devices allow you to expand your storage through a MicroSD card. With a large capacity, you can configure the compatible photo applications to save the content directly to the card instead of using the internal storage of the phone. This is especially useful if you buy a 16 GB or 32 GB device, which, depending on how you are, you can fill it in a short time.
Thus, you can save the internal memory for the applications that you like the most and use the MicroSD card for extra storage.
But remember, do not leave the photos on the card because what it is about is to transfer them at some point to the computer. If you need more information, you can also take a look at our guide on the use of MicroSD cards on Android devices. 
But what if your Android device lacks MicroSD support? In that case, the Leef Access MicroSD reader is awesome for transferring photos between devices while expanding your phone’s storage space. It connects to the Micro USB port on the phone, while the other end works as a MicroSD card reader with a secondary storage slot.
Once the card is inserted, you can use most file management applications to copy photos (or any file) onto the card.
If you use a high-speed MicroSD card, the phone transfer process is relatively quick. We also recommend the Lexar C1 MicroSD reader, as well as using a USB On-the-Go. Also, you can read more about this in the section of this article on External Storage.
Dropbox
And like Google Drive, another option is the popular Dropbox app for Android, a free utility that automatically syncs your files and photos with a cloud server, so you can easily access them anywhere. 
Once you have downloaded the application, you will have to log in or create an account if you don’t have one yet. Either in the settings or at the top of the photos and media tab, select “Enable camera loading” to access the settings that govern that photos are automatically copied and if you want backups to be made in cellular or wifi data.
Microsoft One Drive is another similar option that you should also consider.
Mylio

A group of former Microsoft engineers, who are also photography enthusiasts, came together and created Mylio . This service allows mobile users to back up photos, up to 500,000, for free.
Mylio syncs up to 12 Android and iOS devices and offers on-device photo editing, along with the ability to work with JPEG, TIFF, PNG, and RAW files.
The concept behind Mylio is similar to that of Google Photos, but while the latter is aimed at casual photographers, the former seems to lean towards the more enthusiastic. Google Photos offers more everyday functions, but if you work with high quality files, Mylio is a great complement to Google Photos.
Email and share
It is not the most elegant solution, but if you only need to transfer one or two images and sporadically, then you can easily use your email account.
Depending on your email provider, the process may vary, but it is a simple process, regardless of the application you use. Write a new message and enter your address as recipient.
Afterwards, a menu will open and then you will have to select “Attach file” to add an image to your email, or if you are in Gmail, you can upload a photo directly from that menu. Send the email and, a few minutes later, you will see it in your inbox and you can open it from another phone or computer. 
Consider that if you send a very large file, some email services have a limit related to the sizes you can send.
You can also share a photo using other services, such as Facebook, Google Drive, Instagram and Twitter, for example. Select the image, press the “Share” button and the application you want to use to send the image. Depending on which one you choose, the photo will be emailed, posted, or uploaded.
External storage
As connectivity on smartphones increases, so do your options for connecting to different storage methods.
A positive aspect of the Android system is its compatibility with external storage. Therefore, you can connect an external USB hard drive, like the one you would use with a laptop or desktop computer, to download photos and videos.
However, you will need a USB OTG -to-Micro USB adapter. In addition, you should bear in mind that not all Android devices support USB OTG, so we recommend using the Easy OTG Checker application to confirm if yours does. 
If your phone doesn’t support USB OTG, another handy option is a portable flash drive designed to connect directly to a phone via the Micro USB or Type-C USB port. These products include the SanDisk Ultra Dual Drive m3.0 drive. or the USB Type-C Ultra flash drive. 
And if you have a lot of photos, the Western Digital My Passport Wireless SSD device offers tons of storage, wireless connectivity and portability. With a Wi-Fi connection, you can connect your Android device to the unit (through the WD My Cloud app) and easily copy your photos. There’s also a built-in SD card slot, allowing you to back up photos from your digital camera without a computer.
Источник


