- 4 Ways to Transfer Photos from Android to Android
- Part 1: How to transfer photos from Android to Android using MobileTrans?
- MobileTrans — Phone Transfer
- Part 2: How to transfer photos from Android to Android using Bluetooth?
- Part 3: How to transfer photos from Android to Android using Android Beam
- Part 4: How to transfer photos from Android to Android using dr.fone — Phone Manager (Android)?
- dr.fone — Phone Manager (Android)
- How to Recover Deleted Photos from Android Internal Storage
- Can We Recover Deleted Photos on Android?
- Important Tips Before Android Deleted Photos Recovery
- Principle of Deleted Photo Recovery from Android
- Can We Recover Deleted Photos on Android Without Root?
- 4 Steps to Recover Deleted Photos from Android Internal Storage
- STEP 1. Connect Android to PC
- STEP 2. Choose to Find Deleted Photos
- STEP 3. Allow the FonePaw Program to Scan Deleted Photos
- STEP 4. Preview and Restore Deleted Photos from Android
- Extra Tips: Retrieve Deleted Photos on Android with External Storage
- How to Recover Deleted Photos from the Cloud
- Recover Deleted Photos from Google Photos
- Recover Deleted Photos from OneDrive
- Recover Deleted Photos from Dropbox
- How to Avoid Losing Android Photos Next Time
4 Ways to Transfer Photos from Android to Android


“Is there an easy solution to help me? I change to a new android phone and need to transfer all photos from old to new phone.”
You want to share the pictures taken during trips with your friends or family members or you just got a brand new Android device and want to move all your loved photos from the old Android to the new Android device?
If you want to transfer photos from Android to Android, but you don’t know much about Android photo transfer then this is just the article for you. Keep on reading this to know everything related to how to transfer pictures from Android to Android.
Part 1: How to transfer photos from Android to Android using MobileTrans?
MobileTrans is a very handy data transfer software that can meet most of your Android needs. With MobileTrans — Phone Transfer, you will be able to transfer photos from Android to Android easily and efficiently.
Besides, you can easily do the data transfer between Android and iOS devices in one click when you need to upgrade to a new device.
Let’s check how to transfer photos from Android to Android with MobileTrans — Phone Transfer.
MobileTrans — Phone Transfer
1-Click Phone to Phone Transfer
- • Easy, fast and safe.
- • Transfer photos, text messages, contacts, notes, and many other file types.
- • Move data between devices with different operating systems, i.e iOS to Android.
- • Supports iOS devices that run the latest iOS 14

- • Supports over 8000+ Android devices. Works for all models of iPhone, iPad, and iPod.

- Download and install MobileTrans on your computer. Select the «Phone Transfer» module.
![]()
Then connect both your Android phones to the computer. Select Photos from the supported file type list and click on the «Start» button.
![]()
There you go! You have successfully transferred photos from one Android to another Android Device.
![]()
Here is the video tutorial for you:
Part 2: How to transfer photos from Android to Android using Bluetooth?
Another simple way for Android photo transfer is via Bluetooth, and probably this is the only way that works on almost every device presently in usage in this world. You just have to follow the two simple steps to know how to transfer pictures from Android to Android.
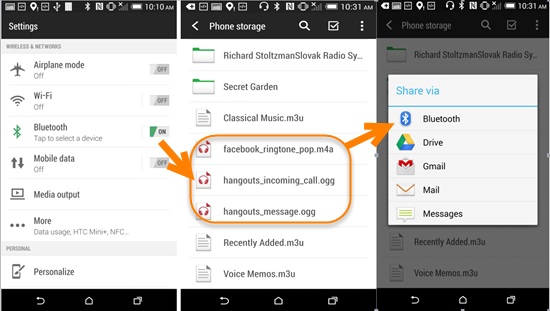
- Turn on the Bluetooth on both android devices and pair Bluetooth with those two devices. Select Bluetooth option that will be available in the settings then turn it вЂon’ on both android devices for file sharing. After that, establish a connection between the two phones to pair them successfully and exchange files.
- Now, share photos between those two android devices.
- When the two smartphones have been successfully paired and connected, open the “File Manager” option on the phone desktop, then select the music that you want to transfer and press it for 2 seconds to share to the destination phone via Bluetooth.
Part 3: How to transfer photos from Android to Android using Android Beam
Android Beam is a software that allows you to send content between devices just by pressing them back-to-back. Android Beam is very ideal for sharing content – web pages, maps, videos, photos, and more – with other people’s Android phones and tablets. Many latest Android phones have integrated NFC hardware under their panel and support Android Beam on them.
Here are the tips on how to transfer photos from Android to Android using Android Beam.
Step 1: Check for NFC Support
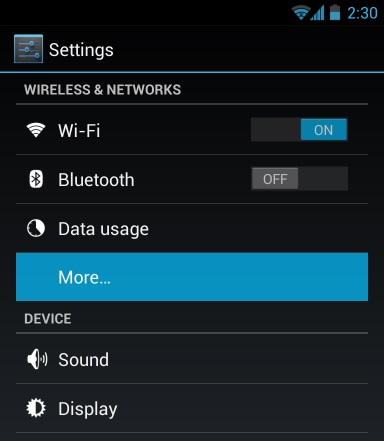
- Before you try to transfer photos between two Android devices using Android Beam, you will need to ensure that both your Android devices support NFC. Some Android smartphones support NFC, however, some don’t come with NFC support, so it is necessary to check before you launch this process.
- To check for NFC support, open your device’s Settings screen and tap on “More…” that will be located under Wireless & networks.

Step 2: Open the Content that You Want to Share
Once your device confirms that you have NFC support and you can use Android Beam, you need to navigate to the content that you want to share. For example, here’s how you would share various types of content using this toolkit:
- Web Page: Open it in Chrome (it is always advisable to use chrome for this purpose).
- YouTube Video: Open it in the default YouTube app, pre-download the app on both devices).
- Map Directions or a Location: Open the Google Maps app and pull up the directions or the location that you want to share.
- Contact Information: Open the contact card in the People app on the sender device.
- An App: Open its download page on Google Play Store.
- Photos: Open a photo in the gallery. You can also send multiple photos by opening the default gallery app, you just have to long-press a photo’s thumbnail, and then tap all the other photos you want to send to select them. With the photos selected, you can finally start the beaming process.
Step 3: Beam the Content
- Now, before you can send your content between two devices with Android Beam, they must both be powered on and completely unlocked. If either device screen is off, or if either device is at its lock screen (or is password-encrypted), Android Beam won’t work, and you can’t transfer photos.
- With both devices on and unlocked, press them back-to-back to transfer your music from one Android to Another.
Part 4: How to transfer photos from Android to Android using dr.fone — Phone Manager (Android)?
dr.fone — Phone Manager (Android)
Transfer Photos from Android to Android flexibly and easily.
- • Transfer files between Android and computer, including contacts, photos, music, SMS, and more.
- • Manage, export/import your music, photos, videos, contacts, SMS, Apps, etc.
- • Transfer iTunes to Android (vice versa). • Manage your Android device on the computer.
- • Fully compatible with Android 10.
- Download and install dr.fone — Phone Manager on your computer. Select the «Phone Manager» from all the models.

Connect both your Android phones to the computer. dr.fone will recognize them and display them like below. Select the Android phone which you would like to transfer photos from.
![]()
Go to the Photos tab on the top. It will display all the photos on your source Android phone. Select the photos you would like to transfer and click Export > Export to Device to transfer the selected photos to the target Android phone.
![]()
So, in this article, we discussed how to transfer photos from Android to Android. I would recommend everyone to use the Wondershare toolkit for this process as it is the safest, secure, and easy to use toolkit for Android photo transfer process. They are the best toolkit makers all over the globe. Lastly, I hope that you enjoyed reading this article on how to transfer pictures from Android to Android.
Источник
How to Recover Deleted Photos from Android Internal Storage
We may delete photos from time to time. However, many Android users may delete the photos mistakenly and unlike iPhone or PC, there is no «recently deleted» folder or trash bin on Android Gallery so you don’t have the option to recover deleted photos directly on the phone. Are those accidentally deleted photos unrecoverable on Android devices? Of course not! On the contrary, it is easy to recover deleted photos from Android Gallery or other location on your phone. But you’ll need the help of a third-party photo recovery app for Android.

Support 6000+ Phone Models
Major Brands such as Samsung, Huawei, HTC, LG, Xiaomi are all supported.

Safe and Trustworthy
The guide provides you with foolproof instructions, making the whole process quick and easy.

The recovery is safe for both your phone and your computer. Not a single file will be lost or damaged.

You can preview the scanned files and decide the files you want to recover.
Can We Recover Deleted Photos on Android?
Important Tips Before Android Deleted Photos Recovery
Before we start, there are two things that you should pay attention to:
First, don’t use the phone until you get back the deleted photos, for instance, do not use the phone to take a new photo, download new photos, send or receive new messages on the Android device.
Second, use a powerful Android photo recovery tool to restore the deleted photos as soon as possible and you’ll need a computer to perform Android photo recovery.
Principle of Deleted Photo Recovery from Android
You can recover deleted photos on Android and the reason is that the photos are not really deleted. Although the deleted photos disappeared from the Android gallery or seems that you cannot find deleted photo in android, the photos still exist on memory storage of your phone.
Whether stored in internal storage or external memory (SD Card), the deleted photos remain in the memory space but the space it occupies is marked as «unused» and can be used by new data at any minute. Once there is new data written into where the deleted photos are, the photos will be gone and unrecoverable.
That’s why you shouldn’t use the phone before recovery. Any operation on the phone could generate new data and overwrite the deleted pictures, including installing new apps, taking photos, receiving messages, etc.
So turn off Wi-Fi and mobile data on the phone and put it aside. Then free download FonePaw Android Data Recovery on a computer, connect your phone to the computer and let the program get the photos back.
Some users prefer an Android photo recovery app to recover deleted files on Android without a computer, but that’s a bad idea since you are taking a risk — the deleted data might be overwritten by the installation of the app.

Can We Recover Deleted Photos on Android Without Root?
You may wonder if you can recover deleted photos on Android without root. But I have to tell you that there is no way to get back the deleted pictures from Android internal memory without root.
Deleted photos are stored in certain system folders that cannot be accessed on unrooted devices. Only after a device is root can you get full control of the phone and find the deleted pictures.
If you really don’t want to root your device, the only possible way to find a deleted photo on Android is that you have back up the photos somewhere, whether on cloud storage, computer or SD card.
Now, we’ll show you how to recover deleted photos from Android internal storage as well as from the cloud.
4 Steps to Recover Deleted Photos from Android Internal Storage
FonePaw Android Data Recovery is a desktop program that can quickly restore deleted and old photos from Android phones and tablets. It supports images in .jpg, .png, .gif, .bmp, .webp, .tiff formats and more. And is fully compatible with most Android brands and can recover deleted photos on Samsung Galaxy, LG G, Sony Xperia, HUAWEI Mate, Xiaomi, and so on.
Free download the program on Windows PC or Mac.
STEP 1. Connect Android to PC
Connect your Android phone to PC and run FonePaw Android Data Recovery on the PC. Make sure that you have enabled USB debugging on the Android phone so that the phone can be detected by the program. And make sure your Android device will not power off during the data recovery.
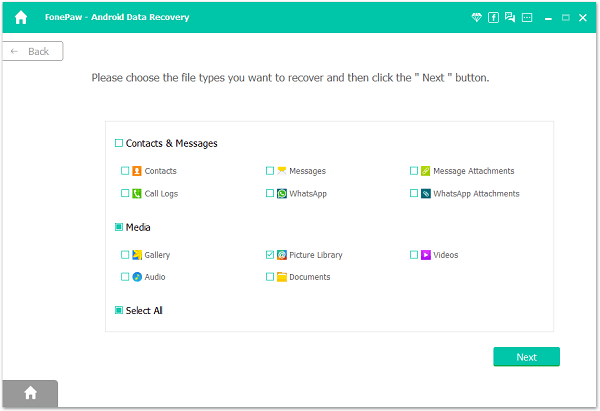
STEP 2. Choose to Find Deleted Photos
When your Android device is connected, you can see the interface as the below screenshot shows, which allows you to select categories of the deleted files. To retrieve deleted pictures from Android gallery, select «Gallery» or «Picture Library» and click the button «Next» to continue.
STEP 3. Allow the FonePaw Program to Scan Deleted Photos
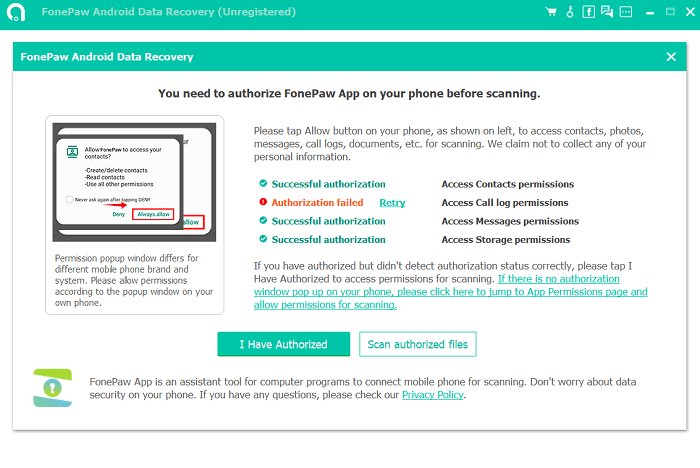
The program needs to get permission to access deleted data so it’ll add an app to your phone asking for permission, which will be removed automatically after your photo recovery. Open your phone, turn on Install via USB in the Developer Options, and select Install to get the FonePaw app via USB.

On your phone, allow the FonePaw app’s requests to access your phone data. Without your permission, the photos recovery program won’t be able to access your phone storage, let alone finding out the deleted photos in your Android. And it is totally safe to grant access to the FonePaw app as it won’t collect any of your information and your phone data are processed and stored locally on your computer.
Click Scan Authorized Files to start scanning for deleted photos after giving the app permissions.
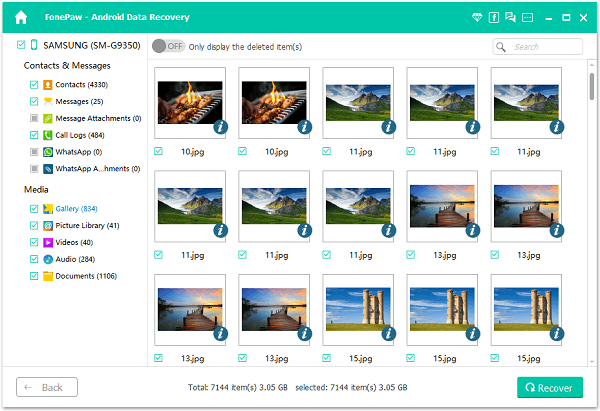
STEP 4. Preview and Restore Deleted Photos from Android
The scanning process can take some time, especially there are many photos on your phone. When the progress bar comes to 100%, the scan process is completed.
The FonePaw program can detect deleted images in two modes: Standard Scan and Deep Scan.
After Standard Scan, you can click «Gallery» or «Picture Library» at the left pane to check if there are the deleted photos that you need. If not, click Deep Scan for the program to search out more deleted photos from your phone (Root Required).

And with the registered version, you can preview the deleted photos in full size by double-clicking them. Mark the pictures you want to restore and click «Recover» to retrieve them to PC.
- The gallery contains camera photos, screenshots, photos received from PC or other devices, downloaded photos. Picture Library includes cache images.
- Restored Photos will be exported as .jpg and .png and they will be sorted by file types on your PC.
- Since the recovered photos are saved on your computer, you may need to transfer the photos from PC back to your Android. To do that, you can connect the Android phone via a USB cable and use a data transfer tool — FonePaw DoTrans to transfer the Android photos quickly.
- If you accidentally delete the photos from the SD memory card, or your device is broken, there is also a way to recover photos from the SD card.
Extra Tips: Retrieve Deleted Photos on Android with External Storage
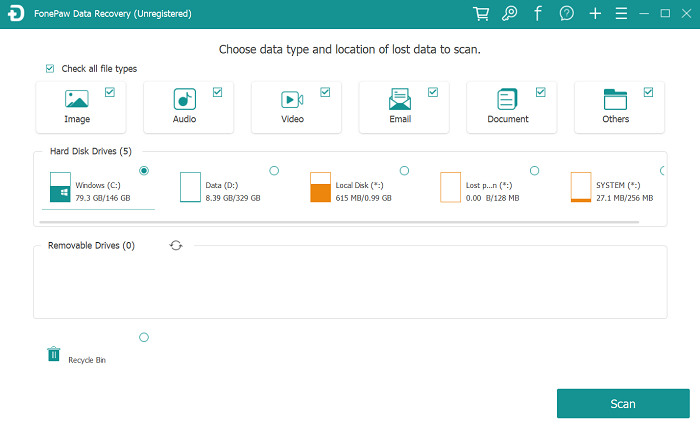
Other than recovering photos from internal memory, you can also restore photos from external memory. FonePaw Data Recovery is one of the desktop apps that can recover photos and other data from SD memory cards, USB memory sticks, external hard drives. It is easy to use as well.
Install Data Recovery and run it. Connect the card reader with an SD card to the computer and the program will detect the SD card memory and scan deleted photos on the card. Just in one click and the deleted photos will be recovered from your SD card.
How to Recover Deleted Photos from the Cloud
If you have saved your Android photos to certain cloud storage, like Google Photos, Onedrive, and Dropbox, you can easily recover deleted photos on Android without a computer and without root. For example, if you have synced photos to a Google account (which is usually a Gmail account), you can recover pictures deleted from Android but saved Google Photos easily.
Recover Deleted Photos from Google Photos
Run the «Google Photos«/»Photos» app on your Android. Then navigate to «Trash» by clicking the «в‰Ў» icon. Preview your deleted images and select desired ones to «Restore» on Android.
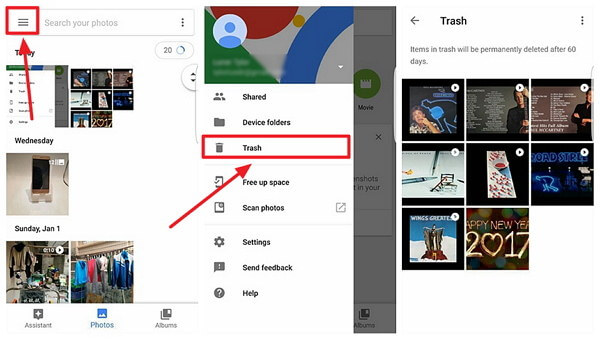
- Deleted Google photos will be removed permanently from Google cloud after 60 days.
Recover Deleted Photos from OneDrive
If you have backed up the photos on Microsoft OneDrive, you can go to the official website and sign in with your Microsoft account.
On the left side of the screen, you will see the Recycle Bin option. Click on it and you will see the deleted photos for the past 30 days.

Select the photos you need and hit Restore to retrieve them.
- The Recycle bin only saves your deleted photos for 30 days.
Recover Deleted Photos from Dropbox
Dropbox also has a trash folder that contains deleted photos for 30 days. To recover deleted photos from Dropbox:
Log in on Dropbox desktop and go to Files > Deleted Files, then select the photos > Restore. The deleted photos will be back in one click.

- Apart from retrieving photos from the Cloud, don’t forget to check your emails, messages, social media, or just ask your friends. If you have shared the photos with someone and haven’t cleared the history, it’s also very likely to get back the deleted photos.
How to Avoid Losing Android Photos Next Time
After learning how to get back your mistakenly deleted photos, you should also know the importance of backup now. Essentially, even though there are multiple effective ways to try, it cannot be denied that you may still not be able to retrieve your important photos, so avoiding loss from the beginning is the best.
Backup is the best way to tackle data loss. You can choose to upload your Android photos to the Cloud, or just connect your Android phone to PC and copy those important photos to the computer. If you want to save space on the computer, some helpful software like Android Data Backup & Restore is a good choice to back up Android data to PC in a small size.
Support 6000+ Phone Models
Major Brands such as Samsung, Huawei, HTC, LG, Xiaomi are all supported.
Safe and Trustworthy
The guide provides you with foolproof instructions, making the whole process quick and easy.
The recovery is safe for both your phone and your computer. Not a single file will be lost or damaged.
You can preview the scanned files and decide the files you want to recover.
Источник


