- Save PDFs to the Books app on your iPhone, iPad, or iPod touch
- Save or import a PDF
- Save a PDF file that’s attached to an email or on a website
- Save a webpage as a PDF
- Save an email as a PDF
- Use your Mac to add a PDF to your library
- Edit a PDF that you saved
- How to open ZIP files on your iPhone, iPad, or iPod touch
- On iPhone or iPod touch
- How to create a ZIP file on your iPhone or iPod touch
- How to open a ZIP file on your iPhone or iPod touch
- On iPad
- Access iCloud Drive files from your iPhone and other devices
- Use iCloud Drive on your iPhone, iPad, iPod touch, Mac, or PC
- Automatically save Pages, Numbers, and Keynote files to iCloud Drive
- Add Desktop and Documents files to iCloud Drive
- Manage your iCloud Drive files while offline
- How to access files while you’re offline
- Upload files to iCloud Drive to save changes made offline
- When changes to your files upload to iCloud
- Where to find missing files
- If your files don’t update to iCloud Drive
- How to address a Resolve Conflict message
- Archive or make copies of the information you store in iCloud
- iCloud Drive files
- Copy files from iCloud Drive to your Mac
- Copy files from the Files app on your iPhone, iPad, or iPod touch
- Copy files from iCloud.com
- Copy files from Windows
- Photos and videos
- Download copies of your photos and videos from your device
- Download copies of your photos and videos from iCloud.com
- Copy photos from Shared Albums
- Copy photos from Shared Albums on your iPhone, iPad, or iPod touch
- Copy photos and videos from Shared Albums on your Mac
- Copy photos and videos from Shared Albums in Windows
- Download photos from My Photo Stream on your iPhone, iPad, or iPod touch
Save PDFs to the Books app on your iPhone, iPad, or iPod touch
On your iPhone, iPad, or iPod touch, you can use Apple Books to save, sign, mark up, and share PDFs.
Save or import a PDF
After you set up iCloud Drive, you can add PDFs to your Apple Books Library on your iPhone, iPad, iPod touch, or Mac, then access your files on any of your other devices.
Save a PDF file that’s attached to an email or on a website
- On your iPhone, iPad, or iPad touch, tap the PDF to open it.
- Tap the share button .
- Swipe left over the app icons, then tap the More button.
- Under Suggestions, tap Books.
Save a webpage as a PDF
- In Safari, open a webpage.
- Tap the share button .
- Swipe left over the app icons, then tap the More button.
- Under Suggestions, tap Books.
Save an email as a PDF
- In the Mail app, tap an email.
- Tap the more actions button , then scroll down and tap Print.
- Tap Books.
Use your Mac to add a PDF to your library
On your Mac, open Apple Books, then find your PDF file in the Finder or on your Desktop and drag the file into your library.
Your PDF will be available in the Books app on any iPhone, iPad, iPod touch, or Mac, as long as you’re signed into the same Apple ID and have iCloud Drive turned on for Books.
Edit a PDF that you saved
If you want to edit or add a signature to a PDF, use Markup.
Источник
How to open ZIP files on your iPhone, iPad, or iPod touch
If you need to email a large file or create an archive, a ZIP file can help save space. Follow these steps to compress files, uncompress a ZIP file, and more.
On iPhone or iPod touch
If you need to share a large file or multiple files, a compressed file takes up less storage space and can be sent faster because of its smaller file size. Learn how to compress or uncompress files on your iPhone or iPod touch.
How to create a ZIP file on your iPhone or iPod touch
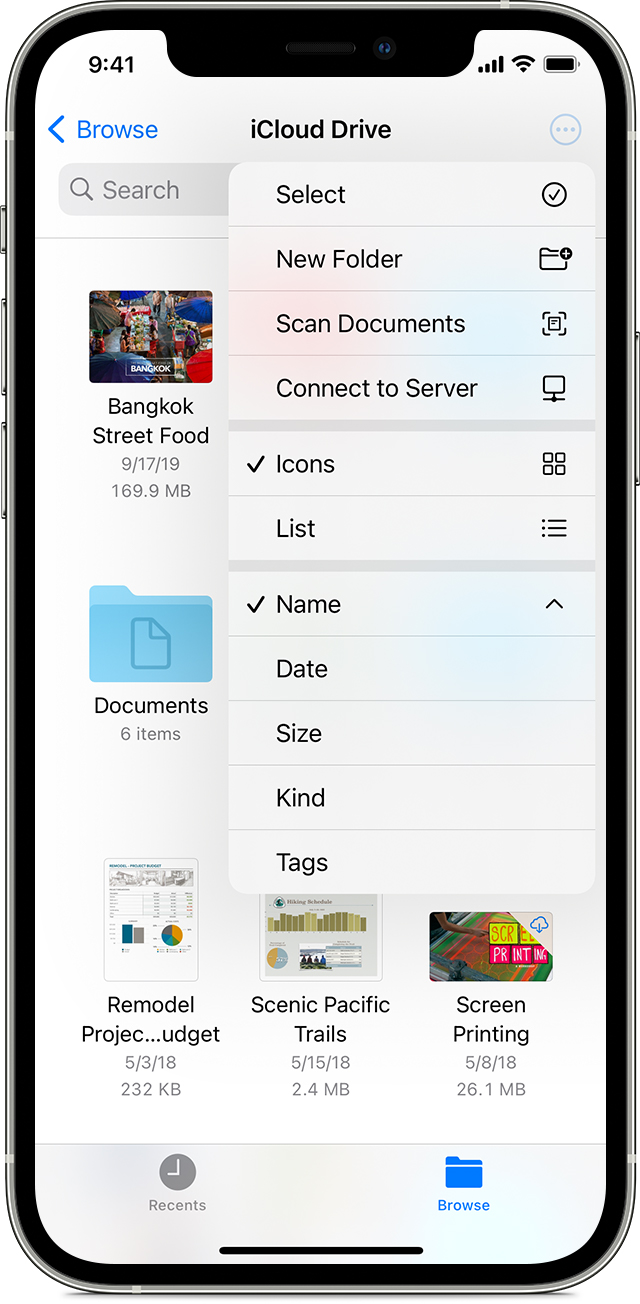
- Open the Files app, then choose a location like On My iPhone or iCloud Drive.
- Tap the more button , then tap Select. Choose one or more files.

- Tap the more button in the lower right, then tap Compress.
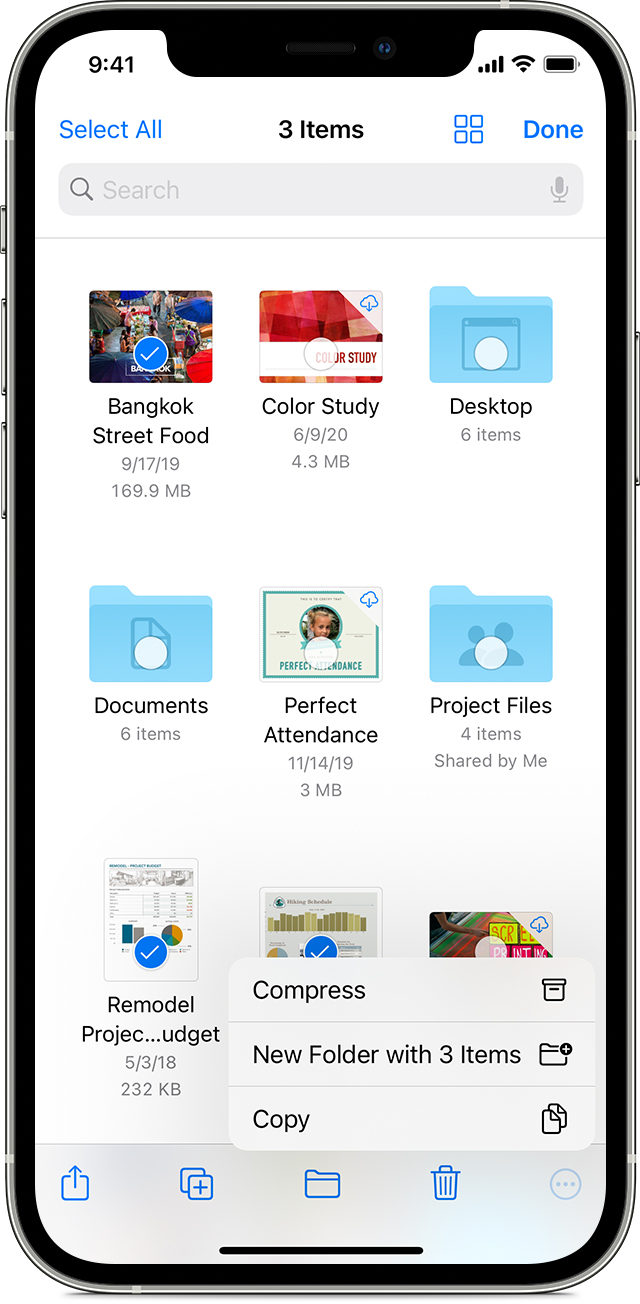
If you selected one file, a ZIP file with the same filename saves to that folder. If you selected multiple files, a ZIP archive named Archive.zip saves to that folder. To change its name, touch and hold on the ZIP archive, then select Rename.
How to open a ZIP file on your iPhone or iPod touch
- Open the Files app, then find the ZIP file or archive you want to uncompress.
- Tap the ZIP file or archive.
- A folder is created containing the files. To change its name, touch and hold on the folder, then tap Rename.
- Tap to open the folder.
On iPad
If you need to share a large file or multiple files, a compressed file takes up less storage space and can be sent faster because of its smaller file size. Learn how to compress or uncompress files on your iPad.
Источник
Access iCloud Drive files from your iPhone and other devices
Use iCloud Drive to manage, view, edit and update file versions across all of your devices.
Use iCloud Drive on your iPhone, iPad, iPod touch, Mac, or PC
Set up iCloud Drive to keep your files up to date across your devices.
On your iPhone, iPad, and iPod touch with iOS 11 and later, you can access your files from the Files app when you have iCloud Drive set up. The Files app makes it easy to share your documents, collaborate in real time on your Pages, Numbers, and Keynote projects, and manage everything that you store in iCloud Drive.
If you don’t have the Files app on your device, update to iOS 11 or later. If you’re using iOS 9 or iOS 10, you can use the iCloud Drive app.
Automatically save Pages, Numbers, and Keynote files to iCloud Drive
You can update the settings on your iPhone, iPad, or iPod touch so that your documents automatically save to iCloud Drive, On My [device], or a third-party cloud service.
- Go to Settings.
- Choose to update the settings for Pages, Numbers, or Keynote.
- Tap Document Storage.
- Choose where you want to automatically save your documents.
If you choose iCloud Drive, changes you make to Pages, Numbers, and Keynote files on your Mac automatically save to iCloud Drive.
Add Desktop and Documents files to iCloud Drive
If you want to access files from your Mac on your other devices, you can add the Desktop and Documents folder to iCloud Drive.

Manage your iCloud Drive files while offline
If you’re offline and want to access, edit, and save documents in iCloud Drive, follow these steps first.
How to access files while you’re offline
To access your files offline, open the Files app on your iPhone, iPad, or iPod touch and follow these steps.
If you make changes to locally stored versions of your files while offline the changes won’t appear in iCloud Drive. Upload the updated versions of your files to iCloud Drive when you’re back online.
Upload files to iCloud Drive to save changes made offline
You can upload files to iCloud Drive from a Mac or PC by doing one of the following:
- Drag files from either your desktop or a folder window on your computer to the iCloud Drive window. You can also drag your files to a folder icon in the iCloud Drive window. If you drag to a folder icon, it’s highlighted to confirm that the item you’re dragging goes into the folder.
- Click the iCloud Drive upload button in the iCloud Drive toolbar. Select the files you want to upload, then click Choose.
If you don’t have enough space in iCloud for your upload, upgrade your iCloud storage or manage your iCloud storage to free up space.
When changes to your files upload to iCloud
The amount of time it takes for your changes to upload to iCloud depends on the app you’re using. Pages, Numbers, and Keynote regularly upload files to iCloud so you don’t lose any changes. Other apps upload your files to iCloud only after you save them to the iCloud Drive folder. To see your saved files on a Mac, go to Finder > iCloud Drive. On your iPhone, iPad, or iPod touch, go to the Files app. On a PC with iCloud for Windows, go to File Explorer > iCloud Drive.
If you still don’t see the latest changes or you see an «in-progress change» icon or the iCloud icon in the notification area (system tray), try to save a new document to the iCloud Drive folder. Then check the iCloud Drive folder to see if the changes appear.
Where to find missing files
When you turn on iCloud Drive, any documents that you already store in iCloud automatically move to iCloud Drive. You can see your files on iCloud.com, in the Files app on iOS 11 and later, in the Pages, Numbers, and Keynote apps, or in the iCloud Drive app on iOS 10 and iOS 9.
If you don’t see your files in any of those locations, set up iCloud Drive on all of your devices.
If you need to access a file that you deleted within the last 30 days, you can get it back from the Recently Deleted folder in the Files app, or on iCloud.com.
If your files don’t update to iCloud Drive
Check these things first:
- Make sure that you have enough iCloud storage. If you need more space in iCloud, you can buy more iCloud storage or free up space by deleting content.
- Sign in to iCloud on all of your devices and turn on iCloud Drive.
- Make sure that you have an active Internet connection on your Mac and on your iPhone, iPad, and iPod touch.
- Install the latest versions of Pages, Numbers, and Keynote. See which versions of Pages, Numbers, and Keynote you can use with iCloud Drive.
- Create a new document and save it to see if it uploads to iCloud. If it does, see if your other documents start uploading.
If you tried these steps and your files still don’t upload to iCloud, stay signed in to iCloud and save your updated files to a different folder on your Mac or PC. Then contact Apple Support for more help.
How to address a Resolve Conflict message
If you get a Resolve Conflict message when you open a file, choose the version of the document that you want to save. Then choose Keep to update the file in iCloud. This message means the file was updated on another device or from iCloud.com since the last time you signed in to iCloud.
Information about products not manufactured by Apple, or independent websites not controlled or tested by Apple, is provided without recommendation or endorsement. Apple assumes no responsibility with regard to the selection, performance, or use of third-party websites or products. Apple makes no representations regarding third-party website accuracy or reliability. Contact the vendor for additional information.
Источник
Archive or make copies of the information you store in iCloud
Learn how to make copies of the information that you use with iCloud.
You might want to make a copy of the information you keep in iCloud. If you accidentally delete an important contact, email, or document, you can restore it from iCloud or from another copy that you have.
iCloud Drive files
Use these steps to copy documents from your Mac, iPhone, iPad, iPod touch, iCloud.com, or PC. If you copy a file from a shared folder in iCloud Drive to another folder, it does not also copy sharing access. Learn more about folder sharing.
Copy files from iCloud Drive to your Mac
- Click iCloud Drive in the sidebar of any Finder window.
- Press and hold the Option key and drag the file to a new location.
Copy files from the Files app on your iPhone, iPad, or iPod touch
Use these steps to send copies of files stored in iCloud Drive:
- Open the Files app and tap iCloud Drive.
- Tap the folder that you want to open, then tap the file to open it.
- Tap Share in the lower-left corner.
- Choose how you want to send a copy of the file.
For documents, spreadsheets, or presentations, tap More in the upper right, select Export, and choose how you want to export the file. You can also save a copy of your file locally.
Copy files from iCloud.com
Use these steps to download files stored in iCloud Drive, or files that are accessible from iWork apps on iCloud.com:
- Sign in to iCloud.com.
- Open iCloud Drive.
- Find and select the file.
- Click Download at the top of the page or double-click the file. The document downloads to your default downloads location.
Copy files from Windows
If you turned on iCloud Drive using iCloud for Windows on a PC, you can copy your files from the iCloud Drive folder in File Explorer. You can also copy your files from iCloud.com.
If you need help with any third-party data that is stored on iCloud, contact the app developer directly. Third-party data might use your iCloud storage, even if you can’t see the details.
Photos and videos
If you use iCloud Photos, your photos and videos are automatically uploaded to iCloud at full resolution.
Download copies of your photos and videos from your device
- On your iPhone, iPad, or iPod touch, tap Settings > [your name] > iCloud > Photos. Then select Download and Keep Originals and import the photos to your computer.
- On your Mac, open the Photos app. Select the photos and videos you want to copy. Choose File > Export.
- On your PC, make sure that you set up iCloud for Windows and turn on iCloud Photos. Open File Explorer. In the Navigation pane, click iCloud Photos, then select the images you want to keep on your PC. Right-click the selection and choose «Always keep on this device.» If you use iCloud for Windows 10 or earlier, learn how to download your photos. After the items download, copy them to another folder on your computer. To do this, press and hold the Ctrl key and drag the items to the folder. Include this folder if you back up your computer.
Download copies of your photos and videos from iCloud.com
If you want to download a few photos or videos, use iCloud.com to download the most recent version of photos and videos.
- On your iPhone, iPad, or iPod touch, go to iCloud.com, tap Photos, and tap Select. Then select the photos and videos you want to download, and tap More . Select Download, and your photos and videos will download as a .zip file to iCloud Drive.
- On your Mac or PC, just go to iCloud.com and click Photos. Then select the photos and videos you want to download and click Download .
Copy photos from Shared Albums
You can also use the steps below to manually copy photos and videos. Comments or likes connected to a shared photo aren’t saved, and photos and videos saved from shared albums aren’t full resolution.
Copy photos from Shared Albums on your iPhone, iPad, or iPod touch
- Open Photos and tap Albums.
- Find Shared Albums, then tap the name of the album that you want. You might need to swipe left to find the shared album.
- Save photos from the album using one of these methods:
- Tap an image to open it, then tap Share . To select more images, scroll the images left or right and tap the ones you want to save. Tap Save Image.
- Tap Select, then tap the images you want to save. Tap Share , then tap Save Image.
- Import the photos to your computer.
Copy photos and videos from Shared Albums on your Mac
Follow these steps to manually import photos and videos in shared albums to your Photos library:
- Open Photos and select Shared Albums.
- Double-click a shared album.
- Control click (or right-click) a photo and choose Import.
After you import your photos, you might want to back up your library. You can store them as a separate library on your computer or on a different drive.
Copy photos and videos from Shared Albums in Windows
Saved photos are available even if you turn off Photos in iCloud for Windows. To save photos and videos from a shared album, you must save them to another folder on your hard drive:
- Open iCloud for Windows.
- Click Options next to Photos. Note the path listed under iCloud Photos location.
- Open a File Explorer window (Windows 8 or later) or Windows Explorer window (Windows 7).
- Go to the iCloud Photos folder using the above path. Open the Shared folder.
- Select the photos you want to save, then copy them to another folder on your computer. To do this, press and hold the Ctrl key and drag the items to your folder. Include this folder if you back up your computer.
For information on backing up your Windows computer, see Microsoft Support.
Download photos from My Photo Stream on your iPhone, iPad, or iPod touch
Photos in My Photo Stream download to your Mac automatically. Use these steps to download them to your iPhone, iPad, or iPod touch.
- Tap Photos, then tap the Albums tab.
- Tap My Photo Stream.
- Tap Select, then tap all the photos you want to save.
- Tap Share , then tap Save Image.
Источник


